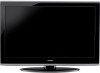
User Manual
Page 8
... to control your other devices.. 25 Remote control codes 26 Chapter 4: Menu layout and navigation 28 Main menu layout 28 Setup/Installation menu layout 29 Navigating the menu system 29 Chapter 5: Setting up your TV 30 Initial Setup 30 Selecting the menu language 30 TOSHIBA Logo LED 30 Configuring the antenna input...
... to control your other devices.. 25 Remote control codes 26 Chapter 4: Menu layout and navigation 28 Main menu layout 28 Setup/Installation menu layout 29 Navigating the menu system 29 Chapter 5: Setting up your TV 30 Initial Setup 30 Selecting the menu language 30 TOSHIBA Logo LED 30 Configuring the antenna input...
User Manual
Page 9
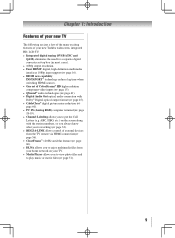
... station numbers, so you always know what you're watching ( page 32). • REGZA-LINK allows control of external devices from the TV remote via HDMI connection( page 56). • ClearFrame™ 120 Hz anti-blur feature ( page 60). • DLNA allows you to ...enjoy multimedia files from your home network on your new Toshiba widescreen, integrated HD, LCD TV: • Integrated digital tuning (8VSB ATSC and QAM) eliminates the need for a separate digital converter set-top box ...
... station numbers, so you always know what you're watching ( page 32). • REGZA-LINK allows control of external devices from the TV remote via HDMI connection( page 56). • ClearFrame™ 120 Hz anti-blur feature ( page 60). • DLNA allows you to ...enjoy multimedia files from your home network on your new Toshiba widescreen, integrated HD, LCD TV: • Integrated digital tuning (8VSB ATSC and QAM) eliminates the need for a separate digital converter set-top box ...
User Manual
Page 10
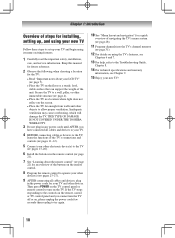
...does not reflect on the TV. Inadequate ventilation may cause overheating, which will damage the TV. THIS TYPE OF DAMAGE IS NOT COVERED UNDER THE TOSHIBA WARRANTY. 3 Do not plug in any power cords until AFTER you cannot turn on the screen. • Place the TV far enough from...TV's connections and controls ( pages 11-12). 5 Connect your other electronic device(s) to the TV ( pages 13-20). 6 Install the batteries in the remote control ( page 21). 7 See "Learning about your LCD TV" ( page 7). • Place the TV on using its many exciting features. 1 ...
...does not reflect on the TV. Inadequate ventilation may cause overheating, which will damage the TV. THIS TYPE OF DAMAGE IS NOT COVERED UNDER THE TOSHIBA WARRANTY. 3 Do not plug in any power cords until AFTER you cannot turn on the screen. • Place the TV far enough from...TV's connections and controls ( pages 11-12). 5 Connect your other electronic device(s) to the TV ( pages 13-20). 6 Install the batteries in the remote control ( page 21). 7 See "Learning about your LCD TV" ( page 7). • Place the TV on using its many exciting features. 1 ...
User Manual
Page 11
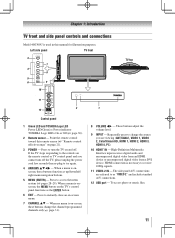
... 1: Introduction TV front and side panel controls and connections Model 40G300U is used in this remote sensor ( "Remote control effective range" on page 21). 3無 POWER -... the power cord few seconds then re-plug to try again. 4無 ARROWS pqtu - Point the remote control toward this manual for illustration purposes. Repeatedly press to change the channel (programmed channels only; ... 5 6 9 10 TV top 11 2 12 Control panel 1無 Green LED and TOSHIBA Logo LED Power LED(Green) = Power indicator TOSHIBA Logo LED= On or Off ( page 30). 2無...
... 1: Introduction TV front and side panel controls and connections Model 40G300U is used in this remote sensor ( "Remote control effective range" on page 21). 3無 POWER -... the power cord few seconds then re-plug to try again. 4無 ARROWS pqtu - Point the remote control toward this manual for illustration purposes. Repeatedly press to change the channel (programmed channels only; ... 5 6 9 10 TV top 11 2 12 Control panel 1無 Green LED and TOSHIBA Logo LED Power LED(Green) = Power indicator TOSHIBA Logo LED= On or Off ( page 30). 2無...
User Manual
Page 14
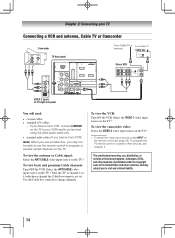
...basic and premium Cable channels: Turn OFF the VCR. To program the TV remote control to operate other countries, and may not be able to use a Cable box, you may subject ...you use the remote control to program or access certain features on the TV. The unauthorized recording, use, distribution... Select the VIDEO 2 video input source on the TV.* ** To select the video input source, press INPUT on the remote control ( page 22). Chapter 2: Connecting your TV Connecting a VCR and antenna, Cable TV or Camcorder Camcorder AUDIO...
...basic and premium Cable channels: Turn OFF the VCR. To program the TV remote control to operate other countries, and may not be able to use a Cable box, you may subject ...you use the remote control to program or access certain features on the TV. The unauthorized recording, use, distribution... Select the VIDEO 2 video input source on the TV.* ** To select the video input source, press INPUT on the remote control ( page 22). Chapter 2: Connecting your TV Connecting a VCR and antenna, Cable TV or Camcorder Camcorder AUDIO...
User Manual
Page 15
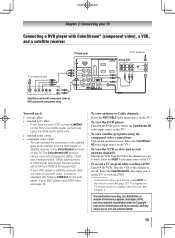
... the TV.* To view the VCR or view and record antenna channels: Turn ON the VCR. Select the ColorStream HD video input source on the remote control ( page 22). Chapter 2: Connecting your TV Connecting a DVD player with ColorStream® (component video), a VCR, and a satellite ...standard A/V cables −− If you have component video, connect a standard A/V cable to VIDEO 2 on the side panel. To program the TV remote control to record. If your VCR's audio out terminal using the component video connections: Turn on the TV.* To record a TV program while watching a ...
... the TV.* To view the VCR or view and record antenna channels: Turn ON the VCR. Select the ColorStream HD video input source on the remote control ( page 22). Chapter 2: Connecting your TV Connecting a DVD player with ColorStream® (component video), a VCR, and a satellite ...standard A/V cables −− If you have component video, connect a standard A/V cable to VIDEO 2 on the side panel. To program the TV remote control to record. If your VCR's audio out terminal using the component video connections: Turn on the TV.* To record a TV program while watching a ...
User Manual
Page 16
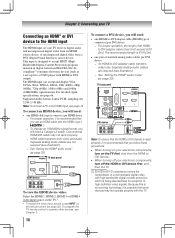
... Note: To ensure that the HDMI or DVI device is reset properly, it is recommended that you will need a Category 2 cable. To program the TV remote control to operate other devices, see illustration). −− See "Setting the HDMI® audio mode" ( page 33). Conventional HDMI/DVI cable may not... (Digital Visual Interface) source device. Chapter 2: Connecting your TV Connecting an HDMI® or DVI device to the HDMI input The HDMI input on the remote control ( page 22).
... Note: To ensure that the HDMI or DVI device is reset properly, it is recommended that you will need a Category 2 cable. To program the TV remote control to operate other devices, see illustration). −− See "Setting the HDMI® audio mode" ( page 33). Conventional HDMI/DVI cable may not... (Digital Visual Interface) source device. Chapter 2: Connecting your TV Connecting an HDMI® or DVI device to the HDMI input The HDMI input on the remote control ( page 22).
User Manual
Page 17
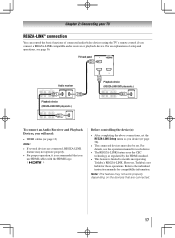
..., see page 56. For an explanation of connected audio/video devices using the TV's remote control if you use HDMI cables with the HDMI Logo ( ). Refer to models incorporating Toshiba's REGZA-LINK. Note: This feature may not operate properly. • For proper operation... feature may not work properly depending on the devices that you connect a REGZA-LINK compatible audio receiver or playback device. However, Toshiba is not liable for compatibility information. Before controlling the device(s): • After completing the above connections, set . Chapter 2: Connecting...
..., see page 56. For an explanation of connected audio/video devices using the TV's remote control if you use HDMI cables with the HDMI Logo ( ). Refer to models incorporating Toshiba's REGZA-LINK. Note: This feature may not operate properly. • For proper operation... feature may not work properly depending on the devices that you connect a REGZA-LINK compatible audio receiver or playback device. However, Toshiba is not liable for compatibility information. Before controlling the device(s): • After completing the above connections, set . Chapter 2: Connecting...
User Manual
Page 18
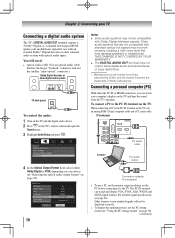
... digital audio system TV back panel To control the audio: 1無 Turn on the TV and the digital audio device. 2無 Press on the TV's remote control and open the Sound menu. 3無 Highlight Audio Setup and press . Dolby, and the double-D symbol are not compatible with Dolby Digital bitstream signals...
... digital audio system TV back panel To control the audio: 1無 Turn on the TV and the digital audio device. 2無 Press on the TV's remote control and open the Sound menu. 3無 Highlight Audio Setup and press . Dolby, and the double-D symbol are not compatible with Dolby Digital bitstream signals...
User Manual
Page 21
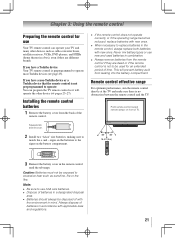
... should always be exposed to the signs on front of batteries in mind. If you have a non-Toshiba device or a Toshiba device that the remote control is preprogrammed to operate most Toshiba devices ( page 23). This will operate the other devices such as sunshine, fire or the like.... Always dispose of TV. Caution: Batteries must not be disposed of the remote control. •• If the remote control does not operate correctly...
... should always be exposed to the signs on front of batteries in mind. If you have a non-Toshiba device or a Toshiba device that the remote control is preprogrammed to operate most Toshiba devices ( page 23). This will operate the other devices such as sunshine, fire or the like.... Always dispose of TV. Caution: Batteries must not be disposed of the remote control. •• If the remote control does not operate correctly...
User Manual
Page 22
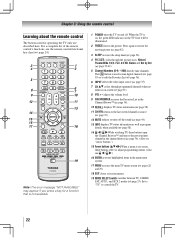
...4:3 HD, Native and Dot by Dot ( page 39-41). 5無 Channel Numbers (0-9, -/100) directly tune channels. For a complete list of the remote control's functions, see / .) 16無 ENTER activates highlighted items in the channel history ( page 36). (Also see "Arrow buttons.") 15無 ... page 23). The button is used for a function that is on -screen, these buttons select or adjust programming menus. (Also see the remote control functional key chart ( page 24). Press again to restore the moving picture ( page 42). 3無 SLEEP accesses the sleep...
...4:3 HD, Native and Dot by Dot ( page 39-41). 5無 Channel Numbers (0-9, -/100) directly tune channels. For a complete list of the remote control's functions, see / .) 16無 ENTER activates highlighted items in the channel history ( page 36). (Also see "Arrow buttons.") 15無 ... page 23). The button is used for a function that is on -screen, these buttons select or adjust programming menus. (Also see the remote control functional key chart ( page 24). Press again to restore the moving picture ( page 42). 3無 SLEEP accesses the sleep...

User Manual
Page 23
.... 23 "AUX 2" to control a VCR; If this happens and you wish to use those features, you have a non-Toshiba device or a Toshiba device that the remote control is programmed, it may not work on some DVD players). 9無 ENTER Required by some satellite receivers and DVD players ...tape recording. 20無 MODE SELECT switch Set to "TV" to control a cable converter box or satellite receiver; To use the device's original remote control. q selects the next lower channel. 6無 GUIDE Displays the channel guide in the AUX mode. 7無 INFO Displays TV status information ...
.... 23 "AUX 2" to control a VCR; If this happens and you wish to use those features, you have a non-Toshiba device or a Toshiba device that the remote control is programmed, it may not work on some DVD players). 9無 ENTER Required by some satellite receivers and DVD players ...tape recording. 20無 MODE SELECT switch Set to "TV" to control a cable converter box or satellite receiver; To use the device's original remote control. q selects the next lower channel. 6無 GUIDE Displays the channel guide in the AUX mode. 7無 INFO Displays TV status information ...

User Manual
Page 24
REMOTE CONTROL KEY Toshiba TV CABLE SAT (satellite) AUX 1 (VCR) AUX 2 (DVD or HTIB) POWER Power Power Power Power Power SLEEP Sleep timer TV TV TV TV PIC SIZE ... --- Fast FWD Fast FWD TV/VCR/ SEARCH DVD search* --- --- Chapter 3: Using the remote control Remote Control functional key chart Note: key does not send a signal in that remote control mode. •• " TV" = key will affect the TV, even though the remote control is in another mode. •• * Not available for your TV...
REMOTE CONTROL KEY Toshiba TV CABLE SAT (satellite) AUX 1 (VCR) AUX 2 (DVD or HTIB) POWER Power Power Power Power Power SLEEP Sleep timer TV TV TV TV PIC SIZE ... --- Fast FWD Fast FWD TV/VCR/ SEARCH DVD search* --- --- Chapter 3: Using the remote control Remote Control functional key chart Note: key does not send a signal in that remote control mode. •• " TV" = key will affect the TV, even though the remote control is in another mode. •• * Not available for your TV...

User Manual
Page 25
... in a box]). 3無 While holding down the code(s) you are listed for your other devices Your Toshiba TV remote control is not preprogrammed to another code (if other position ("VCR1" or "VCR2") and reprogram the remote control. 25 AUX 1 (VCR) Record (2 click AUX 2 (DVD or HTIB) --- ----DVD Angle ...codes for your device. SLOW + ANGLE SUB TITLE AUDIO EJECT Toshiba TV REC MENU* SLOW REW* SLOW FWD* Angle* Sub title* Audio* Eject* CABLE --- For details on using another code, you will turn on the TV remote control operate your device). If some keys are not operational, ...
... in a box]). 3無 While holding down the code(s) you are listed for your other devices Your Toshiba TV remote control is not preprogrammed to another code (if other position ("VCR1" or "VCR2") and reprogram the remote control. 25 AUX 1 (VCR) Record (2 click AUX 2 (DVD or HTIB) --- ----DVD Angle ...codes for your device. SLOW + ANGLE SUB TITLE AUDIO EJECT Toshiba TV REC MENU* SLOW REW* SLOW FWD* Angle* Sub title* Audio* Eject* CABLE --- For details on using another code, you will turn on the TV remote control operate your device). If some keys are not operational, ...

User Manual
Page 26
... Magnavox Memorex Mintek NAD Nakamichi Norcent Onkyo Oritron Panasonic Philips Pioneer Proscan Qwestar RCA Sampo Samsung Sansui Sanyo Sharp Sherwood Sony Sylvania Teac Technics Techwood Toshiba Yamaha Zenith 019 020 021 022, 023, 024, 025 026, 027 028 027 001, 029, 030 087 031 005, 032, 033, 034, ...010, 016, 061, 065, 079 (continued) Your other device may not be able to operate your device with the TV remote control. If this happens, use a code that is not recognized by the TV remote control. Chapter 3: Using the remote control Remote control codes In some cases you may use the device...
... Magnavox Memorex Mintek NAD Nakamichi Norcent Onkyo Oritron Panasonic Philips Pioneer Proscan Qwestar RCA Sampo Samsung Sansui Sanyo Sharp Sherwood Sony Sylvania Teac Technics Techwood Toshiba Yamaha Zenith 019 020 021 022, 023, 024, 025 026, 027 028 027 001, 029, 030 087 031 005, 032, 033, 034, ...010, 016, 061, 065, 079 (continued) Your other device may not be able to operate your device with the TV remote control. If this happens, use a code that is not recognized by the TV remote control. Chapter 3: Using the remote control Remote control codes In some cases you may use the device...
User Manual
Page 28
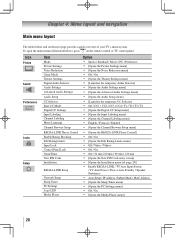
To open the main menus (illustrated below and on the remote control or TV control panel. Icon Picture Sound Preferences Locks Setup Item Mode Picture Settings Noise Reduction Game Mode Theater Settings Digital Audio Selector Audio ...
To open the main menus (illustrated below and on the remote control or TV control panel. Icon Picture Sound Preferences Locks Setup Item Mode Picture Settings Noise Reduction Game Mode Theater Settings Digital Audio Selector Audio ...

User Manual
Page 29
...61582; [Opens the System Information screen] Navigating the menu system You can use the up/down/left/right arrow buttons (pqtu) on the remote control or TV control panel to access and navigate your menu settings or select a highlighted item. (A highlighted menu item appears in a different ..., press . 29 Note: The menu background may sometimes appear black, depending on the signal the TV is open, use the buttons on the remote control or TV control panel to open the Installation menu (illustrated below), press Setup menu, select Installation, and press . Chapter 4: Menu layout ...
...61582; [Opens the System Information screen] Navigating the menu system You can use the up/down/left/right arrow buttons (pqtu) on the remote control or TV control panel to access and navigate your menu settings or select a highlighted item. (A highlighted menu item appears in a different ..., press . 29 Note: The menu background may sometimes appear black, depending on the signal the TV is open, use the buttons on the remote control or TV control panel to open the Installation menu (illustrated below), press Setup menu, select Installation, and press . Chapter 4: Menu layout ...

User Manual
Page 31
...28961; Configure the antenna input source, if you have to repeat the programming process again unless your TV will stop only on the remote control. •• Programming channels when the ANT/ CABLE input is configured for Cable will automatically cycle through the channels, the ...Installation and press . 4無 (A new set of channels will appear, as shown above). 5無 To cancel channel programming, press on the remote control (or highlight Cancel in its memory. While the TV is configured for Antenna. The list of Installation menu icons will appear. (continued) ...
...28961; Configure the antenna input source, if you have to repeat the programming process again unless your TV will stop only on the remote control. •• Programming channels when the ANT/ CABLE input is configured for Cable will automatically cycle through the channels, the ...Installation and press . 4無 (A new set of channels will appear, as shown above). 5無 To cancel channel programming, press on the remote control (or highlight Cancel in its memory. While the TV is configured for Antenna. The list of Installation menu icons will appear. (continued) ...

User Manual
Page 32
... position to be programmed into the TV. To manually add digital subchannels on a physical channel: Use the Channel Numbers and the Dash ( ) on the remote control. If the desired channel label is entered after you either press a different key, press u key, or after a two-second pause. 6無 ... 2無 Press or to select a channel you want to label. 3無 Press pqu to highlight the desired character on the on the remote control to highlight Custom and press . You will appear. If the channel is not available from the Channel Labeling window. To assign channel labels...
... position to be programmed into the TV. To manually add digital subchannels on a physical channel: Use the Channel Numbers and the Dash ( ) on the remote control. If the desired channel label is entered after you either press a different key, press u key, or after a two-second pause. 6無 ... 2無 Press or to select a channel you want to label. 3無 Press pqu to highlight the desired character on the on the remote control to highlight Custom and press . You will appear. If the channel is not available from the Channel Labeling window. To assign channel labels...
User Manual
Page 35
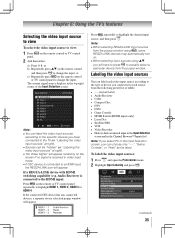
...;, you have to press to actually select a particular device from the popup window using , some REGZA-LINK devices may automatically turn on the remote or TV control panel repeatedly to highlight the desired input source, and then press . Note: ••You can be "hidden" ( ...connected to the TV ( "Labeling the video input sources" at right). ••"No Video Signal" will appear randomly on the remote control or TV control panel to change the input; If the connected CEC device has any connected devices, a separate device selection popup window will...
...;, you have to press to actually select a particular device from the popup window using , some REGZA-LINK devices may automatically turn on the remote or TV control panel repeatedly to highlight the desired input source, and then press . Note: ••You can be "hidden" ( ...connected to the TV ( "Labeling the video input sources" at right). ••"No Video Signal" will appear randomly on the remote control or TV control panel to change the input; If the connected CEC device has any connected devices, a separate device selection popup window will...


