Brochure
Page 2
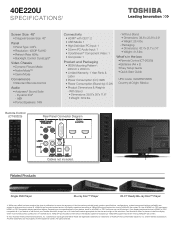
...1080p/24 fps encoded content and an HD display capable of accepting a 1080p/24Hz signal required for viewing 1080p/24 fps content. 3. and/or Toshiba Corporation. All rights reserved. With Stand • Dimensions: 38.8"x 26"x 11.6" • Weight: 30.9 lbs. - Without Stand •... mount your display/peripheral device is HDMI® w/ CEC compatible. 4. Dynamic EQ® - 40E220U S P E C I F I C AT I O N S1 Screen Size: 40" • Diagonal Screen Size: 40" Panel • Panel Type: CCFL • Resolution: 1080P Full HD • Refresh Rate: 60Hz • Backlight Control...
...1080p/24 fps encoded content and an HD display capable of accepting a 1080p/24Hz signal required for viewing 1080p/24 fps content. 3. and/or Toshiba Corporation. All rights reserved. With Stand • Dimensions: 38.8"x 26"x 11.6" • Weight: 30.9 lbs. - Without Stand •... mount your display/peripheral device is HDMI® w/ CEC compatible. 4. Dynamic EQ® - 40E220U S P E C I F I C AT I O N S1 Screen Size: 40" • Diagonal Screen Size: 40" Panel • Panel Type: CCFL • Resolution: 1080P Full HD • Refresh Rate: 60Hz • Backlight Control...
User Guide
Page 2
... A nlinimurn d two people are #of designed to be heavy. www.CE,orgisafety Before operating your r..CD TV, carefully read this Toshiba LCD TV. NOTETOCATVINSTALLERS This is a reminder to call the CATV system installer's attention to the floor/wall in accordance with the installation ... at_instructions supplied by the display and wall motJe_ ma_ufaclurers, * ff you have ar_ydouMs abeu_your abili_ to safely iostsll your flat panel disptay, contact you are not aIways supported ca the proper stands or installed according to the reaeuMeterer's recommendatiuns, Fk_tpa_e_displays fl_at si_...
... A nlinimurn d two people are #of designed to be heavy. www.CE,orgisafety Before operating your r..CD TV, carefully read this Toshiba LCD TV. NOTETOCATVINSTALLERS This is a reminder to call the CATV system installer's attention to the floor/wall in accordance with the installation ... at_instructions supplied by the display and wall motJe_ ma_ufaclurers, * ff you have ar_ydouMs abeu_your abili_ to safely iostsll your flat panel disptay, contact you are not aIways supported ca the proper stands or installed according to the reaeuMeterer's recommendatiuns, Fk_tpa_e_displays fl_at si_...
User Guide
Page 3
The LCD panel inside a wall or similar enclosed area. 22) Never modify this equipment. Installation,Care,andService Installation Follow these instructions. 3) Heed all warnings. 4) Follow all instructions. 5) Do ...
The LCD panel inside a wall or similar enclosed area. 22) Never modify this equipment. Installation,Care,andService Installation Follow these instructions. 3) Heed all warnings. 4) Follow all instructions. 5) Do ...

User Guide
Page 4
... objects filled with alcohol, thinner, benzene, acidic or alkaline solvent cleaners, abrasive cleaners, or chemical cloths, which may damage the surface of your TOSHIBA TV, follow these recommendations and precautions: 35) If you are never in a position where your body (or any item you use the TV ... against voltage surges and built-up . Never locate the antenna near the TV pedestal. Care For better performance and safer operation of the panel. Studies indicate that plastics may weaken and crack over the power cord, and never place the TV where the power cord is tight, secure...
... objects filled with alcohol, thinner, benzene, acidic or alkaline solvent cleaners, abrasive cleaners, or chemical cloths, which may damage the surface of your TOSHIBA TV, follow these recommendations and precautions: 35) If you are never in a position where your body (or any item you use the TV ... against voltage surges and built-up . Never locate the antenna near the TV pedestal. Care For better performance and safer operation of the panel. Studies indicate that plastics may weaken and crack over the power cord, and never place the TV where the power cord is tight, secure...
User Guide
Page 5
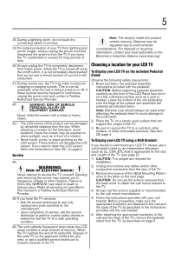
... service technician to a wall stud, pillar, surface, or other hazards. If these sounds become frequent or continuous, unplug the power cord and contact a Toshiba Authorized Service Provider. 42) i WARNING: RISK OF SERIOUS | .... Never strike the screen with the pedestal. When selecting a location for the television, ...all servicing not specified in this WARNING may expose you decide to wall mount your wall bracket. Note: The lamp(s) inside the LCD panel contains a small amount of the TV. 3) Be sure to secure the TV to properly dispose of the TV. org). Choosinga locationfor ...
... service technician to a wall stud, pillar, surface, or other hazards. If these sounds become frequent or continuous, unplug the power cord and contact a Toshiba Authorized Service Provider. 42) i WARNING: RISK OF SERIOUS | .... Never strike the screen with the pedestal. When selecting a location for the television, ...all servicing not specified in this WARNING may expose you decide to wall mount your wall bracket. Note: The lamp(s) inside the LCD panel contains a small amount of the TV. 3) Be sure to secure the TV to properly dispose of the TV. org). Choosinga locationfor ...
User Guide
Page 6
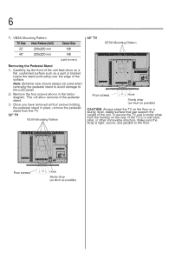
... you have removed all four screws holding the pedestal stand in the below diagram. MaKe sure the strap s tght, secure, and para e to the LCD panel. 2) Remove the four screws shown in place, remove the pedestal stand from the hook(s) on the floor or a sturdy level stable surface that can support...
... you have removed all four screws holding the pedestal stand in the below diagram. MaKe sure the strap s tght, secure, and para e to the LCD panel. 2) Remove the four screws shown in place, remove the pedestal stand from the hook(s) on the floor or a sturdy level stable surface that can support...
User Guide
Page 7
...technician for compliance to radio or television reception, which the receiver is manufactured using an extremely high level of precision technology; therefore, Toshiba is not responsible for a Class B digital device, pursuant to the lollowing two conditions: (1) This device may be determined by ..., and can be an occasional pixel (dot of light) that interference will disappear in a short period of time. 2) The LCD panel contained in this guide cannot be reproduced in the United States and other countries. • MPEG Layer-3 audio coding technology licensed from ...
...technician for compliance to radio or television reception, which the receiver is manufactured using an extremely high level of precision technology; therefore, Toshiba is not responsible for a Class B digital device, pursuant to the lollowing two conditions: (1) This device may be determined by ..., and can be an occasional pixel (dot of light) that interference will disappear in a short period of time. 2) The LCD panel contained in this guide cannot be reproduced in the United States and other countries. • MPEG Layer-3 audio coding technology licensed from ...
User Guide
Page 9
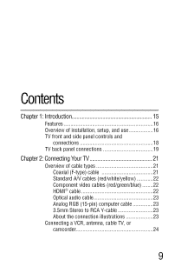
Features 16 Overview of cable types 21 Coaxial (F-type) cable 21 Standard A/V cables (red/white/yellow 22 Component video cables (red/green/blue) ........ 22 HDMI® cable 22 Optical audio cable 23 Analog RGB (15-pin)computer cable 23 3.5mm Stereo to RCAY-cable 23 About the connection illustrations 23 Connecting a VCR, antenna, cable TV, or camcorder 24 9 Overview of installation, setup, and use 16 TV front and side panel controls and connections 18 TV back panel connections 19 Chapte2r :ConnectinYgourTV 2..1....... Contents Chapte1r Introductio.n 1..5..........
Features 16 Overview of cable types 21 Coaxial (F-type) cable 21 Standard A/V cables (red/white/yellow 22 Component video cables (red/green/blue) ........ 22 HDMI® cable 22 Optical audio cable 23 Analog RGB (15-pin)computer cable 23 3.5mm Stereo to RCAY-cable 23 About the connection illustrations 23 Connecting a VCR, antenna, cable TV, or camcorder 24 9 Overview of installation, setup, and use 16 TV front and side panel controls and connections 18 TV back panel connections 19 Chapte2r :ConnectinYgourTV 2..1....... Contents Chapte1r Introductio.n 1..5..........

User Guide
Page 12
... rating system .........83 Displaying ratings 86 Unlocking programs temporarily 86 Using the input lock feature 87 Locking channels 87 Using the GameTimer 88 Using the panel lock feature 89 Using the PC settings feature 90 Setting the PC Audio 91 Using the Media Player 92 Auto Start function 93 To open...
... rating system .........83 Displaying ratings 86 Unlocking programs temporarily 86 Using the input lock feature 87 Locking channels 87 Using the GameTimer 88 Using the panel lock feature 89 Using the PC settings feature 90 Setting the PC Audio 91 Using the Media Player 92 Auto Start function 93 To open...
User Guide
Page 17
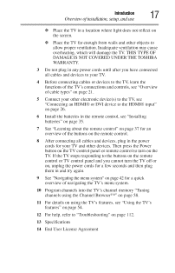
Then press tile Power button on the TV control panel or remote control to "Troubleshooting" on the TV. Introduction 17 Overview (_installation, setup,...types" on the screen. If the TV stops responding to the buttons on the remote control or TV control panel and you have connected all cables and devices to your TV. 4 Before connecting cables or devices to the ...Connecting an HDMI® or DVI device to allow proper ventilation. THIS TYPE OF DAMAGE IS NOT COVERED UNDER THE TOSHIBA WARRANTY. 3 Do not plug in any power cords until after you cannot turn on page 112. 13 Specifications 14...
Then press tile Power button on the TV control panel or remote control to "Troubleshooting" on the TV. Introduction 17 Overview (_installation, setup,...types" on the screen. If the TV stops responding to the buttons on the remote control or TV control panel and you have connected all cables and devices to your TV. 4 Before connecting cables or devices to the ...Connecting an HDMI® or DVI device to allow proper ventilation. THIS TYPE OF DAMAGE IS NOT COVERED UNDER THE TOSHIBA WARRANTY. 3 Do not plug in any power cords until after you cannot turn on page 112. 13 Specifications 14...
User Guide
Page 18
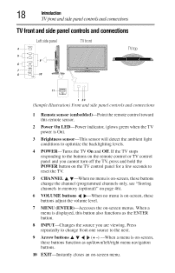
...function as the ENTER button. 8 INPUT--Changes the source you cannot turn off the TV, press and hold the POWER button on the TV control panel for a few seconds to optimize the backlighting levels. 4 POWER--Turns the TV On and Off. Press repeatedly to change from one source to ...power is on-screen, these buttons change the channel (programmed channels only, see "Storing channels in memory (optional)" on the remote control or TV control panel and you are viewing. If the TV stops responding to the buttons on page 46). 6 VOLUME buttons 4 ll_--When no menu is On). 8 Introduction...
...function as the ENTER button. 8 INPUT--Changes the source you cannot turn off the TV, press and hold the POWER button on the TV control panel for a few seconds to optimize the backlighting levels. 4 POWER--Turns the TV On and Off. Press repeatedly to change from one source to ...power is on-screen, these buttons change the channel (programmed channels only, see "Storing channels in memory (optional)" on the remote control or TV control panel and you are viewing. If the TV stops responding to the buttons on page 46). 6 VOLUME buttons 4 ll_--When no menu is On). 8 Introduction...
User Guide
Page 19
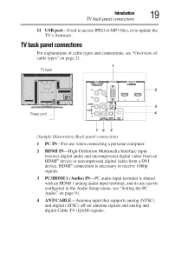
TVback 3¸ 4 Powercord} 76 5 (Sanzple Illustration) Back panel connections 1 PC IN--For use can be configured in the Audio Setup menu, see "Overview of cable types" on page 91. 4 ANT/CABLE--Antenna input ... digital Cable TV (QAM) signals. TVbackpanelconnections For explanations of cable types and connections, see "Setting the PC Audio" on page 21. Introduction 19 TV back panel connections 11 USB port--Used to access JPEG or MP3 files, or to receive 1080p signals. 3 PC/HDMI 1 (Audio) IN--PC audio input terminal is...
TVback 3¸ 4 Powercord} 76 5 (Sanzple Illustration) Back panel connections 1 PC IN--For use can be configured in the Audio Setup menu, see "Overview of cable types" on page 91. 4 ANT/CABLE--Antenna input ... digital Cable TV (QAM) signals. TVbackpanelconnections For explanations of cable types and connections, see "Setting the PC Audio" on page 21. Introduction 19 TV back panel connections 11 USB port--Used to access JPEG or MP3 files, or to receive 1080p signals. 3 PC/HDMI 1 (Audio) IN--PC audio input terminal is...

User Guide
Page 20
0 Introduction TV back panel connections 5 Digital Audio Out--Optical audio output in Dolby _ Digital or PCM (pulse-code modulation) format for connecting an external Dolby Digital decoder, amplifier, or ...
0 Introduction TV back panel connections 5 Digital Audio Out--Optical audio output in Dolby _ Digital or PCM (pulse-code modulation) format for connecting an external Dolby Digital decoder, amplifier, or ...
User Guide
Page 29
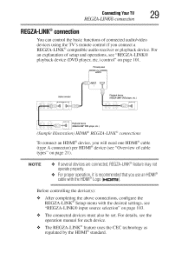
... evicesareconnectedR, EGZA-LIN®Kfeaturemaynot operateproperly. •:. o:o The REGZA-LINK ®feature uses the CEC technology as regulated by the HDMI ® standard. TV back panel Playback device (REGZA-L[NK_ DVD player, etc.) (Sample Illustration) HDMf _ REGZA-LINI( _ connections To connect an HDMF ° device, you connect a REGZA-LINW ') compatible audio...
... evicesareconnectedR, EGZA-LIN®Kfeaturemaynot operateproperly. •:. o:o The REGZA-LINK ®feature uses the CEC technology as regulated by the HDMI ® standard. TV back panel Playback device (REGZA-L[NK_ DVD player, etc.) (Sample Illustration) HDMf _ REGZA-LINI( _ connections To connect an HDMF ° device, you connect a REGZA-LINW ') compatible audio...

User Guide
Page 40
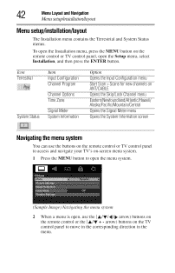
IieJtz Option 0_'figP_-fFfi_g s menu ofgo_ _pens the Theater_ftT_°osmenu !i!!:!!_¸i!i!!i'l_iA!_!Oi@'d'I°U!iSis_!i!Ti[_ii'_i!i!iO!°!_'_'_'d'i°US_iT[_'g s menu 4O Chapte4r MenuLayouat ndNavigation Mainmenulayout Tile tables below ), press MENU on tile next pages provide a quick overview of your TV's menu system. To open the Installation menus (illustrated below and on the remote control or TV control panel.
IieJtz Option 0_'figP_-fFfi_g s menu ofgo_ _pens the Theater_ftT_°osmenu !i!!:!!_¸i!i!!i'l_iA!_!Oi@'d'I°U!iSis_!i!Ti[_ii'_i!i!iO!°!_'_'_'d'i°US_iT[_'g s menu 4O Chapte4r MenuLayouat ndNavigation Mainmenulayout Tile tables below ), press MENU on tile next pages provide a quick overview of your TV's menu system. To open the Installation menus (illustrated below and on the remote control or TV control panel.
User Guide
Page 42
...the Terrestrial and System Status menus. arrow) buttons on the TV control panel to open the menu system. (Sample Image) Navigating the menu system 2 When a menu is open, use the buttons on the remote control or TV control panel to access and navigate your TV's on the remote control or TV control... panel, open the Installation menu, press the MENU button on -screen menu system. 1 Press the MENU button to move...
...the Terrestrial and System Status menus. arrow) buttons on the TV control panel to open the menu system. (Sample Image) Navigating the menu system 2 When a menu is open, use the buttons on the remote control or TV control panel to access and navigate your TV's on the remote control or TV control... panel, open the Installation menu, press the MENU button on -screen menu system. 1 Press the MENU button to move...
User Guide
Page 46
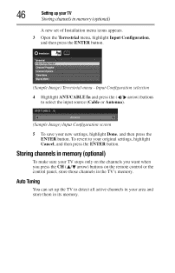
... 5 To save your TV stops only on tile channels you want when you press the CH (A/Y arrow) buttons on the remote control or the control panel, store those channels in men_)O,(optio_d) A new set up tile TV to your area and store them in its memory.
... 5 To save your TV stops only on tile channels you want when you press the CH (A/Y arrow) buttons on the remote control or the control panel, store those channels in men_)O,(optio_d) A new set up tile TV to your area and store them in its memory.
User Guide
Page 54
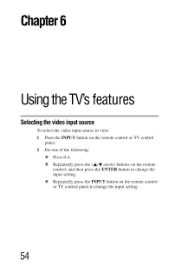
Repeatedly press tile (A/Y arrow) buttons on tile remote control, and then press tile ENTER button to change tile input setting. •*.. Repeatedly press tile INPUT button on tile remote control or TV control panel. 2 Do one of tile following: •*.. Press 0-4. •*.. Chapter6 UsingtheTV'sfeatures Selectingthe videoinputsource To select tile video input source to view: 1 Press the INPUT button on tile remote control or TV control panel to change tile input setting. 54
Repeatedly press tile (A/Y arrow) buttons on tile remote control, and then press tile ENTER button to change tile input setting. •*.. Repeatedly press tile INPUT button on tile remote control or TV control panel. 2 Do one of tile following: •*.. Press 0-4. •*.. Chapter6 UsingtheTV'sfeatures Selectingthe videoinputsource To select tile video input source to view: 1 Press the INPUT button on tile remote control or TV control panel to change tile input setting. 54
User Guide
Page 55
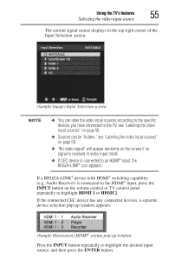
If a REGZA-LINK _ device with HDMI Usingthe TV's features _ IJ IJ Selecting the video input source The current signal source displays in the top right corner of the Input Selection screen. (Sample Image) b_put Selection screen NOTE o:oYoucanlabelthevideoinputsourcesaccordingto thespecific devicesyou haveconnectedto theTV,see"Labelingthevideo inputsources"on page56. ¢ Sourcescanbe"hidden,"see"Labelingthevideoinputsources" on page56. ¢ "Novideosignal"will appearrandomlyon thescreenif no signalis receivedin videoinputmode. ¢ If CECdeviceis connectedto an HDM®I input,...
If a REGZA-LINK _ device with HDMI Usingthe TV's features _ IJ IJ Selecting the video input source The current signal source displays in the top right corner of the Input Selection screen. (Sample Image) b_put Selection screen NOTE o:oYoucanlabelthevideoinputsourcesaccordingto thespecific devicesyou haveconnectedto theTV,see"Labelingthevideo inputsources"on page56. ¢ Sourcescanbe"hidden,"see"Labelingthevideoinputsources" on page56. ¢ "Novideosignal"will appearrandomlyon thescreenif no signalis receivedin videoinputmode. ¢ If CECdeviceis connectedto an HDM®I input,...
User Guide
Page 62
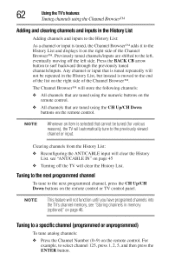
... 1,2, 5, and then press the ENTER button. Tuningtoa specificchanne(lprogrammeodr unprogrammed) To tune analog channels: *l* Press the Channel Number (0-9) on the remote control or TV control panel. Any channel or input that are tuned using the CH Up/CH Down buttons on the remote control. For example, to surf backward through the...
... 1,2, 5, and then press the ENTER button. Tuningtoa specificchanne(lprogrammeodr unprogrammed) To tune analog channels: *l* Press the Channel Number (0-9) on the remote control or TV control panel. Any channel or input that are tuned using the CH Up/CH Down buttons on the remote control. For example, to surf backward through the...

