User Manual
Page 8
...audio system 18 Connecting a personal computer (PC 18 Chapter 3: Using the remote control 20 Installing the remote control batteries 20 Remote control effective range 20 Learning about the remote control 21 Chapter 4: Menu layout and navigation 22 Main menu layout 22 ...Setup/Installation menu layout 23 Navigating the menu system 23 Chapter 5: Setting up your TV 24 Initial Setup 24 Selecting the menu language 24 TOSHIBA...
...audio system 18 Connecting a personal computer (PC 18 Chapter 3: Using the remote control 20 Installing the remote control batteries 20 Remote control effective range 20 Learning about the remote control 21 Chapter 4: Menu layout and navigation 22 Main menu layout 22 ...Setup/Installation menu layout 23 Navigating the menu system 23 Chapter 5: Setting up your TV 24 Initial Setup 24 Selecting the menu language 24 TOSHIBA...
User Manual
Page 9
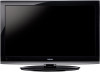
Chapter 1: Introduction Features of your new TV The following are just a few of the many exciting features of your new Toshiba widescreen, integrated HD, LCD TV: • Integrated digital tuning (8VSB ATSC and QAM) eliminates the need for a separate digital converter set-top box (in...; page 16). • HDMI new capability INSTAPORT™ technology reduces lag time when switching HDMI sources. • One set of external devices from the TV remote via HDMI connection ( page 49). • Media Player allows you to play music files.( page 45). 9 ABC, HBO, etc.) on the ...
Chapter 1: Introduction Features of your new TV The following are just a few of the many exciting features of your new Toshiba widescreen, integrated HD, LCD TV: • Integrated digital tuning (8VSB ATSC and QAM) eliminates the need for a separate digital converter set-top box (in...; page 16). • HDMI new capability INSTAPORT™ technology reduces lag time when switching HDMI sources. • One set of external devices from the TV remote via HDMI connection ( page 49). • Media Player allows you to play music files.( page 45). 9 ABC, HBO, etc.) on the ...
User Manual
Page 10
...TV's connections and controls ( pages 11-12). 5 Connect your other electronic device(s) to the TV ( pages 13-19). 6 Install the batteries in the remote control ( page 20). 7 See "Learning about your LCD TV" ( page 7). • Place the TV on the floor or a sturdy, level, ...stable surface that can support the weight of the unit. THIS TYPE OF DAMAGE IS NOT COVERED UNDER THE TOSHIBA WARRANTY. 3 Do not plug in the power cords for your TV and other objects to the Troubleshooting Guide, Chapter 8. 13 For technical specifications and...
...TV's connections and controls ( pages 11-12). 5 Connect your other electronic device(s) to the TV ( pages 13-19). 6 Install the batteries in the remote control ( page 20). 7 See "Learning about your LCD TV" ( page 7). • Place the TV on the floor or a sturdy, level, ...stable surface that can support the weight of the unit. THIS TYPE OF DAMAGE IS NOT COVERED UNDER THE TOSHIBA WARRANTY. 3 Do not plug in the power cords for your TV and other objects to the Troubleshooting Guide, Chapter 8. 13 For technical specifications and...
User Manual
Page 11
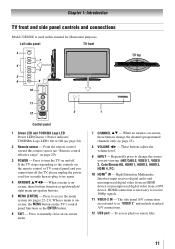
... 1, HDMI 2, HDMI 3, HDMI 4, PC). 10無 HDMI® IN - Press to as the ENTER button. 6無 EXIT - Point the remote control toward this manual for illustration purposes. Left side panel TV front 3 7 4 8 5 6 9 10 TV top 11 12 2 Control panel 1無 Green... LED and TOSHIBA Logo LED Power LED(Green) = Power indicator TOSHIBA Logo LED= On or Off ( page 24). 2無 Remote sensor - High-Definition Multimedia Interface input receives digital audio and uncompressed digital video from an HDMI ...
... 1, HDMI 2, HDMI 3, HDMI 4, PC). 10無 HDMI® IN - Press to as the ENTER button. 6無 EXIT - Point the remote control toward this manual for illustration purposes. Left side panel TV front 3 7 4 8 5 6 9 10 TV top 11 12 2 Control panel 1無 Green... LED and TOSHIBA Logo LED Power LED(Green) = Power indicator TOSHIBA Logo LED= On or Off ( page 24). 2無 Remote sensor - High-Definition Multimedia Interface input receives digital audio and uncompressed digital video from an HDMI ...
User Manual
Page 14
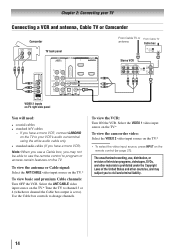
... basic and premium Cable channels: Turn OFF the VCR. To view the antenna or Cable signal: Select the ANT/CABLE video input source on the remote control ( page 21). Chapter 2: Connecting your TV Connecting a VCR and antenna, Cable TV or Camcorder Camcorder AUDIO OUT L R VIDEO TV back panel From Cable..., distribution, or revision of the United States and other countries, and may not be able to use a Cable box, you may subject you use the remote control to civil and criminal liability. 14 To view the VCR: Turn ON the VCR.
... basic and premium Cable channels: Turn OFF the VCR. To view the antenna or Cable signal: Select the ANT/CABLE video input source on the remote control ( page 21). Chapter 2: Connecting your TV Connecting a VCR and antenna, Cable TV or Camcorder Camcorder AUDIO OUT L R VIDEO TV back panel From Cable..., distribution, or revision of the United States and other countries, and may not be able to use a Cable box, you may subject you use the remote control to civil and criminal liability. 14 To view the VCR: Turn ON the VCR.
User Manual
Page 15
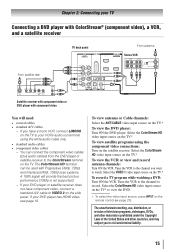
...: Turn ON the DVD player. Tune the VCR to the channel to view the DVD. ** To select the video input source, press INPUT on the remote control ( page 21). The ColorStream HD terminal can connect the component video cables (plus audio cables) from ANT OUT to TV Y PB PR Satellite...
...: Turn ON the DVD player. Tune the VCR to the channel to view the DVD. ** To select the video input source, press INPUT on the remote control ( page 21). The ColorStream HD terminal can connect the component video cables (plus audio cables) from ANT OUT to TV Y PB PR Satellite...
User Manual
Page 16
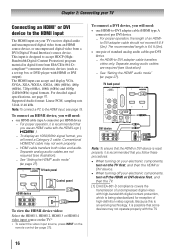
... properly, it is recommended that you follow these procedures: •• When turning on your electronic components, turn off your electronic components, turn on the remote control ( page 21). Separate analog audio cables are not required (see illustration). −− See "Setting the HDMI® audio mode" ( page 27...
... properly, it is recommended that you follow these procedures: •• When turning on your electronic components, turn off your electronic components, turn on the remote control ( page 21). Separate analog audio cables are not required (see illustration). −− See "Setting the HDMI® audio mode" ( page 27...
User Manual
Page 17
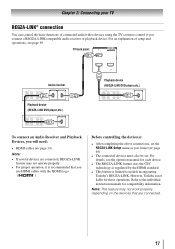
... cables ( page 13) Note: • If several devices are connected. 17 Refer to models incorporating Toshiba's REGZA-LINK. For details, see page 49. For an explanation of connected audio/video devices using the TV's remote control if you desire ( page 49). • The connected devices must also be set the...
... cables ( page 13) Note: • If several devices are connected. 17 Refer to models incorporating Toshiba's REGZA-LINK. For details, see page 49. For an explanation of connected audio/video devices using the TV's remote control if you desire ( page 49). • The connected devices must also be set the...
User Manual
Page 18
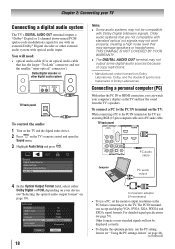
... digital audio system TV back panel To control the audio: 1無 Turn on the TV and the digital audio device. 2無 Press on the TV's remote control and open the Sound menu. 3無 Highlight Audio Setup and press . Other formats or non-standard signals will need: • optical audio cable (Use...
... digital audio system TV back panel To control the audio: 1無 Turn on the TV and the digital audio device. 2無 Press on the TV's remote control and open the Sound menu. 3無 Highlight Audio Setup and press . Other formats or non-standard signals will need: • optical audio cable (Use...
User Manual
Page 20
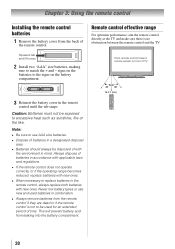
... or if the operating range becomes reduced, replace batteries with new ones. •• When necessary to replace batteries in the remote control, always replace both batteries with the environment in a designated disposal area. •• Batteries should always be exposed to the... signs on front of the remote control. Point remote control toward remote sensor on the battery compartment. Caution: Batteries must not be disposed of batteries in mind. This will prevent battery ...
... or if the operating range becomes reduced, replace batteries with new ones. •• When necessary to replace batteries in the remote control, always replace both batteries with the environment in a designated disposal area. •• Batteries should always be exposed to the... signs on front of the remote control. Point remote control toward remote sensor on the battery compartment. Caution: Batteries must not be disposed of batteries in mind. This will prevent battery ...
User Manual
Page 21
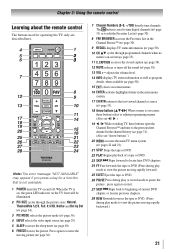
... or DVD. (Press during play mode to view the picture moving picture ( page 36). 7無 Channel Numbers (0-9, -/100) directly tune channels. Chapter 3: Using the remote control Learning about the remote control The buttons used to tune digital channels ( page 33) or to restore the moving rapidly backward.) 21
... or DVD. (Press during play mode to view the picture moving picture ( page 36). 7無 Channel Numbers (0-9, -/100) directly tune channels. Chapter 3: Using the remote control Learning about the remote control The buttons used to tune digital channels ( page 33) or to restore the moving rapidly backward.) 21
User Manual
Page 22
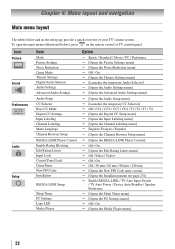
...; [Opens the PC Settings menu] Off / On [Opens the Media Player menu] 22 To open the main menus (illustrated below and on the remote control or TV control panel.
...; [Opens the PC Settings menu] Off / On [Opens the Media Player menu] 22 To open the main menus (illustrated below and on the remote control or TV control panel.
User Manual
Page 23
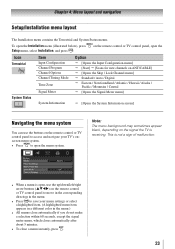
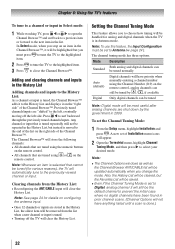
... Setup/Installation menu layout The Installation menu contains the Terrestrial and System Status menus. To open the menu system. on the remote control or TV control panel, open the Icon Terrestrial Item Input Configuration Channel Program Channel Options Channel Tuning Mode Time Zone Signal ... about 5 minutes. • To close a menu instantly, press . 23 Note: The menu background may sometimes appear black, depending on the remote control or TV control panel to open the Installation menu (illustrated below), press Setup menu, select Installation, and press . This is not a ...
... Setup/Installation menu layout The Installation menu contains the Terrestrial and System Status menus. To open the menu system. on the remote control or TV control panel, open the Icon Terrestrial Item Input Configuration Channel Program Channel Options Channel Tuning Mode Time Zone Signal ... about 5 minutes. • To close a menu instantly, press . 23 Note: The menu background may sometimes appear black, depending on the remote control or TV control panel to open the Installation menu (illustrated below), press Setup menu, select Installation, and press . This is not a ...
User Manual
Page 25
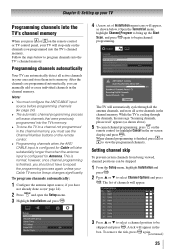
...appears (as shown below to view the programmed channels. A tick will appear, as shown above). 5無 To cancel channel programming, press on the remote control (or highlight Cancel in the on-screen display and press ). To remove the tick, press agai(nc.ontinued) 25 After the channels are ... and press . 2無 Press p or q to be skipped and press . Note: •• You must use the Channel Number buttons on the remote control. •• Programming channels when the ANT/ CABLE input is configured for Antenna. This is normal; Chapter 5: Setting up the Start Scan, and press...
...appears (as shown below to view the programmed channels. A tick will appear, as shown above). 5無 To cancel channel programming, press on the remote control (or highlight Cancel in the on-screen display and press ). To remove the tick, press agai(nc.ontinued) 25 After the channels are ... and press . 2無 Press p or q to be skipped and press . Note: •• You must use the Channel Number buttons on the remote control. •• Programming channels when the ANT/ CABLE input is configured for Antenna. This is normal; Chapter 5: Setting up the Start Scan, and press...

User Manual
Page 26
...and marked with or ; To manually add digital subchannels on a physical channel: Use the Channel Numbers and the Dash ( ) on the remote control. Assigned channel labels will be added to the list in the banner, Channel Options, and Channel BrowserTM. The software keyboard will appear.... 4無 Repeatedly press the corresponding key on the remote control to highlight the desired character on the on-screen software keyboard. 5無 The highlighted character is not provided in the list...
...and marked with or ; To manually add digital subchannels on a physical channel: Use the Channel Numbers and the Dash ( ) on the remote control. Assigned channel labels will be added to the list in the banner, Channel Options, and Channel BrowserTM. The software keyboard will appear.... 4無 Repeatedly press the corresponding key on the remote control to highlight the desired character on the on-screen software keyboard. 5無 The highlighted character is not provided in the list...
User Manual
Page 29
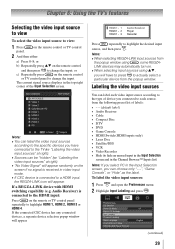
...the type of device you connected to each source, from the following preset list of the Input Selection screen. or c) Repeatedly press on the remote control and then press to change the input. Press repeatedly to the TV ( "Labeling the video input sources" at right). •&#... Chapter 6: Using the TV's features Selecting the video input source to view To select the video input source to view: 1無 Press on the remote or TV control panel repeatedly to highlight HDMI 1, HDMI 2, HDMI 3 or HDMI 4. The current signal source displays in the top right corner of ...
...the type of device you connected to each source, from the following preset list of the Input Selection screen. or c) Repeatedly press on the remote control and then press to change the input. Press repeatedly to the TV ( "Labeling the video input sources" at right). •&#... Chapter 6: Using the TV's features Selecting the video input source to view To select the video input source to view: 1無 Press on the remote or TV control panel repeatedly to highlight HDMI 1, HDMI 2, HDMI 3 or HDMI 4. The current signal source displays in the top right corner of ...
User Manual
Page 30
... default labels, highlight Reset and press . Chapter 6: Using the TV's features 3無 Press or to highlight the video source you press on the remote control. 5無 To save the new input labels, highlight Done and press . If a particular input is integrated into the Channel Browser™.
... default labels, highlight Reset and press . Chapter 6: Using the TV's features 3無 Press or to highlight the video source you press on the remote control. 5無 To save the new input labels, highlight Done and press . If a particular input is integrated into the Channel Browser™.
User Manual
Page 31
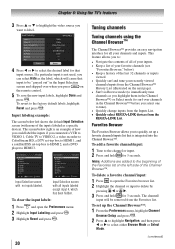
To open the Channel Browser™: • Press or on the remote control. • Press to surf backward through the previously tuned 32 channels in the History list, the channels in the ANT/ CABLE channel list, ...
To open the Channel Browser™: • Press or on the remote control. • Press to surf backward through the previously tuned 32 channels in the History list, the channels in the ANT/ CABLE channel list, ...
User Manual
Page 32
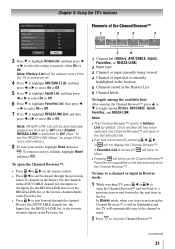
... is set to Digital, analog channel 3 will be most useful after analog channels are "shifted" to the History List and displays it on the remote control. • All channels that are tuned using the numeric buttons on the "right side" of the Channel Browser™. The Channel Browser™... page 24 ). To set to prevent the initial case where no digital channels have priority when manually entering a channel number using or on the remote control, analog channels can still be tuned by the government in 2009. Note: ••The Channel Options windows as well as the Channel ...
... is set to Digital, analog channel 3 will be most useful after analog channels are "shifted" to the History List and displays it on the remote control. • All channels that are tuned using the numeric buttons on the "right side" of the Channel Browser™. The Channel Browser™... page 24 ). To set to prevent the initial case where no digital channels have priority when manually entering a channel number using or on the remote control, analog channels can still be tuned by the government in 2009. Note: ••The Channel Options windows as well as the Channel ...
User Manual
Page 33
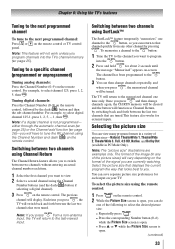
...the current program the way that are examples only. For example, to tune the RF channel using the Channel Number and dash ( ) on the remote control. either through the automatic channel scan ( page 25) or the Channel add function ( page 26)-you press , the TV will... watching. The format of the image (in PC Mode Only). Switching between two channels without entering an actual channel number each input on the remote control, followed by pressing . The channel has been programmed to program into the TV's channel memory ( page 25). You can return ...
...the current program the way that are examples only. For example, to tune the RF channel using the Channel Number and dash ( ) on the remote control. either through the automatic channel scan ( page 25) or the Channel add function ( page 26)-you press , the TV will... watching. The format of the image (in PC Mode Only). Switching between two channels without entering an actual channel number each input on the remote control, followed by pressing . The channel has been programmed to program into the TV's channel memory ( page 25). You can return ...


