Owner's Manual - English
Page 1
... Definition LCD Television HIGH-DEFINITION TELEVISION 26HL67 32HL67 32HL67U 37HL67 42HL67 For an overview of your new TV, see page 9. Record these numbers whenever you communicate with your Toshiba dealer about this TV. For details, please contact your TV antenna ...installer, cable provider, or satellite provider. © 2007 TOSHIBA CORPORATION All Rights Reserved Owner's Record The model number and serial number are on the back of steps for setting up your TV. Note: To display a High Definition picture, the TV...
... Definition LCD Television HIGH-DEFINITION TELEVISION 26HL67 32HL67 32HL67U 37HL67 42HL67 For an overview of your new TV, see page 9. Record these numbers whenever you communicate with your Toshiba dealer about this TV. For details, please contact your TV antenna ...installer, cable provider, or satellite provider. © 2007 TOSHIBA CORPORATION All Rights Reserved Owner's Record The model number and serial number are on the back of steps for setting up your TV. Note: To display a High Definition picture, the TV...
Owner's Manual - English
Page 4
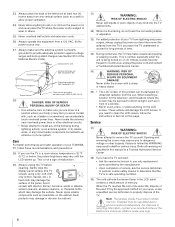
... temperature is 32 ºF (0 ºC) or below, the picture brightness may damage the surface. Gently wipe the display panel surface (the TV screen) using a dry, soft cloth only (cotton, flannel, ...your TOSHIBA TV, follow the instructions in the LCD panel contains a small amount of mercury. These actions will damage the LCD screen. Opening and removing the covers may expose you use the TV in... performance and safer operation of your TV from lightning and power surges, always unplug the power cord and disconnect the antenna from the sun. Service 37) WARNING: RISK OF ELECTRIC SHOCK!...
... temperature is 32 ºF (0 ºC) or below, the picture brightness may damage the surface. Gently wipe the display panel surface (the TV screen) using a dry, soft cloth only (cotton, flannel, ...your TOSHIBA TV, follow the instructions in the LCD panel contains a small amount of mercury. These actions will damage the LCD screen. Opening and removing the covers may expose you use the TV in... performance and safer operation of your TV from lightning and power surges, always unplug the power cord and disconnect the antenna from the sun. Service 37) WARNING: RISK OF ELECTRIC SHOCK!...
Owner's Manual - English
Page 6
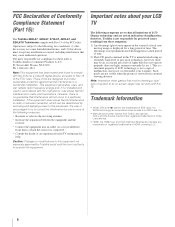
... are not visible when the picture is manufactured using an extremely high level of the FCC rules. FCC Declaration of Conformity Compliance Statement (Part 15): The Toshiba 26HL67, 32HL67, 37HL67, 42HL67, and 32HL67U Televisions ...comply with the instructions, may cause harmful interference to radio communications. Ph: 1-800-631-3811 Note: This equipment has been tested and found to radio or television reception, which the receiver is incorporated under license from SRS Labs, Inc. • Manufactured under your LCD TV...
... are not visible when the picture is manufactured using an extremely high level of the FCC rules. FCC Declaration of Conformity Compliance Statement (Part 15): The Toshiba 26HL67, 32HL67, 37HL67, 42HL67, and 32HL67U Televisions ...comply with the instructions, may cause harmful interference to radio communications. Ph: 1-800-631-3811 Note: This equipment has been tested and found to radio or television reception, which the receiver is incorporated under license from SRS Labs, Inc. • Manufactured under your LCD TV...
Owner's Manual - English
Page 7
... 8 Welcome to Toshiba 8 Features of your new TV 8 Overview of steps for installing, setting up, and using your new TV 9 TV front and side panel controls and connections 10 TV back panel connections 11 Chapter 2: Connecting your TV 12 Overview of... feature 53 Understanding the last mode memory feature 53 Chapter 7: Using the TV's advanced features 54 Using the advanced picture settings features 54 Using dynamic contrast 54 Using the static gamma feature 54 ...Appendix 61 Specifications 61 Limited United States Warranty for LCD Televisions 26" and Larger 62 Limited Canada Warranty for...
... 8 Welcome to Toshiba 8 Features of your new TV 8 Overview of steps for installing, setting up, and using your new TV 9 TV front and side panel controls and connections 10 TV back panel connections 11 Chapter 2: Connecting your TV 12 Overview of... feature 53 Understanding the last mode memory feature 53 Chapter 7: Using the TV's advanced features 54 Using the advanced picture settings features 54 Using dynamic contrast 54 Using the static gamma feature 54 ...Appendix 61 Specifications 61 Limited United States Warranty for LCD Televisions 26" and Larger 62 Limited Canada Warranty for...
Owner's Manual - English
Page 8
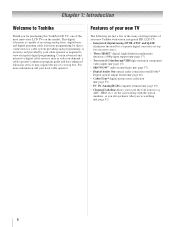
...; Integrated digital tuning (8VSB ATSC and QAM) eliminates the need for purchasing this Toshiba LCD TV, one of a set -top box (in most innovative LCD TVs on the screen along with Dolby® Digital optical output format (- page 46). • CableClear® digital picture noise reduction (- page 55). • PC IN (Analog RGB) computer terminal (- page...
...; Integrated digital tuning (8VSB ATSC and QAM) eliminates the need for purchasing this Toshiba LCD TV, one of a set -top box (in most innovative LCD TVs on the screen along with Dolby® Digital optical output format (- page 46). • CableClear® digital picture noise reduction (- page 55). • PC IN (Analog RGB) computer terminal (- page...
Owner's Manual - English
Page 12
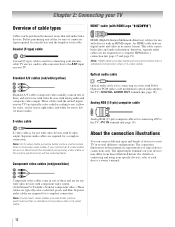
... cable S-video cable Analog RGB (15-pin) computer cable is for use with video devices with an HDMI output. S-video cable is Toshiba's brand of component video.) These cables are for connecting receivers with Dolby Digital or PCM (pulse-code modulation) optical audio input to use...specific devices, refer to disconnect the standard (composite) video cable or the picture performance will be sure of connector types required by your TV in its native format. These cables (and the related inputs on your TV. HDMI™ cable (with analog audio and composite video output. Component ...
... cable S-video cable Analog RGB (15-pin) computer cable is for use with video devices with an HDMI output. S-video cable is Toshiba's brand of component video.) These cables are for connecting receivers with Dolby Digital or PCM (pulse-code modulation) optical audio input to use...specific devices, refer to disconnect the standard (composite) video cable or the picture performance will be sure of connector types required by your TV in its native format. These cables (and the related inputs on your TV. HDMI™ cable (with analog audio and composite video output. Component ...
Owner's Manual - English
Page 13
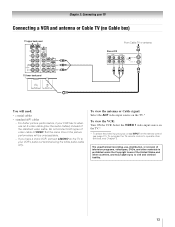
...3. Chapter 2: Connecting your TV Connecting a VCR and antenna or Cable TV (no Cable box) TV upper back panel TV lower back panel From Cable TV or antenna Stereo VCR VIDEO AUDIO L R IN CH 3 CH 4 OUT L R IN from ANT OUT to TV You will be unacceptable. - For better picture performance, if your VCR's ...audio out terminal using the white audio cable only. Do not connect both types of the standard video cable. If you to VIDEO 1 at the same time or the picture performance will need: &#...
...3. Chapter 2: Connecting your TV Connecting a VCR and antenna or Cable TV (no Cable box) TV upper back panel TV lower back panel From Cable TV or antenna Stereo VCR VIDEO AUDIO L R IN CH 3 CH 4 OUT L R IN from ANT OUT to TV You will be unacceptable. - For better picture performance, if your VCR's ...audio out terminal using the white audio cable only. Do not connect both types of the standard video cable. If you to VIDEO 1 at the same time or the picture performance will need: &#...

Owner's Manual - English
Page 14
... VIDEO 1 at the same time or the picture performance will need: • coaxial cables • S-video cable - To view basic and premium Cable channels: Turn OFF the VCR. To view the VCR: Turn ON the VCR. Use the Cable box controls to your TV Connecting a VCR with S-video and a cable... box An S-video connection will provide better picture performance than a standard (composite) video cable. Do not connect both types of video cable to civil and ...
... VIDEO 1 at the same time or the picture performance will need: • coaxial cables • S-video cable - To view basic and premium Cable channels: Turn OFF the VCR. To view the VCR: Turn ON the VCR. Use the Cable box controls to your TV Connecting a VCR with S-video and a cable... box An S-video connection will provide better picture performance than a standard (composite) video cable. Do not connect both types of video cable to civil and ...
Owner's Manual - English
Page 15
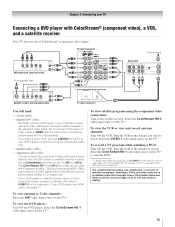
.... - Tune the VCR to the channel to VIDEO 1 at the same time or the picture performance will be used with component video TV lower back panel You will provide the best picture performance (1080p is prohibited under the Copyright Laws of ColorStream® (component video) inputs. The... satellite receiver. Select the ColorStream HD-2 video input source on the TV.* To record a TV program while watching a DVD: Turn ON the VCR. For better picture performance, if your DVD player has HDMI video, see Chapter 3. TV upper back panel From antenna Y PB PR COMPONENT VIDEO S-VIDEO VIDEO...
.... - Tune the VCR to the channel to VIDEO 1 at the same time or the picture performance will be used with component video TV lower back panel You will provide the best picture performance (1080p is prohibited under the Copyright Laws of ColorStream® (component video) inputs. The... satellite receiver. Select the ColorStream HD-2 video input source on the TV.* To record a TV program while watching a DVD: Turn ON the VCR. For better picture performance, if your DVD player has HDMI video, see Chapter 3. TV upper back panel From antenna Y PB PR COMPONENT VIDEO S-VIDEO VIDEO...

Owner's Manual - English
Page 16
For better picture performance, if your TV Connecting a camcorder You will need: • standard A/V cables - page 21). To program the TV remote control to VIDEO 1 on the TV back instead of the VIDEO 2 on the remote control (- Chapter 2: Connecting your camcorder has S-video, connect an S-video cable (plus the audio cables) to operate... other devices, see Chapter 3. 16 Camcorder VIDEO AUDIO OUT L R VIDEO 2 inputs on TV right side panel To view the camcorder video: Select the VIDEO 2 video input source on the...
For better picture performance, if your TV Connecting a camcorder You will need: • standard A/V cables - page 21). To program the TV remote control to VIDEO 1 on the TV back instead of the VIDEO 2 on the remote control (- Chapter 2: Connecting your camcorder has S-video, connect an S-video cable (plus the audio cables) to operate... other devices, see Chapter 3. 16 Camcorder VIDEO AUDIO OUT L R VIDEO 2 inputs on TV right side panel To view the camcorder video: Select the VIDEO 2 video input source on the...
Owner's Manual - English
Page 19
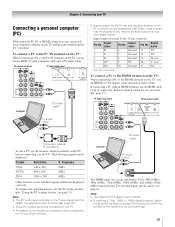
...If connecting a PC with the HDMI-1 analog audio input terminals (- "Using the PC settings feature" on the TV: When connecting a PC to display the entire picture within the borders of the PC on the TV, use the PC setting feature (- page 52). • Some PC models cannot be able to this... TV. • An adapter is not needed for mini D-sub 15-pin connector Pin No. Chapter 2: Connecting your...
...If connecting a PC with the HDMI-1 analog audio input terminals (- "Using the PC settings feature" on the TV: When connecting a PC to display the entire picture within the borders of the PC on the TV, use the PC setting feature (- page 52). • Some PC models cannot be able to this... TV. • An adapter is not needed for mini D-sub 15-pin connector Pin No. Chapter 2: Connecting your...
Owner's Manual - English
Page 21
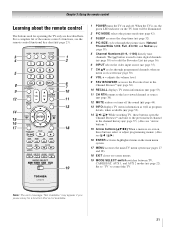
...video input source (- adjusts the volume level. 9 FAV BROWSER accesses the Favorites List in the main menu system. 17 MENU accesses the main TV menu system (- page 37). (Also see "Arrow buttons.") 15 Arrow buttons (BbC c) When a menu is on-screen, these buttons open the Channel Browser™ ...30). 8 VOL + - page 53). 11 CH RTN returns to edit the Favorites List (- page 22). page 23). 1 POWER turns the TV on the TV front will be illuminated. 2 PIC MODE selects the picture mode (- When the TV is used for a function that is on -screen menus. 19 MODE SELECT switch switches between...
...video input source (- adjusts the volume level. 9 FAV BROWSER accesses the Favorites List in the main menu system. 17 MENU accesses the main TV menu system (- page 37). (Also see "Arrow buttons.") 15 Arrow buttons (BbC c) When a menu is on-screen, these buttons open the Channel Browser™ ...30). 8 VOL + - page 53). 11 CH RTN returns to edit the Favorites List (- page 22). page 23). 1 POWER turns the TV on the TV front will be illuminated. 2 PIC MODE selects the picture mode (- When the TV is used for a function that is on -screen menus. 19 MODE SELECT switch switches between...
Owner's Manual - English
Page 22
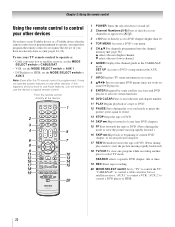
...selects a specific DVD chapter, title or time. 19 REC Starts tape recording. 20 MODE SELECT switch Set to "TV" to control a VCR; To use those features, you have a non-Toshiba device or a Toshiba device that the remote control is programmed, it may not work on some DVD players). 9 ENTER Required by some... playback of current DVD chapter, or locates previous chapters. 17 REW Rewinds/reverses the tape or DVD. (Press during play mode to view the picture moving rapidly forward.) 16 SKIP Z Skips back to beginning of a tape or DVD. 12 PAUSE Press during play or record mode to directly ...
...selects a specific DVD chapter, title or time. 19 REC Starts tape recording. 20 MODE SELECT switch Set to "TV" to control a VCR; To use those features, you have a non-Toshiba device or a Toshiba device that the remote control is programmed, it may not work on some DVD players). 9 ENTER Required by some... playback of current DVD chapter, or locates previous chapters. 17 REW Rewinds/reverses the tape or DVD. (Press during play mode to view the picture moving rapidly forward.) 16 SKIP Z Skips back to beginning of a tape or DVD. 12 PAUSE Press during play or record mode to directly ...

Owner's Manual - English
Page 23
... CLEAR Exit DVD clear* --- EJECT Eject* --- --- REMOTE CONTROL KEY Toshiba TV CABLE SAT (satellite) POWER SLEEP PIC SIZE PIC MODE Power Sleep timer Picture size PIC MODE Power s TV s TV s TV Power s TV s TV s TV 1-9 Digit 1-9 Digit 1-9 Digit 1-9 0 Digit 0 Digit 0 Digit 0 100/-/+10 INPUT - (sub CH) TV/Video select --s TV - (sub CH) s TV FAV BROWSER/ TOP MENU MUTE FAV BROWSER DVD TOP...
... CLEAR Exit DVD clear* --- EJECT Eject* --- --- REMOTE CONTROL KEY Toshiba TV CABLE SAT (satellite) POWER SLEEP PIC SIZE PIC MODE Power Sleep timer Picture size PIC MODE Power s TV s TV s TV Power s TV s TV s TV 1-9 Digit 1-9 Digit 1-9 Digit 1-9 0 Digit 0 Digit 0 Digit 0 100/-/+10 INPUT - (sub CH) TV/Video select --s TV - (sub CH) s TV FAV BROWSER/ TOP MENU MUTE FAV BROWSER DVD TOP...
Owner's Manual - English
Page 27
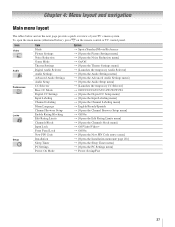
...menu layout The tables below ), press Y on the next page provide a quick overview of your TV's menu system. Icon Video Audio Preferences Locks Setup Item Mode Picture Settings Noise Reduction Game Mode Theater Settings Digital Audio Selector Audio Settings Advanced Audio Settings Audio Setup CC... Block Input Lock Front Panel Lock New PIN Code Installation Sleep Timer PC Settings Power-On Mode Option S Sports/Standard/Movie/Preference S [Opens the Picture Settings menu] S [Opens the Noise Reduction menu] S On/Off S [Opens the Theater Settings menu] S [Launches the temporary Audio Selector] ...
...menu layout The tables below ), press Y on the next page provide a quick overview of your TV's menu system. Icon Video Audio Preferences Locks Setup Item Mode Picture Settings Noise Reduction Game Mode Theater Settings Digital Audio Selector Audio Settings Advanced Audio Settings Audio Setup CC... Block Input Lock Front Panel Lock New PIN Code Installation Sleep Timer PC Settings Power-On Mode Option S Sports/Standard/Movie/Preference S [Opens the Picture Settings menu] S [Opens the Noise Reduction menu] S On/Off S [Opens the Theater Settings menu] S [Launches the temporary Audio Selector] ...
Owner's Manual - English
Page 28
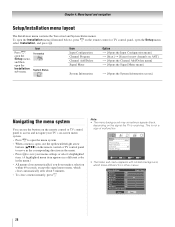
...Sharpness 50 Advanced Picture Settings Reset Mode: Sports On Done 28 Note: • The menu background may sometimes appear black, depending on the remote control or TV control panel, open , use the buttons on the remote control or TV control panel to access and navigate your TV's on-screen ...malfunction. Press Y, open the Setup menu, and then open the Installation menu (illustrated below), press Y on the signal the TV is receiving. Video Mode Picture Settings Noise Reduction Game Mode Theater Settings Sports Off Navigate ENTER Select CH RTN Back EXIT Exit • The Video sub-menu...
...Sharpness 50 Advanced Picture Settings Reset Mode: Sports On Done 28 Note: • The menu background may sometimes appear black, depending on the remote control or TV control panel, open , use the buttons on the remote control or TV control panel to access and navigate your TV's on-screen ...malfunction. Press Y, open the Setup menu, and then open the Installation menu (illustrated below), press Y on the signal the TV is receiving. Video Mode Picture Settings Noise Reduction Game Mode Theater Settings Sports Off Navigate ENTER Select CH RTN Back EXIT Exit • The Video sub-menu...
Owner's Manual - English
Page 39
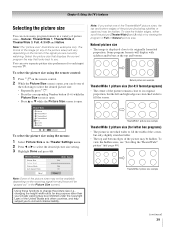
... current program the way that looks best to select the desired picture size setting. 3 Highlight Done and press T. The format of the image (in any purpose other than your TV. A B C D E F G TheaterWide 2 picture size example (continued) 39 Chapter 6: Using the TV's features Selecting the picture size You can view many program formats in a variety of the...
... current program the way that looks best to select the desired picture size setting. 3 Highlight Done and press T. The format of the image (in any purpose other than your TV. A B C D E F G TheaterWide 2 picture size example (continued) 39 Chapter 6: Using the TV's features Selecting the picture size You can view many program formats in a variety of the...

Owner's Manual - English
Page 40
... 3 only) You can set the scroll settings: 1 Press Y and open the Video menu. 2 Highlight Theater Settings and press T. Chapter 6: Using the TV's features TheaterWide 3 picture size (for letter box programs with subtitles) • The picture is supported only for HDMI and ColorStream inputs. • Depending on the input signals, the border of the...
... 3 only) You can set the scroll settings: 1 Press Y and open the Video menu. 2 Highlight Theater Settings and press T. Chapter 6: Using the TV's features TheaterWide 3 picture size (for letter box programs with subtitles) • The picture is supported only for HDMI and ColorStream inputs. • Depending on the input signals, the border of the...
Owner's Manual - English
Page 41
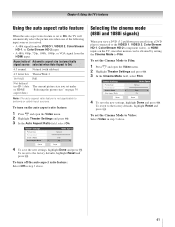
...Cinema Mode Auto Aspect Ratio Mode: Sports Natural -- Selecting the cinema mode (480i and 1080i signals) When you set under "Selecting the picture size" on the TV, smoother motion can be obtained by setting the Cinema Mode to Film. Film On Reset Done 4 To save the new settings, highlight... Using the auto aspect ratio feature When the auto aspect ratio feature is set to On, the TV will automatically select the picture size when one of Automatic aspect size (automatically signal source selected when Auto Aspect is On) 4:3 normal Natural (with sidebars) 4:3 letter box TheaterWide...
...Cinema Mode Auto Aspect Ratio Mode: Sports Natural -- Selecting the cinema mode (480i and 1080i signals) When you set under "Selecting the picture size" on the TV, smoother motion can be obtained by setting the Cinema Mode to Film. Film On Reset Done 4 To save the new settings, highlight... Using the auto aspect ratio feature When the auto aspect ratio feature is set to On, the TV will automatically select the picture size when one of Automatic aspect size (automatically signal source selected when Auto Aspect is On) 4:3 normal Natural (with sidebars) 4:3 letter box TheaterWide...
Owner's Manual - English
Page 42
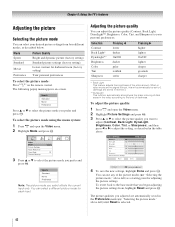
... softer sharper * Back Light This feature adjusts the brightness of the picture modes (- You can use any of the entire screen. "Selecting the picture mode," above left ) as a starting point for adjusting the picture settings. Chapter 6: Using the TV's features Adjusting the picture Selecting the picture mode You can select your personal preferences. To select the...
... softer sharper * Back Light This feature adjusts the brightness of the picture modes (- You can use any of the entire screen. "Selecting the picture mode," above left ) as a starting point for adjusting the picture settings. Chapter 6: Using the TV's features Adjusting the picture Selecting the picture mode You can select your personal preferences. To select the...


