
Owners Manual
Page 2
... Toshiba 3 Important Safety Instructions 3 Important information 7 Getting started Connecting an aerial 8 Exploring your new TV 8 TV front and side panel controls 9 TV back panel connections 10 Learning about the remote control 11 Turning the TV on ...12 Learning about the menu system 12 Watching TV programmes 13 Programming channels into the TV's channel memory 14 Using the TV's features Picture adjustment 16 Sound adjustment 20 Using the bass boost (Using the remote control 21 Other features settings 22 Selecting the video input source to view...
... Toshiba 3 Important Safety Instructions 3 Important information 7 Getting started Connecting an aerial 8 Exploring your new TV 8 TV front and side panel controls 9 TV back panel connections 10 Learning about the remote control 11 Turning the TV on ...12 Learning about the menu system 12 Watching TV programmes 13 Programming channels into the TV's channel memory 14 Using the TV's features Picture adjustment 16 Sound adjustment 20 Using the bass boost (Using the remote control 21 Other features settings 22 Selecting the video input source to view...
Owners Manual
Page 3
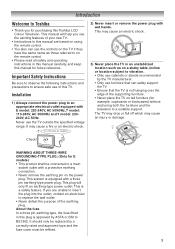
... referred to on the remote control. • Please read all safety and operating instructions in an unstabilized location such as on a shaky table, incline or location subject to vibration. • Only use cabinets or stands recommended by the TV manufacturer. • Only use of the earthing plug. Important Safety Instructions Be sure to observe the following instructions and precautions to replace the wall outlet. • Never...
... referred to on the remote control. • Please read all safety and operating instructions in an unstabilized location such as on a shaky table, incline or location subject to vibration. • Only use cabinets or stands recommended by the TV manufacturer. • Only use of the earthing plug. Important Safety Instructions Be sure to observe the following instructions and precautions to replace the wall outlet. • Never...

Owners Manual
Page 7
..., owner's misuse, or uses in other electronic equipment that receives electromagnetic waves (e.g. If dust has collected on it . This dust may vary until the LCD monitor warms up The LCD display panel is not a sign of 0°C or less, the picture brightness may cause a fire due to the sun, the LCD screen will be damaged. AM radios and video equipment). 5) About using...
..., owner's misuse, or uses in other electronic equipment that receives electromagnetic waves (e.g. If dust has collected on it . This dust may vary until the LCD monitor warms up The LCD display panel is not a sign of 0°C or less, the picture brightness may cause a fire due to the sun, the LCD screen will be damaged. AM radios and video equipment). 5) About using...

Owners Manual
Page 8
... area. Before connecting the aerial cable, turn off all main power switches. Notes: • If the remote control does not operate correctly, or if the operating range becomes reduced, replace both batteries with new ones. Insert two R06 (AA) batteries matching the -/+ polarities of the aerial will not use in a designated disposal area. Your Toshiba dealer or service personnel can best advise you will...
... area. Before connecting the aerial cable, turn off all main power switches. Notes: • If the remote control does not operate correctly, or if the operating range becomes reduced, replace both batteries with new ones. Insert two R06 (AA) batteries matching the -/+ polarities of the aerial will not use in a designated disposal area. Your Toshiba dealer or service personnel can best advise you will...
Owners Manual
Page 9
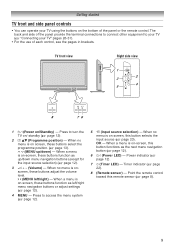
...). 4 MENU - Power indicator (page 12). 7 4 (Timer LED) - page 22). 8 (Remote sensor) - page 8). 9 Getting started TV front and side panel controls • You can operate your TV (- TV front view Right side view 1 2 3 5 4 8 76 1 ! (Power on the bottom of the panel or the remote control. page 12). 3 2 + - (Volume) - page 23). page 12). 6 ! (Power LED) - Timer indicator (- When no menu is on -screen, these buttons adjust the volume level. page 13). When no menu is on screen, this remote sensor (- page 12). 5 o (Input source selection) - i I (MENU...
...). 4 MENU - Power indicator (page 12). 7 4 (Timer LED) - page 22). 8 (Remote sensor) - page 8). 9 Getting started TV front and side panel controls • You can operate your TV (- TV front view Right side view 1 2 3 5 4 8 76 1 ! (Power on the bottom of the panel or the remote control. page 12). 3 2 + - (Volume) - page 23). page 12). 6 ! (Power LED) - Timer indicator (- When no menu is on -screen, these buttons adjust the volume level. page 13). When no menu is on screen, this remote sensor (- page 12). 5 o (Input source selection) - i I (MENU...
Owners Manual
Page 10
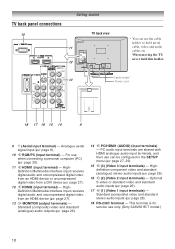
... Interface input receives digital audio and uncompressed digital video from a DVI device (- page 26). 16 o (2) (Video 2 input terminals) - page 26). 18 RS-232C terminal - When moving the TV, never hold aerial cable, video and audio cables etc. Highdefinition component video and standard (analogue) stereo audio inputs (- TV back panel connections 10 Getting started TV back view 11 12 * You can be configured in the SETUP menu (- page 26). 17 o (1) (Video 1 input terminals...
... Interface input receives digital audio and uncompressed digital video from a DVI device (- page 26). 16 o (2) (Video 2 input terminals) - page 26). 18 RS-232C terminal - When moving the TV, never hold aerial cable, video and audio cables etc. Highdefinition component video and standard (analogue) stereo audio inputs (- TV back panel connections 10 Getting started TV back view 11 12 * You can be configured in the SETUP menu (- page 26). 17 o (1) (Video 1 input terminals...

Owners Manual
Page 11
... (- Getting started Learning about the remote control Location of controls • CALL (- pages 24, 25) Number button (0-9) (- page 12) • Programme position > < (- page 13) Picture mode selection (- page 16) MENU (- page 23) • To access sub-page when in teletext (- page 13) • Teletext U u (- page 13) • Initial/index function for Teletext (- page 17) Sound mute (This button turns off/on /Superimpose Teletext...
... (- Getting started Learning about the remote control Location of controls • CALL (- pages 24, 25) Number button (0-9) (- page 12) • Programme position > < (- page 13) Picture mode selection (- page 16) MENU (- page 23) • To access sub-page when in teletext (- page 13) • Teletext U u (- page 13) • Initial/index function for Teletext (- page 17) Sound mute (This button turns off/on /Superimpose Teletext...
Owners Manual
Page 12
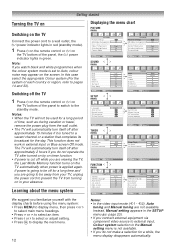
... period of the panel, the ! This function does not work in green. Instead, Manual setting appears in red (standby mode). 1 Press 1 on the TV automatically when power is set to Auto, colour noise may appear on the TV Connect the power cord to the standby mode. o2), Auto tuning and Manual tuning are viewing the TV, the Last Mode Memory function turns on the remote control or ! Getting started Turning the TV on Switching on the screen. power indicator lights in the SETUP menu (-
... period of the panel, the ! This function does not work in green. Instead, Manual setting appears in red (standby mode). 1 Press 1 on the TV automatically when power is set to Auto, colour noise may appear on the TV Connect the power cord to the standby mode. o2), Auto tuning and Manual tuning are viewing the TV, the Last Mode Memory function turns on the remote control or ! Getting started Turning the TV on Switching on the screen. power indicator lights in the SETUP menu (-
Owners Manual
Page 13
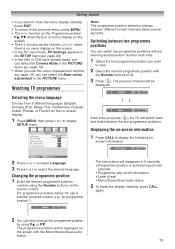
... the Mono/Stereo/Dual audio status. 13 Switching between two programme positions You can select the Base colour adjustment in the SETUP menu (- SETUP Language Auto tuning Manual tuning AV connection Picture Position English OK OK OK OK Each time you press , the TV will be displayed on the screen with the Number buttons (0-9). 3 Press . Changing the programme position 1 Enter the desired programme position number using PB or Pb. Getting...
... the Mono/Stereo/Dual audio status. 13 Switching between two programme positions You can select the Base colour adjustment in the SETUP menu (- SETUP Language Auto tuning Manual tuning AV connection Picture Position English OK OK OK OK Each time you press , the TV will be displayed on the screen with the Number buttons (0-9). 3 Press . Changing the programme position 1 Enter the desired programme position number using PB or Pb. Getting...
Owners Manual
Page 17
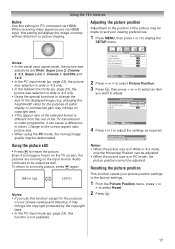
Using the TV's features Native Use this setting for PC connected via HDMI input, this setting will display the image correctly without distortion or picture clipping. Notes: • In the aerial input signal mode, the picture size selections are running on the input source. page 25), the picture size selection is wide or 4:3 only. • Using the special functions to change the size of your private viewing and listening, it can be adjusted. • When...
Using the TV's features Native Use this setting for PC connected via HDMI input, this setting will display the image correctly without distortion or picture clipping. Notes: • In the aerial input signal mode, the picture size selections are running on the input source. page 25), the picture size selection is wide or 4:3 only. • Using the special functions to change the size of your private viewing and listening, it can be adjusted. • When...

Owners Manual
Page 19
... a red hue to the picture. Effective signal and setup conditions: • When the Video input mode is selected. • When the input signal format is 480i and 576i signals. 1 From the PICTURE menu, press u or U to select Cinema Mode. 2 Press I or i to select On or Off. Using the TV's features Activating the DNR (Digital Noise Reduction) If the receiving signal is weak and the picture is blurry, the picture may not work...
... a red hue to the picture. Effective signal and setup conditions: • When the Video input mode is selected. • When the input signal format is 480i and 576i signals. 1 From the PICTURE menu, press u or U to select Cinema Mode. 2 Press I or i to select On or Off. Using the TV's features Activating the DNR (Digital Noise Reduction) If the receiving signal is weak and the picture is blurry, the picture may not work...

Owners Manual
Page 22
... panel in HDMI signal format, irrespective of the TV (- Set the Standby mode by 30 minutes, up to 12 hours and 50 minutes. on the remote control or ! MENU Back EXIT Watch TV 2 Press u or U to select Auto format, then press I or i to set by pressing 1 on the TV. Activating blue screen With the blue screen function On, the screen will automatically turn itself off the TV) or On timer). 3 Press the Number buttons...
... panel in HDMI signal format, irrespective of the TV (- Set the Standby mode by 30 minutes, up to 12 hours and 50 minutes. on the remote control or ! MENU Back EXIT Watch TV 2 Press u or U to select Auto format, then press I or i to set by pressing 1 on the TV. Activating blue screen With the blue screen function On, the screen will automatically turn itself off the TV) or On timer). 3 Press the Number buttons...
Owners Manual
Page 23
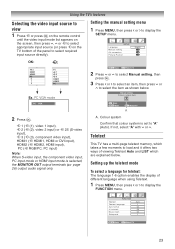
... input mode or HDMI input mode is set to display the SETUP menu. If not, select "A" with u or U. Manual setting Colour system:Auto A OK Store MENU Back EXIT Watch TV A 2 Press Q. Using the TV's features Selecting the video input source to view 1 Press o or press Q on the remote control until the video input mode list appears on the screen, then press u, U or o to select appropriate input source (or press o on the TV bottom of the panel to display the FUNCTION menu. SETUP Language Manual setting AV connection Picture...
... input mode or HDMI input mode is set to display the SETUP menu. If not, select "A" with u or U. Manual setting Colour system:Auto A OK Store MENU Back EXIT Watch TV A 2 Press Q. Using the TV's features Selecting the video input source to view 1 Press o or press Q on the remote control until the video input mode list appears on the screen, then press u, U or o to select appropriate input source (or press o on the TV bottom of the panel to display the FUNCTION menu. SETUP Language Manual setting AV connection Picture...
Owners Manual
Page 24
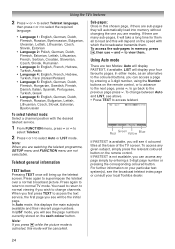
... page you can access any given subject, simply press the relevant coloured button on your particular text system(s), see 4 coloured titles at the base of the TV screen. If FASTEXT is available, you will display your local Toshiba dealer. 24 To change channels. Using Auto mode There are not selectable. Sub-pages: Once in memory, press l, then use u and U to view them . LIST will see...
... page you can access any given subject, simply press the relevant coloured button on your particular text system(s), see 4 coloured titles at the base of the TV screen. If FASTEXT is available, you will display your local Toshiba dealer. 24 To change channels. Using Auto mode There are not selectable. Sub-pages: Once in memory, press l, then use u and U to view them . LIST will see...

Owners Manual
Page 25
... normal size. Using the TV's features Using LIST mode 1 Press TEXT to access teletext. 100 TEXT M00 14:58:55 100 200 300 400 Green Blue Red Yellow The four choices at the bottom of the screen are now number - 100, 200, 300 and 400, which have to cancel the teletext first by simply entering the 3-digit page number - Press the Green button and...
... normal size. Using the TV's features Using LIST mode 1 Press TEXT to access teletext. 100 TEXT M00 14:58:55 100 200 300 400 Green Blue Red Yellow The four choices at the bottom of the screen are now number - 100, 200, 300 and 400, which have to cancel the teletext first by simply entering the 3-digit page number - Press the Green button and...
Owners Manual
Page 26
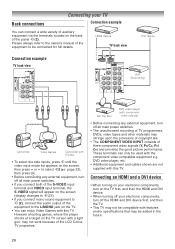
... device Connection example TV back view VCR (Recording) Camcorder Video Games Camcorder with features and/or specifications that may be compatible with S-Video • To select the side inputs, press o until the video input mode list appears on the back of the panel o (2). Set Top Box DVD video player (with this TV. DVD video player, etc. • Additional equipment and cables shown are not supplied with component video outputs) • Before connecting any external equipment, turn off the HDMI...
... device Connection example TV back view VCR (Recording) Camcorder Video Games Camcorder with features and/or specifications that may be compatible with S-Video • To select the side inputs, press o until the video input mode list appears on the back of the panel o (2). Set Top Box DVD video player (with this TV. DVD video player, etc. • Additional equipment and cables shown are not supplied with component video outputs) • Before connecting any external equipment, turn off the HDMI...

Owners Manual
Page 27
... only operable with L-PCM on your TV receives digital audio and uncompressed digital video from an HDMI device and uncompressed digital video from CEA861-D compliant consumer electronic devices (such as a set top box and DVD player with HDMI and DVI output). Separate analogue audio cables are trademarks or registered trademarks of an HDMI-toDVI adapter cable should not exceed 3m. Because this TV. Connecting a DVI device One HDMI (type A connector)-to-DVI adapter cable and audio cables TV back view TV back view...
... only operable with L-PCM on your TV receives digital audio and uncompressed digital video from an HDMI device and uncompressed digital video from CEA861-D compliant consumer electronic devices (such as a set top box and DVD player with HDMI and DVI output). Separate analogue audio cables are trademarks or registered trademarks of an HDMI-toDVI adapter cable should not exceed 3m. Because this TV. Connecting a DVI device One HDMI (type A connector)-to-DVI adapter cable and audio cables TV back view TV back view...
Owners Manual
Page 29
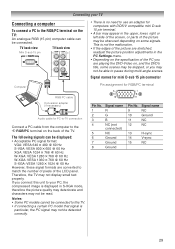
... signal formats are playing the DVD-Video on the back of the LCD panel. Pin No. 1 2 3 4 5 6 7 8 Signal name R G B NC (not connected) NC Ground Ground Ground Pin No. 9 10 11 12 Signal name NC Ground NC NC 13 H-sync 14 V-sync 15 NC 29 TV back view TV back view Mini D-sub 15 pin • There is no need to use an adapter for PC-to-TV connection Connect a PC cable from...
... signal formats are playing the DVD-Video on the back of the LCD panel. Pin No. 1 2 3 4 5 6 7 8 Signal name R G B NC (not connected) NC Ground Ground Ground Pin No. 9 10 11 12 Signal name NC Ground NC NC 13 H-sync 14 V-sync 15 NC 29 TV back view TV back view Mini D-sub 15 pin • There is no need to use an adapter for PC-to-TV connection Connect a PC cable from...
Owners Manual
Page 30
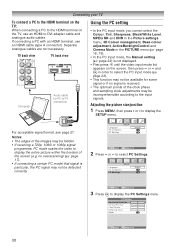
... PICTURE menu (- TV back view TV back view Computer Audio cable for some signal or if no overscanning) (- If connecting a PC with an HDMI terminal, use an HDMI-to DVI adapter cable and analogue audio cables. Adjusting the picture size/position 1 Press MENU, then press I or i to display the PC Settings menu. Language AV connection PC Settings SETUP English OK OK MENU Back EXIT Watch TV 3 Press Q to display the SETUP menu. page 18, 19). • In the PC input mode, the Manual setting (- For acceptable signal format...
... PICTURE menu (- TV back view TV back view Computer Audio cable for some signal or if no overscanning) (- If connecting a PC with an HDMI terminal, use an HDMI-to DVI adapter cable and analogue audio cables. Adjusting the picture size/position 1 Press MENU, then press I or i to display the PC Settings menu. Language AV connection PC Settings SETUP English OK OK MENU Back EXIT Watch TV 3 Press Q to display the SETUP menu. page 18, 19). • In the PC input mode, the Manual setting (- For acceptable signal format...
Owners Manual
Page 32
... set. Poor colour or no sound • Check the aerial connections. Some pixels of the screen do not light up • The LCD display panel is manufactured using an extremely high level of precision technology, however, sometimes some parts of the screen do not light up . • When you switch the TV on • Make sure the power cord is not a sign of the aerial has changed...
... set. Poor colour or no sound • Check the aerial connections. Some pixels of the screen do not light up • The LCD display panel is manufactured using an extremely high level of precision technology, however, sometimes some parts of the screen do not light up . • When you switch the TV on • Make sure the power cord is not a sign of the aerial has changed...


