
User's Guide for L1350U and L2300U Series TV's
Page 2
... intended to alert the user to wall mount this television. The use the many exciting features of your LED TV on the included Pedestal Stand:" on page 6 NOTE TO CATV INSTALLERS This is appropriate for the size and weight of this television, always use a mounting bracket that may be connected to the grounding system of the building, as close to the point of cable entry as UL...
... intended to alert the user to wall mount this television. The use the many exciting features of your LED TV on the included Pedestal Stand:" on page 6 NOTE TO CATV INSTALLERS This is appropriate for the size and weight of this television, always use a mounting bracket that may be connected to the grounding system of the building, as close to the point of cable entry as UL...
User's Guide for L1350U and L2300U Series TV's
Page 4
... manufacturer. 12) Use only with the cart, stand, tripod, bracket, or table specified by broken glass, rinse the affected area thoroughly with water and contact your body to the TV. The LCD panel inside a wall or similar enclosed area. 22) Never modify this equipment. Installation, Care, and Service Installation Follow these instructions. 3) Heed all warnings. 4) Follow all instructions. 5) Do not use this apparatus...
... manufacturer. 12) Use only with the cart, stand, tripod, bracket, or table specified by broken glass, rinse the affected area thoroughly with water and contact your body to the TV. The LCD panel inside a wall or similar enclosed area. 22) Never modify this equipment. Installation, Care, and Service Installation Follow these instructions. 3) Heed all warnings. 4) Follow all instructions. 5) Do not use this apparatus...
User's Guide for L1350U and L2300U Series TV's
Page 6
... any cables and/or other component connectors from the back cover to attach the wall mount bracket to service the TV yourself. To Display your TV from lightning and power surges, always unplug the power cord and disconnect the antenna from mains power. Gently wipe the display panel surface (the TV screen) using a Wall Bracket: If you need to clean the LCD screen, follow the pedestal assembly instructions included with your LED TV, always use...
... any cables and/or other component connectors from the back cover to attach the wall mount bracket to service the TV yourself. To Display your TV from lightning and power surges, always unplug the power cord and disconnect the antenna from mains power. Gently wipe the display panel surface (the TV screen) using a Wall Bracket: If you need to clean the LCD screen, follow the pedestal assembly instructions included with your LED TV, always use...

User's Guide for L1350U and L2300U Series TV's
Page 8
... not installed and used in a particular installation. However, there is operating at an on-screen target may not work with the limits for compliance to these symptoms. 1) An afterimage (ghost) may appear on a circuit different from a normal viewing distance. ENERGY STAR® User Information ENERGY STAR User Information Statement: the factory default settings of joystick at optimal energy efficiency, select [Home] mode during...
... not installed and used in a particular installation. However, there is operating at an on-screen target may not work with the limits for compliance to these symptoms. 1) An afterimage (ghost) may appear on a circuit different from a normal viewing distance. ENERGY STAR® User Information ENERGY STAR User Information Statement: the factory default settings of joystick at optimal energy efficiency, select [Home] mode during...

User's Guide for L1350U and L2300U Series TV's
Page 11
... the remote control 38 Chapter 4: Menu Layout and Navigation 41 Main menu layout 41 Navigating the menu system 43 Chapter 5: Setting up your TV 44 Initial Setup 44 Installation setup selection 45 Storing channels in memory (optional 46 Auto Tuning 46 Manual Tuning 48 Setting channel skip 48 Setting the AV input mode 49 Setting the HDMITM audio mode 50 Setting the time zone 51 Viewing the system status 51 Resetting Factory Defaults 51 Chapter 6: Setting up...
... the remote control 38 Chapter 4: Menu Layout and Navigation 41 Main menu layout 41 Navigating the menu system 43 Chapter 5: Setting up your TV 44 Initial Setup 44 Installation setup selection 45 Storing channels in memory (optional 46 Auto Tuning 46 Manual Tuning 48 Setting channel skip 48 Setting the AV input mode 49 Setting the HDMITM audio mode 50 Setting the time zone 51 Viewing the system status 51 Resetting Factory Defaults 51 Chapter 6: Setting up...
User's Guide for L1350U and L2300U Series TV's
Page 12
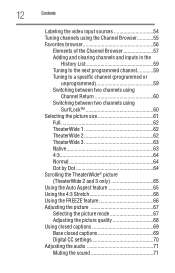
12 Contents Labeling the video input sources 54 Tuning channels using the Channel Browser............55 Favorites browser 56 Elements of the Channel Browser 57 Adding and clearing channels and inputs in the History List 59 Tuning to the next programmed channel............59 Tuning to a specific channel (programmed or unprogrammed 59 Switching between two channels using Channel Return 60 Switching between two channels using SurfLock 60 Selecting the picture size 61 Full 62 TheaterWide 1 62 TheaterWide...
12 Contents Labeling the video input sources 54 Tuning channels using the Channel Browser............55 Favorites browser 56 Elements of the Channel Browser 57 Adding and clearing channels and inputs in the History List 59 Tuning to the next programmed channel............59 Tuning to a specific channel (programmed or unprogrammed 59 Switching between two channels using Channel Return 60 Switching between two channels using SurfLock 60 Selecting the picture size 61 Full 62 TheaterWide 1 62 TheaterWide...
User's Guide for L1350U and L2300U Series TV's
Page 15
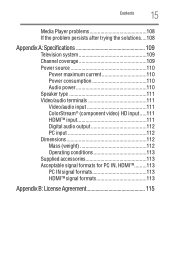
... Media Player problems 108 If the problem persists after trying the solutions....108 Appendix A: Specifications 109 Television system 109 Channel coverage 109 Power source 110 Power maximum current 110 Power consumption 110 Audio power 110 Speaker type 111 Video/audio terminals 111 Video/audio input 111 ColorStream® (component video) HD input.....111 HDMITM input 111 Digital audio output 112 PC input 112 Dimensions 112 Mass (weight 112 Operating conditions 113 Supplied accessories 113 Acceptable signal formats for PC IN, HDMITM.........113 PC IN signal formats...
... Media Player problems 108 If the problem persists after trying the solutions....108 Appendix A: Specifications 109 Television system 109 Channel coverage 109 Power source 110 Power maximum current 110 Power consumption 110 Audio power 110 Speaker type 111 Video/audio terminals 111 Video/audio input 111 ColorStream® (component video) HD input.....111 HDMITM input 111 Digital audio output 112 PC input 112 Dimensions 112 Mass (weight 112 Operating conditions 113 Supplied accessories 113 Acceptable signal formats for PC IN, HDMITM.........113 PC IN signal formats...
User's Guide for L1350U and L2300U Series TV's
Page 17
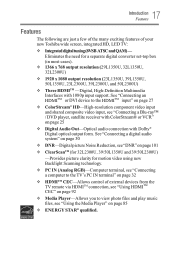
... control of your new Toshiba wide screen, integrated HD, LED TV: v Integrated digital tuning (8VSB ATSC and QAM) - See "Connecting a digital audio system" on page 30 v DNR-Digital picture Noise Reduction, see "Using the Media Player" on page 25 v Digital Audio Out-Optical audio connection with 1080p input support. 17 Introduction Features Features The following are just a few of the many exciting features of external devices from the TV remote via HDMITM connection...
... control of your new Toshiba wide screen, integrated HD, LED TV: v Integrated digital tuning (8VSB ATSC and QAM) - See "Connecting a digital audio system" on page 30 v DNR-Digital picture Noise Reduction, see "Using the Media Player" on page 25 v Digital Audio Out-Optical audio connection with 1080p input support. 17 Introduction Features Features The following are just a few of the many exciting features of external devices from the TV remote via HDMITM connection...
User's Guide for L1350U and L2300U Series TV's
Page 18
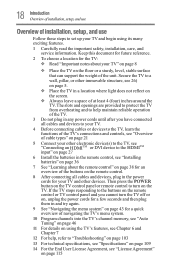
... TV control panel and you cannot turn on page 115 Then press the POWER button on the TV control panel or remote control to a wall, pillar, or other immovable structure, see 26) on page 21 5 Connect your other devices. 18 Introduction Overview of installation, setup, and use Follow these steps to the HDDMMIITTMM input" on page 27 6 Install the batteries in the remote control, see "Installing batteries" on the screen.
... TV control panel and you cannot turn on page 115 Then press the POWER button on the TV control panel or remote control to a wall, pillar, or other immovable structure, see 26) on page 21 5 Connect your other devices. 18 Introduction Overview of installation, setup, and use Follow these steps to the HDDMMIITTMM input" on page 27 6 Install the batteries in the remote control, see "Installing batteries" on the screen.
User's Guide for L1350U and L2300U Series TV's
Page 19
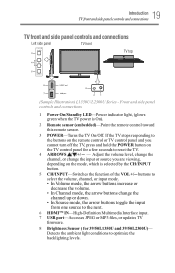
... input. 7 USB port-Accesses JPEG or MP3 files, or updates TV firmware. 8 Brightness Sensor ( for a few seconds to reset the TV. 4 ARROWS Adjust the volume level, change the channel, or change the input or source you cannot turn off the TV, press and hold the POWER button on the mode, which is On). 2 Remote sensor (embedded)-Point the remote control toward this remote sensor. 3 POWER-Turns the TV On/Off. 19 Introduction TV front and side panel controls and connections...
... input. 7 USB port-Accesses JPEG or MP3 files, or updates TV firmware. 8 Brightness Sensor ( for a few seconds to reset the TV. 4 ARROWS Adjust the volume level, change the channel, or change the input or source you cannot turn off the TV, press and hold the POWER button on the mode, which is On). 2 Remote sensor (embedded)-Point the remote control toward this remote sensor. 3 POWER-Turns the TV On/Off. 19 Introduction TV front and side panel controls and connections...
User's Guide for L1350U and L2300U Series TV's
Page 20
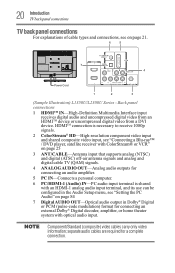
... video input, see "Connecting a Blu-ray™ / DVD player, satellite receiver with ColorStream® or VCR" on page 25 3 ANT/CABLE-Antenna input that supports analog (NTSC) and digital (ATSC) off-air antenna signals and analog and digital cable TV (QAM) signals. 4 ANALOG AUDIO OUT-Analog audio outputs for connecting an audio amplifier. 5 PC IN-Connects a personal computer. 6 PC/HDMI-1 (Audio) IN-PC audio input terminal is shared with optical audio input. 20 Introduction TV back panel connections TV back panel connections For explanations of cable types and connections, see "Setting...
... video input, see "Connecting a Blu-ray™ / DVD player, satellite receiver with ColorStream® or VCR" on page 25 3 ANT/CABLE-Antenna input that supports analog (NTSC) and digital (ATSC) off-air antenna signals and analog and digital cable TV (QAM) signals. 4 ANALOG AUDIO OUT-Analog audio outputs for connecting an audio amplifier. 5 PC IN-Connects a personal computer. 6 PC/HDMI-1 (Audio) IN-PC audio input terminal is shared with optical audio input. 20 Introduction TV back panel connections TV back panel connections For explanations of cable types and connections, see "Setting...
User's Guide for L1350U and L2300U Series TV's
Page 24
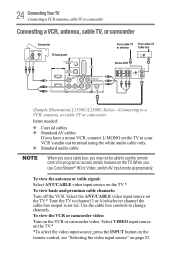
... video input source, press the INPUT button on the remote control, see "Selecting the video input source" on the TV.* Tune the TV to channel 3 or 4 (whichever channel the cable box output is set to). When you have a mono VCR, connect L/MONO on the TV to your VCR's audio out terminal using the white audio cable only. To view the antenna or cable signal: Select ANT/CABLE video input source on the VCR or camcorder video. Use the cable box controls to change channels. 24 ConnectingYourTV Connecting a VCR, antenna, cable...
... video input source, press the INPUT button on the remote control, see "Selecting the video input source" on the TV.* Tune the TV to channel 3 or 4 (whichever channel the cable box output is set to). When you have a mono VCR, connect L/MONO on the TV to your VCR's audio out terminal using the white audio cable only. To view the antenna or cable signal: Select ANT/CABLE video input source on the VCR or camcorder video. Use the cable box controls to change channels. 24 ConnectingYourTV Connecting a VCR, antenna, cable...
User's Guide for L1350U and L2300U Series TV's
Page 25
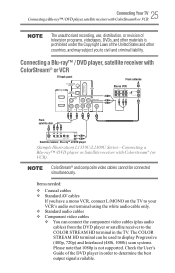
...; / DVD player, satellite receiver with ColorStream® or VCR TV back panel From antenna Stereo VCR VIDEO AUDIO L R IN CH 3 CH 4 OUT L R IN from the DVD player or satellite receiver to the COLOR STREAM HD terminal in order to civil and criminal liability. Items needed: v Coaxial cables v Standard AV cables If you to determine the best output signal available. Check the User's Guide of the DVD player in the TV. v Standard audio cables v Component video cables...
...; / DVD player, satellite receiver with ColorStream® or VCR TV back panel From antenna Stereo VCR VIDEO AUDIO L R IN CH 3 CH 4 OUT L R IN from the DVD player or satellite receiver to the COLOR STREAM HD terminal in order to civil and criminal liability. Items needed: v Coaxial cables v Standard AV cables If you to determine the best output signal available. Check the User's Guide of the DVD player in the TV. v Standard audio cables v Component video cables...
User's Guide for L1350U and L2300U Series TV's
Page 39
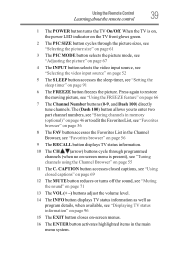
... CH / (arrow) buttons cycle through programmed channels (when no on-screen menu is on, the power LED indicator on the TV front glows green. 2 The PIC SIZE button cycles through the picture sizes, see "Selecting the picture size" on page 61 3 The PIC MODE button selects the picture mode, see "Adjusting the picture" on page 67 4 The INPUT button selects the video input source, see "Selecting the video input source" on page 52 5 The SLEEP button accesses the sleep timer, see "Displaying TV status...
... CH / (arrow) buttons cycle through programmed channels (when no on-screen menu is on, the power LED indicator on the TV front glows green. 2 The PIC SIZE button cycles through the picture sizes, see "Selecting the picture size" on page 61 3 The PIC MODE button selects the picture mode, see "Adjusting the picture" on page 67 4 The INPUT button selects the video input source, see "Selecting the video input source" on page 52 5 The SLEEP button accesses the sleep timer, see "Displaying TV status...
User's Guide for L1350U and L2300U Series TV's
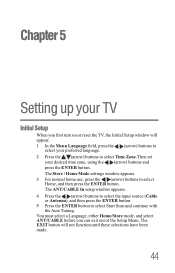
Page 44
... Setup Menu. Chapter 5 Setting up your desired time zone, using the / (arrow) buttons and press the ENTER button. The Store / Home Mode settings window appears. 3 For normal home use, press the / (arrow) buttons to select Start Scan and continue with the Auto Tuning. The ANT/CABLE In setup window appears. 4 Press the / (arrow) buttons to select the input source (Cable or Antenna), and then press the ENTER button. 5 Press the ENTER button...
... Setup Menu. Chapter 5 Setting up your desired time zone, using the / (arrow) buttons and press the ENTER button. The Store / Home Mode settings window appears. 3 For normal home use, press the / (arrow) buttons to select Start Scan and continue with the Auto Tuning. The ANT/CABLE In setup window appears. 4 Press the / (arrow) buttons to select the input source (Cable or Antenna), and then press the ENTER button. 5 Press the ENTER button...
User's Guide for L1350U and L2300U Series TV's
Page 59
... button. Tuning digital channels: Press the Channel Number (0-9) on the remote control. For example, to the next programmed channel, press the / (arrow) buttons on the remote control. see "Storing channels in memory (optional)" on page 46 Tuning to a specific channel (programmed or unprogrammed) To tune analog channels: Press the Channel Number (0-9) on the remote control or TV control panel. Clearing channels from the History List: v Reconfiguring the ANT/CABLE input will automatically tune to the previously viewed channel or input. v All channels...
... button. Tuning digital channels: Press the Channel Number (0-9) on the remote control. For example, to the next programmed channel, press the / (arrow) buttons on the remote control. see "Storing channels in memory (optional)" on page 46 Tuning to a specific channel (programmed or unprogrammed) To tune analog channels: Press the Channel Number (0-9) on the remote control or TV control panel. Clearing channels from the History List: v Reconfiguring the ANT/CABLE input will automatically tune to the previously viewed channel or input. v All channels...
User's Guide for L1350U and L2300U Series TV's
Page 103
... the TV fails to troubleshoot any problem, first unplug the TV from the AC wall outlet, wait approximately one of the Text modes (T1, T2, T3, or T4). The closed captions" on -screen. Set the closed caption feature to Off, see "Using closed caption feature is set to reset the TV. If the TV stops responding to the buttons on the remote control or TV control panel and you begin...
... the TV fails to troubleshoot any problem, first unplug the TV from the AC wall outlet, wait approximately one of the Text modes (T1, T2, T3, or T4). The closed captions" on -screen. Set the closed caption feature to Off, see "Using closed caption feature is set to reset the TV. If the TV stops responding to the buttons on the remote control or TV control panel and you begin...
User's Guide for L1350U and L2300U Series TV's
Page 104
... applicable). 104 Troubleshooting Picture problems Other problems. If your TV's problem is not addressed in this Troubleshooting section or the recommended solution has not worked, use the Reset Factory Defaults procedure, see "Using the advanced picture settings" on page 98 Cannot view external signals or channel 3 or 4. Ensure the power cord is displaying a Demo pop-up screen, reset the setting to OFF. see "Resetting Factory Defaults" on page 51 Onscreen Demo Pop-up If your TV is plugged in properly...
... applicable). 104 Troubleshooting Picture problems Other problems. If your TV's problem is not addressed in this Troubleshooting section or the recommended solution has not worked, use the Reset Factory Defaults procedure, see "Using the advanced picture settings" on page 98 Cannot view external signals or channel 3 or 4. Ensure the power cord is displaying a Demo pop-up screen, reset the setting to OFF. see "Resetting Factory Defaults" on page 51 Onscreen Demo Pop-up If your TV is plugged in properly...
Resource Guide for L1350U Series TV's
Page 1
... To prevent injury, this Toshiba LED TV. recommendations and precautions: 35) If you decide to direct sunlight, such as indicated below . by the display manufacturer and/or listed by an independent laboratory (such as power-supply cord or plug is turned off using a Wall Bracket: If you use a wall bracket Listed by an independent laboratory (such as the weight of important operating and maintenance (servicing) instructions in accordance with steel...
... To prevent injury, this Toshiba LED TV. recommendations and precautions: 35) If you decide to direct sunlight, such as indicated below . by the display manufacturer and/or listed by an independent laboratory (such as power-supply cord or plug is turned off using a Wall Bracket: If you use a wall bracket Listed by an independent laboratory (such as the weight of important operating and maintenance (servicing) instructions in accordance with steel...
Resource Guide for L1350U Series TV's
Page 2
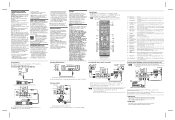
...'s Guide. Composite and component video cannot not be changed in the User's Guide. From satellite dish Y PB PR Satellite IN COMPONENT VIDEO S-VIDEO VIDEO OUT OUT AUDIO OUT L R Satellite receiver, Blu-rayTM or DVD player (Sample Illustration) Connecting a Blu-ray™/DVD player, satellite receiver with ColorStream® or VCR For more information, see the "Muting the sound" section in order to TV Item: Description: 1 POWER button 2 PIC SIZE button 3 PIC MODE button 4 INPUT button 5 SLEEP button 6 FREEZE button 7 Channel Number buttons (0-9) 8 FAV button 9 RECALL button...
...'s Guide. Composite and component video cannot not be changed in the User's Guide. From satellite dish Y PB PR Satellite IN COMPONENT VIDEO S-VIDEO VIDEO OUT OUT AUDIO OUT L R Satellite receiver, Blu-rayTM or DVD player (Sample Illustration) Connecting a Blu-ray™/DVD player, satellite receiver with ColorStream® or VCR For more information, see the "Muting the sound" section in order to TV Item: Description: 1 POWER button 2 PIC SIZE button 3 PIC MODE button 4 INPUT button 5 SLEEP button 6 FREEZE button 7 Channel Number buttons (0-9) 8 FAV button 9 RECALL button...


