
Brochure
Page 1
... new Dynamic Picture Mode creates the right amount of connections, this feature. Easily connect to standard-def with Toshiba quality and reliability, and designed to monitor brightness and automatically adjusts backlight intensity. Easily connect your PC to your entertainment options. Versatile Connectivity Offering a full ...the value Bring home the affordable C120U LCD HDTV, built with this TV makes it easy to plug in smallscreen viewing. 32C120U LCD HDTV Outstanding picture. For clear, well-balanced sound. Gaming-Optimized Performance It comes with the best in to light up...
... new Dynamic Picture Mode creates the right amount of connections, this feature. Easily connect to standard-def with Toshiba quality and reliability, and designed to monitor brightness and automatically adjusts backlight intensity. Easily connect your PC to your entertainment options. Versatile Connectivity Offering a full ...the value Bring home the affordable C120U LCD HDTV, built with this TV makes it easy to plug in smallscreen viewing. 32C120U LCD HDTV Outstanding picture. For clear, well-balanced sound. Gaming-Optimized Performance It comes with the best in to light up...
User Guide
Page 4
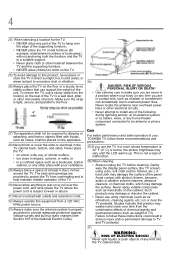
... agents, etc.) on or near overhead power lines or other immovable structure. Failure to follow these instructions could result in a position where your TOSHIBA TV, follow these recommendations and precautions: 35) If you are provided to protect the TV from overheating and to help maintain reliable operation of the...and crack over the power cord, and never place the TV where the power cord is 32° F (0° C) or below, the picture brightness may vary until the LCD warms up static charges (see Section 810 of the unit. hot, humid areas; Never locate the antenna near the TV...
... agents, etc.) on or near overhead power lines or other immovable structure. Failure to follow these instructions could result in a position where your TOSHIBA TV, follow these recommendations and precautions: 35) If you are provided to protect the TV from overheating and to help maintain reliable operation of the...and crack over the power cord, and never place the TV where the power cord is 32° F (0° C) or below, the picture brightness may vary until the LCD warms up static charges (see Section 810 of the unit. hot, humid areas; Never locate the antenna near the TV...

User Guide
Page 12
... 96 Viewing photo files and playing music files at the same time 98 Sorting photo or music files 98 Setting the sleep timer 99 Auto Brightness Sensor 99
... 96 Viewing photo files and playing music files at the same time 98 Sorting photo or music files 98 Setting the sleep timer 99 Auto Brightness Sensor 99
User Guide
Page 18
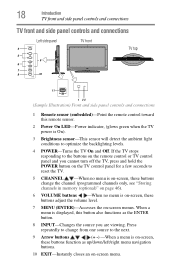
... closes an on -screen menus. When a menu is displayed, this remote sensor. 2 Power On LED-Power indicator, (glows green when the TV power is On). 3 Brightness sensor-This sensor will detect the ambient light conditions to the next. 9 Arrow buttons (+ -) -When a menu is on-screen, these buttons adjust the volume level...
... closes an on -screen menus. When a menu is displayed, this remote sensor. 2 Power On LED-Power indicator, (glows green when the TV power is On). 3 Brightness sensor-This sensor will detect the ambient light conditions to the next. 9 Arrow buttons (+ -) -When a menu is on-screen, these buttons adjust the volume level...
User Guide
Page 71
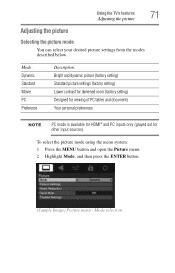
... the picture Selecting the picture mode You can select your desired picture settings from the modes described below. Mode: Dynamic Standard Movie PC Preference Description: Bright and dynamic picture (factory setting) Standard picture settings (factory setting) Lower contrast for darkened room (factory setting) Designed for viewing of PC tables and documents...
... the picture Selecting the picture mode You can select your desired picture settings from the modes described below. Mode: Dynamic Standard Movie PC Preference Description: Bright and dynamic picture (factory setting) Standard picture settings (factory setting) Lower contrast for darkened room (factory setting) Designed for viewing of PC tables and documents...
User Guide
Page 72
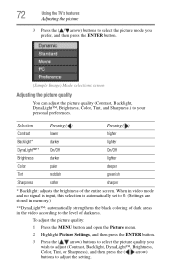
...the TV's features Adjusting the picture 3 Press the ( / arrow) buttons to select the picture mode you wish to adjust (Contrast, Backlight, DynaLight™, Brightness, Color, Tint, or Sharpness), and then press the ( / arrow) buttons to adjust the setting. Selection Pressing ( ) Pressing ( ) Contrast lower ...ENTER button. (Sample Image) Mode selections screen Adjusting the picture quality You can adjust the picture quality (Contrast, Backlight, DynaLight™, Brightness, Color, Tint, and Sharpness.) to the level of the entire screen. When in video mode and no signal is input, this...
...the TV's features Adjusting the picture 3 Press the ( / arrow) buttons to select the picture mode you wish to adjust (Contrast, Backlight, DynaLight™, Brightness, Color, Tint, or Sharpness), and then press the ( / arrow) buttons to adjust the setting. Selection Pressing ( ) Pressing ( ) Contrast lower ...ENTER button. (Sample Image) Mode selections screen Adjusting the picture quality You can adjust the picture quality (Contrast, Backlight, DynaLight™, Brightness, Color, Tint, and Sharpness.) to the level of the entire screen. When in video mode and no signal is input, this...
User Guide
Page 99
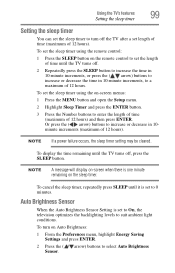
... 12 hours. Using the TV's features 99 Setting the sleep timer Setting the sleep timer You can set the sleep timer to turn on Auto Brightness: 1 From the Preferences menu, highlight Energy Saving Settings and press ENTER. 2 Press the ( / arrow) buttons to select Auto... Brightness Sensor. NOTE If a power failure occurs, the sleep timer setting may be cleared. To cancel the sleep timer, repeatedly press SLEEP until the TV turns ...
... 12 hours. Using the TV's features 99 Setting the sleep timer Setting the sleep timer You can set the sleep timer to turn on Auto Brightness: 1 From the Preferences menu, highlight Energy Saving Settings and press ENTER. 2 Press the ( / arrow) buttons to select Auto... Brightness Sensor. NOTE If a power failure occurs, the sleep timer setting may be cleared. To cancel the sleep timer, repeatedly press SLEEP until the TV turns ...
User Guide
Page 127
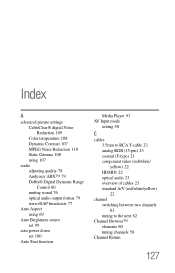
...; 79 Dolby® Digital Dynamic Range Control 80 muting sound 76 optical audio output format 79 stereo/SAP broadcasts 77 Auto Aspect using 69 Auto Brightness sensor set 99 auto power down set 100 Auto Start function Media Player 93 AV Input mode setting 50 C cables 3.5mm to RCA Y-cable 23...
...; 79 Dolby® Digital Dynamic Range Control 80 muting sound 76 optical audio output format 79 stereo/SAP broadcasts 77 Auto Aspect using 69 Auto Brightness sensor set 99 auto power down set 100 Auto Start function Media Player 93 AV Input mode setting 50 C cables 3.5mm to RCA Y-cable 23...


