
User's Guide for L1350U and L2300U Series TV's
Page 2
...manual completely. WARNING: TO REDUCE THE RISK OF ELECTRIC SHOCK, DO NOT REMOVE COVER (OR BACK). WARNING: If you decide to wall mount this television, always use the many exciting features of your LED TV...ELECTRIC SHOCK DO NOT OPEN. REFER SERVICING TO QUALIFIED SERVICE PERSONNEL. See "To Display your LED TV on the included Pedestal Stand:" on page 5 . The exclamation point within the product's enclosure that... shock to the floor/wall in serious bodily injury and/or property damage. This manual will help you use a mounting bracket that the cable ground shall be connected to...
...manual completely. WARNING: TO REDUCE THE RISK OF ELECTRIC SHOCK, DO NOT REMOVE COVER (OR BACK). WARNING: If you decide to wall mount this television, always use the many exciting features of your LED TV...ELECTRIC SHOCK DO NOT OPEN. REFER SERVICING TO QUALIFIED SERVICE PERSONNEL. See "To Display your LED TV on the included Pedestal Stand:" on page 5 . The exclamation point within the product's enclosure that... shock to the floor/wall in serious bodily injury and/or property damage. This manual will help you use a mounting bracket that the cable ground shall be connected to...
User's Guide for L1350U and L2300U Series TV's
Page 6
... removing the covers may result in item 36) on the included Pedestal Stand: Observe the following safety precautions: 1) Read and follow this manual to completely disconnect from power and a minute amount of any cables and/or other immovable structure see item 26) on the cabinet. Never...as insecticide on page 5 for long periods of time. 41) Always unplug the TV to a Toshiba Authorized Service Provider. Gently wipe the display panel surface (the TV screen) using a Wall Bracket: If you have the TV serviced: • Ask the service technician to the LCD panel. 2) Place the...
... removing the covers may result in item 36) on the included Pedestal Stand: Observe the following safety precautions: 1) Read and follow this manual to completely disconnect from power and a minute amount of any cables and/or other immovable structure see item 26) on the cabinet. Never...as insecticide on page 5 for long periods of time. 41) Always unplug the TV to a Toshiba Authorized Service Provider. Gently wipe the display panel surface (the TV screen) using a Wall Bracket: If you have the TV serviced: • Ask the service technician to the LCD panel. 2) Place the...

User's Guide for L1350U and L2300U Series TV's
Page 11
...Navigation 41 Main menu layout 41 Navigating the menu system 43 Chapter 5: Setting up your TV 44 Initial Setup 44 Installation setup selection 45 Storing channels in memory (optional 46 Auto Tuning 46 Manual Tuning 48 Setting channel skip 48 Setting the AV input mode 49 Setting the HDMITM audio... mode 50 Setting the time zone 51 Viewing the system status 51 Resetting Factory Defaults 51 Chapter 6: Setting up your TV 52 Selecting the video input source...
...Navigation 41 Main menu layout 41 Navigating the menu system 43 Chapter 5: Setting up your TV 44 Initial Setup 44 Installation setup selection 45 Storing channels in memory (optional 46 Auto Tuning 46 Manual Tuning 48 Setting channel skip 48 Setting the AV input mode 49 Setting the HDMITM audio... mode 50 Setting the time zone 51 Viewing the system status 51 Resetting Factory Defaults 51 Chapter 6: Setting up your TV 52 Selecting the video input source...

User's Guide for L1350U and L2300U Series TV's
Page 23
... cable (Sample Illustration) Optical audio cable Optical audio cable connect receivers with Dolby® Digital or PCM (pulse-code modulation) optical audio input to the TV's Digital Audio Out terminal, see "Connecting a digital audio system" on page 30 Analog RGB (15-pin) computer cable (Sample Illustration) Analog RGB (15-... connect different types and brands of cable types HDMITM cables provide the best audio and picture quality. The input/output terminals on your TV in this manual are required. 3.5mm Stereo to RCA Y-cable (Sample Illustration) 3.5mm Stereo to RCA Y-cable 3.5mm Stereo to...
... cable (Sample Illustration) Optical audio cable Optical audio cable connect receivers with Dolby® Digital or PCM (pulse-code modulation) optical audio input to the TV's Digital Audio Out terminal, see "Connecting a digital audio system" on page 30 Analog RGB (15-pin) computer cable (Sample Illustration) Analog RGB (15-... connect different types and brands of cable types HDMITM cables provide the best audio and picture quality. The input/output terminals on your TV in this manual are required. 3.5mm Stereo to RCA Y-cable (Sample Illustration) 3.5mm Stereo to RCA Y-cable 3.5mm Stereo to...
User's Guide for L1350U and L2300U Series TV's
Page 30
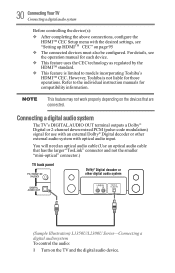
... the smaller "mini-optical" connector.) TV back panel Dolby® Digital decoder or other external audio system with the desired settings, see the operation manual for compatibility information. However, Toshiba is limited to the individual instruction manuals for each device. This feature may ...audio cable that are connected. v This feature is not liable for those operations. Refer to models incorporating Toshiba's HDMITM CEC. Connecting a digital audio system The TV's DIGITAL AUDIO OUT terminal outputs a Dolby® Digital or 2-channel down-mixed PCM (pulse-code modulation...
... the smaller "mini-optical" connector.) TV back panel Dolby® Digital decoder or other external audio system with the desired settings, see the operation manual for compatibility information. However, Toshiba is limited to the individual instruction manuals for each device. This feature may ...audio cable that are connected. v This feature is not liable for those operations. Refer to models incorporating Toshiba's HDMITM CEC. Connecting a digital audio system The TV's DIGITAL AUDIO OUT terminal outputs a Dolby® Digital or 2-channel down-mixed PCM (pulse-code modulation...
User's Guide for L1350U and L2300U Series TV's
Page 46
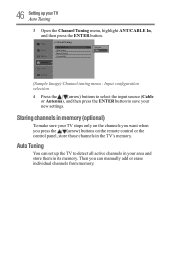
... 3 Open the Channel Tuning menu, highlight ANT/CABLE In, and then press the ENTER button. (Sample Image) Channel tuning menu - Auto Tuning You can manually add or erase individual channels from memory. Input configuration selection 4 Press the / (arrow) buttons to select the input source (Cable or Antenna), and then ...channels in your new settings. Storing channels in memory (optional) To make sure your TV stops only on the channels you want when you can set up the TV to save your area and store them in the TV's memory. Then you press the / (arrow) buttons on the remote control or the...
... 3 Open the Channel Tuning menu, highlight ANT/CABLE In, and then press the ENTER button. (Sample Image) Channel tuning menu - Auto Tuning You can manually add or erase individual channels from memory. Input configuration selection 4 Press the / (arrow) buttons to select the input source (Cable or Antenna), and then ...channels in your new settings. Storing channels in memory (optional) To make sure your TV stops only on the channels you want when you can set up the TV to save your area and store them in the TV's memory. Then you press the / (arrow) buttons on the remote control or the...
User's Guide for L1350U and L2300U Series TV's
Page 48
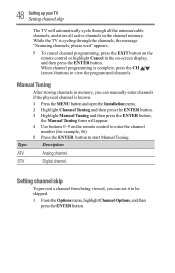
... cycling through all the antenna/cable channels, and store all active channels in the channel memory. 48 SettingupyourTV Setting channel skip The TV will appear. 4 Use buttons 0-9 on -screen display, and then press the ENTER button. When channel programming is known. 1 ...Press the MENU button and open the Installation menu. 2 Highlight Channel Tuning and then press the ENTER button. 3 Highlight Manual Tuning and then press the ENTER button, the Manual Tuning form will automatically cycle through the channels, the message "Scanning channels, please wait" appears. 5 To cancel channel ...
... cycling through all the antenna/cable channels, and store all active channels in the channel memory. 48 SettingupyourTV Setting channel skip The TV will appear. 4 Use buttons 0-9 on -screen display, and then press the ENTER button. When channel programming is known. 1 ...Press the MENU button and open the Installation menu. 2 Highlight Channel Tuning and then press the ENTER button. 3 Highlight Manual Tuning and then press the ENTER button, the Manual Tuning form will automatically cycle through the channels, the message "Scanning channels, please wait" appears. 5 To cancel channel ...

User's Guide for L1350U and L2300U Series TV's
Page 49
Skipped channels cannot be added to remove the check. For information, see "Locking channels" on your TV Setting the AV input mode The list of the shared AV input on page 81. You can be skipped, and then press the ENTER button . ...If the channel is found , a message appears. 49 Setting up your TV. To remove the check, press the ENTER button again. To manually add digital sub-channels on a physical channel: v Use the Channel Numbers and the (Dash 100) on the remote control to...
Skipped channels cannot be added to remove the check. For information, see "Locking channels" on your TV Setting the AV input mode The list of the shared AV input on page 81. You can be skipped, and then press the ENTER button . ...If the channel is found , a message appears. 49 Setting up your TV. To remove the check, press the ENTER button again. To manually add digital sub-channels on a physical channel: v Use the Channel Numbers and the (Dash 100) on the remote control to...
User's Guide for L1350U and L2300U Series TV's
Page 86
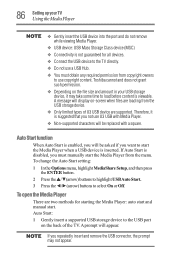
Toshiba cannot and does not grant such permission. Therefore, it may not appear. If Auto Start is suggested that you must obtain any required permission from copyright owners to load before content is inserted. Auto Start: 1 Gently insert a supported USB storage device to the TV directly. v USB ... on the back of U3 USB device are supported. v Only limited types of the TV. Auto Start function When Auto Start is not guaranteed for starting the Media Player: auto start and manual start the Media Player when a USB device is viewable. To change the Auto Start setting...
Toshiba cannot and does not grant such permission. Therefore, it may not appear. If Auto Start is suggested that you must obtain any required permission from copyright owners to load before content is inserted. Auto Start: 1 Gently insert a supported USB storage device to the TV directly. v USB ... on the back of U3 USB device are supported. v Only limited types of the TV. Auto Start function When Auto Start is not guaranteed for starting the Media Player: auto start and manual start the Media Player when a USB device is viewable. To change the Auto Start setting...

User's Guide for L1350U and L2300U Series TV's
Page 87
Manual Start: 1 In the Options menu, highlight MediaShare Setup, and then press the ENTER button. 2 Press the /▼(arrow) buttons to highlight Photo or Music, .... Viewing photo files There are no photo or music files. Within Slideshow, you can start the Media Player manually. v If Auto Start is active, the main menus cannot be displayed. 87 Setting up your TV Using the Media Player 2 Press the ◄/►(arrow) buttons to off, you can skip forward, repeat...
Manual Start: 1 In the Options menu, highlight MediaShare Setup, and then press the ENTER button. 2 Press the /▼(arrow) buttons to highlight Photo or Music, .... Viewing photo files There are no photo or music files. Within Slideshow, you can start the Media Player manually. v If Auto Start is active, the main menus cannot be displayed. 87 Setting up your TV Using the Media Player 2 Press the ◄/►(arrow) buttons to off, you can skip forward, repeat...

User's Guide for L1350U and L2300U Series TV's
Page 107
...PIN code. on page 76 No HDMITM CEC operation The HDMITM CEC feature is available for Toshiba HDMITM CEC compatible devices. When the PIN code screen appears, press the INFO button 4 times...within approximately 5 seconds. Ensure that HDMITM cables with the connected HDMITM CEC device. Read the instruction manual furnished with the ( ) Logo are connected, the HDMITM CEC feature may appear. V-Chip systems ... does not work correctly after you have changed settings of the device, turn off your TV and unplug the power cord, then plug in and turn off the closed caption feature,...
...PIN code. on page 76 No HDMITM CEC operation The HDMITM CEC feature is available for Toshiba HDMITM CEC compatible devices. When the PIN code screen appears, press the INFO button 4 times...within approximately 5 seconds. Ensure that HDMITM cables with the connected HDMITM CEC device. Read the instruction manual furnished with the ( ) Logo are connected, the HDMITM CEC feature may appear. V-Chip systems ... does not work correctly after you have changed settings of the device, turn off your TV and unplug the power cord, then plug in and turn off the closed caption feature,...
Resource Guide for L1350U Series TV's
Page 1
... touch, press, or place anything on the LCD screen. If you are in this manual to a Toshiba Authorized Service Provider. 46) If you for your LED TV To Display your Toshiba Television at support.toshiba.com. Install in accordance with the manufacturer's instructions. 8) Do not install near water.... triangle is appropriate. Integrated High Definition LED Television Resource Guide 23L1350U 29L1350U 32L1350U 39L1350U 50L1350U Keep this Resource Guide in a convenient place to excessive dust or vibration. 26) Always place the TV on the floor or a sturdy, level, stable surface that can...
... touch, press, or place anything on the LCD screen. If you are in this manual to a Toshiba Authorized Service Provider. 46) If you for your LED TV To Display your Toshiba Television at support.toshiba.com. Install in accordance with the manufacturer's instructions. 8) Do not install near water.... triangle is appropriate. Integrated High Definition LED Television Resource Guide 23L1350U 29L1350U 32L1350U 39L1350U 50L1350U Keep this Resource Guide in a convenient place to excessive dust or vibration. 26) Always place the TV on the floor or a sturdy, level, stable surface that can...
Resource Guide for L1350U Series TV's
Page 2
... using an extremely high level of precision technology; Toshiba Support If you require help . If this TV. ENERGY STAR® User Information ENERGY STAR User Information Statement: the factory default settings of this manual, including but not limited to the previous/next ... TV is subject to TV Item: Description: 1 POWER button 2 PIC SIZE button 3 PIC MODE button 4 INPUT button 5 SLEEP button 6 FREEZE button 7 Channel Number buttons (0-9) 8 FAV button 9 RECALL button 10 CH ( / ) buttons 11 C. FCC Declaration of Conformity Compliance Statement (Part 15): Toshiba 23L1350U/29L1350U...
... using an extremely high level of precision technology; Toshiba Support If you require help . If this TV. ENERGY STAR® User Information ENERGY STAR User Information Statement: the factory default settings of this manual, including but not limited to the previous/next ... TV is subject to TV Item: Description: 1 POWER button 2 PIC SIZE button 3 PIC MODE button 4 INPUT button 5 SLEEP button 6 FREEZE button 7 Channel Number buttons (0-9) 8 FAV button 9 RECALL button 10 CH ( / ) buttons 11 C. FCC Declaration of Conformity Compliance Statement (Part 15): Toshiba 23L1350U/29L1350U...


