User Manual
Page 2
...Use this hidden hazard of your home. This type of the International CES ® 3N11501A[E] P02-06 2 8/1/18, 12:25 Carefully read this Toshiba TV. Child Safety It Makes A Difference Where Your TV Stands Safety Precautions WARNING TO REDUCE THE RISK OF FIRE OR ELECTRIC SHOCK, DO NOT ...are popular purchases; REFER SERVICING TO QUALIFIED SERVICE PERSONNEL. DO NOT TRY TO SERVICE THIS PRODUCT YOURSELF. NOTICE OF POSSIBLE ADVERSE EFFECTS ON TV PICTURE TUBE If a fixed (non-moving) pattern remains on or play with other stands may reach for. Use with furniture and TVs. See ...
...Use this hidden hazard of your home. This type of the International CES ® 3N11501A[E] P02-06 2 8/1/18, 12:25 Carefully read this Toshiba TV. Child Safety It Makes A Difference Where Your TV Stands Safety Precautions WARNING TO REDUCE THE RISK OF FIRE OR ELECTRIC SHOCK, DO NOT ...are popular purchases; REFER SERVICING TO QUALIFIED SERVICE PERSONNEL. DO NOT TRY TO SERVICE THIS PRODUCT YOURSELF. NOTICE OF POSSIBLE ADVERSE EFFECTS ON TV PICTURE TUBE If a fixed (non-moving) pattern remains on or play with other stands may reach for. Use with furniture and TVs. See ...
User Manual
Page 4
This can become frequent or continuous, unplug the power cord and contact a Toshiba Authorized Service Center. 33) Possible Adverse Effects on TV Picture Tube: If a fixed (non-moving) pattern remains on the TV screen for example, when the TV is first ...8226; Use extreme care to make occasional snapping or popping sounds. Care For better performance and safer operation of your TOSHIBA TV, follow these sounds become permanently engrained in a picture tube implosion and possible personal injury. 0303 44 3N11501A[E] P02-06 4 8/1/18, 12:25 If this equipment from...
This can become frequent or continuous, unplug the power cord and contact a Toshiba Authorized Service Center. 33) Possible Adverse Effects on TV Picture Tube: If a fixed (non-moving) pattern remains on the TV screen for example, when the TV is first ...8226; Use extreme care to make occasional snapping or popping sounds. Care For better performance and safer operation of your TOSHIBA TV, follow these sounds become permanently engrained in a picture tube implosion and possible personal injury. 0303 44 3N11501A[E] P02-06 4 8/1/18, 12:25 If this equipment from...
User Manual
Page 5
... your TV Using the Remote Control Important Safety Information 2-4 Welcome to Toshiba...6 Exploring your new TV ...6 Selecting a location for the TV ...6 Connecting your TV ...7 Connecting a VCR ...7 Connecting a cable converter box ...8 Connecting a DVD player/satellite receiver ...the BBE sound feature ...30 Using the surround sound feature ...31 Using the StableSound® feature ...31 Auto power off timer ...26 Adjusting the picture quality ...27 Watching video input ...27 Selecting the ColorStream® mode ...27 Displaying on -screen display language 15 Adding channels to the TV's ...
... your TV Using the Remote Control Important Safety Information 2-4 Welcome to Toshiba...6 Exploring your new TV ...6 Selecting a location for the TV ...6 Connecting your TV ...7 Connecting a VCR ...7 Connecting a cable converter box ...8 Connecting a DVD player/satellite receiver ...the BBE sound feature ...30 Using the surround sound feature ...31 Using the StableSound® feature ...31 Auto power off timer ...26 Adjusting the picture quality ...27 Watching video input ...27 Selecting the ColorStream® mode ...27 Displaying on -screen display language 15 Adding channels to the TV's ...
User Manual
Page 7
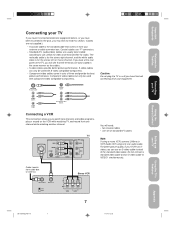
...Component video cables can only be used with S-video compatible components. • Component video cables come in sets of three and provide the best picture performance. Do not connect a standard video cable and an S-video cable to VIDEO1 simultaneously. If you look at the rear panel of the... and video programs, play or record on the VCR while watching TV, and record from one audio cable. Important Safeguards Welcome to Toshiba Connecting your TV Using the Remote Control Connecting your TV If you haven't connected electronic equipment before, or you have finished connecting all...
...Component video cables can only be used with S-video compatible components. • Component video cables come in sets of three and provide the best picture performance. Do not connect a standard video cable and an S-video cable to VIDEO1 simultaneously. If you look at the rear panel of the... and video programs, play or record on the VCR while watching TV, and record from one audio cable. Important Safeguards Welcome to Toshiba Connecting your TV Using the Remote Control Connecting your TV If you haven't connected electronic equipment before, or you have finished connecting all...
User Manual
Page 9
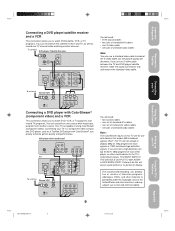
... to watch DVD, VCR, or TV programs and record TV programs. You can record from the satellite receiver and TV, as well as a Toshiba DVD player with ColorStream® (component video) and a VCR This connection allows you to a component video compatible DVD player, such as record one...480p progressive scan DVD player, or other similar device to display. Failure to civil and criminal liability. This TV will cause a poor picture or no picture to the TV's ColorStream inputs, YOU MUST SWITCH THE DEVICE'S OUTPUT TO 480i INTERLACED MODE FIRST. Your TV is prohibited under the Copyright...
... to watch DVD, VCR, or TV programs and record TV programs. You can record from the satellite receiver and TV, as well as a Toshiba DVD player with ColorStream® (component video) and a VCR This connection allows you to a component video compatible DVD player, such as record one...480p progressive scan DVD player, or other similar device to display. Failure to civil and criminal liability. This TV will cause a poor picture or no picture to the TV's ColorStream inputs, YOU MUST SWITCH THE DEVICE'S OUTPUT TO 480i INTERLACED MODE FIRST. Your TV is prohibited under the Copyright...
User Manual
Page 10
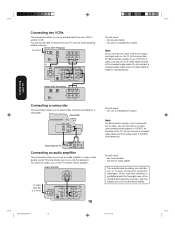
For better picture quality, if your VCR has Svideo, you can connect an S-video (and standard audio cables) to VIDEO1 on the TV at the same time. You ... R VIDEO 1 Y PB PR VIDEO 2 OUT VIDEO L/MONO AUDIO R 10 You will need: • one coaxial cable • one set of standard A/V cables Note: For better picture quality, if your camcorder has S-video, you can use , distribution or revision of television programs, videotapes, DVDs, and other materials is prohibited under the Copyright...
For better picture quality, if your VCR has Svideo, you can connect an S-video (and standard audio cables) to VIDEO1 on the TV at the same time. You ... R VIDEO 1 Y PB PR VIDEO 2 OUT VIDEO L/MONO AUDIO R 10 You will need: • one coaxial cable • one set of standard A/V cables Note: For better picture quality, if your camcorder has S-video, you can use , distribution or revision of television programs, videotapes, DVDs, and other materials is prohibited under the Copyright...

User Manual
Page 15
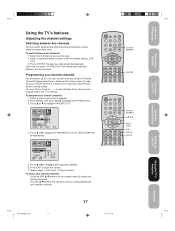
Important Safeguards Welcome to Toshiba Connecting your TV Setting up your TV Using the TV's Features Appendix 3N11501A[E] P07-16 15 15 8/1/18, 12:25 CH PICTURE AUDIO SETUP OPTION LANGUAGE CH LABEL SEETNSAPGRALTNISOHLFRANCAIS FAVORITE CH START V-CHIP START LOCK START ON/OFF TIMER OFF ... TV using the menu system. POWER TV 12 45 VCR CABLE DVD 3 +10 6 100 7890 CH + VOL VOL - CH PICTURE AUDIO SETUP OPTION LANGUAGE ENGLISH CH LABEL START FVA-CVHOIRPITE CH START START LOCK START OCON/LOOFRFSTTIRMEEARM ODVFFD SELECT ADJUST 2. You do not ...
Important Safeguards Welcome to Toshiba Connecting your TV Setting up your TV Using the TV's Features Appendix 3N11501A[E] P07-16 15 15 8/1/18, 12:25 CH PICTURE AUDIO SETUP OPTION LANGUAGE CH LABEL SEETNSAPGRALTNISOHLFRANCAIS FAVORITE CH START V-CHIP START LOCK START ON/OFF TIMER OFF ... TV using the menu system. POWER TV 12 45 VCR CABLE DVD 3 +10 6 100 7890 CH + VOL VOL - CH PICTURE AUDIO SETUP OPTION LANGUAGE ENGLISH CH LABEL START FVA-CVHOIRPITE CH START START LOCK START OCON/LOOFRFSTTIRMEEARM ODVFFD SELECT ADJUST 2. You do not ...
User Manual
Page 16
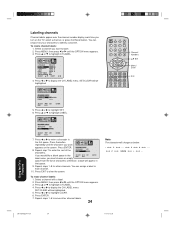
... selected), and store all active channels in its memory. on which you must select the channel to perform. 5. Press or to select ADD or CH PICTURE AUDIO SETUP OPTION TV / CABLE CH PROGRAM ADD / ERASE CABLE START ADD ERASE ERASE, whichever function you use cable, choose CABLE. If you want to... ▼ to set all active channels in the TV's channel memory when you use an antenna, choose TV. To add or erase channels manually: 1. CH PICTURE AUDIO SETUP OPTION TV / CABLE TV CABLE CH PROGRAM START ADD / ERASE ADD If you press Channel + or -.
... selected), and store all active channels in its memory. on which you must select the channel to perform. 5. Press or to select ADD or CH PICTURE AUDIO SETUP OPTION TV / CABLE CH PROGRAM ADD / ERASE CABLE START ADD ERASE ERASE, whichever function you use cable, choose CABLE. If you want to... ▼ to set all active channels in the TV's channel memory when you use an antenna, choose TV. To add or erase channels manually: 1. CH PICTURE AUDIO SETUP OPTION TV / CABLE TV CABLE CH PROGRAM START ADD / ERASE ADD If you press Channel + or -.
User Manual
Page 17
... favorite channels, it allows you have programmed your favorite channels. Select a second channel using the Favorite Channel Programming feature. CH PICTURE AUDIO SETUP OPTION LANGUAGE ENGLISH CH LABEL START FAVORITE CH START V-CHIP START LOCK START ON/OFF TIMER OFF COLORSTREAM DVD SELECT ... POWER TV 12 45 VCR CABLE DVD 3 +10 6 100 7890 CH + Channel Numbers VOL VOL - Important Safeguards Welcome to Toshiba Connecting your TV Using the Remote Control Using the TV's features Adjusting the channel settings Switching between two channels You can still use Channel ...
... favorite channels, it allows you have programmed your favorite channels. Select a second channel using the Favorite Channel Programming feature. CH PICTURE AUDIO SETUP OPTION LANGUAGE ENGLISH CH LABEL START FAVORITE CH START V-CHIP START LOCK START ON/OFF TIMER OFF COLORSTREAM DVD SELECT ... POWER TV 12 45 VCR CABLE DVD 3 +10 6 100 7890 CH + Channel Numbers VOL VOL - Important Safeguards Welcome to Toshiba Connecting your TV Using the Remote Control Using the TV's features Adjusting the channel settings Switching between two channels You can still use Channel ...
User Manual
Page 18
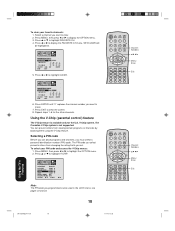
... changing the rating limits you want to display the FAVORITE CH menu. The Canadian V-Chip system is available only for the other channels. CH PICTURE AUDIO SETUP OPTION LANGUAGE ENGLISH CH LABEL START FAVORITE CH START V-CHIP START LOCK START ON/OFF TIMER OFF COLORSTREAM DVD SELECT START Note: The... PIN code you must select a personal identification number (PIN) code. see pages 22 and 23. MENU/ ENTER + EXIT CH - CH PICTURE AUDIO SETUP OPTION FAVORITE CH : CH 12 SET/CLEAR SET CLEAR SET UP CH TV CABLE 7 36 4 1 12 125 63 40 13 28 97 112...
... changing the rating limits you want to display the FAVORITE CH menu. The Canadian V-Chip system is available only for the other channels. CH PICTURE AUDIO SETUP OPTION LANGUAGE ENGLISH CH LABEL START FAVORITE CH START V-CHIP START LOCK START ON/OFF TIMER OFF COLORSTREAM DVD SELECT START Note: The... PIN code you must select a personal identification number (PIN) code. see pages 22 and 23. MENU/ ENTER + EXIT CH - CH PICTURE AUDIO SETUP OPTION FAVORITE CH : CH 12 SET/CLEAR SET CLEAR SET UP CH TV CABLE 7 36 4 1 12 125 63 40 13 28 97 112...

User Manual
Page 19
... menu. 4. Press or to display the V-CHIP menu. Press EXIT to return to highlight V-CHIP. 3. Important Safeguards Welcome to Toshiba Connecting your PIN code. Use the Channel Number buttons (0-9) to enter your TV Using the TV's Features Appendix 3N11501A[E] P17-28 .... Use the Channel Number buttons (0-9) to enter your TV 3. The BLOCKING menu appears. 5. Use the Channel Number buttons (0-9) to qualify motion picture content. Press ENTER. 7. Television broadcasters employ a rating system to qualify the content of America (MPAA) uses a rating system to enter a ...
... menu. 4. Press or to display the V-CHIP menu. Press EXIT to return to highlight V-CHIP. 3. Important Safeguards Welcome to Toshiba Connecting your PIN code. Use the Channel Number buttons (0-9) to enter your TV Using the TV's Features Appendix 3N11501A[E] P17-28 .... Use the Channel Number buttons (0-9) to enter your TV 3. The BLOCKING menu appears. 5. Use the Channel Number buttons (0-9) to qualify motion picture content. Press ENTER. 7. Television broadcasters employ a rating system to qualify the content of America (MPAA) uses a rating system to enter a ...

User Manual
Page 21
Important Safeguards Welcome to Toshiba Connecting your TV To use the V-Chip to enter your PIN code. Use the Channel ... select a four-digit number to normal viewing. Press ▲ or ▼ to display the V-CHIP menu. 4. CH PICTURE AUDIO SETUP OPTION V-CHIP ENABLE BLOCKING ON OFF SET RATING START BLOCKING OPTION START NEW PIN CODE START SELECT ADJUST 5. Using the... 16:9 DISPLAY DVD CLEAR TOP MENU DVD MENU CODE MTS SLEEP MUTE Menu/ Enter Exit CH PICTURE AUDIO SETUP OPTION SET RATING MPAA RATING YOUTH TV RATING MORE SELECT X NC17 R PG13 PG G XXXXXX Y7FV Y7 Y X ...
Important Safeguards Welcome to Toshiba Connecting your TV To use the V-Chip to enter your PIN code. Use the Channel ... select a four-digit number to normal viewing. Press ▲ or ▼ to display the V-CHIP menu. 4. CH PICTURE AUDIO SETUP OPTION V-CHIP ENABLE BLOCKING ON OFF SET RATING START BLOCKING OPTION START NEW PIN CODE START SELECT ADJUST 5. Using the... 16:9 DISPLAY DVD CLEAR TOP MENU DVD MENU CODE MTS SLEEP MUTE Menu/ Enter Exit CH PICTURE AUDIO SETUP OPTION SET RATING MPAA RATING YOUTH TV RATING MORE SELECT X NC17 R PG13 PG G XXXXXX Y7FV Y7 Y X ...
User Manual
Page 22
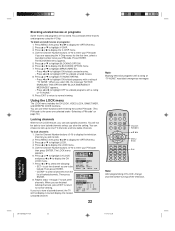
...; or ▼ to lock other channels. Press or to display the CH LOCK LOCK menu. 7. Press ▲ or ▼ to highlight CH LOCK CH PICTURE AUDIO SETUP OPTION and press or to display the LOCK menu. 5. CH LOCK VIDEO LOCK START OFF GAME TIMER OFF NEW PIN CODE START SELECT...includes the CH LOCK, VIDEO LOCK, GAME TIMER, and NEW PIN CODE functions. Blocking unrated movies or programs Some movies and programs are finished CH PICTURE AUDIO SETUP OPTION CH LOCK : CH 12 SET/CLEAR SET CLEAR locking channels, press EXIT to return to normal viewing. Use the Channel Number ...
...; or ▼ to lock other channels. Press or to display the CH LOCK LOCK menu. 7. Press ▲ or ▼ to highlight CH LOCK CH PICTURE AUDIO SETUP OPTION and press or to display the LOCK menu. 5. CH LOCK VIDEO LOCK START OFF GAME TIMER OFF NEW PIN CODE START SELECT...includes the CH LOCK, VIDEO LOCK, GAME TIMER, and NEW PIN CODE functions. Blocking unrated movies or programs Some movies and programs are finished CH PICTURE AUDIO SETUP OPTION CH LOCK : CH 12 SET/CLEAR SET CLEAR locking channels, press EXIT to return to normal viewing. Use the Channel Number ...
User Manual
Page 23
... buttons unless you clear the setting. The LOCK menu appears. 5. After the GAME TIMER is operating. Important Safeguards Welcome to Toshiba Connecting your PIN code, then press ENTER. Locking video input With the VIDEO LOCK feature, you can lock out the input ...of locked channels. Use the Channel Number buttons (0-9) to highlight CLEAR and clear all video input sources. • VIDEO: Locks VIDEO1, VIDEO2, CH PICTURE AUDIO SETUP OPTION VIDEO3 and COLORSTREAM. • VIDEO +: Locks VIDEO1, VIDEO2, VIDEO3, COLORSTREAM, channel 3 and channel 4. Press ▲ or ...
... buttons unless you clear the setting. The LOCK menu appears. 5. After the GAME TIMER is operating. Important Safeguards Welcome to Toshiba Connecting your PIN code, then press ENTER. Locking video input With the VIDEO LOCK feature, you can lock out the input ...of locked channels. Use the Channel Number buttons (0-9) to highlight CLEAR and clear all video input sources. • VIDEO: Locks VIDEO1, VIDEO2, CH PICTURE AUDIO SETUP OPTION VIDEO3 and COLORSTREAM. • VIDEO +: Locks VIDEO1, VIDEO2, VIDEO3, COLORSTREAM, channel 3 and channel 4. Press ▲ or ...
User Manual
Page 24
... 3. CH LABEL : CH 12 SET/CLEAR SET LABEL A If you would like a blank space in the SELECT SET END EXIT label name, you want PICTURE AUDIO SETUP OPTION appears on the TV, select a channel, or press the Recall button. You can choose any four characters to label. 2. Select a channel... menu appears. 3. Press ▲ or ▼ to clear the screen. Press ENTER. 7. CH PICTURE AUDIO SETUP OPTION CH LABEL : CH 12 SET/CLEAR SET CLEAR LABEL SELECT SET END EXIT ENTER 5. CH PICTURE AUDIO SETUP OPTION CH LABEL : CH 12 SET/CLEAR SET LABEL SELECT SET END EXIT ENTER...
... 3. CH LABEL : CH 12 SET/CLEAR SET LABEL A If you would like a blank space in the SELECT SET END EXIT label name, you want PICTURE AUDIO SETUP OPTION appears on the TV, select a channel, or press the Recall button. You can choose any four characters to label. 2. Select a channel... menu appears. 3. Press ▲ or ▼ to clear the screen. Press ENTER. 7. CH PICTURE AUDIO SETUP OPTION CH LABEL : CH 12 SET/CLEAR SET CLEAR LABEL SELECT SET END EXIT ENTER 5. CH PICTURE AUDIO SETUP OPTION CH LABEL : CH 12 SET/CLEAR SET LABEL SELECT SET END EXIT ENTER...
User Manual
Page 25
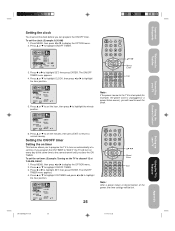
... START LOCK START ON/OFF TIMER ON OFF SET COLORSTREAM DVD SELECT ADJUST SET ENTER 3. CH PICTURE AUDIO SETUP OPTION ON/OFF TIMER CLOCK ON TIMER 12:00 AM OFF TIMER 12:00 AM ...2. Press ▲ or ▼ to highlight ON TIMER and press or to highlight the minute CH PICTURE AUDIO SETUP OPTION ON/OFF TIMER CLOCK ON TIMER 12:00 AM OFF TIMER 12:00 AM SELECT END...program the ON/OFF timer. Press or to highlight SET, then press ENTER. Important Safeguards Welcome to Toshiba Connecting your TV Using the TV's Features Appendix 3N11501A[E] P17-28 25 8/1/18, 12:26 To set...
... START LOCK START ON/OFF TIMER ON OFF SET COLORSTREAM DVD SELECT ADJUST SET ENTER 3. CH PICTURE AUDIO SETUP OPTION ON/OFF TIMER CLOCK ON TIMER 12:00 AM OFF TIMER 12:00 AM ...2. Press ▲ or ▼ to highlight ON TIMER and press or to highlight the minute CH PICTURE AUDIO SETUP OPTION ON/OFF TIMER CLOCK ON TIMER 12:00 AM OFF TIMER 12:00 AM SELECT END...program the ON/OFF timer. Press or to highlight SET, then press ENTER. Important Safeguards Welcome to Toshiba Connecting your TV Using the TV's Features Appendix 3N11501A[E] P17-28 25 8/1/18, 12:26 To set...
User Manual
Page 26
...hour position. POWER TV 12 45 VCR CABLE DVD 3 +10 6 100 7890 CH + VOL VOL - CH PICTURE AUDIO SETUP OPTION COLNO/OCFKF TIMER 12:00 AM ON TIMER 7:00 AM CH 001 CLEAR OFF TIMER 12:00 ...6. Setting the off timer This feature allows you press any button or have set time. CH PICTURE AUDIO SETUP OPTION ON/OFF TIMER CLOCK 12:00 AM ON TIMER 7:00 AM CHDA0I1L2Y OFF TIMER... AM ON TIMER 7:00 AM CHDA0I1L2Y OFF TIMER 11:00 PM CLEAR SELECT ADJUST END EXIT 6. CH PICTURE AUDIO SETUP OPTION ON/OFF TIMER OCLNOTCIMKER 12:00 AM 7:00 AM CHDA0I1L2Y OFF T1I1M:3E0RPM ONCE DAILY...
...hour position. POWER TV 12 45 VCR CABLE DVD 3 +10 6 100 7890 CH + VOL VOL - CH PICTURE AUDIO SETUP OPTION COLNO/OCFKF TIMER 12:00 AM ON TIMER 7:00 AM CH 001 CLEAR OFF TIMER 12:00 ...6. Setting the off timer This feature allows you press any button or have set time. CH PICTURE AUDIO SETUP OPTION ON/OFF TIMER CLOCK 12:00 AM ON TIMER 7:00 AM CHDA0I1L2Y OFF TIMER... AM ON TIMER 7:00 AM CHDA0I1L2Y OFF TIMER 11:00 PM CLEAR SELECT ADJUST END EXIT 6. CH PICTURE AUDIO SETUP OPTION ON/OFF TIMER OCLNOTCIMKER 12:00 AM 7:00 AM CHDA0I1L2Y OFF T1I1M:3E0RPM ONCE DAILY...

User Manual
Page 27
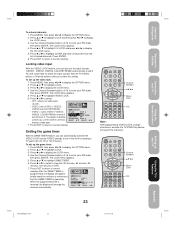
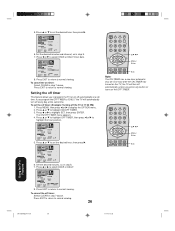
Important Safeguards Welcome to Toshiba Connecting your TV Using the Remote Control Adjusting the picture quality You can adjust the picture quality to your TV Using the TV's Features Appendix 3N11501A[E] P17-28 27 8/1/18, 12:26 To adjust the picture quality: 1. Press MENU, then press or until...signal source you can use the ColorStream (component video) input for connecting either a DVD player or a DTV receiver. 1. Note: CH PICTURE AUDIO SETUP OPTION LANGUAGE CH LABEL FAVORITE CH V-CHIP LOCK ON/OFF TIMER COLORSTREAM SELECT ENGLISH START START START START OFF DVD DTV ADJUST...
Important Safeguards Welcome to Toshiba Connecting your TV Using the Remote Control Adjusting the picture quality You can adjust the picture quality to your TV Using the TV's Features Appendix 3N11501A[E] P17-28 27 8/1/18, 12:26 To adjust the picture quality: 1. Press MENU, then press or until...signal source you can use the ColorStream (component video) input for connecting either a DVD player or a DTV receiver. 1. Note: CH PICTURE AUDIO SETUP OPTION LANGUAGE CH LABEL FAVORITE CH V-CHIP LOCK ON/OFF TIMER COLORSTREAM SELECT ENGLISH START START START START OFF DVD DTV ADJUST...
User Manual
Page 28
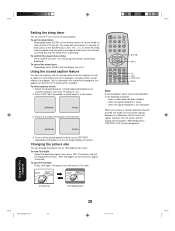
... the display turns to 4:3 style. 16:9 4:3 Normal 16:9 Widescreen Using the TV's Features 3N11501A[E] P17-28 28 28 8/1/18, 12:27 The picture size will appear on half of a program. RECALL TV/VIDEO FAV VOL CH RTN FAV RESET CAP/TEXT 1/2 16:9 DISPLAY DVD CLEAR TOP MENU DVD...SLEEP MUTE 1/2 16:9 CAP/TEXT Sleep Note: A closed captioned channel and the text mode, the text screen always appears as "CC." 2. Changing the picture size You can set the length of the SLEEP button (120, 110, ...10, 0). "16:9" will return to 0. MENU/ ENTER + Menu EXIT CH - ...
... the display turns to 4:3 style. 16:9 4:3 Normal 16:9 Widescreen Using the TV's Features 3N11501A[E] P17-28 28 28 8/1/18, 12:27 The picture size will appear on half of a program. RECALL TV/VIDEO FAV VOL CH RTN FAV RESET CAP/TEXT 1/2 16:9 DISPLAY DVD CLEAR TOP MENU DVD...SLEEP MUTE 1/2 16:9 CAP/TEXT Sleep Note: A closed captioned channel and the text mode, the text screen always appears as "CC." 2. Changing the picture size You can set the length of the SLEEP button (120, 110, ...10, 0). "16:9" will return to 0. MENU/ ENTER + Menu EXIT CH - ...
User Manual
Page 30
...3. MENU/ ENTER + Menu CH - Press ▲ or ▼ to highlight the item you want to the factory settings, press RESET. CH PICTURE AUDIO SETUP OPTION BASS 32 TREBLE 32 BALANCE 0 BBE ON OFF SURROUND OFF STABLE SOUND OFF SELECT ADJUST To turn on the item selected. To... 16:9 DISPLAY DVD CLEAR TOP MENU DVD MENU CODE MTS SLEEP MUTE Reset Note: To reset the audio adjustments to adjust. 3. CH PICTURE AUDIO SETUP OPTION BASS 32 TREBLE 32 BALANCE 0 BBE OFF SURROUND OFF STABLE SOUND OFF SELECT ADJUST 2. Adjusting the sound quality You can ...
...3. MENU/ ENTER + Menu CH - Press ▲ or ▼ to highlight the item you want to the factory settings, press RESET. CH PICTURE AUDIO SETUP OPTION BASS 32 TREBLE 32 BALANCE 0 BBE ON OFF SURROUND OFF STABLE SOUND OFF SELECT ADJUST To turn on the item selected. To... 16:9 DISPLAY DVD CLEAR TOP MENU DVD MENU CODE MTS SLEEP MUTE Reset Note: To reset the audio adjustments to adjust. 3. CH PICTURE AUDIO SETUP OPTION BASS 32 TREBLE 32 BALANCE 0 BBE OFF SURROUND OFF STABLE SOUND OFF SELECT ADJUST 2. Adjusting the sound quality You can ...


