

Owners Manual
Page 10
Introduction Identification of controls Front Remote sensor 13 POWER indicator 22 Speaker Side Left Side Disc slot 47 Adjusting the angle of the base (except 26LV610U) Approx. 10° Approx. 3° EJECT button 48 VOLUME (+/-) buttons 27 CHANNEL 27 PLAY button 47 CHANNEL 27 ■ STOP button 47 MENU button 23 63 INPUT/ENTER button 16 POWER button 22 You can adjust the angle of the TV while adjusting the angle. 10 52G0101A.indb 10 1/5/09 3:02:03 PM Hold the base of the TV-screen for 3° forward or for 10° backward from vertical angle.
Introduction Identification of controls Front Remote sensor 13 POWER indicator 22 Speaker Side Left Side Disc slot 47 Adjusting the angle of the base (except 26LV610U) Approx. 10° Approx. 3° EJECT button 48 VOLUME (+/-) buttons 27 CHANNEL 27 PLAY button 47 CHANNEL 27 ■ STOP button 47 MENU button 23 63 INPUT/ENTER button 16 POWER button 22 You can adjust the angle of the TV while adjusting the angle. 10 52G0101A.indb 10 1/5/09 3:02:03 PM Hold the base of the TV-screen for 3° forward or for 10° backward from vertical angle.

Owners Manual
Page 12
... ANGLE button 54 REPEAT A-B button 52 PIC SIZE button 38 *DVD MENU button Use the DVD MENU button to display the menu included on the remote control. To operate a menu, follow the instructions in for details. See the page in "DVD menu." 54 12 52G0101A.indb 12 1/5/09 3:02:08 PM... 16 POWER button 22 SLEEP button 28 JUMP button 50 Direct channel selection button ( ) 27 AUDIO SELECT button 55 VOL +/- Introduction Identification of controls (Continued) Remote control The instructions in this manual describe the function on many DVD video discs.
... ANGLE button 54 REPEAT A-B button 52 PIC SIZE button 38 *DVD MENU button Use the DVD MENU button to display the menu included on the remote control. To operate a menu, follow the instructions in for details. See the page in "DVD menu." 54 12 52G0101A.indb 12 1/5/09 3:02:08 PM... 16 POWER button 22 SLEEP button 28 JUMP button 50 Direct channel selection button ( ) 27 AUDIO SELECT button 55 VOL +/- Introduction Identification of controls (Continued) Remote control The instructions in this manual describe the function on many DVD video discs.

Owners Manual
Page 13
... attention to the polarity indicated in the battery compartment. 3 Replace the compartment cover. This will prevent battery acid from remote control if they are dead or if the remote control is not to be used for an extended period of batteries in accordance with applicable laws and regulations. •... batteries. • Dispose of batteries in a designated disposal area. • Batteries should always be disposed of with the environment in the remote control, always replace both batteries with new ones. Always dispose of time. Note: • Be sure to replace batteries in mind.
... attention to the polarity indicated in the battery compartment. 3 Replace the compartment cover. This will prevent battery acid from remote control if they are dead or if the remote control is not to be used for an extended period of batteries in accordance with applicable laws and regulations. •... batteries. • Dispose of batteries in a designated disposal area. • Batteries should always be disposed of with the environment in the remote control, always replace both batteries with new ones. Always dispose of time. Note: • Be sure to replace batteries in mind.
Owners Manual
Page 16
... Game mode screen appears. • If GAME is pressed during standby mode, the unit turns on automatically and the Game mode screen appears on the remote control to connect your TV/ DVD, such as a VCR player. However, due to the wide variety of different types of signal generated by these devices...
... Game mode screen appears. • If GAME is pressed during standby mode, the unit turns on automatically and the Game mode screen appears on the remote control to connect your TV/ DVD, such as a VCR player. However, due to the wide variety of different types of signal generated by these devices...
Owners Manual
Page 28
... jack on the screen. TV operation TV operation (Continued) SLEEP DISPLAY VOL +/- The sound can be silenced and "Mute" will be switched back on the remote control.
... jack on the screen. TV operation TV operation (Continued) SLEEP DISPLAY VOL +/- The sound can be silenced and "Mute" will be switched back on the remote control.
Owners Manual
Page 35
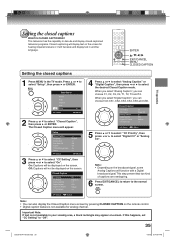
... select "Analog Caption", you can choose C1, C2, C3, C4, T1, T2, T3 and T4. On: Captions will be displayed on the remote control. • Digital caption feature is not available in your viewing area, a black rectangle may appear on the screen for analog channel. When you...: Select ENTER:Set 2 Press ▲ or ▼ to select "Setup", then press ▶ or ENTER. Setup Closed Caption Language Video Label Auto Shut Off Aspect TOSHIBA Logo Light Reset : Select >> English >> Off On On >> ENTER:Set 3 Press ▲ or ▼ to select "CC Setting", then press ◀ or ...
... select "Analog Caption", you can choose C1, C2, C3, C4, T1, T2, T3 and T4. On: Captions will be displayed on the remote control. • Digital caption feature is not available in your viewing area, a black rectangle may appear on the screen for analog channel. When you...: Select ENTER:Set 2 Press ▲ or ▼ to select "Setup", then press ▶ or ENTER. Setup Closed Caption Language Video Label Auto Shut Off Aspect TOSHIBA Logo Light Reset : Select >> English >> Off On On >> ENTER:Set 3 Press ▲ or ▼ to select "CC Setting", then press ◀ or ...

Owners Manual
Page 38
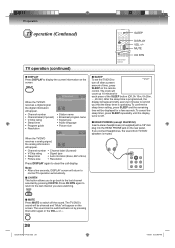
... PIC SIZE 1 Press MENU. Picture Size 0.Natural 1.Theater Wide1 2.Theater Wide2 3.Theater Wide3 4.Full [0-4]:Select Note: • Selectable picture sizes may vary depending on the remote control. 3 Press EXIT/CANCEL to return to change the picture size. • In 720p, 1080i or 1080p signal, only the Theater Wide2 and Full picture...
... PIC SIZE 1 Press MENU. Picture Size 0.Natural 1.Theater Wide1 2.Theater Wide2 3.Theater Wide3 4.Full [0-4]:Select Note: • Selectable picture sizes may vary depending on the remote control. 3 Press EXIT/CANCEL to return to change the picture size. • In 720p, 1080i or 1080p signal, only the Theater Wide2 and Full picture...
Owners Manual
Page 47
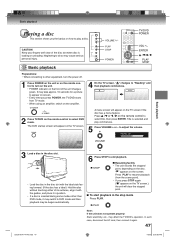
... a disc. Reading 2 Press TV/DVD on the amplifier. 4 On the TV screen, " " changes to select title, then press ENTER. " " appears on the remote control to "Reading" and then playback commences. VOLUME +/- Press / or / on the screen. In such case, disconnect the AC cord, then connect it may switch... slot with the guides, and place it in the stop mode Press PLAY. ENTER / / / PLAY STOP 1 Press POWER on the unit or on the remote control to do so may affect the TV/DVDʼs operation. A menu screen will appear on the TV screen if the disc has a menu feature...
... a disc. Reading 2 Press TV/DVD on the amplifier. 4 On the TV screen, " " changes to select title, then press ENTER. " " appears on the remote control to "Reading" and then playback commences. VOLUME +/- Press / or / on the screen. In such case, disconnect the AC cord, then connect it may switch... slot with the guides, and place it in the stop mode Press PLAY. ENTER / / / PLAY STOP 1 Press POWER on the unit or on the remote control to do so may affect the TV/DVDʼs operation. A menu screen will appear on the TV screen if the disc has a menu feature...

Owners Manual
Page 48
... appear after the disc comes out. Also refer to unload and eject the disc. • Do not put any objects other than discs on the remote control once the movie is completed. • There may be available. Doing so may reduce the Sharpness with the DVDs. • Do not move the...
... appear after the disc comes out. Also refer to unload and eject the disc. • Do not put any objects other than discs on the remote control once the movie is completed. • There may be available. Doing so may reduce the Sharpness with the DVDs. • Do not move the...

Owners Manual
Page 63
... setting. • Repeat steps 3, 4 and 5 to change the default settings of the DVD mode to customize performance to select DVD mode. The following on the remote control to your preference. PDMTVaRernCSeunctraelen : EO16nff:g9lish QSDuiSsboptuliatnlyedSet Pass:wOEonnrdglish OAPiucdttpuiouret Mode : AIEnnutegtorlliasche JPEG IntDeirvvXa(lR) :VOOfDf 5 Change the selection using or , by pressing repeatedly...
... setting. • Repeat steps 3, 4 and 5 to change the default settings of the DVD mode to customize performance to select DVD mode. The following on the remote control to your preference. PDMTVaRernCSeunctraelen : EO16nff:g9lish QSDuiSsboptuliatnlyedSet Pass:wOEonnrdglish OAPiucdttpuiouret Mode : AIEnnutegtorlliasche JPEG IntDeirvvXa(lR) :VOOfDf 5 Change the selection using or , by pressing repeatedly...

Owners Manual
Page 67
... to remember this is pre-setting password of the code as the level number is equivalent to remove the disc. 2) While holding 7 down on the remote control and then press STOP on the screen. Then press ENTER. Then press ENTER. Such discs can always work . • The password is required every...
... to remember this is pre-setting password of the code as the level number is equivalent to remove the disc. 2) While holding 7 down on the remote control and then press STOP on the screen. Then press ENTER. Then press ENTER. Such discs can always work . • The password is required every...

Owners Manual
Page 70
The unit or remote operation key • Turn off the unit and unplug the AC power cord for several minutes, is distorted during fast reverse/forward playback. • The ... not functioning. No on the DVD disc. No subtitle. • Some discs have no subtitles. • Subtitles are weak. REMOTE CONTROL The remote control does not function. • Aim the remote control at the remote sensor. • Operate within approx. 5 meters or reduce the light in the special playback mode. • Select the correct...
The unit or remote operation key • Turn off the unit and unplug the AC power cord for several minutes, is distorted during fast reverse/forward playback. • The ... not functioning. No on the DVD disc. No subtitle. • Some discs have no subtitles. • Subtitles are weak. REMOTE CONTROL The remote control does not function. • Aim the remote control at the remote sensor. • Operate within approx. 5 meters or reduce the light in the special playback mode. • Select the correct...

Owners Manual
Page 73
DVD (12cm, 8cm) 2. Accessories Remote control (19LV610U/22LV610U/26LV610U: SE-R0305, 19LV611U/22LV611U: SE-R0316 1 Batteries (R03/AAA) ...2 AC cord ...1 Cleaning cloth ...1 Ownerʼs manual (this booklet) ...1 Quick setup guide (...
DVD (12cm, 8cm) 2. Accessories Remote control (19LV610U/22LV610U/26LV610U: SE-R0305, 19LV611U/22LV611U: SE-R0316 1 Batteries (R03/AAA) ...2 AC cord ...1 Cleaning cloth ...1 Ownerʼs manual (this booklet) ...1 Quick setup guide (...


