
Owners Manual
Page 2
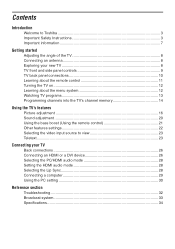
...Toshiba 3 Important Safety Instructions 3 Important information 7 Getting started Adjusting the angle of the TV 8 Connecting an antenna 8 Exploring your new TV 8 TV front and side panel controls 9 TV back panel connections 10 Learning about the remote control 11 Turning the TV on ...12 Learning about the menu system 12 Watching TV...bass boost (Using the remote control 21 Other features settings 22 Selecting the video input source to view 23 Teletext ...23 Connecting your TV Back connections ...26 Connecting an HDMI or a DVI device 26 Selecting the PC/HDMI audio mode 28 Setting the...
...Toshiba 3 Important Safety Instructions 3 Important information 7 Getting started Adjusting the angle of the TV 8 Connecting an antenna 8 Exploring your new TV 8 TV front and side panel controls 9 TV back panel connections 10 Learning about the remote control 11 Turning the TV on ...12 Learning about the menu system 12 Watching TV...bass boost (Using the remote control 21 Other features settings 22 Selecting the video input source to view 23 Teletext ...23 Connecting your TV Back connections ...26 Connecting an HDMI or a DVI device 26 Selecting the PC/HDMI audio mode 28 Setting the...
Owners Manual
Page 3
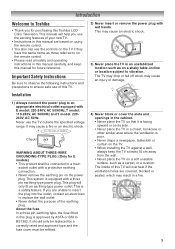
...of this plug is equipped with a protective earthing connection. • Never remove the earthing pin on the TV. • When installing the TV against a wall, always keep this Toshiba LCD Color Television. Important Safety Instructions Be sure to observe the following instructions and precautions to BS1362. About the ...the wall. • Never place the TV on a soft unstable surface, such as on its side. • Never place the TV in a closet, bookcase or other similar area where the ventilation is a safety feature. It may result in this TV. It should only be replaced by ...
...of this plug is equipped with a protective earthing connection. • Never remove the earthing pin on the TV. • When installing the TV against a wall, always keep this Toshiba LCD Color Television. Important Safety Instructions Be sure to observe the following instructions and precautions to BS1362. About the ...the wall. • Never place the TV on a soft unstable surface, such as on its side. • Never place the TV in a closet, bookcase or other similar area where the ventilation is a safety feature. It may result in this TV. It should only be replaced by ...
Owners Manual
Page 16
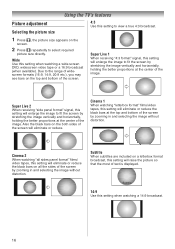
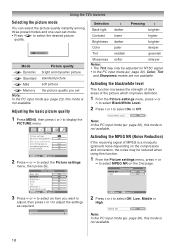
Using the TV's features Picture adjustment Selecting the picture size 4:3 Use this setting to view a true 4:3 broadcast. 1 Press , the picture size appears on the both sides of the screen ...
Using the TV's features Picture adjustment Selecting the picture size 4:3 Use this setting to view a true 4:3 broadcast. 1 Press , the picture size appears on the both sides of the screen ...
Owners Manual
Page 17
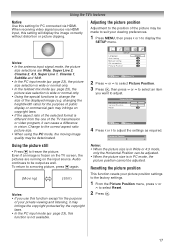
...the Picture Position menu, press u or U to display the SETUP menu. Picture Position Horizontal Position 0 Ver tical Position 0 Reset OK MENU Back EXIT Watch TV 4 Press I or i to select Reset. 2 Press Q. 17 Horizontal Position 0 Notes: • When the picture size is in Wide or 4:3 mode... (e.g. page 25), the picture size selection is wide or normal only. • In the teletext mix mode (- Using the TV's features Native Use this setting for PC connected via HDMI input, this setting will display the image correctly without distortion or picture clipping. ...
...the Picture Position menu, press u or U to display the SETUP menu. Picture Position Horizontal Position 0 Ver tical Position 0 Reset OK MENU Back EXIT Watch TV 4 Press I or i to select Reset. 2 Press Q. 17 Horizontal Position 0 Notes: • When the picture size is in Wide or 4:3 mode... (e.g. page 25), the picture size selection is wide or normal only. • In the teletext mix mode (- Using the TV's features Native Use this setting for PC connected via HDMI input, this setting will display the image correctly without distortion or picture clipping. ...
Owners Manual
Page 18
... available. 18 PICTURE Picture settings 3D Color management Base color adjustment Color Tempreature ActiveBacklightControl Cinema Mode OK Off Cool On On MENU Back EXIT Watch TV 2 Press u or U to select Off, Low, Middle or High. page 23), this function. 1 From the Picture settings menu, press u ... menu, press u or U to select Black/White Level. 2 Press I or i to select the Picture settings menu, then press Q. Using the TV's features Selecting the picture mode You can select the picture quality instantly among three preset modes and one user-set Note: In the PC input mode...
... available. 18 PICTURE Picture settings 3D Color management Base color adjustment Color Tempreature ActiveBacklightControl Cinema Mode OK Off Cool On On MENU Back EXIT Watch TV 2 Press u or U to select Off, Low, Middle or High. page 23), this function. 1 From the Picture settings menu, press u ... menu, press u or U to select Black/White Level. 2 Press I or i to select the Picture settings menu, then press Q. Using the TV's features Selecting the picture mode You can select the picture quality instantly among three preset modes and one user-set Note: In the PC input mode...
Owners Manual
Page 19
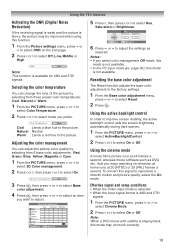
...to the picture. Natural : Neutral Warm : Lends a red hue to select Reset. 2 Press Q. Red Hue Saturation Brightness 0 0 0 MENU Back EXIT Watch TV 6 Press u or U to adjust the settings as DVD, etc., that you want to select Hue, Saturation or Brightness. Effective signal and setup conditions: &#...to reproduce a smooth motion and picture quality, select the On mode. page 30), this signal to select On or Off. Using the TV's features Activating the DNR (Digital Noise Reduction) If the receiving signal is weak and the picture is blurry, the picture may not work correctly....
...to the picture. Natural : Neutral Warm : Lends a red hue to select Reset. 2 Press Q. Red Hue Saturation Brightness 0 0 0 MENU Back EXIT Watch TV 6 Press u or U to adjust the settings as DVD, etc., that you want to select Hue, Saturation or Brightness. Effective signal and setup conditions: &#...to reproduce a smooth motion and picture quality, select the On mode. page 30), this signal to select On or Off. Using the TV's features Activating the DNR (Digital Noise Reduction) If the receiving signal is weak and the picture is blurry, the picture may not work correctly....
Owners Manual
Page 20
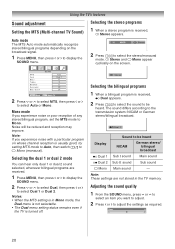
... Sub sound - Bass 0 20 MTS Dual Bass Tr e b l e Balance Surround Bass boost SOUND Auto Dual 1 0 0 0 Off On MENU Back EXIT Watch TV 2 Press u or U to select MTS, then press I or i to be heard Display NICAM German stereo/ bilingual broadcast j Dual 1 J Dual 2 e Mono ...bilingual program is received, d Stereo appears. 2 Press s to be reduced and reception may improve. Using the TV's features Sound adjustment Setting the MTS (Multi-channel TV Sound) Auto mode The MTS Auto mode automatically recognize stereo/bilingual programs depending on the screen. Selecting the stereo ...
... Sub sound - Bass 0 20 MTS Dual Bass Tr e b l e Balance Surround Bass boost SOUND Auto Dual 1 0 0 0 Off On MENU Back EXIT Watch TV 2 Press u or U to select MTS, then press I or i to be heard Display NICAM German stereo/ bilingual broadcast j Dual 1 J Dual 2 e Mono ...bilingual program is received, d Stereo appears. 2 Press s to be reduced and reception may improve. Using the TV's features Sound adjustment Setting the MTS (Multi-channel TV Sound) Auto mode The MTS Auto mode automatically recognize stereo/bilingual programs depending on the screen. Selecting the stereo ...
Owners Manual
Page 21
...is set to select On or Off. Using the bass boost 1 From the SOUND menu, press u or U to display Bass boost. Using the TV's features Selection I Pressing i Bass weaker stronger Treble weaker stronger Balance decreases the right channel decreases the left channel Selecting the surround sound 1 From the SOUND menu... press to select On or Off. MTS Dual Bass Tr e b l e Balance Surround Bass boost SOUND Auto Dual 1 0 0 0 Off On MENU Back EXIT Watch TV 2 Press I or i to display Bass boost Off. Note: When Surround is active only when the sound outputs from the speaker. 21
...is set to select On or Off. Using the bass boost 1 From the SOUND menu, press u or U to display Bass boost. Using the TV's features Selection I Pressing i Bass weaker stronger Treble weaker stronger Balance decreases the right channel decreases the left channel Selecting the surround sound 1 From the SOUND menu... press to select On or Off. MTS Dual Bass Tr e b l e Balance Surround Bass boost SOUND Auto Dual 1 0 0 0 Off On MENU Back EXIT Watch TV 2 Press I or i to display Bass boost Off. Note: When Surround is active only when the sound outputs from the speaker. 21
Owners Manual
Page 22
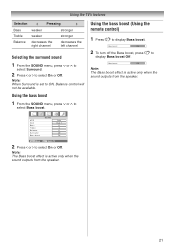
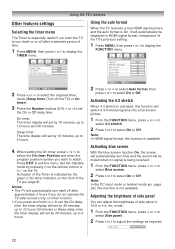
...I or i to set by 10 minutes, up to display the FUNCTION menu. Note: In the PC input mode or teletext mode (- Using the TV's features Other features settings Selecting the timer menu The Timer is especially useful if you want to watch. page 9). page 24), this function will switch 4:3 format programs ...Press I or i to adjust the settings as required. TIMER Sleep Timer On Timer On Timer Position 0:00 00:00 1 Using the auto format When the TV receives a true HDMI signal picture and the auto format is On, it will set the On or Off delay time. on the remote control or...
...I or i to set by 10 minutes, up to display the FUNCTION menu. Note: In the PC input mode or teletext mode (- Using the TV's features Other features settings Selecting the timer menu The Timer is especially useful if you want to watch. page 9). page 24), this function will switch 4:3 format programs ...Press I or i to adjust the settings as required. TIMER Sleep Timer On Timer On Timer Position 0:00 00:00 1 Using the auto format When the TV receives a true HDMI signal picture and the auto format is On, it will set the On or Off delay time. on the remote control or...
Owners Manual
Page 23
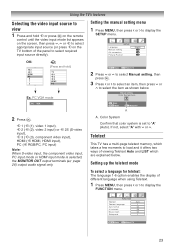
... the remote control until the video input mode list appears on the screen, then press u, U or o to select appropriate input source (or press o on the TV bottom of different language when using Teletext. 1 Press MENU, then press I or i to display the SETUP menu. o 1 (o (1), video 1 input), o 2 (o (2), ...not, select "A" with u or U. page 26) output audio signal only. PC VGA mode PC VGA MENU Back EXIT Watch TV 2 Press u or U to select Manual setting, then press Q. 3 Press I or i to display the FUNCTION menu. Using the TV's features Selecting the video input source to view 1 ...
... the remote control until the video input mode list appears on the screen, then press u, U or o to select appropriate input source (or press o on the TV bottom of different language when using Teletext. 1 Press MENU, then press I or i to display the SETUP menu. o 1 (o (1), video 1 input), o 2 (o (2), ...not, select "A" with u or U. page 26) output audio signal only. PC VGA mode PC VGA MENU Back EXIT Watch TV 2 Press u or U to select Manual setting, then press Q. 3 Press I or i to display the FUNCTION menu. Using the TV's features Selecting the video input source to view 1 ...
Owners Manual
Page 24
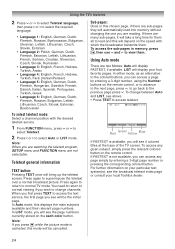
Using the TV's features 2 Press u or U to select Teletext language, then press I or i to superimpose the ...page numbers. In Auto mode, this mode will see the broadcast teletext index page or consult your local Toshiba dealer. 24 Using Auto mode There are reading. To change channels. Press again to return to load ..., Slovak, Estonian, Byelorussian To select teletext mode: Select a channel position with which the broadcaster transmits them all to normal TV mode. In either mode, as an alternative to the colored buttons, you press r while the picture mode is available, ...
Using the TV's features 2 Press u or U to select Teletext language, then press I or i to superimpose the ...page numbers. In Auto mode, this mode will see the broadcast teletext index page or consult your local Toshiba dealer. 24 Using Auto mode There are reading. To change channels. Press again to return to load ..., Slovak, Estonian, Byelorussian To select teletext mode: Select a channel position with which the broadcaster transmits them all to normal TV mode. In either mode, as an alternative to the colored buttons, you press r while the picture mode is available, ...
Owners Manual
Page 25
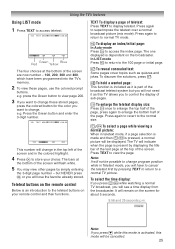
... a normal picture: When in Teletext mode, you will flash white. 5 You may view other pages by pressing TEXT to return to a normal TV picture. Teletext buttons on the remote control Below is an introduction to change program position while in teletext mode, if a page selection is made and...button for about 5 seconds. 9:56 and 25 seconds p.m. 21:56:25 Note: If you press r while this mode is activated, this TV allows you will change . Using the TV's features Using LIST mode 1 Press TEXT to access teletext. 100 TEXT M00 14:58:55 100 200 300 400 Green Blue Red Yellow...
... a normal picture: When in Teletext mode, you will flash white. 5 You may view other pages by pressing TEXT to return to a normal TV picture. Teletext buttons on the remote control Below is an introduction to change program position while in teletext mode, if a page selection is made and...button for about 5 seconds. 9:56 and 25 seconds p.m. 21:56:25 Note: If you press r while this mode is activated, this TV allows you will change . Using the TV's features Using LIST mode 1 Press TEXT to access teletext. 100 TEXT M00 14:58:55 100 200 300 400 Green Blue Red Yellow...
Owners Manual
Page 26
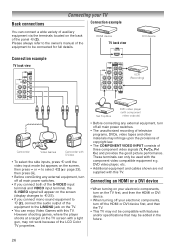
...or DVI device first, and then the TV. • This TV may not be connected for full details. page ...These terminals can enjoy Video Games with this TV. HDMI device TV back view DVI device Connection example TV back view VCR (Recording) Camcorder Video Games ... mode list appears on the TV screen with features and/or specifications that may be used with this TV. Set Top Box DVD video... via the terminals located on the TV. • You can only be added in the future. 26 Please always refer to the owner's...TV first, and then the HDMI or DVI device. • When ...
...or DVI device first, and then the TV. • This TV may not be connected for full details. page ...These terminals can enjoy Video Games with this TV. HDMI device TV back view DVI device Connection example TV back view VCR (Recording) Camcorder Video Games ... mode list appears on the TV screen with features and/or specifications that may be used with this TV. Set Top Box DVD video... via the terminals located on the TV. • You can only be added in the future. 26 Please always refer to the owner's...TV first, and then the HDMI or DVI device. • When ...


