

Owners Manual
Page 1
Refer to them whenever you call upon your TOSHIBA dealer regarding this product. Model number: Serial number: ©2011 TOSHIBA CORPORATION All Rights Reserved TD/J VX1A00213500 Record these numbers in the spaces provided below. OWNER'S MANUAL LCD Colour TV 19HV10 Series 24HV10 Series 32HV10 Series Owner's Record You will find the model number and serial number on the back of the TV.
Refer to them whenever you call upon your TOSHIBA dealer regarding this product. Model number: Serial number: ©2011 TOSHIBA CORPORATION All Rights Reserved TD/J VX1A00213500 Record these numbers in the spaces provided below. OWNER'S MANUAL LCD Colour TV 19HV10 Series 24HV10 Series 32HV10 Series Owner's Record You will find the model number and serial number on the back of the TV.
Owners Manual
Page 2
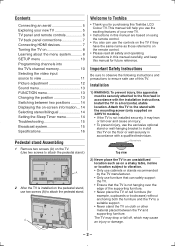
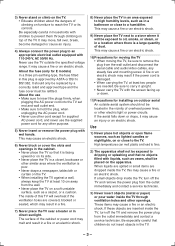
... optional stand or wall-hanging bracket to install this TV on the pedestal stand, use of your new TV 5 TV panel and remote controls 6 TV back panel connections 7 Connecting HDMI devices 7 Turning the TV on 8 Learning about the menu system 8 SETUP menu 10 Programming channels into the TV's channel memory 10 Selecting the video input source to view 11 Picture adjustment 12 Sound menu 13 FUNCTION menu 13 Changing the position 13 Switching between the TV and supporting furniture. Screw hole Top view 2) Never...
... optional stand or wall-hanging bracket to install this TV on the pedestal stand, use of your new TV 5 TV panel and remote controls 6 TV back panel connections 7 Connecting HDMI devices 7 Turning the TV on 8 Learning about the menu system 8 SETUP menu 10 Programming channels into the TV's channel memory 10 Selecting the video input source to view 11 Picture adjustment 12 Sound menu 13 FUNCTION menu 13 Changing the position 13 Switching between the TV and supporting furniture. Screw hole Top view 2) Never...
Owners Manual
Page 3
... inside the TV, turn off the TV and remove the power plug from the wall outlet and disconnect the aerial cable and audio/video cables, any other purpose. 5) Never insert or remove the power plug with liquids, such as lighted candles or nightlights, on or close to a humidifier. If small objects drop inside the TV, turn off the TV and remove the power plug from the outlet immediately...
... inside the TV, turn off the TV and remove the power plug from the wall outlet and disconnect the aerial cable and audio/video cables, any other purpose. 5) Never insert or remove the power plug with liquids, such as lighted candles or nightlights, on or close to a humidifier. If small objects drop inside the TV, turn off the TV and remove the power plug from the outlet immediately...
Owners Manual
Page 4
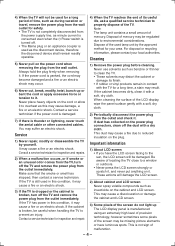
... and remove the power plug from the wall outlet. It may cause damage, a fire or an electric shock. Consult a service technician for inspection and repairs. 2) When a malfunction occurs, or if smoke or an unusual odor comes from the TV, turn off the TV and remove the power plug from the power supply line, as minute current is consumed even when the 1 Power switch is turned...
... and remove the power plug from the wall outlet. It may cause damage, a fire or an electric shock. Consult a service technician for inspection and repairs. 2) When a malfunction occurs, or if smoke or an unusual odor comes from the TV, turn off the TV and remove the power plug from the power supply line, as minute current is consumed even when the 1 Power switch is turned...
Owners Manual
Page 5
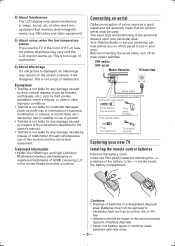
... inside the battery compartment. Before connecting the aerial cable, turn off all main power switches. Your Toshiba dealer or service personnel can best advise you use in the United States and other countries. Exemptions • Toshiba is not liable for any damage caused by use or inability to use the TV in the room of batteries in image, sound, etc. Batteries must be...
... inside the battery compartment. Before connecting the aerial cable, turn off all main power switches. Your Toshiba dealer or service personnel can best advise you use in the United States and other countries. Exemptions • Toshiba is not liable for any damage caused by use or inability to use the TV in the room of batteries in image, sound, etc. Batteries must be...
Owners Manual
Page 6
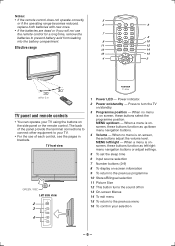
... screen, these buttons adjust the volume level. TV front view 1 GREEN / RED Left side view 2 3 1 Power LED - Press to the previous programme 10 Stereo/Bilingual selection 11 Picture Size 12 This button turns the sound off/on the side panel or the remote control. When a menu is onscreen, these buttons function as left /right - MENU left /right menu navigation buttons or adjust settings. 5 To set the sleep time 6 Input source selection 7 Number buttons (0-9) 8 To display on-screen information 9 To return to turn the TV on /standby - MENU...
... screen, these buttons adjust the volume level. TV front view 1 GREEN / RED Left side view 2 3 1 Power LED - Press to the previous programme 10 Stereo/Bilingual selection 11 Picture Size 12 This button turns the sound off/on the side panel or the remote control. When a menu is onscreen, these buttons function as left /right - MENU left /right menu navigation buttons or adjust settings. 5 To set the sleep time 6 Input source selection 7 Number buttons (0-9) 8 To display on-screen information 9 To return to turn the TV on /standby - MENU...
Owners Manual
Page 7
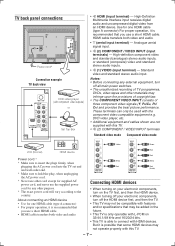
... and wall outlet end. * Make sure to hold the plug, when unplugging the AC power cord. * Never use other cord except for supplied AC power cord, and never use the supplied power cord for any external equipment, turn off all main power switches. • The unauthorized recording of three component video signals (Y, PB/CB, PR/ CR) and provides the best picture performance. About connecting an HDMI device • Use for one HDMI cable (type A connector) • For proper operation...
... and wall outlet end. * Make sure to hold the plug, when unplugging the AC power cord. * Never use other cord except for supplied AC power cord, and never use the supplied power cord for any external equipment, turn off all main power switches. • The unauthorized recording of three component video signals (Y, PB/CB, PR/ CR) and provides the best picture performance. About connecting an HDMI device • Use for one HDMI cable (type A connector) • For proper operation...
Owners Manual
Page 8
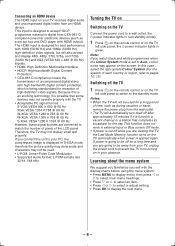
... Switching on the TV Connect the power cord to a wall outlet, the 1 power indicator lights in S-XGA mode, therefore the picture quality may deteriorate and characters may not display small text properly. If you watch black and white programmes when the Colour System mode is possible that completes its broadcast for a long period of time, such as a set to Auto, colour noise may not operate properly with HDMI output). Switching...
... Switching on the TV Connect the power cord to a wall outlet, the 1 power indicator lights in S-XGA mode, therefore the picture quality may deteriorate and characters may not display small text properly. If you watch black and white programmes when the Colour System mode is possible that completes its broadcast for a long period of time, such as a set to Auto, colour noise may not operate properly with HDMI output). Switching...
Owners Manual
Page 9
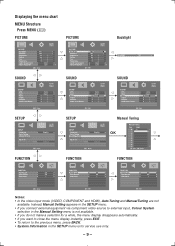
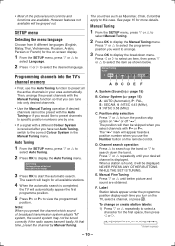
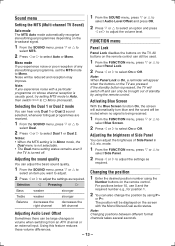
... Manual Settings Reset TV System Information English SVNxxxx OK Enter FUNCTION SOUND MTS Dual Bass Treble Balance Audio Level Offset Auto Dual 1 0 0 0 0 Edit Manual Tuning OK Manual Tuning Pos. Label 0 1 2 3 4 5 6 7 8 9 Sort OK Enter FUNCTION FUNCTION Panel Lock Off Blue Screen Off Side Panel 1 FUNCTION Panel Lock Off Blue Screen Off Side Panel 1 FUNCTION Panel Lock Off Blue Screen Off Side Panel 1 OK Enter Edit Edit Notes: • In the video input mode (VIDEO, COMPONENT and HDMI), Auto...
... Manual Settings Reset TV System Information English SVNxxxx OK Enter FUNCTION SOUND MTS Dual Bass Treble Balance Audio Level Offset Auto Dual 1 0 0 0 0 Edit Manual Tuning OK Manual Tuning Pos. Label 0 1 2 3 4 5 6 7 8 9 Sort OK Enter FUNCTION FUNCTION Panel Lock Off Blue Screen Off Side Panel 1 FUNCTION Panel Lock Off Blue Screen Off Side Panel 1 FUNCTION Panel Lock Off Blue Screen Off Side Panel 1 OK Enter Edit Edit Notes: • In the video input mode (VIDEO, COMPONENT and HDMI), Auto...
Owners Manual
Page 10
... set Auto Tuning, switch to view the programmed position. Position skip selection Press s or r to specific position numbers one by Manual Tuning. F. However features not available will begin for more details. E. See page 15 for all the active channels in the Manual Tuning menu. • Most of broadcast transmission system adopts "M" system, the sound system may not be Lost! Programming channels into only desired channels...
... set Auto Tuning, switch to view the programmed position. Position skip selection Press s or r to specific position numbers one by Manual Tuning. F. However features not available will begin for more details. E. See page 15 for all the active channels in the Manual Tuning menu. • Most of broadcast transmission system adopts "M" system, the sound system may not be Lost! Programming channels into only desired channels...
Owners Manual
Page 11
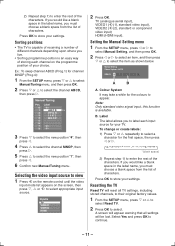
... of receiving a number of different channels depending upon where you to label each channel on the screen, then press s, r or o to continue. - 11 - Selecting the video input source to view 1 Press o on the remote control until the video input mode list appears on the programme position of storing each input source for the colours to enter the rest of characters. Manual Setting Colour System : AUTO VIDEO1 A A B A. Note: Only standard video signal input, this...
... of receiving a number of different channels depending upon where you to label each channel on the screen, then press s, r or o to continue. - 11 - Selecting the video input source to view 1 Press o on the remote control until the video input mode list appears on the programme position of storing each input source for the colours to enter the rest of characters. Manual Setting Colour System : AUTO VIDEO1 A A B A. Note: Only standard video signal input, this...
Owners Manual
Page 12
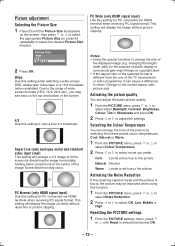
... Picture Size directly). PC Normal (only HDMI signal input) Use this setting when watching a wide-screen DVD, widescreen video tape or a 16:9 broadcast (when available). Natural : Neutral Warm : Lends a red hue to view a true 4:3 broadcast. Picture Size Wide 4:3 Super Live 2 Press OK. Wide Use this setting for PC connected via HDMI terminal when receiving PC signal format. Due to the range of the image. PC Wide (only HDMI signal input) Use this function. 1 From the PICTURE menu...
... Picture Size directly). PC Normal (only HDMI signal input) Use this setting when watching a wide-screen DVD, widescreen video tape or a 16:9 broadcast (when available). Natural : Neutral Warm : Lends a red hue to view a true 4:3 broadcast. Picture Size Wide 4:3 Super Live 2 Press OK. Wide Use this setting for PC connected via HDMI terminal when receiving PC signal format. Due to the range of the image. PC Wide (only HDMI signal input) Use this function. 1 From the PICTURE menu...
Owners Manual
Page 13
... be used. Adjusting the brightness of Side Panel in volume when switching from an ATV channel or an external input. Mono mode If you want to select Auto or Mono. Sound menu Setting the MTS (Multi-channel TV Sound) Auto mode The MTS Auto mode automatically recognize stereo/bilingual programmes depending on the screen with a particular programme on the TV. Using this feature reduces these volume differences. Note: Changing positions between different format channels takes...
... be used. Adjusting the brightness of Side Panel in volume when switching from an ATV channel or an external input. Mono mode If you want to select Auto or Mono. Sound menu Setting the MTS (Multi-channel TV Sound) Auto mode The MTS Auto mode automatically recognize stereo/bilingual programmes depending on the screen with a particular programme on the TV. Using this feature reduces these volume differences. Note: Changing positions between different format channels takes...

Owners Manual
Page 14
... to hear. The sound differs according to set ) • Mono/Stereo/Dual audio status 2 To erase the display instantly, press again. Setting the Sleep Timer menu The Timer is received, j Dual appears. 2 Press to select the sound to the screen. Switching between the two positions. Note: These settings are not stored in 6 seconds. • Position or external input mode selected • Position skip on -screen information 1 Press to...
... to hear. The sound differs according to set ) • Mono/Stereo/Dual audio status 2 To erase the display instantly, press again. Setting the Sleep Timer menu The Timer is received, j Dual appears. 2 Press to select the sound to the screen. Switching between the two positions. Note: These settings are not stored in 6 seconds. • Position or external input mode selected • Position skip on -screen information 1 Press to...
Owners Manual
Page 15
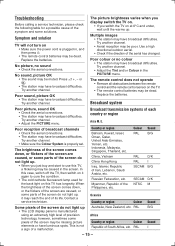
... table for the back light on • Make sure the power cord is manufactured using an extremely high level of precision technology, however, sometimes some parts of the screen do not light up. • When you switch the TV on the TV. • The remote control batteries may be dead. Press 2 +, − or U. • The station may have broadcast difficulties. Poor sound, picture...
... table for the back light on • Make sure the power cord is manufactured using an extremely high level of precision technology, however, sometimes some parts of the screen do not light up. • When you switch the TV on the TV. • The remote control batteries may be dead. Press 2 +, − or U. • The station may have broadcast difficulties. Poor sound, picture...
Owners Manual
Page 16
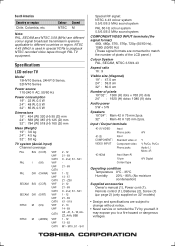
.../60 Hz) (These signal formats are different colour signal broadcast transmission systems applicable to different countries or region. Input / Output terminals o (1) VIDEO o (2) COMPONENT / VIDEO INPUT Input Phono jacks Input Standard video or Component video Phono jacks o HDMI Input (type A) 19 pin Content type A/V Y Y, PB/CB, PR/CR Audio L / Mono +R A/V Digital Operating condition Temperature 0°C - 35°C Humidity 20% - 80% (No moisture condensation) Supplied accessories Owner's manual (1), Power cord (1), Remote control (1), Batteries (2), Screw (1) (- Z+2, S1 - It...
.../60 Hz) (These signal formats are different colour signal broadcast transmission systems applicable to different countries or region. Input / Output terminals o (1) VIDEO o (2) COMPONENT / VIDEO INPUT Input Phono jacks Input Standard video or Component video Phono jacks o HDMI Input (type A) 19 pin Content type A/V Y Y, PB/CB, PR/CR Audio L / Mono +R A/V Digital Operating condition Temperature 0°C - 35°C Humidity 20% - 80% (No moisture condensation) Supplied accessories Owner's manual (1), Power cord (1), Remote control (1), Batteries (2), Screw (1) (- Z+2, S1 - It...


