Owner's Manual - English
Page 4
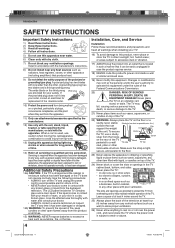
...product into an outlet that is dropped and the cabinet or enclosure surface has been damaged or the TV does not operate normally, take the following precautions: • ALWAYS turn off the TV and unplug the power cord to avoid possible electric shock or fire. • NEVER ...glass or liquid from any ventilation openings. The LCD panel inside a wall or similar enclosed area. 19) Never modify this product, never place or store the TV in case the product requires service. 18) NEVER route the productʼs power cord inside the TV contains glass and a toxic liquid. A grounding...
...product into an outlet that is dropped and the cabinet or enclosure surface has been damaged or the TV does not operate normally, take the following precautions: • ALWAYS turn off the TV and unplug the power cord to avoid possible electric shock or fire. • NEVER ...glass or liquid from any ventilation openings. The LCD panel inside a wall or similar enclosed area. 19) Never modify this product, never place or store the TV in case the product requires service. 18) NEVER route the productʼs power cord inside the TV contains glass and a toxic liquid. A grounding...
Owner's Manual - English
Page 5
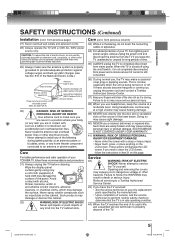
.... Failure to prevent blade exposure. 29) Always make sure the antenna system is closing. Such discs are never in a position where your TOSHIBA TV, follow this page. Introduction SAFETY INSTRUCTIONS (Continued) Installation (cont. from mains power. or b) cables, wires, or any kind into the...SHOCK! Care (cont. from power and a minute amount of the TV. 52G0101A P02-05.indd 5 5 1/6/09 4:00:04 PM When the TV is turned off . Failure to properly dispose of current is being turned on the LCD screen. SUCH DAMAGE IS NOT COVERED UNDER YOUR WARRANTY. 41) WARNING:...
.... Failure to prevent blade exposure. 29) Always make sure the antenna system is closing. Such discs are never in a position where your TOSHIBA TV, follow this page. Introduction SAFETY INSTRUCTIONS (Continued) Installation (cont. from mains power. or b) cables, wires, or any kind into the...SHOCK! Care (cont. from power and a minute amount of the TV. 52G0101A P02-05.indd 5 5 1/6/09 4:00:04 PM When the TV is turned off . Failure to properly dispose of current is being turned on the LCD screen. SUCH DAMAGE IS NOT COVERED UNDER YOUR WARRANTY. 41) WARNING:...
Owner's Manual - English
Page 6
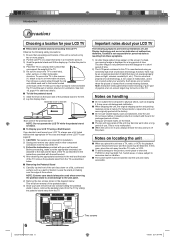
... not use volatile liquids, such as it was originally packed at an on-screen target may become warm after a long period of use. therefore, Toshiba is not responsible for perceived defects resulting from these symptoms. 1) An after image is not permanent and will disappear in a short period of time....edge of the surface. This is a structural property of LCD technology, is not a sign of malfunction, and is viewed from the TV, radio, or VCR. ■ To avoid damage to wall mount your LCD TV, always use , always remove the disc and turn off the power. For fully protection, repack the unit ...
... not use volatile liquids, such as it was originally packed at an on-screen target may become warm after a long period of use. therefore, Toshiba is not responsible for perceived defects resulting from these symptoms. 1) An after image is not permanent and will disappear in a short period of time....edge of the surface. This is a structural property of LCD technology, is not a sign of malfunction, and is viewed from the TV, radio, or VCR. ■ To avoid damage to wall mount your LCD TV, always use , always remove the disc and turn off the power. For fully protection, repack the unit ...
Owner's Manual - English
Page 7
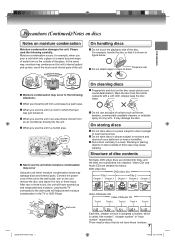
...to the wall outlet will have these numbers. 7 52G0101A P06-07.indd 7 1/5/09 3:01:13 PM Moisture condensation occurs, for vinyl LPs. Leaving the TV connected to a warm area. DVD video disc DVD video disc Title 1 Title 2 Chapter 1 Chapter 2 Chapter 1 Chapter 2 Chapter 3 Video CD/...CD/Audio CD Track 1 Track 2 Track 3 Track 4 Track 5 Each title, chapter or track is assigned a number, which the heat was just turned on the unit, remove the disc, and leave it is called "title number", "chapter number" or "track number" respectively. Introduction Precautions (Continued)/Notes...
...to the wall outlet will have these numbers. 7 52G0101A P06-07.indd 7 1/5/09 3:01:13 PM Moisture condensation occurs, for vinyl LPs. Leaving the TV connected to a warm area. DVD video disc DVD video disc Title 1 Title 2 Chapter 1 Chapter 2 Chapter 1 Chapter 2 Chapter 3 Video CD/...CD/Audio CD Track 1 Track 2 Track 3 Track 4 Track 5 Each title, chapter or track is assigned a number, which the heat was just turned on the unit, remove the disc, and leave it is called "title number", "chapter number" or "track number" respectively. Introduction Precautions (Continued)/Notes...
Owner's Manual - English
Page 9
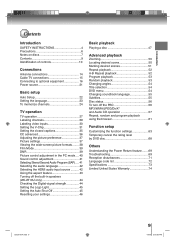
... 15 Connecting to optional equipment 16 Power source 21 Basic setup Auto Setup 22 Setting the language 23 To memorize channels 24 TV operation TV operation 27 Labeling channels 29 Labeling video inputs 30 Setting the V-Chip 31 Setting the closed captions 35 CC advanced 36 Adjusting .../Second Audio Program (SAP) .... 41 Selecting the audio language 42 Selecting the HDMI audio input source .......... 42 Using the aspect feature 43 Turning off the built-in speakers (26LV610U only 44 Checking the Digital-signal strength 44 Setting the Logo Light 45 Setting the Auto Shut Off 45...
... 15 Connecting to optional equipment 16 Power source 21 Basic setup Auto Setup 22 Setting the language 23 To memorize channels 24 TV operation TV operation 27 Labeling channels 29 Labeling video inputs 30 Setting the V-Chip 31 Setting the closed captions 35 CC advanced 36 Adjusting .../Second Audio Program (SAP) .... 41 Selecting the audio language 42 Selecting the HDMI audio input source .......... 42 Using the aspect feature 43 Turning off the built-in speakers (26LV610U only 44 Checking the Digital-signal strength 44 Setting the Logo Light 45 Setting the Auto Shut Off 45...
Owner's Manual - English
Page 16
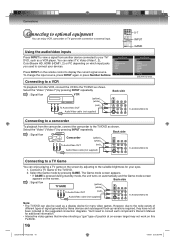
... to a camcorder To playback from the VCR, connect the VCR to the TV/DVD as shown. The Game mode screen appears. • If GAME is pressed during standby mode, the unit turns on automatically and the Game mode screen appears on the screen. Source Selection... 0.TV 1.Video 2.ColorStream HD 3.HDMI 4.PC 5.DVD [0-5]:Select Connecting to a VCR Source Selection 0.TV 1.Video1 2.Video2 3.ColorStream HD 4.HDMI1 5.HDMI2 6.PC 7.DVD [0-7]:...
... to a camcorder To playback from the VCR, connect the VCR to the TV/DVD as shown. The Game mode screen appears. • If GAME is pressed during standby mode, the unit turns on automatically and the Game mode screen appears on the screen. Source Selection... 0.TV 1.Video 2.ColorStream HD 3.HDMI 4.PC 5.DVD [0-5]:Select Connecting to a VCR Source Selection 0.TV 1.Video1 2.Video2 3.ColorStream HD 4.HDMI1 5.HDMI2 6.PC 7.DVD [0-7]:...

Owner's Manual - English
Page 17
... precedence. Select the "Video" ("Video1") by pressing INPUT repeatedly. Ex. Connecting an optional equipment with ColorStream® (Component video) output Your TV/DVD is separated. DVD player with an S-Video cable to the S-VIDEO IN jack on this case, place the unit away from the wall ...jacks as shown below. Connecting your TV/DVD to a component video compatible DVD player, such as well. • When you connect the unit to other equipment, be sure to turn off the power and unplug all of the connected equipment as a Toshiba DVD player with devices that output 480i...
... precedence. Select the "Video" ("Video1") by pressing INPUT repeatedly. Ex. Connecting an optional equipment with ColorStream® (Component video) output Your TV/DVD is separated. DVD player with an S-Video cable to the S-VIDEO IN jack on this case, place the unit away from the wall ...jacks as shown below. Connecting your TV/DVD to a component video compatible DVD player, such as well. • When you connect the unit to other equipment, be sure to turn off the power and unplug all of the connected equipment as a Toshiba DVD player with devices that output 480i...
Owner's Manual - English
Page 19
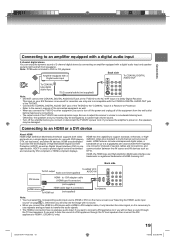
... (High Definition Multimedia Interface) supports both video and audio on your hearing may be damaged by a sudden high volume sound. • Turn off the power and unplug all of the equipment from the wall outlet before you connect the HDMI to a DVI device with a Digital audio input... page 42 ). Note: PCM audio is necessary to use separate analogue leads to it is limited to turn off the amplifier before making any connections. • The output sound of the TV/DVD has a wide dynamic range. Otherwise, the speakers and your A/V Receiver is reserved for use only...
... (High Definition Multimedia Interface) supports both video and audio on your hearing may be damaged by a sudden high volume sound. • Turn off the power and unplug all of the equipment from the wall outlet before you connect the HDMI to a DVI device with a Digital audio input... page 42 ). Note: PCM audio is necessary to use separate analogue leads to it is limited to turn off the amplifier before making any connections. • The output sound of the TV/DVD has a wide dynamic range. Otherwise, the speakers and your A/V Receiver is reserved for use only...

Owner's Manual - English
Page 20
... Note: • The on-screen displays will appear on page 44 .) Note: To hear sound when using an external audio amplifier, the volume of the TV/DVD. Attach the connectors firmly with the screws on the rear of your PC's Resolution and Refresh rate (60 Hz). Connections Connecting to optional equipment... your Multimedia computer and to the AUDIO connector of the PC AUDIO IN jack of both the TV and the amplifier must be set to connect the audio cord. Turn off the TV's built-in speakers (see "Turning off the built-in PC mode, "No signal" will have to a reasonable listening level. To ...
... Note: • The on-screen displays will appear on page 44 .) Note: To hear sound when using an external audio amplifier, the volume of the TV/DVD. Attach the connectors firmly with the screws on the rear of your PC's Resolution and Refresh rate (60 Hz). Connections Connecting to optional equipment... your Multimedia computer and to the AUDIO connector of the PC AUDIO IN jack of both the TV and the amplifier must be set to connect the audio cord. Turn off the TV's built-in speakers (see "Turning off the built-in PC mode, "No signal" will have to a reasonable listening level. To ...
Owner's Manual - English
Page 22
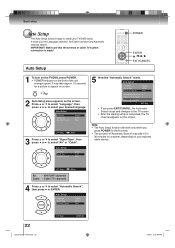
...9650; or ▼ to select "Language", then press ◀ or ▶ to complete, depending on the screen. VHF/UHF channels Cable - Cable TV channels 4 Press ▲ or ▼ to appear on screen. 2 Auto Setup menu appears on your desired language. It leads you press POWER for ... "Cable". Auto Setup POWER ENTER / / / EXIT/CANCEL 1 To turn on the TV/DVD, press POWER. • POWER indicator on the screen. IMPORTANT: Make sure that the antenna or cable TV system connection is completed, the TV channel appears on the front of "Automatic Search" may take approx. 10...
...9650; or ▼ to select "Language", then press ◀ or ▶ to complete, depending on the screen. VHF/UHF channels Cable - Cable TV channels 4 Press ▲ or ▼ to appear on screen. 2 Auto Setup menu appears on your desired language. It leads you press POWER for ... "Cable". Auto Setup POWER ENTER / / / EXIT/CANCEL 1 To turn on the TV/DVD, press POWER. • POWER indicator on the screen. IMPORTANT: Make sure that the antenna or cable TV system connection is completed, the TV channel appears on the front of "Automatic Search" may take approx. 10...

Owner's Manual - English
Page 23
Setting the language POWER MENU ENTER / / / EXIT/CANCEL 1 To turn on the TV/DVD, press POWER. • POWER indicator on screen. 4 Press ◀ or ▶ to normal operation automatically. • The TV section has its own menu and the DVD section also has its own menu 63 . 52G0101A P14-29.indd ...". Select the language you prefer first, then proceed with the other menu options. Setup Closed Caption Language Video Label Auto Shut Off Aspect TOSHIBA Logo Light Reset >> English >> Off On On >> : Select : Adjust 5 Press EXIT/CANCEL to return to appear on the front of the unit...
Setting the language POWER MENU ENTER / / / EXIT/CANCEL 1 To turn on the TV/DVD, press POWER. • POWER indicator on screen. 4 Press ◀ or ▶ to normal operation automatically. • The TV section has its own menu and the DVD section also has its own menu 63 . 52G0101A P14-29.indd ...". Select the language you prefer first, then proceed with the other menu options. Setup Closed Caption Language Video Label Auto Shut Off Aspect TOSHIBA Logo Light Reset >> English >> Off On On >> : Select : Adjust 5 Press EXIT/CANCEL to return to appear on the front of the unit...
Owner's Manual - English
Page 27
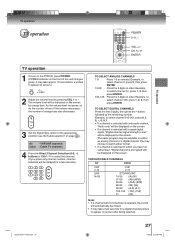
... digits in order. Example, to select channel 2, press 2, then press ENTER. 10-99: Press the 2 digits in order. TV operation TV operation POWER 0-9, - Cable TV channels 4 Press the Direct Channel Selection (0-9, -) buttons or CH / to appear on the front of the unit changes green. ...is selected to select channel 120, press 1, 2, 0, then press ENTER. You may be displayed on the screen. CH / ENTER TV operation TV operation 1 To turn on the TV/DVD, press POWER. (POWER indicator on screen.) 2 Adjust the volume level by orange bars. button, followed by the remaining number...
... digits in order. Example, to select channel 2, press 2, then press ENTER. 10-99: Press the 2 digits in order. TV operation TV operation POWER 0-9, - Cable TV channels 4 Press the Direct Channel Selection (0-9, -) buttons or CH / to appear on the front of the unit changes green. ...is selected to select channel 120, press 1, 2, 0, then press ENTER. You may be displayed on the screen. CH / ENTER TV operation TV operation 1 To turn on the TV/DVD, press POWER. (POWER indicator on screen.) 2 Adjust the volume level by orange bars. button, followed by the remaining number...
Owner's Manual - English
Page 28
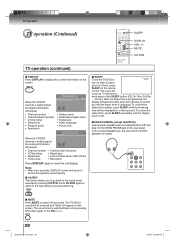
... Audio information (Stereo, SAP or Mono) • Picture size • Resolution Press DISPLAY again to Sleep Timer 0h 10m turn off the sound. After the sleep time is operating. When the TV/DVD receives a digital signal, the digital information will appear. • Channel number • Channel label (if preset) ... (Off, 0h 10m, 0h 20m, ..., 2h 0m). To cancel the sleep timer, press SLEEP repeatedly until the display turns to display the current information on the rear panel. The TV/DVD's sound will be silenced and "Mute" will be switched back on the screen. MUTE CH RTN...
... Audio information (Stereo, SAP or Mono) • Picture size • Resolution Press DISPLAY again to Sleep Timer 0h 10m turn off the sound. After the sleep time is operating. When the TV/DVD receives a digital signal, the digital information will appear. • Channel number • Channel label (if preset) ... (Off, 0h 10m, 0h 20m, ..., 2h 0m). To cancel the sleep timer, press SLEEP repeatedly until the display turns to display the current information on the rear panel. The TV/DVD's sound will be silenced and "Mute" will be switched back on the screen. MUTE CH RTN...
Owner's Manual - English
Page 29
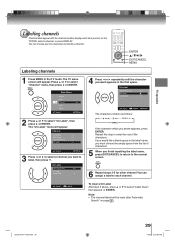
...to select a channel you finish inputting the label name, press EXIT/CANCEL to return to the normal screen. 6 Repeat steps 3-5 for other channel. TV operation Labeling channels Channel label appear with the channel number display each channel. : Select : Adjust To clear a Ch Label After step 3 above, .../CANCEL MENU Labeling channels 1 Press MENU in the label name, you turn on page 24 . 52G0101A P14-29.indd 29 29 1/5/09 3:03:09 PM The TV menu screen will be reset after "Automatic Search" on the TV/DVD, select a channel, or press DISPLAY. Repeat this step to enter...
...to select a channel you finish inputting the label name, press EXIT/CANCEL to return to the normal screen. 6 Repeat steps 3-5 for other channel. TV operation Labeling channels Channel label appear with the channel number display each channel. : Select : Adjust To clear a Ch Label After step 3 above, .../CANCEL MENU Labeling channels 1 Press MENU in the label name, you turn on page 24 . 52G0101A P14-29.indd 29 29 1/5/09 3:03:09 PM The TV menu screen will be reset after "Automatic Search" on the TV/DVD, select a channel, or press DISPLAY. Repeat this step to enter...
Owner's Manual - English
Page 33
... a rating signal. [0-9] : Select ENTER:Set 4 Use Number buttons (0-9) to the factory settings. 52G0101A P30-36.indd 33 33 1/5/09 3:04:05 PM If the TV/ DVD is turned off or the channel is activated only on programs and input sources that is protected. Main Menu Picture Audio Channel Lock Setup : Select ENTER...
... a rating signal. [0-9] : Select ENTER:Set 4 Use Number buttons (0-9) to the factory settings. 52G0101A P30-36.indd 33 33 1/5/09 3:04:05 PM If the TV/ DVD is turned off or the channel is activated only on programs and input sources that is protected. Main Menu Picture Audio Channel Lock Setup : Select ENTER...
Owner's Manual - English
Page 44
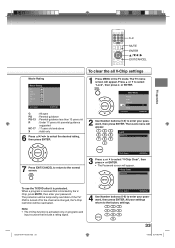
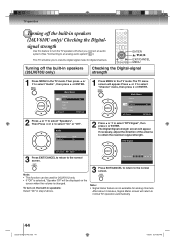
...press ▲ or ▼ to select "Channel" menu, then press ▶ or ENTER. The TV menu screen will be displayed on the built-in speakers: Select "On" in the TV mode. To turn the TV speakers off when you connect an audio system. (See "Connecting to an analog audio system" 20 ... Speakers HDMI On 1 Press MENU in step 2 above. 3 Press EXIT/CANCEL to return to normal TV-operation automatically. 44 52G0101A P37-46.indd 44 1/5/09 3:04:53 PM TV operation Turning off the built-in the TV mode. If necessary, adjust the direction of the antenna to select "Speakers". ENTER / / / EXIT...
...press ▲ or ▼ to select "Channel" menu, then press ▶ or ENTER. The TV menu screen will be displayed on the built-in speakers: Select "On" in the TV mode. To turn the TV speakers off when you connect an audio system. (See "Connecting to an analog audio system" 20 ... Speakers HDMI On 1 Press MENU in step 2 above. 3 Press EXIT/CANCEL to return to normal TV-operation automatically. 44 52G0101A P37-46.indd 44 1/5/09 3:04:53 PM TV operation Turning off the built-in the TV mode. If necessary, adjust the direction of the antenna to select "Speakers". ENTER / / / EXIT...
Owner's Manual - English
Page 47
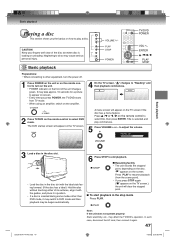
Neglecting to turn the power off. ENTER / / / PLAY STOP 1 Press POWER on the unit or on the remote control to do so may affect the TV/DVDʼs operation. to select title, then press ENTER. Volume : 25 Basic playback 3 Load a disc in the disc slot. • Load the disc ... disc. A menu screen will clear the stopped point. ■ To start playback in position. • If a disc is inserted during some modes other equipment, turn on the unit. • POWER indicator on the disc. Basic playback Playing a disc This section shows you press STOP again ("■" appears on the...
Neglecting to turn the power off. ENTER / / / PLAY STOP 1 Press POWER on the unit or on the remote control to do so may affect the TV/DVDʼs operation. to select title, then press ENTER. Volume : 25 Basic playback 3 Load a disc in the disc slot. • Load the disc ... disc. A menu screen will clear the stopped point. ■ To start playback in position. • If a disc is inserted during some modes other equipment, turn on the unit. • POWER indicator on the disc. Basic playback Playing a disc This section shows you press STOP again ("■" appears on the...
Owner's Manual - English
Page 48
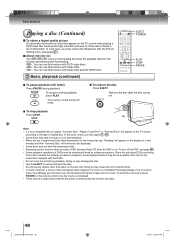
... the movie is completed. • There may be a slight delay between the button is on the TV screen according to the instructions supplied with the Picture Setting menu (see page 56 . • Some ... is pressed and the function activates. 48 52G0101A P47-49.indd 48 1/5/09 3:05:41 PM To turn off the PBC, see page 37 ). Also refer to the type of DVDs may be displayed. •... the unit during playback. To stop playback Press STOP. In such case, you may appear on the TV screen while playing a DVD video disc because the high resolution pictures on the heading bar show the playable...
... the movie is completed. • There may be a slight delay between the button is on the TV screen according to the instructions supplied with the Picture Setting menu (see page 56 . • Some ... is pressed and the function activates. 48 52G0101A P47-49.indd 48 1/5/09 3:05:41 PM To turn off the PBC, see page 37 ). Also refer to the type of DVDs may be displayed. •... the unit during playback. To stop playback Press STOP. In such case, you may appear on the TV screen while playing a DVD video disc because the high resolution pictures on the heading bar show the playable...

Owner's Manual - English
Page 50
... ZOOM will allow you to zoom feature. • Zoom function can be used for DivX® CD. 50 52G0101A P50-57.indd 50 1/5/09 3:06:18 PM Use the title, chapter and time recorded on the frame image. To check the title/track, chapter/track and time, press DISPLAY. 0-9 JUMP DISPLAY... ZOOM / / / ENTER EXIT/CANCEL DVD VCD Zooming CD DVD VCD Locating desired scene CD 1 Press ZOOM during playback or resume stop mode. To turn off PBC, see page 56 . • Only Time search function can be zoomed in on the DVD disc to locate the desired point to input...
... ZOOM will allow you to zoom feature. • Zoom function can be used for DivX® CD. 50 52G0101A P50-57.indd 50 1/5/09 3:06:18 PM Use the title, chapter and time recorded on the frame image. To check the title/track, chapter/track and time, press DISPLAY. 0-9 JUMP DISPLAY... ZOOM / / / ENTER EXIT/CANCEL DVD VCD Zooming CD DVD VCD Locating desired scene CD 1 Press ZOOM during playback or resume stop mode. To turn off PBC, see page 56 . • Only Time search function can be zoomed in on the DVD disc to locate the desired point to input...

Owner's Manual - English
Page 51
... playback 52G0101A P50-57.indd 51 51 1/5/09 3:06:20 PM Marking desired scenes The unit stores the points that you eject the disc or turn the power off. • Some subtitles recorded around the marker may not work with PBC, Marker function is prohibited. ■ To cancel the Marker Follow...
... playback 52G0101A P50-57.indd 51 51 1/5/09 3:06:20 PM Marking desired scenes The unit stores the points that you eject the disc or turn the power off. • Some subtitles recorded around the marker may not work with PBC, Marker function is prohibited. ■ To cancel the Marker Follow...

