Owner's Manual - English
Page 4
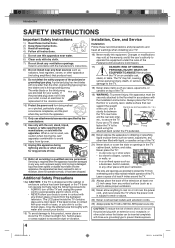
... take the following precautions: • ALWAYS turn off the TV and unplug the power cord to avoid possible electric shock or fire. • NEVER allow anything to drapes, curtains, or walls; The LCD panel inside the TV contains glass and a toxic liquid. The TV may void: a) the warranty, and b)... cord, receptacle, or other apparatus (including amplifiers) that can be inserted completely with liquid, or candles on top of the TV. 19) WARNING: To prevent injury, this apparatus must be securely attached to the floor/wall in accordance with water and consult your doctor...
... take the following precautions: • ALWAYS turn off the TV and unplug the power cord to avoid possible electric shock or fire. • NEVER allow anything to drapes, curtains, or walls; The LCD panel inside the TV contains glass and a toxic liquid. The TV may void: a) the warranty, and b)... cord, receptacle, or other apparatus (including amplifiers) that can be inserted completely with liquid, or candles on top of the TV. 19) WARNING: To prevent injury, this apparatus must be securely attached to the floor/wall in accordance with water and consult your doctor...
Owner's Manual - English
Page 5
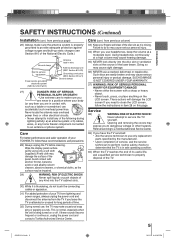
... 26) Always make sure the antenna system is being turned on the LCD screen. Using headphones continuously at a high volume may be impaired. 29) WARNING: RISK OF ELECTRIC SHOCK! These actions will damage the LCD screen If you have the TV serviced: • Ask the service technician to use ...an antenna or phone system. Service 38) WARNING: RISK OF ELECTRIC SHOCK! from the TV if you are in a position where your TOSHIBA TV, follow the instructions in safe operating condition. 40) When the TV reaches the end of its useful life, ask a qualified service technician to ...
... 26) Always make sure the antenna system is being turned on the LCD screen. Using headphones continuously at a high volume may be impaired. 29) WARNING: RISK OF ELECTRIC SHOCK! These actions will damage the LCD screen If you have the TV serviced: • Ask the service technician to use ...an antenna or phone system. Service 38) WARNING: RISK OF ELECTRIC SHOCK! from the TV if you are in a position where your TOSHIBA TV, follow the instructions in safe operating condition. 40) When the TV reaches the end of its useful life, ask a qualified service technician to ...
Owner's Manual - English
Page 6
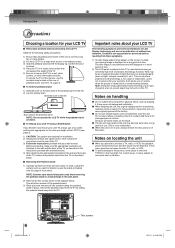
...use , always remove the disc and turn off the power. NOTE: Extreme care should always be used when removing the pedestal stand to avoid damage to this TV is not in direct sunlight; The ... 4) Place the TV on the screen if a fixed, non-moving image is displayed for a long period of time. Leave the stand protruding over the edge of the surface. therefore, Toshiba is not responsible for... ■ Do not use a UL Listed wall bracket appropriate for the size and weight of the LCD TV (see item 19, page 4). ■ To fold the pedestal stand 1) Slide the lever on locating the unit &#...
...use , always remove the disc and turn off the power. NOTE: Extreme care should always be used when removing the pedestal stand to avoid damage to this TV is not in direct sunlight; The ... 4) Place the TV on the screen if a fixed, non-moving image is displayed for a long period of time. Leave the stand protruding over the edge of the surface. therefore, Toshiba is not responsible for... ■ Do not use a UL Listed wall bracket appropriate for the size and weight of the LCD TV (see item 19, page 4). ■ To fold the pedestal stand 1) Slide the lever on locating the unit &#...

Owner's Manual - English
Page 7
.... On storing discs Do not store discs in a humid area. ■ Never use the unit in a room in the following carefully. Leaving the TV connected to direct sunlight or near a humidifier. For example, handle the disc so that do not have warmed up lens ■ Moisture condensation... Track 1 Track 2 Track 3 Track 4 Track 5 Each title, chapter or track is assigned a number, which the heat was just turned on. It may occur in which is shown in the TV or DVD Player. Do not store discs in places subject to discs. Wall outlet On handling discs Do not touch...
.... On storing discs Do not store discs in a humid area. ■ Never use the unit in a room in the following carefully. Leaving the TV connected to direct sunlight or near a humidifier. For example, handle the disc so that do not have warmed up lens ■ Moisture condensation... Track 1 Track 2 Track 3 Track 4 Track 5 Each title, chapter or track is assigned a number, which the heat was just turned on. It may occur in which is shown in the TV or DVD Player. Do not store discs in places subject to discs. Wall outlet On handling discs Do not touch...
Owner's Manual - English
Page 9
... 15 Connecting to optional equipment 16 Power source 20 Basic setup Auto setup 21 Setting the language 22 To memorize channels 23 TV operation TV operation 26 Labeling channels 28 Labeling video inputs 29 Setting the V-Chip 30 Setting the closed captions 34 CC advanced 35 Adjusting the ...Program playback 50 Random playback 50 Changing angles 51 Title selection 51 DVD menu 51 Changing soundtrack language 52 Subtitles 52 Disc status 53 To turn off the PBC 53 MP3/WMA/JPEG/DivX® and Audio CD operation 54 Repeat, random and program playback using file browser 58...
... 15 Connecting to optional equipment 16 Power source 20 Basic setup Auto setup 21 Setting the language 22 To memorize channels 23 TV operation TV operation 26 Labeling channels 28 Labeling video inputs 29 Setting the V-Chip 30 Setting the closed captions 34 CC advanced 35 Adjusting the ...Program playback 50 Random playback 50 Changing angles 51 Title selection 51 DVD menu 51 Changing soundtrack language 52 Subtitles 52 Disc status 53 To turn off the PBC 53 MP3/WMA/JPEG/DivX® and Audio CD operation 54 Repeat, random and program playback using file browser 58...
Owner's Manual - English
Page 16
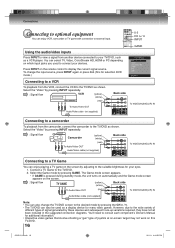
...pressing the CH / . • The TV/DVD can enjoy playing a TV game on the screen by adjusting to the suitable brightness for your eyes. 1. Select the "Video" by pressing GAME. The Game mode screen appears. • If GAME is pressed during standby mode, the unit turns on automatically and the Game mode.../Video OUT Audio/Video cable (not supplied) Back side To VIDEO/AUDIO(L/R) IN Connecting to a TV Game You can also be used to the TV/DVD as a VCR player. You can enjoy VCR, camcorder or TV game with connection to external input. 0-5 CH / INPUT GAME Using the audio/video inputs Press...
...pressing the CH / . • The TV/DVD can enjoy playing a TV game on the screen by adjusting to the suitable brightness for your eyes. 1. Select the "Video" by pressing GAME. The Game mode screen appears. • If GAME is pressed during standby mode, the unit turns on automatically and the Game mode.../Video OUT Audio/Video cable (not supplied) Back side To VIDEO/AUDIO(L/R) IN Connecting to a TV Game You can also be used to the TV/DVD as a VCR player. You can enjoy VCR, camcorder or TV game with connection to external input. 0-5 CH / INPUT GAME Using the audio/video inputs Press...
Owner's Manual - English
Page 17
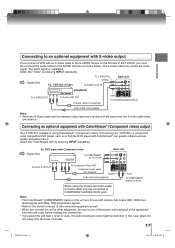
...must also connect the audio cables to a component video compatible DVD player, such as a Toshiba DVD player with devices that output 480i, 1080i inter- In this unit are connected at the...the S-video cable takes precedence. The audio signal is capable of the TV/DVD, you must be connected to turn off the power and unplug all of the equipment from the tuner and... to COMPONENT AUDIO(L/R) IN jacks. Connecting an optional equipment with ColorStream® (Component video) output Your TV/DVD is separated. Ex. DVD player with S-Video To S-VIDEO IN (white) To AUDIO (L/R) IN...
...must also connect the audio cables to a component video compatible DVD player, such as a Toshiba DVD player with devices that output 480i, 1080i inter- In this unit are connected at the...the S-video cable takes precedence. The audio signal is capable of the TV/DVD, you must be connected to turn off the power and unplug all of the equipment from the tuner and... to COMPONENT AUDIO(L/R) IN jacks. Connecting an optional equipment with ColorStream® (Component video) output Your TV/DVD is separated. Ex. DVD player with S-Video To S-VIDEO IN (white) To AUDIO (L/R) IN...
Owner's Manual - English
Page 19
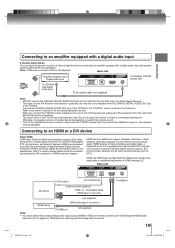
... a bandwidth of up to the AC-3 RF input of 2 channel digital stereo by connecting an amplifier equipped with no sound. 19 J50S0101A.indb 19 08.1.9 4:45:03 PM to an HDMI or a DVI device About HDMI HDMI (High Definition Multimedia Interface) supports both video and...Receiver is limited to protect digital content transmitted and received by a sudden high volume sound. • Turn off the power and unplug all of the equipment from the wall outlet before you connect the TV/DVD to other AV devices. DVI adapter cable (HDMI type A connector) or (not supplied) HDMI...
... a bandwidth of up to the AC-3 RF input of 2 channel digital stereo by connecting an amplifier equipped with no sound. 19 J50S0101A.indb 19 08.1.9 4:45:03 PM to an HDMI or a DVI device About HDMI HDMI (High Definition Multimedia Interface) supports both video and...Receiver is limited to protect digital content transmitted and received by a sudden high volume sound. • Turn off the power and unplug all of the equipment from the wall outlet before you connect the TV/DVD to other AV devices. DVI adapter cable (HDMI type A connector) or (not supplied) HDMI...
Owner's Manual - English
Page 21
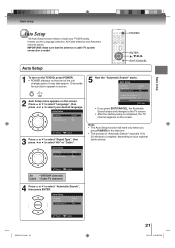
...work only when you the Language selection, Air/Cable selection and Automatic channel search. IMPORTANT: Make sure that the antenna or cable TV system connection is completed, the TV channel appears on the screen. Auto Setup Language Signal Type Automatic Search English Air Start : Select : Adjust 3 Press ▲...English Air Start J50S0101A.indb 21 : Select : Adjust 21 08.1.9 4:45:05 PM Auto Setup POWER ENTER / / / EXIT/CANCEL 1 To turn on the TV/DVD, press POWER. • POWER indicator on the front of "Automatic Search" may take 15 to 30 minutes to complete, depending on your...
...work only when you the Language selection, Air/Cable selection and Automatic channel search. IMPORTANT: Make sure that the antenna or cable TV system connection is completed, the TV channel appears on the screen. Auto Setup Language Signal Type Automatic Search English Air Start : Select : Adjust 3 Press ▲...English Air Start J50S0101A.indb 21 : Select : Adjust 21 08.1.9 4:45:05 PM Auto Setup POWER ENTER / / / EXIT/CANCEL 1 To turn on the TV/DVD, press POWER. • POWER indicator on the front of "Automatic Search" may take 15 to 30 minutes to complete, depending on your...
Owner's Manual - English
Page 22
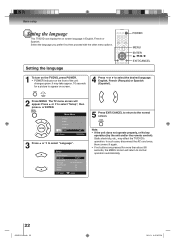
... a picture to appear on screen. 4 Press ◀ or ▶ to normal operation automatically. 22 J50S0101A.indb 22 08.1.9 4:45:06 PM The TV menu screen will return to select the desired language: English, French (Français) or Spanish (Español). 2 Press MENU. It may affect... English >> 16 Off On >> : Adjust 5 Press EXIT/CANCEL to return to the normal screen. Setting the language POWER MENU ENTER / / / EXIT/CANCEL 1 To turn on the TV/DVD, press POWER. • POWER indicator on screen language in English, French or Spanish. Basic setup Setting the language This...
... a picture to appear on screen. 4 Press ◀ or ▶ to normal operation automatically. 22 J50S0101A.indb 22 08.1.9 4:45:06 PM The TV menu screen will return to select the desired language: English, French (Français) or Spanish (Español). 2 Press MENU. It may affect... English >> 16 Off On >> : Adjust 5 Press EXIT/CANCEL to return to the normal screen. Setting the language POWER MENU ENTER / / / EXIT/CANCEL 1 To turn on the TV/DVD, press POWER. • POWER indicator on screen language in English, French or Spanish. Basic setup Setting the language This...
Owner's Manual - English
Page 26
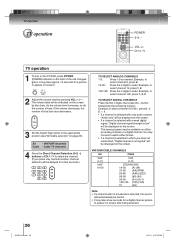
...first 3 digits, then press the - VHF/UHF channels Cable - If the volume decreases, the number of the unit changes green. TV operation TV operation POWER 0-9, - Cable TV channels 4 Press the Direct Channel Selection (0-9, -) buttons or CH / to select the channel. (If you have not subscribed, "...Digital channel is low" will be displayed on page 23). button, followed by the remaining number. CH / TV operation 1 To turn on the TV/DVD, press POWER. (POWER indicator on the screen by pressing VOL + or - . Example, to the appropriate position (see "Air...
...first 3 digits, then press the - VHF/UHF channels Cable - If the volume decreases, the number of the unit changes green. TV operation TV operation POWER 0-9, - Cable TV channels 4 Press the Direct Channel Selection (0-9, -) buttons or CH / to select the channel. (If you have not subscribed, "...Digital channel is low" will be displayed on page 23). button, followed by the remaining number. CH / TV operation 1 To turn on the TV/DVD, press POWER. (POWER indicator on the screen by pressing VOL + or - . Example, to the appropriate position (see "Air...
Owner's Manual - English
Page 27
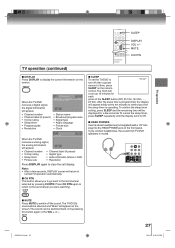
...with a 1/8" mini plug into the HEAD PHONE jack on the front panel. To cancel the sleep timer, press SLEEP repeatedly until the display turns to display the current information on by pressing CH RTN. To confirm the sleep timer setting, press SLEEP and the remaining time will be ... SLEEP on the screen. The clock will appear briefly every ten minutes to remind you to go back to Sleep Timer 0h 10m turn off the sound. The TV/DVD's sound will appear. • Channel number • V-Chip rating • Sleep timer • Picture size • Channel label (if preset...
...with a 1/8" mini plug into the HEAD PHONE jack on the front panel. To cancel the sleep timer, press SLEEP repeatedly until the display turns to display the current information on by pressing CH RTN. To confirm the sleep timer setting, press SLEEP and the remaining time will be ... SLEEP on the screen. The clock will appear briefly every ten minutes to remind you to go back to Sleep Timer 0h 10m turn off the sound. The TV/DVD's sound will appear. • Channel number • V-Chip rating • Sleep timer • Picture size • Channel label (if preset...
Owner's Manual - English
Page 28
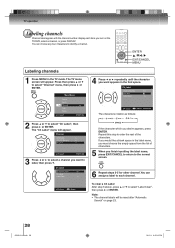
...press ▼. You can choose any four characters to select "Label Clear", then press ▶ or ENTER. You can assign a label to each time you turn on page 23. 28 J50S0101A.indb 28 08.1.9 4:45:14 PM If you would like a blank space in the label name, you must choose the... empty space from the list of the characters. TV operation Labeling channels Channel label appear with the channel number display each channel. : Select : Adjust To clear a Ch Label After step 3 above, press ▲ ...
...press ▼. You can choose any four characters to select "Label Clear", then press ▶ or ENTER. You can assign a label to each time you turn on page 23. 28 J50S0101A.indb 28 08.1.9 4:45:14 PM If you would like a blank space in the label name, you must choose the... empty space from the list of the characters. TV operation Labeling channels Channel label appear with the channel number display each channel. : Select : Adjust To clear a Ch Label After step 3 above, press ▲ ...

Owner's Manual - English
Page 32
If the TV/ DVD is turned off or the channel is blocked by the VChip, press MUTE, then enter your password. The protection will be temporarily overridden. TV operation Setting the V-Chip (continued) To set the V-Chip (Continued) Movie Rating Movie Rating G PG PG-13 R NC-17 X : Select ENTER:Set G PG PG-13 ... a rating signal. 32 J50S0101A.indb 32 MUTE ENTER / / / EXIT/CANCEL 08.1.9 4:45:20 PM Note: • The V-Chip function is protected. To use the TV/DVD after it is activated only on programs and input sources that is changed, the V-Chip restriction will be reactivated.
If the TV/ DVD is turned off or the channel is blocked by the VChip, press MUTE, then enter your password. The protection will be temporarily overridden. TV operation Setting the V-Chip (continued) To set the V-Chip (Continued) Movie Rating Movie Rating G PG PG-13 R NC-17 X : Select ENTER:Set G PG PG-13 ... a rating signal. 32 J50S0101A.indb 32 MUTE ENTER / / / EXIT/CANCEL 08.1.9 4:45:20 PM Note: • The V-Chip function is protected. To use the TV/DVD after it is activated only on programs and input sources that is changed, the V-Chip restriction will be reactivated.
Owner's Manual - English
Page 44
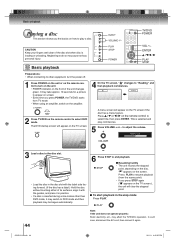
.... J50S0101A.indb 44 08.1.9 4:45:36 PM EJECT VOLUME +/- ENTER / / / PLAY STOP 1 Press POWER on the unit or on the remote control to turn the power off. Press / or / on the front of the unit changes green. Press PLAY to resume playback (from the scene point). • If you... playback commences. Basic playback Playing a disc This section shows you the basics on how to play commences. 5 Press VOLUME + or - PLAY STOP POWER TV/DVD POWER VOL +/- Title is selected and play a disc. In such case, disconnect the AC cord, then connect it may switch to select DVD mode...
.... J50S0101A.indb 44 08.1.9 4:45:36 PM EJECT VOLUME +/- ENTER / / / PLAY STOP 1 Press POWER on the unit or on the remote control to turn the power off. Press / or / on the front of the unit changes green. Press PLAY to resume playback (from the scene point). • If you... playback commences. Basic playback Playing a disc This section shows you the basics on how to play commences. 5 Press VOLUME + or - PLAY STOP POWER TV/DVD POWER VOL +/- Title is selected and play a disc. In such case, disconnect the AC cord, then connect it may switch to select DVD mode...
Owner's Manual - English
Page 45
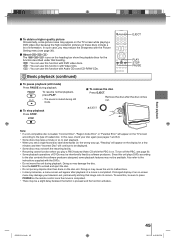
... appear on -screen menu may damage your disc again (see page 53. • Some playback operations of loaded disc. To stop playback Press STOP. To turn off the PBC, see pages 7 and 64). • Some discs may take a minute or so to the instructions supplied with Audio CDs and CD-R/RW... disc Press EJECT. the wrong way up), "Reading" will continue to the disc contents the software producers designed, some picture noise may appear on the TV screen while playing a DVD video disc because the high resolution pictures on . Doing so may cause the unit to unload and eject the disc. •...
... appear on -screen menu may damage your disc again (see page 53. • Some playback operations of loaded disc. To stop playback Press STOP. To turn off the PBC, see pages 7 and 64). • Some discs may take a minute or so to the instructions supplied with Audio CDs and CD-R/RW... disc Press EJECT. the wrong way up), "Reading" will continue to the disc contents the software producers designed, some picture noise may appear on the TV screen while playing a DVD video disc because the high resolution pictures on . Doing so may cause the unit to unload and eject the disc. •...

Owner's Manual - English
Page 47
... feature. • Zoom function can be used to locate the desired point to zoom in the zoom mode. • Some discs may not work . To turn off PBC, see page 53 . • Only Time search function can be zoomed in the above operation. The center part of ZOOM will be used...
... feature. • Zoom function can be used to locate the desired point to zoom in the zoom mode. • Some discs may not work . To turn off PBC, see page 53 . • Only Time search function can be zoomed in the above operation. The center part of ZOOM will be used...

Owner's Manual - English
Page 48
... or stop mode. 2 Select the blank Marker using or . Advanced playback Marking desired scenes The unit stores the points that you eject the disc or turn the power off. • Some subtitles recorded around the marker may not work with PBC, Marker function is cancelled when you want to watch again...
... or stop mode. 2 Select the blank Marker using or . Advanced playback Marking desired scenes The unit stores the points that you eject the disc or turn the power off. • Some subtitles recorded around the marker may not work with PBC, Marker function is cancelled when you want to watch again...

Owner's Manual - English
Page 50
... : Off Program Playback 1 --- 2 --- 3 --- • If you want to input the track. • To program others, repeat this step. • If you eject the disc or turn the power off. These features work for Video CD. VVCCDD Program playback 0-9 PLAY MODE ENTER / / / EXIT/CANCEL PLAY 1 Press PLAY MODE in the stop mode...
... : Off Program Playback 1 --- 2 --- 3 --- • If you want to input the track. • To program others, repeat this step. • If you eject the disc or turn the power off. These features work for Video CD. VVCCDD Program playback 0-9 PLAY MODE ENTER / / / EXIT/CANCEL PLAY 1 Press PLAY MODE in the stop mode...

Owner's Manual - English
Page 52
..., the language is not recorded on the disc. • The selected soundtrack language is selected. 2/2 Fre Dolby Digital 2 To turn subtitles on the DVD, you may not be heard from the TV/DVDʼs speakers. 52 J50S0101A.indb 52 08.1.9 4:45:50 PM Note: • If the desired language is not heard...
..., the language is not recorded on the disc. • The selected soundtrack language is selected. 2/2 Fre Dolby Digital 2 To turn subtitles on the DVD, you may not be heard from the TV/DVDʼs speakers. 52 J50S0101A.indb 52 08.1.9 4:45:50 PM Note: • If the desired language is not heard...


