

Guidebook
Page 2
... or an experienced radio/television technician for special, collateral, incidental, or consequential damages in a residential installation. However, there is " basis. Important Texas Instruments makes no event shall Texas Instruments be determined by turning the equipment off and on, you can try to correct the interference by any other party. US FCC Information Concerning Radio Frequency...
... or an experienced radio/television technician for special, collateral, incidental, or consequential damages in a residential installation. However, there is " basis. Important Texas Instruments makes no event shall Texas Instruments be determined by turning the equipment off and on, you can try to correct the interference by any other party. US FCC Information Concerning Radio Frequency...
Guidebook
Page 3
... 15 Finding the Calculated Maximum: Box with Lid.......... 16 Other TI-83 Features 17 Chapter 1: Operating the TI-83 Turning On and Turning Off the TI-83 1-2 Setting the Display Contrast 1-3 The Display 1-4 Entering Expressions and Instructions 1-6 TI-83 Edit Keys 1-8 Setting Modes 1-9 Using TI-83 Variable Names 1-13 Storing Variable Values 1-14 Recalling Variable Values 1-15...
... 15 Finding the Calculated Maximum: Box with Lid.......... 16 Other TI-83 Features 17 Chapter 1: Operating the TI-83 Turning On and Turning Off the TI-83 1-2 Setting the Display Contrast 1-3 The Display 1-4 Entering Expressions and Instructions 1-6 TI-83 Edit Keys 1-8 Setting Modes 1-9 Using TI-83 Variable Names 1-13 Storing Variable Values 1-14 Recalling Variable Values 1-15...
Guidebook
Page 13
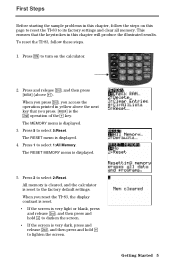
...; key. Press 2 to select 1:All Memory. This ensures that you access the operation printed in yellow above Ã). To reset the TI.83, follow the steps on the calculator. 2. Press 1 to select 2:Reset. First Steps Before starting the sample problems in this chapter, follow these... steps. 1. When you press y, you press. [MEM] is displayed. 4. Press 5 to turn on this chapter will produce the illustrated results. Press É to select 5:Reset. All memory is cleared, and the calculator is displayed. 5. The...
...; key. Press 2 to select 1:All Memory. This ensures that you access the operation printed in yellow above Ã). To reset the TI.83, follow the steps on the calculator. 2. Press 1 to select 2:Reset. First Steps Before starting the sample problems in this chapter, follow these... steps. 1. When you press y, you press. [MEM] is displayed. 4. Press 5 to turn on this chapter will produce the illustrated results. Press É to select 5:Reset. All memory is cleared, and the calculator is displayed. 5. The...

Guidebook
Page 27
1 Operating the TI-83 Contents Turning On and Turning Off the TI.83 Setting the Display Contrast The Display Entering Expressions and Instructions TI.83 Edit Keys Setting Modes Using TI.83 Variable Names Storing Variable Values Recalling Variable Values ENTRY (Last Entry) Storage Area Ans (Last Answer) Storage Area TI.83 Menus VARS and VARS Y.VARS Menus Equation Operating System (EOS Error Conditions 1-2 1-3 1-4 1-6 1-8 1-9 1-13 1-14 1-15 1-16 1-18 1-19 1-21 1-22 1-24 Operating the TI-83 1-1
1 Operating the TI-83 Contents Turning On and Turning Off the TI.83 Setting the Display Contrast The Display Entering Expressions and Instructions TI.83 Edit Keys Setting Modes Using TI.83 Variable Names Storing Variable Values Recalling Variable Values ENTRY (Last Entry) Storage Area Ans (Last Answer) Storage Area TI.83 Menus VARS and VARS Y.VARS Menus Equation Operating System (EOS Error Conditions 1-2 1-3 1-4 1-6 1-8 1-9 1-13 1-14 1-15 1-16 1-18 1-19 1-21 1-22 1-24 Operating the TI-83 1-1
Guidebook
Page 28
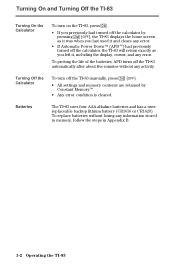
...lithium battery (CR1616 or CR1620). Turning On and Turning Off the TI-83 Turning On the Calculator To turn off the TI.83 automatically after about five minutes without losing any error. To replace batteries without any activity. Turning Off the Calculator To turn on the TI.83, press É. • ...If you previously had previously turned off the calculator, the TI.83 will return exactly as it was when you last used it ...
...lithium battery (CR1616 or CR1620). Turning On and Turning Off the TI-83 Turning On the Calculator To turn off the TI.83 automatically after about five minutes without losing any error. To replace batteries without any activity. Turning Off the Calculator To turn on the TI.83, press É. • ...If you previously had previously turned off the calculator, the TI.83 will return exactly as it was when you last used it ...
Guidebook
Page 29
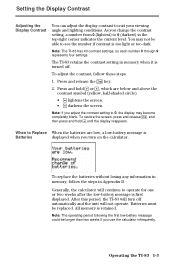
As you turn off . The TI.83 retains the contrast setting in the top-right corner indicates the current... number 0 through 9 represents four settings. Press and release the y key. 2. After this period, the TI.83 will turn on the calculator. Note: If you use the calculator infrequently. To restore the screen, press and release y, and... when you change the contrast setting, a number from 0 (lightest) to 9 (darkest) in memory when it is turned off automatically and the unit will continue to suit your viewing angle and lighting conditions. To replace the batteries without losing ...
As you turn off . The TI.83 retains the contrast setting in the top-right corner indicates the current... number 0 through 9 represents four settings. Press and release the y key. 2. After this period, the TI.83 will turn on the calculator. Note: If you use the calculator infrequently. To restore the screen, press and release y, and... when you change the contrast setting, a number from 0 (lightest) to 9 (darkest) in memory when it is turned off automatically and the unit will continue to suit your viewing angle and lighting conditions. To replace the batteries without losing ...
Guidebook
Page 35
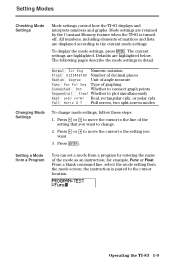
...Pol Seq Type of graphing Connected Dot Whether to connect graph points Sequential Simul Whether to the current mode settings. the instruction is turned off. To display the mode settings, press z. for example, Func or Float. Mode settings are displayed according to plot simultaneously Real... the line of the mode as an instruction; Press Í. Setting Modes Checking Mode Settings Mode settings control how the TI.83 displays and interprets numbers and graphs. The following pages describe the mode settings in detail. All numbers, including elements of matrices and...
...Pol Seq Type of graphing Connected Dot Whether to connect graph points Sequential Simul Whether to the current mode settings. the instruction is turned off. To display the mode settings, press z. for example, Func or Float. Mode settings are displayed according to plot simultaneously Real... the line of the mode as an instruction; Press Í. Setting Modes Checking Mode Settings Mode settings control how the TI.83 displays and interprets numbers and graphs. The following pages describe the mode settings in detail. All numbers, including elements of matrices and...
Guidebook
Page 42
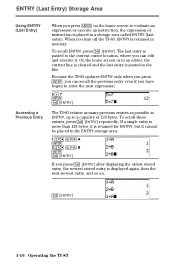
The last entry is pasted to the current cursor location, where you turn off the TI.83, ENTRY is retained in memory. On the home screen or in the ENTRY storage area. 1 ¿ ƒ A Í 2 ¿ ƒ B Í y [ENTRY] If you press y [... the home screen to evaluate an expression or execute an instruction, the expression or instruction is pasted to the line. y [ENTRY] 1-16 Operating the TI-83 To scroll those entries, press y [ENTRY] repeatedly. When you can recall the previous entry even if you press Í on . ENTRY (Last Entry) Storage Area...
The last entry is pasted to the current cursor location, where you turn off the TI.83, ENTRY is retained in memory. On the home screen or in the ENTRY storage area. 1 ¿ ƒ A Í 2 ¿ ƒ B Í y [ENTRY] If you press y [... the home screen to evaluate an expression or execute an instruction, the expression or instruction is pasted to the line. y [ENTRY] 1-16 Operating the TI-83 To scroll those entries, press y [ENTRY] repeatedly. When you can recall the previous entry even if you press Í on . ENTRY (Last Entry) Storage Area...
Guidebook
Page 44
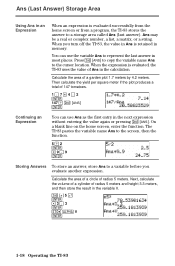
... variable Ans to represent the last answer in an Expression When an expression is evaluated successfully from the home screen or from a program, the TI.83 stores the answer to a storage area called Ans (last answer). Calculate the area of radius 5 meters. y [p] 5 ¡ Í ¯ 3 Ë 3 Í ¿ ƒ ... Using Ans in most places. Press y [ANS] to copy the variable name Ans to a variable before you turn off the TI.83, the value in Ans is evaluated, the TI.83 uses the value of radius 5 meters and height 3.3 meters, and then store the result in the next expression ...
... variable Ans to represent the last answer in an Expression When an expression is evaluated successfully from the home screen or from a program, the TI.83 stores the answer to a storage area called Ans (last answer). Calculate the area of radius 5 meters. y [p] 5 ¡ Í ¯ 3 Ë 3 Í ¿ ƒ ... Using Ans in most places. Press y [ANS] to copy the variable name Ans to a variable before you turn off the TI.83, the value in Ans is evaluated, the TI.83 uses the value of radius 5 meters and height 3.3 meters, and then store the result in the next expression ...
Guidebook
Page 83
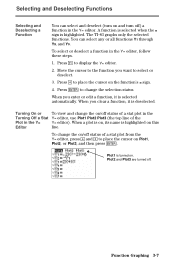
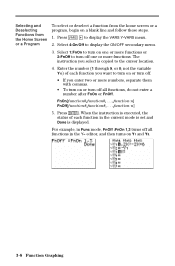
...To view and change the on/off status of a stat plot in the Y= Y= editor). When a plot is on /off status of the Plot in the Turning Off a Stat Y= editor, use Plot1 Plot2 Plot3 (the top line of a stat plot from the Y= editor, press } and ~ to place the cursor on... want to place the cursor on . Press Í to display the Y= editor. 2. The TI-83 graphs only the selected functions. To select or deselect a function in the Y= editor. Function Graphing 3-7 Plot2 and Plot3 are turned off ) a function in the Y= editor, follow these steps. 1. Move the cursor to the function...
...To view and change the on/off status of a stat plot in the Y= Y= editor). When a plot is on /off status of the Plot in the Turning Off a Stat Y= editor, use Plot1 Plot2 Plot3 (the top line of a stat plot from the Y= editor, press } and ~ to place the cursor on... want to place the cursor on . Press Í to display the Y= editor. 2. The TI-83 graphs only the selected functions. To select or deselect a function in the Y= editor. Function Graphing 3-7 Plot2 and Plot3 are turned off ) a function in the Y= editor, follow these steps. 1. Move the cursor to the function...
Guidebook
Page 84
...Y1 and Y3. 3-8 Function Graphing The instruction you enter two or more numbers, separate them with commas. • To turn on one or more functions or 2:FnOff to turn on or turn off one or more functions. Press ~ to display the ON/OFF secondary menu. 3. Enter the number (1 through...enter a number after FnOn or FnOff. Press Í. When the instruction is executed, the status of each function in Func mode, FnOff :FnOn 1,3 turns off . • If you select is displayed. Select 4:On/Off to display the VARS Y.VARS menu. 2. not the variable Yn) of each ...
...Y1 and Y3. 3-8 Function Graphing The instruction you enter two or more numbers, separate them with commas. • To turn on one or more functions or 2:FnOff to turn on or turn off one or more functions. Press ~ to display the ON/OFF secondary menu. 3. Enter the number (1 through...enter a number after FnOn or FnOff. Press Í. When the instruction is executed, the status of each function in Func mode, FnOff :FnOn 1,3 turns off . • If you select is displayed. Select 4:On/Off to display the VARS Y.VARS menu. 2. not the variable Yn) of each ...
Guidebook
Page 87
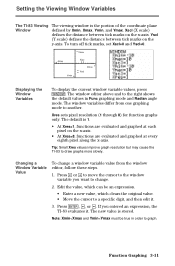
... graphing mode and Radian angle mode. Xscl (X scale) defines the distance between tick marks on the y-axis. Setting the Viewing Window Variables The TI-83 Viewing The viewing window is 1. • At Xres=1, functions are evaluated and graphed at each pixel on the x-axis. • At Xres=8,... functions are evaluated and graphed at every eighth pixel along the x-axis. To turn off tick marks, set Xscl=0 and Yscl=0. Yscl (Y scale) defines the distance between tick marks on the x-axis. Press † or } to...
... graphing mode and Radian angle mode. Xscl (X scale) defines the distance between tick marks on the y-axis. Setting the Viewing Window Variables The TI-83 Viewing The viewing window is 1. • At Xres=1, functions are evaluated and graphed at each pixel on the x-axis. • At Xres=8,... functions are evaluated and graphed at every eighth pixel along the x-axis. To turn off tick marks, set Xscl=0 and Yscl=0. Yscl (Y scale) defines the distance between tick marks on the x-axis. Press † or } to...
Guidebook
Page 107
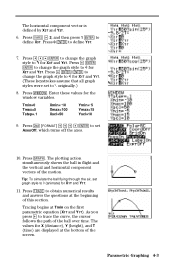
... graph style to ë for the window variables. The values for X1T and Y1T. (These keystrokes assume that all graph styles were set AxesOff, which turns off the axes. 10. Press y [FORMAT to ì (animate) for X3T and Y3T. Tip: To simulate the ball flying through the air, set graph style...
... graph style to ë for the window variables. The values for X1T and Y1T. (These keystrokes assume that all graph styles were set AxesOff, which turns off the axes. 10. Press y [FORMAT to ì (animate) for X3T and Y3T. Tip: To simulate the ball flying through the air, set graph style...
Guidebook
Page 143
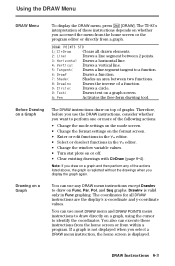
...draw on Func, Par, Pol, and Seq graphs. Using the DRAW Menu DRAW Menu To display the DRAW menu, press y [DRAW]. The TI-83's interpretation of graphs. DRAW Instructions 8-3 Therefore, before you use any of the actions listed above, the graph is replotted without the drawings when you... is displayed. Note: If you display the graph again. DrawInv is valid only in the Y= editor. • Change the window variable values. • Turn stat plots on whether you select a DRAW menu instruction, the home screen is not displayed when you accessed the menu from the home screen or...
...draw on Func, Par, Pol, and Seq graphs. Using the DRAW Menu DRAW Menu To display the DRAW menu, press y [DRAW]. The TI-83's interpretation of graphs. DRAW Instructions 8-3 Therefore, before you use any of the actions listed above, the graph is replotted without the drawings when you... is displayed. Note: If you display the graph again. DrawInv is valid only in the Y= editor. • Change the window variable values. • Turn stat plots on whether you select a DRAW menu instruction, the home screen is not displayed when you accessed the menu from the home screen or...
Guidebook
Page 153
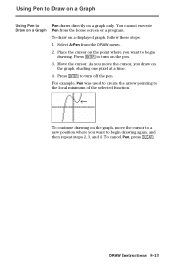
... the pen. 3. Press Í to turn off the pen. To cancel Pen, press '. For example, Pen was used to create the arrow pointing to Draw on a Graph Pen draws directly on a ...
... the pen. 3. Press Í to turn off the pen. To cancel Pen, press '. For example, Pen was used to create the arrow pointing to Draw on a Graph Pen draws directly on a ...
Guidebook
Page 154
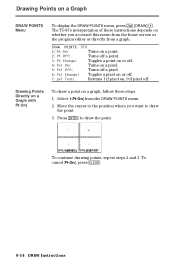
The TI-83's interpretation of these instructions depends on a graph, follow these steps. 1. Move the cursor to the position where you accessed this menu from the home screen ... draw the point. 3. To cancel Pt.On(, press '. 8-14 DRAW Instructions DRAW POINTS STO 1: Pt-On( Turns on a point. 2: Pt-Off( Turns off a point. 3: Pt-Change( Toggles a point on or off. 4: Pxl-On( Turns on a pixel. 5: Pxl-Off( Turns off a pixel. 6: Pxl-Change( Toggles a pixel on or off. 7: pxl-Test( Returns 1 if pixel on...
The TI-83's interpretation of these instructions depends on a graph, follow these steps. 1. Move the cursor to the position where you accessed this menu from the home screen ... draw the point. 3. To cancel Pt.On(, press '. 8-14 DRAW Instructions DRAW POINTS STO 1: Pt-On( Turns on a point. 2: Pt-Off( Turns off a point. 3: Pt-Change( Toggles a point on or off. 4: Pxl-On( Turns on a pixel. 5: Pxl-Off( Turns off a pixel. 6: Pxl-Change( Toggles a pixel on or off. 7: pxl-Test( Returns 1 if pixel on...
Guidebook
Page 155
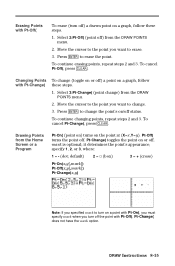
... from the DRAW POINTS menu. 2. Press Í to change (toggle on or off ) from the Home Screen or a Program Pt.On( (point on) turns on /off status. Select 3:Pt.Change( (point change the point's on the point at (X=x,Y=y). To cancel Pt.Change(, press '. Pt.Change( toggles the point... on a graph, follow these steps. 1. it determines the point's appearance; Erasing Points with Pt-Off( To erase (turn off the point with Pt.Off(. Press Í to the point you turn off) a drawn point on or off . To continue changing points, repeat steps 2 and 3. mark is optional; Select...
... from the DRAW POINTS menu. 2. Press Í to change (toggle on or off ) from the Home Screen or a Program Pt.On( (point on) turns on /off status. Select 3:Pt.Change( (point change the point's on the point at (X=x,Y=y). To cancel Pt.Change(, press '. Pt.Change( toggles the point... on a graph, follow these steps. 1. it determines the point's appearance; Erasing Points with Pt-Off( To erase (turn off the point with Pt.Off(. Press Í to the point you turn off) a drawn point on or off . To continue changing points, repeat steps 2 and 3. mark is optional; Select...

Guidebook
Page 156
... instructions are not interactive. Pxl.Off( turns the pixel off , or reverse a pixel (dot) on the graph using the cursor. column must be an integer between 0 and 94. The Pxl. (pixel) instructions let you select a pixel instruction from the DRAW POINTS menu, the TI-83 returns to the home screen or the... and Off Pixels with Pxl-On( and Pxl-Off( Pxl.On( (pixel on) turns on the pixel at (row,column) is turned on the TI-83 display. Pxl.On(row,column) Pxl.Off(row,column) Pxl.Change(row,column) Using pxl-Test( pxl.Test( (pixel test) returns 1 if the pixel at (...
... instructions are not interactive. Pxl.Off( turns the pixel off , or reverse a pixel (dot) on the graph using the cursor. column must be an integer between 0 and 94. The Pxl. (pixel) instructions let you select a pixel instruction from the DRAW POINTS menu, the TI-83 returns to the home screen or the... and Off Pixels with Pxl-On( and Pxl-Off( Pxl.On( (pixel on) turns on the pixel at (row,column) is turned on the TI-83 display. Pxl.On(row,column) Pxl.Off(row,column) Pxl.Change(row,column) Using pxl-Test( pxl.Test( (pixel test) returns 1 if the pixel at (...
Guidebook
Page 166
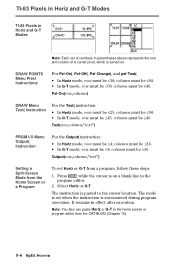
...; Select Horiz or G.T. It remains in the program editor. 2. TI-83 Pixels in Horiz and G-T Modes TI-83 Pixels in Horiz and G-T Modes Note: Each set of numbers in parentheses above represents the row and column of a corner pixel, which is turned on a blank line in effect after execution. column must be {94...
...; Select Horiz or G.T. It remains in the program editor. 2. TI-83 Pixels in Horiz and G-T Modes TI-83 Pixels in Horiz and G-T Modes Note: Each set of numbers in parentheses above represents the row and column of a corner pixel, which is turned on a blank line in effect after execution. column must be {94...
Guidebook
Page 184
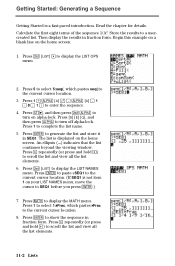
... Í to paste ÙSEQ1 to the current cursor location. (If SEQ1 is not item 1 on your LIST NAMES menu, move the cursor to turn on alpha-lock. Press [S] [E] [Q], and then press ƒ to SEQ1 before you press Í.) 7. An ellipsis (...) indicates that the list continues...press y ƒ to the current cursor location. 3. Press Í to the current cursor location. 8. Press 1 to select 1:4Frac, which pastes seq( to turn off alpha-lock. Press ~ repeatedly (or press and hold ~) to a usercreated list. Then display the results in fraction form. Press y [LIST] ~ to scroll...
... Í to paste ÙSEQ1 to the current cursor location. (If SEQ1 is not item 1 on your LIST NAMES menu, move the cursor to turn on alpha-lock. Press [S] [E] [Q], and then press ƒ to SEQ1 before you press Í.) 7. An ellipsis (...) indicates that the list continues...press y ƒ to the current cursor location. 3. Press Í to the current cursor location. 8. Press 1 to select 1:4Frac, which pastes seq( to turn off alpha-lock. Press ~ repeatedly (or press and hold ~) to a usercreated list. Then display the results in fraction form. Press y [LIST] ~ to scroll...

