

User Guide
Page 6
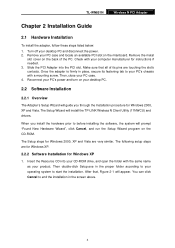
... Product 2 1.2 Features ...2 1.3 LED Status ...3 Chapter 2 Installation Guide 4 2.1 Hardware Installation 4 2.2 Software Installation 4 2.2.1 Overview ...4 2.2.2 For Windows XP 4 2.2.3 For Windows Vista 9 2.2.4 For Windows 7 13 Chapter 3 Configuration Guide 17 3.1 For Windows XP 17 3.1.1 Current Status 17 3.1.2 Profile Management 19 3.1.3 Diagnostics 27 3.2 For Windows Vista 29 3.3 For Windows 7 ...31 Chapter 4 QSS Configuration 34 4.1 PBC (Push Button Configuration) method 35 4.2 PIN method...
... Product 2 1.2 Features ...2 1.3 LED Status ...3 Chapter 2 Installation Guide 4 2.1 Hardware Installation 4 2.2 Software Installation 4 2.2.1 Overview ...4 2.2.2 For Windows XP 4 2.2.3 For Windows Vista 9 2.2.4 For Windows 7 13 Chapter 3 Configuration Guide 17 3.1 For Windows XP 17 3.1.1 Current Status 17 3.1.2 Profile Management 19 3.1.3 Diagnostics 27 3.2 For Windows Vista 29 3.3 For Windows 7 ...31 Chapter 4 QSS Configuration 34 4.1 PBC (Push Button Configuration) method 35 4.2 PIN method...

User Guide
Page 8
... It has good capability on . the TP-LINK Wireless Client Utility helps you step-by-step through the installation process; The adapter is a 802.11n client device; With unmatched wireless performance, reception, and security protection, the TL-WN851N is designed to your notebook computer. 1.2... ¾ Supports Windows 2000, Windows XP, Windows Vista, Windows 7 ¾ Built-in two internal antennas which are listed in a format of 2x2 for easily adding or upgrading wireless connectivity to provide a high-speed and unrivaled wireless performance for choosing the TL-WN851N 300Mbps Wireless N ...
... It has good capability on . the TP-LINK Wireless Client Utility helps you step-by-step through the installation process; The adapter is a 802.11n client device; With unmatched wireless performance, reception, and security protection, the TL-WN851N is designed to your notebook computer. 1.2... ¾ Supports Windows 2000, Windows XP, Windows Vista, Windows 7 ¾ Built-in two internal antennas which are listed in a format of 2x2 for easily adding or upgrading wireless connectivity to provide a high-speed and unrivaled wireless performance for choosing the TL-WN851N 300Mbps Wireless N ...
User Guide
Page 10
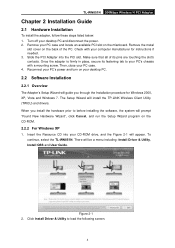
... Slide the PCI Adapter into your PC case and locate an available PCI slot on the CD-ROM. 2.2.2 For Windows XP 1. To continue, select the TL-WN851N. Remove the metal slot cover on the back of its fastening tab to your PC's chassis with your desktop PC...'s power and turn on your computer manufacturer for Windows 2000, XP, Vista and Windows 7. When you through the Installation procedure for instructions if needed. 3. Click Install Driver & Utility to before installing the software, the system will install the TP-LINK Wireless Client Utility (TWCU) and drivers. Make ...
... Slide the PCI Adapter into your PC case and locate an available PCI slot on the CD-ROM. 2.2.2 For Windows XP 1. To continue, select the TL-WN851N. Remove the metal slot cover on the back of its fastening tab to your PC's chassis with your desktop PC...'s power and turn on your computer manufacturer for Windows 2000, XP, Vista and Windows 7. When you through the Installation procedure for instructions if needed. 3. Click Install Driver & Utility to before installing the software, the system will install the TP-LINK Wireless Client Utility (TWCU) and drivers. Make ...
User Guide
Page 14
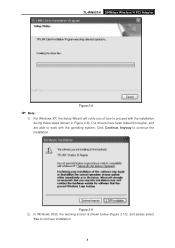
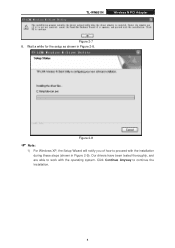
Our drivers have been tested thoroughly, and are able to work with the installation during these steps (shown in Figure 2-9). Click Continue Anyway to continue installation. 8 Figure 2-9 2) In Windows 2000, the warning screen is shown below (Figure 2-10), and please select Yes to continue the Installation. TL-WN851N 300Mbps Wireless N PCI Adapter Figure 2-8 ) Note: 1) For Windows XP, the Setup Wizard will notify you of how to proceed with the operating system.
Our drivers have been tested thoroughly, and are able to work with the installation during these steps (shown in Figure 2-9). Click Continue Anyway to continue installation. 8 Figure 2-9 2) In Windows 2000, the warning screen is shown below (Figure 2-10), and please select Yes to continue the Installation. TL-WN851N 300Mbps Wireless N PCI Adapter Figure 2-8 ) Note: 1) For Windows XP, the Setup Wizard will notify you of how to proceed with the operating system.
User Guide
Page 15
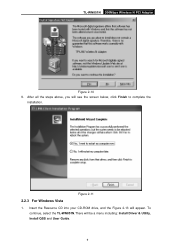
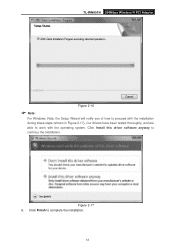
Figure 2-11 2.2.3 For Windows Vista 1. After all the steps above, you will appear. Insert the Resource CD into your CD-ROM drive, and the Figure 2-13 will see the screen below, click Finish to complete the installation. To continue, select the TL-WN851N.There will be a menu including: Install Driver & Utility, Install QSS and User Guide. 9 TL-WN851N 300Mbps Wireless N PCI Adapter Figure 2-10 9.
Figure 2-11 2.2.3 For Windows Vista 1. After all the steps above, you will appear. Insert the Resource CD into your CD-ROM drive, and the Figure 2-13 will see the screen below, click Finish to complete the installation. To continue, select the TL-WN851N.There will be a menu including: Install Driver & Utility, Install QSS and User Guide. 9 TL-WN851N 300Mbps Wireless N PCI Adapter Figure 2-10 9.
User Guide
Page 18
TL-WN851N 300Mbps Wireless N PCI Adapter Figure 2-16 ) Note: For Windows Vista, the Setup Wizard will notify you of how to work with the installation during these steps (shown in Figure 2-17). Our drivers have been tested thoroughly, and are able to proceed with the operating system. Figure 2-17 6. Click Install this driver software anyway to complete the installation. 12 Click Finish to continue the Installation.
TL-WN851N 300Mbps Wireless N PCI Adapter Figure 2-16 ) Note: For Windows Vista, the Setup Wizard will notify you of how to work with the installation during these steps (shown in Figure 2-17). Our drivers have been tested thoroughly, and are able to proceed with the operating system. Figure 2-17 6. Click Install this driver software anyway to complete the installation. 12 Click Finish to continue the Installation.

User Guide
Page 19
To continue, select the TL-WN851N.There will appear. Figure 2-19 2. Click Install Driver & Utility to load the following screen. 13 Insert the Resource CD into your CD-ROM drive, and the Figure 2-19 will be a menu including: Install Driver & Utility, Install QSS and User Guide. TL-WN851N 300Mbps Wireless N PCI Adapter Figure 2-18 2.2.4 For Windows 7 1.
To continue, select the TL-WN851N.There will appear. Figure 2-19 2. Click Install Driver & Utility to load the following screen. 13 Insert the Resource CD into your CD-ROM drive, and the Figure 2-19 will be a menu including: Install Driver & Utility, Install QSS and User Guide. TL-WN851N 300Mbps Wireless N PCI Adapter Figure 2-18 2.2.4 For Windows 7 1.
User Guide
Page 21
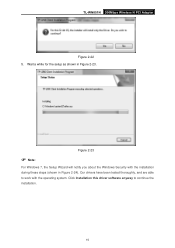
TL-WN851N 300Mbps Wireless N PCI Adapter Figure 2-22 5. Figure 2-23 ) Note: For Windows 7, the Setup Wizard will notify you about the Windows Security with the operating system. Our drivers have been tested thoroughly, and are able XX to continue the installation. 15 Click Installation this driver software anyway to work with the installation during these steps (shown in Figure 2-23. Wait a while for the setup as shown in Figure 2-24).
TL-WN851N 300Mbps Wireless N PCI Adapter Figure 2-22 5. Figure 2-23 ) Note: For Windows 7, the Setup Wizard will notify you about the Windows Security with the operating system. Our drivers have been tested thoroughly, and are able XX to continue the installation. 15 Click Installation this driver software anyway to work with the installation during these steps (shown in Figure 2-23. Wait a while for the setup as shown in Figure 2-24).
User Guide
Page 23
... some integrated and easy tools to configure your Adapter for wireless connectivity on your system tray. TL-WN851N 300Mbps Wireless N PCI Adapter Chapter 3 Configuration Guide 3.1 For Windows XP TP-LINK TL-WN851N can also run . It appears at the bottom of the screen, and shows the signal .... You can be configured by clicking the Start→All Programs→TP-LINK→TP-LINK Wireless Client Utility. After Installing the Adapter, the Adapter's tray icon will run the utility by TP-LINK Wireless Client Utility (TWCU). The Current Status tab needn't any configurations....
... some integrated and easy tools to configure your Adapter for wireless connectivity on your system tray. TL-WN851N 300Mbps Wireless N PCI Adapter Chapter 3 Configuration Guide 3.1 For Windows XP TP-LINK TL-WN851N can also run . It appears at the bottom of the screen, and shows the signal .... You can be configured by clicking the Start→All Programs→TP-LINK→TP-LINK Wireless Client Utility. After Installing the Adapter, the Adapter's tray icon will run the utility by TP-LINK Wireless Client Utility (TWCU). The Current Status tab needn't any configurations....
User Guide
Page 27
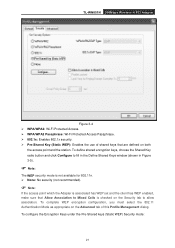
To define shared encryption keys, choose the Shared Key radio button and click Configure to fill in the Define Shared Keys window (shown in Figure 3-5). ) Note: The WEP security mode is not available for 802.11n. ¾ None: No security (not recommended). ) Note: If the access point... has WEP enabled, make sure that are defined on the Security tab to Mixed Cells is checked on both the access point and the station. TL-WN851N 300Mbps Wireless N PCI Adapter Figure 3-4 ¾ WPA/WPA2: Wi-Fi Protected Access. ¾ WPA/WPA2 Passphrase: Wi-Fi Protected Access Passphrase. ¾ 802.1x: ...
To define shared encryption keys, choose the Shared Key radio button and click Configure to fill in the Define Shared Keys window (shown in Figure 3-5). ) Note: The WEP security mode is not available for 802.11n. ¾ None: No security (not recommended). ) Note: If the access point... has WEP enabled, make sure that are defined on the Security tab to Mixed Cells is checked on both the access point and the station. TL-WN851N 300Mbps Wireless N PCI Adapter Figure 3-4 ¾ WPA/WPA2: Wi-Fi Protected Access. ¾ WPA/WPA2 Passphrase: Wi-Fi Protected Access Passphrase. ¾ 802.1x: ...
User Guide
Page 31
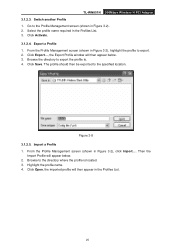
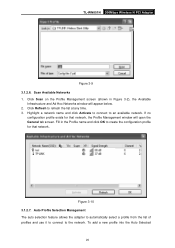
... Profile Management screen (shown in the Profiles List. 3. Go to export. 2. Switch another Profile 1. Click Export..., the Export Profile window will then appear below . 2. The profile should then be exported to the specified location. TL-WN851N 300Mbps Wireless N PCI Adapter 3.1.2.3. Click Save. Select the profile name required in Figure 3-2), click Import.... Export a Profile 1.
... Profile Management screen (shown in the Profiles List. 3. Go to export. 2. Switch another Profile 1. Click Export..., the Export Profile window will then appear below . 2. The profile should then be exported to the specified location. TL-WN851N 300Mbps Wireless N PCI Adapter 3.1.2.3. Click Save. Select the profile name required in Figure 3-2), click Import.... Export a Profile 1.
User Guide
Page 32
... list at any time. 3. Click Refresh to the network. TL-WN851N 300Mbps Wireless N PCI Adapter Figure 3-9 3.1.2.6. Highlight a network name and click Activate to connect to create the configuration profile for that network. Fill in Figure 3-2), the Available Infrastructure and Ad Hoc Networks window will open the General tab screen. To add a new profile...
... list at any time. 3. Click Refresh to the network. TL-WN851N 300Mbps Wireless N PCI Adapter Figure 3-9 3.1.2.6. Highlight a network name and click Activate to connect to create the configuration profile for that network. Fill in Figure 3-2), the Available Infrastructure and Ad Hoc Networks window will open the General tab screen. To add a new profile...

User Guide
Page 33
...Selected Profiles box has highest priority, while the last profile has the lowest priority. 6. The Auto Profiles Selection management window will appear in the Available Profiles. The profile with a list of the TP-LINK Wireless Client Utility (TWCU) provides buttons used to connect to auto profile selection, and click Add. Figure 3-11 ...networks will be used to retrieve receiving and transmitting statistics. If the connection fails, the client adapter will scan for an available network. TL-WN851N 300Mbps Wireless N PCI Adapter Profiles list, please follow these steps. 1.
...Selected Profiles box has highest priority, while the last profile has the lowest priority. 6. The Auto Profiles Selection management window will appear in the Available Profiles. The profile with a list of the TP-LINK Wireless Client Utility (TWCU) provides buttons used to connect to auto profile selection, and click Add. Figure 3-11 ...networks will be used to retrieve receiving and transmitting statistics. If the connection fails, the client adapter will scan for an available network. TL-WN851N 300Mbps Wireless N PCI Adapter Profiles list, please follow these steps. 1.
User Guide
Page 35
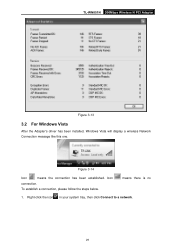
Right-click the icon in your system tray, then click Connect to a network. 29 means there is no 1. To establish a connection, please follow the steps below. Icon connection. Figure 3-14 Icon means the connection has been established. TL-WN851N 300Mbps Wireless N PCI Adapter Figure 3-13 3.2 For Windows Vista After the Adapter's driver has been installed, Windows Vista will display a wireless Network Connection message like this one.
Right-click the icon in your system tray, then click Connect to a network. 29 means there is no 1. To establish a connection, please follow the steps below. Icon connection. Figure 3-14 Icon means the connection has been established. TL-WN851N 300Mbps Wireless N PCI Adapter Figure 3-13 3.2 For Windows Vista After the Adapter's driver has been installed, Windows Vista will display a wireless Network Connection message like this one.
User Guide
Page 37
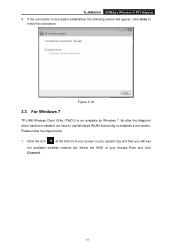
...Windows 7 TP-LINK Wireless Client Utility (TWCU) is successful established, the following screen will see the available wireless network list. Select the SSID of your screen in your Access Point and click Connect. 31 So after the Adapter's driver has been installed, we have to use Windows... WLAN Autoconfig to finish the connection. If the connection is not available for Windows 7. Click the icon at the bottom of your system tray and then you will appear, click close to establish a connection. Please follow the steps below. 1. TL-WN851N 300Mbps Wireless N...
...Windows 7 TP-LINK Wireless Client Utility (TWCU) is successful established, the following screen will see the available wireless network list. Select the SSID of your screen in your Access Point and click Connect. 31 So after the Adapter's driver has been installed, we have to use Windows... WLAN Autoconfig to finish the connection. If the connection is not available for Windows 7. Click the icon at the bottom of your system tray and then you will appear, click close to establish a connection. Please follow the steps below. 1. TL-WN851N 300Mbps Wireless N...
User Guide
Page 46
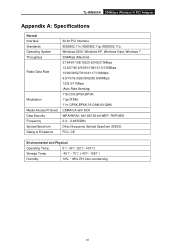
Windows 2000, Windows XP, Windows Vista, Windows 7 300Mbps (Maximal) 27/54/81/108/162/216/243/270Mbps 13.5/27/40.5/54/81/108/121.5/135Mbps 13/26/39/52/78/104/117/...; (32℉~104℉) Storage Temp. -40℃~ 70℃ (-40℉~158℉) Humidity 10% ~ 95% RH, Non-condensing 40 IEEE802.11g; IEEE802.11b; TL-WN851N 300Mbps Wireless N PCI Adapter Appendix A: Specifications Normal Interface Standards Operating System Throughput Radio Data Rate Modulation Media Access Protocol Data Security Frequency Spread Spectrum Safety...
Windows 2000, Windows XP, Windows Vista, Windows 7 300Mbps (Maximal) 27/54/81/108/162/216/243/270Mbps 13.5/27/40.5/54/81/108/121.5/135Mbps 13/26/39/52/78/104/117/...; (32℉~104℉) Storage Temp. -40℃~ 70℃ (-40℉~158℉) Humidity 10% ~ 95% RH, Non-condensing 40 IEEE802.11g; IEEE802.11b; TL-WN851N 300Mbps Wireless N PCI Adapter Appendix A: Specifications Normal Interface Standards Operating System Throughput Radio Data Rate Modulation Media Access Protocol Data Security Frequency Spread Spectrum Safety...

User Guide
Page 5
...Overview of the Product 2 1.2 Features ...2 1.3 LED Status ...3 Chapter 2 Installation Guide 4 2.1 Hardware Installation 4 2.2 Software Installation 4 2.2.1 Overview ...4 2.2.2 Software Installation for Windows XP 4 Chapter 3 Configuration 11 3.1 Current Status ...11 3.2 Profile Management 13 3.2.1 Add or Modify a Configuration Profile 13 3.2.2 Remove a profile 18 3.2.3 Switch another Profile ...21 3.3.1 Check Driver Information 22 3.3.2 Check Receive and Transmit Statistical Information 22 3.4 Configuration for Windows Vista 23 Appendix A: Specifications 26 Appendix B: Glossary 27
...Overview of the Product 2 1.2 Features ...2 1.3 LED Status ...3 Chapter 2 Installation Guide 4 2.1 Hardware Installation 4 2.2 Software Installation 4 2.2.1 Overview ...4 2.2.2 Software Installation for Windows XP 4 Chapter 3 Configuration 11 3.1 Current Status ...11 3.2 Profile Management 13 3.2.1 Add or Modify a Configuration Profile 13 3.2.2 Remove a profile 18 3.2.3 Switch another Profile ...21 3.3.1 Check Driver Information 22 3.3.2 Check Receive and Transmit Statistical Information 22 3.4 Configuration for Windows Vista 23 Appendix A: Specifications 26 Appendix B: Glossary 27

User Guide
Page 7
...connectivity to your notebook. the TP-LINK Wireless N Client Utility helps you step-by-step through the installation process; The adapter supports WEP, WPA and WPA2 encryption to install and manage. TL-WN851N Wireless N PCI Adapter Chapter 1 Introduction Thank you for choosing the TL-WN851N Wireless N PCI Adapter! ... roaming between access points when configured in Infrastructure mode ¾ Ease to configure and provides monitoring information ¾ Supports Windows 2000, XP, Vista ¾ Built-in two internal antennas which are listed in a format of 2x2 for two receivers and two transmitters...
...connectivity to your notebook. the TP-LINK Wireless N Client Utility helps you step-by-step through the installation process; The adapter supports WEP, WPA and WPA2 encryption to install and manage. TL-WN851N Wireless N PCI Adapter Chapter 1 Introduction Thank you for choosing the TL-WN851N Wireless N PCI Adapter! ... roaming between access points when configured in Infrastructure mode ¾ Ease to configure and provides monitoring information ¾ Supports Windows 2000, XP, Vista ¾ Built-in two internal antennas which are listed in a format of 2x2 for two receivers and two transmitters...
User Guide
Page 9
...will guide you install the hardware prior to your PC's chassis with a mounting screw. Make sure that , Figure 2-1 will install the TP-LINK Wireless N Client Utility (11NWCU) and drivers. Insert the Resource CD into the PCI slot. Remove the metal slot cover on the ...the installation in place, secure its pins are touching the slot's contacts. When you through the Installation procedure for Windows XP 1. After that all of the PC. TL-WN851N Wireless N PCI Adapter Chapter 2 Installation Guide 2.1 Hardware Installation To install the adapter, follow these steps listed below:...
...will guide you install the hardware prior to your PC's chassis with a mounting screw. Make sure that , Figure 2-1 will install the TP-LINK Wireless N Client Utility (11NWCU) and drivers. Insert the Resource CD into the PCI slot. Remove the metal slot cover on the ...the installation in place, secure its pins are touching the slot's contacts. When you through the Installation procedure for Windows XP 1. After that all of the PC. TL-WN851N Wireless N PCI Adapter Chapter 2 Installation Guide 2.1 Hardware Installation To install the adapter, follow these steps listed below:...
User Guide
Page 13
Our drivers have been tested thoroughly, and are able to work with the installation during these steps (shown in Figure 2-8. Click Continue Anyway to proceed with the operating system. TL-WN851N Wireless N PCI Adapter Figure 2-7 8. Wait a while for the setup as shown in Figure 2-9). Figure 2-8 ) Note: 1) For Windows XP, the Setup Wizard will notify you of how to continue the Installation. 8
Our drivers have been tested thoroughly, and are able to work with the installation during these steps (shown in Figure 2-8. Click Continue Anyway to proceed with the operating system. TL-WN851N Wireless N PCI Adapter Figure 2-7 8. Wait a while for the setup as shown in Figure 2-9). Figure 2-8 ) Note: 1) For Windows XP, the Setup Wizard will notify you of how to continue the Installation. 8


