
User Guide
Page 10
... you install the hardware prior to before installing the software, the system will install the TP-LINK Wireless Client Utility (TWCU) and drivers. To continue, select the TL-WN851N. Turn off your PC case and locate an available PCI slot on the CD-ROM. 2.2.2 For Windows XP 1. Remove your desktop PC and disconnect the power. 2. Figure 2-1 2.
... you install the hardware prior to before installing the software, the system will install the TP-LINK Wireless Client Utility (TWCU) and drivers. To continue, select the TL-WN851N. Turn off your PC case and locate an available PCI slot on the CD-ROM. 2.2.2 For Windows XP 1. Remove your desktop PC and disconnect the power. 2. Figure 2-1 2.
User Guide
Page 14
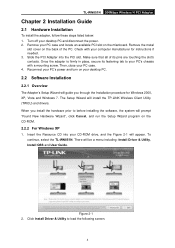
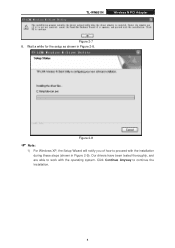
Click Continue Anyway to continue installation. 8 Figure 2-9 2) In Windows 2000, the warning screen is shown below (Figure 2-10), and please select Yes to continue the Installation. TL-WN851N 300Mbps Wireless N PCI Adapter Figure 2-8 ) Note: 1) For Windows XP, the Setup Wizard will notify you of how to work with the installation during these steps (shown in Figure 2-9). Our drivers have been tested thoroughly, and are able to proceed with the operating system.
Click Continue Anyway to continue installation. 8 Figure 2-9 2) In Windows 2000, the warning screen is shown below (Figure 2-10), and please select Yes to continue the Installation. TL-WN851N 300Mbps Wireless N PCI Adapter Figure 2-8 ) Note: 1) For Windows XP, the Setup Wizard will notify you of how to work with the installation during these steps (shown in Figure 2-9). Our drivers have been tested thoroughly, and are able to proceed with the operating system.
User Guide
Page 15
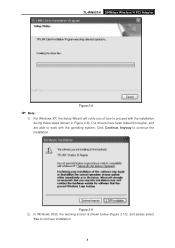
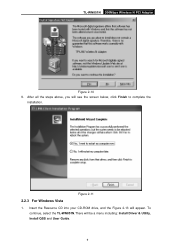
To continue, select the TL-WN851N.There will appear. TL-WN851N 300Mbps Wireless N PCI Adapter Figure 2-10 9. Figure 2-11 2.2.3 For Windows Vista 1. Insert the Resource CD into your CD-ROM drive, and the Figure 2-13 will be a menu including: Install Driver & Utility, Install QSS and User Guide. 9 After all the steps above, you will see the screen below, click Finish to complete the installation.
To continue, select the TL-WN851N.There will appear. TL-WN851N 300Mbps Wireless N PCI Adapter Figure 2-10 9. Figure 2-11 2.2.3 For Windows Vista 1. Insert the Resource CD into your CD-ROM drive, and the Figure 2-13 will be a menu including: Install Driver & Utility, Install QSS and User Guide. 9 After all the steps above, you will see the screen below, click Finish to complete the installation.
User Guide
Page 18
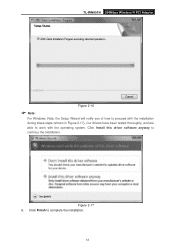
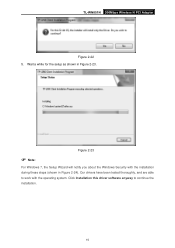
Figure 2-17 6. Our drivers have been tested thoroughly, and are able to complete the installation. 12 Click Finish to work with the installation during these steps (shown in Figure 2-17). TL-WN851N 300Mbps Wireless N PCI Adapter Figure 2-16 ) Note: For Windows Vista, the Setup Wizard will notify you of how to continue the Installation. Click Install this driver software anyway to proceed with the operating system.
Figure 2-17 6. Our drivers have been tested thoroughly, and are able to complete the installation. 12 Click Finish to work with the installation during these steps (shown in Figure 2-17). TL-WN851N 300Mbps Wireless N PCI Adapter Figure 2-16 ) Note: For Windows Vista, the Setup Wizard will notify you of how to continue the Installation. Click Install this driver software anyway to proceed with the operating system.

User Guide
Page 19
To continue, select the TL-WN851N.There will appear. Click Install Driver & Utility to load the following screen. 13 Figure 2-19 2. TL-WN851N 300Mbps Wireless N PCI Adapter Figure 2-18 2.2.4 For Windows 7 1. Insert the Resource CD into your CD-ROM drive, and the Figure 2-19 will be a menu including: Install Driver & Utility, Install QSS and User Guide.
To continue, select the TL-WN851N.There will appear. Click Install Driver & Utility to load the following screen. 13 Figure 2-19 2. TL-WN851N 300Mbps Wireless N PCI Adapter Figure 2-18 2.2.4 For Windows 7 1. Insert the Resource CD into your CD-ROM drive, and the Figure 2-19 will be a menu including: Install Driver & Utility, Install QSS and User Guide.
User Guide
Page 21
Wait a while for the setup as shown in Figure 2-24). Figure 2-23 ) Note: For Windows 7, the Setup Wizard will notify you about the Windows Security with the operating system. Click Installation this driver software anyway to work with the installation during these steps (shown in Figure 2-23. Our drivers have been tested thoroughly, and are able XX to continue the installation. 15 TL-WN851N 300Mbps Wireless N PCI Adapter Figure 2-22 5.
Wait a while for the setup as shown in Figure 2-24). Figure 2-23 ) Note: For Windows 7, the Setup Wizard will notify you about the Windows Security with the operating system. Click Installation this driver software anyway to work with the installation during these steps (shown in Figure 2-23. Our drivers have been tested thoroughly, and are able XX to continue the installation. 15 TL-WN851N 300Mbps Wireless N PCI Adapter Figure 2-22 5.
User Guide
Page 35
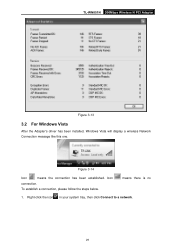
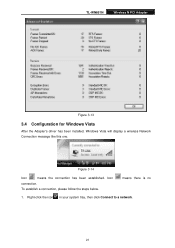
Icon connection. means there is no 1. TL-WN851N 300Mbps Wireless N PCI Adapter Figure 3-13 3.2 For Windows Vista After the Adapter's driver has been installed, Windows Vista will display a wireless Network Connection message like this one. Right-click the icon in your system tray, then click Connect to a network. 29 Figure 3-14 Icon means the connection has been established. To establish a connection, please follow the steps below.
Icon connection. means there is no 1. TL-WN851N 300Mbps Wireless N PCI Adapter Figure 3-13 3.2 For Windows Vista After the Adapter's driver has been installed, Windows Vista will display a wireless Network Connection message like this one. Right-click the icon in your system tray, then click Connect to a network. 29 Figure 3-14 Icon means the connection has been established. To establish a connection, please follow the steps below.
User Guide
Page 37
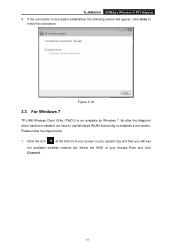
So after the Adapter's driver has been installed, we have to use Windows WLAN Autoconfig to finish the connection. Select the SSID of your screen in your Access Point and click Connect. 31 Figure 3-18 3.3 For Windows 7 TP-LINK Wireless Client Utility (TWCU) is successful ...established, the following screen will see the available wireless network list. Click the icon at the bottom of your system tray and then you will appear, click close to establish a connection. Please follow the steps below. 1. TL-WN851N ...
So after the Adapter's driver has been installed, we have to use Windows WLAN Autoconfig to finish the connection. Select the SSID of your screen in your Access Point and click Connect. 31 Figure 3-18 3.3 For Windows 7 TP-LINK Wireless Client Utility (TWCU) is successful ...established, the following screen will see the available wireless network list. Click the icon at the bottom of your system tray and then you will appear, click close to establish a connection. Please follow the steps below. 1. TL-WN851N ...

User Guide
Page 5
... Features ...2 1.3 LED Status ...3 Chapter 2 Installation Guide 4 2.1 Hardware Installation 4 2.2 Software Installation 4 2.2.1 Overview ...4 2.2.2 Software Installation for Windows XP 4 Chapter 3 Configuration 11 3.1 Current Status ...11 3.2 Profile Management 13 3.2.1 Add or Modify a Configuration Profile 13 3.2.2 Remove a profile...20 3.2.7 Auto Profile Selection Management 20 3.3 Diagnostics...21 3.3.1 Check Driver Information 22 3.3.2 Check Receive and Transmit Statistical Information 22 3.4 Configuration for Windows Vista 23 Appendix A: Specifications 26 Appendix B: Glossary 27
... Features ...2 1.3 LED Status ...3 Chapter 2 Installation Guide 4 2.1 Hardware Installation 4 2.2 Software Installation 4 2.2.1 Overview ...4 2.2.2 Software Installation for Windows XP 4 Chapter 3 Configuration 11 3.1 Current Status ...11 3.2 Profile Management 13 3.2.1 Add or Modify a Configuration Profile 13 3.2.2 Remove a profile...20 3.2.7 Auto Profile Selection Management 20 3.3 Diagnostics...21 3.3.1 Check Driver Information 22 3.3.2 Check Receive and Transmit Statistical Information 22 3.4 Configuration for Windows Vista 23 Appendix A: Specifications 26 Appendix B: Glossary 27
User Guide
Page 9
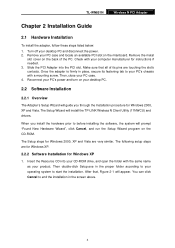
..., Figure 2-1 will install the TP-LINK Wireless N Client Utility (11NWCU) and drivers. Then, close your desktop PC and disconnect the power. 2. When you install the hardware prior to before installing the software, the system will guide you through the Installation procedure for Windows XP 1. The Setup steps for ... folder according to start the installation. The following setup steps are very similar. Turn off your PC case. 4. TL-WN851N Wireless N PCI Adapter Chapter 2 Installation Guide 2.1 Hardware Installation To install the adapter, follow these steps listed below: 1.
..., Figure 2-1 will install the TP-LINK Wireless N Client Utility (11NWCU) and drivers. Then, close your desktop PC and disconnect the power. 2. When you install the hardware prior to before installing the software, the system will guide you through the Installation procedure for Windows XP 1. The Setup steps for ... folder according to start the installation. The following setup steps are very similar. Turn off your PC case. 4. TL-WN851N Wireless N PCI Adapter Chapter 2 Installation Guide 2.1 Hardware Installation To install the adapter, follow these steps listed below: 1.
User Guide
Page 13
Wait a while for the setup as shown in Figure 2-9). TL-WN851N Wireless N PCI Adapter Figure 2-7 8. Figure 2-8 ) Note: 1) For Windows XP, the Setup Wizard will notify you of how to proceed with the operating system. Our drivers have been tested thoroughly, and are able to continue the Installation. 8 Click Continue Anyway to work with the installation during these steps (shown in Figure 2-8.
Wait a while for the setup as shown in Figure 2-9). TL-WN851N Wireless N PCI Adapter Figure 2-7 8. Figure 2-8 ) Note: 1) For Windows XP, the Setup Wizard will notify you of how to proceed with the operating system. Our drivers have been tested thoroughly, and are able to continue the Installation. 8 Click Continue Anyway to work with the installation during these steps (shown in Figure 2-8.
User Guide
Page 28
Right-click the icon in your system tray, then click Connect to a network. 23 means there is no 1. Figure 3-14 Icon means the connection has been established. Icon connection. To establish a connection, please follow the steps below. TL-WN851N Wireless N PCI Adapter Figure 3-13 3.4 Configuration for Windows Vista After the Adapter's driver has been installed, Windows Vista will display a wireless Network Connection message like this one.
Right-click the icon in your system tray, then click Connect to a network. 23 means there is no 1. Figure 3-14 Icon means the connection has been established. Icon connection. To establish a connection, please follow the steps below. TL-WN851N Wireless N PCI Adapter Figure 3-13 3.4 Configuration for Windows Vista After the Adapter's driver has been installed, Windows Vista will display a wireless Network Connection message like this one.


