TL-WN8200ND V1 User Guide
Page 7
... connect using TWCU 9 3.2 To connect using WPS 13 3.2.1 PBC (Push Button Configuration) method 13 3.2.2 PIN method 15 3.3 To connect using Windows built-in wireless utility 18 3.3.1 In Windows 7 18 3.3.2 In Windows Vista 20 3.3.3 In Windows XP 22 Chapter 4 Management 25 4.1 Profile...25 4.1.1 Add a profile 25 4.1.2 Modify a profile 27 4.1.3 Delete a profile 28 4.2 Advanced ...28 4.3 About...
... connect using TWCU 9 3.2 To connect using WPS 13 3.2.1 PBC (Push Button Configuration) method 13 3.2.2 PIN method 15 3.3 To connect using Windows built-in wireless utility 18 3.3.1 In Windows 7 18 3.3.2 In Windows Vista 20 3.3.3 In Windows XP 22 Chapter 4 Management 25 4.1 Profile...25 4.1.1 Add a profile 25 4.1.2 Modify a profile 27 4.1.3 Delete a profile 28 4.2 Advanced ...28 4.3 About...

TL-WN8200ND V1 User Guide
Page 9
...TP-LINK Wireless Configuration Utility instructing you to quickly set up to 300Mbps for your desktop. 1.2 Features ¾ Complies with its high receive sensitivity, which could let you don't have to be physically tethered to the walls or floors to access the Internet. TL-WN8200ND... wireless connectivity to configure and provides monitoring information ¾ Supports Windows XP, Windows Vista and Windows 7 ¾ 2*5dBi high gain detachable omnidirectional antennas make the performance enhanced. 2 The TL-WN8200ND's auto-sensing capability allows high packet transfer rate of up a...
...TP-LINK Wireless Configuration Utility instructing you to quickly set up to 300Mbps for your desktop. 1.2 Features ¾ Complies with its high receive sensitivity, which could let you don't have to be physically tethered to the walls or floors to access the Internet. TL-WN8200ND... wireless connectivity to configure and provides monitoring information ¾ Supports Windows XP, Windows Vista and Windows 7 ¾ 2*5dBi high gain detachable omnidirectional antennas make the performance enhanced. 2 The TL-WN8200ND's auto-sensing capability allows high packet transfer rate of up a...
TL-WN8200ND V1 User Guide
Page 11
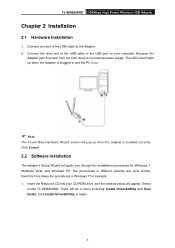
...window below will be a menu including: Install Driver&Utility and User Guide. Connect the other end of the USB cable to begin. 4 Insert the Resource CD into your computer. Click Install Driver&Utility to the Adapter. 2. There will appear. Select model TL-WN8200ND.... The procedures in different systems are quite similar, therefore here takes the procedures in and the PC is installed correctly. TL-WN8200ND 300Mbps High Power Wireless USB Adapter Chapter 2 Installation 2.1 Hardware ...
...window below will be a menu including: Install Driver&Utility and User Guide. Connect the other end of the USB cable to begin. 4 Insert the Resource CD into your computer. Click Install Driver&Utility to the Adapter. 2. There will appear. Select model TL-WN8200ND.... The procedures in different systems are quite similar, therefore here takes the procedures in and the PC is installed correctly. TL-WN8200ND 300Mbps High Power Wireless USB Adapter Chapter 2 Installation 2.1 Hardware ...

TL-WN8200ND V1 User Guide
Page 12
Selecting Install Driver Only will appear. Click Next to continue. Figure 2-2 3. Choose a setup type. Click Next to continue. 5 The InstallShield Wizard window will only install driver. TL-WN8200ND 300Mbps High Power Wireless USB Adapter Figure 2-1 2. It is recommended to select Install TP-LINK Wireless Configuration Utility and Driver.
Selecting Install Driver Only will appear. Click Next to continue. Figure 2-2 3. Choose a setup type. Click Next to continue. 5 The InstallShield Wizard window will only install driver. TL-WN8200ND 300Mbps High Power Wireless USB Adapter Figure 2-1 2. It is recommended to select Install TP-LINK Wireless Configuration Utility and Driver.

TL-WN8200ND V1 User Guide
Page 16
...connect using Windows built-in wireless utility. 3.1 To connect using WPS By this method, you can quickly connect to a wireless network using one of the following methods. ¾ Method One: To connect using TWCU (TP-LINK Wireless Configuration Utility) TL-WN8200ND uses the TP-LINK Wireless ...Configuration Utility as is called by double-clicking on the icon on the condition that are available in your area. TL-WN8200ND 300Mbps High Power Wireless USB Adapter Chapter 3 ...
...connect using Windows built-in wireless utility. 3.1 To connect using WPS By this method, you can quickly connect to a wireless network using one of the following methods. ¾ Method One: To connect using TWCU (TP-LINK Wireless Configuration Utility) TL-WN8200ND uses the TP-LINK Wireless ...Configuration Utility as is called by double-clicking on the icon on the condition that are available in your area. TL-WN8200ND 300Mbps High Power Wireless USB Adapter Chapter 3 ...

TL-WN8200ND V1 User Guide
Page 17
TL-WN8200ND 300Mbps High Power Wireless USB Adapter Connect. Figure 3-2 3. You will be prompted different windows when you choose wireless network of different security types. 1) Wireless network of WPA/WPA2-Personal If you selected a wireless network of the security type WPA/...
TL-WN8200ND 300Mbps High Power Wireless USB Adapter Connect. Figure 3-2 3. You will be prompted different windows when you choose wireless network of different security types. 1) Wireless network of WPA/WPA2-Personal If you selected a wireless network of the security type WPA/...
TL-WN8200ND V1 User Guide
Page 22
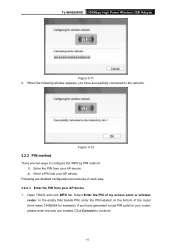
... are two ways to configure the WPS by PIN method: 1) Enter the PIN from your router, please enter the new one instead. When the following window appears, you have successfully connected to continue. 15 TL-WN8200ND 300Mbps High Power Wireless USB Adapter Figure 3-11 4.
... are two ways to configure the WPS by PIN method: 1) Enter the PIN from your router, please enter the new one instead. When the following window appears, you have successfully connected to continue. 15 TL-WN8200ND 300Mbps High Power Wireless USB Adapter Figure 3-11 4.

TL-WN8200ND V1 User Guide
Page 25
The utility will display any available wireless networks in your area. Follow the steps below. 1. Left-click the wireless icon in your system tray (lower-right corner). Highlight the wireless network (displayed using Windows built-in wireless utility 3.3.1 In Windows 7 Windows 7 users may use the built-in wireless utility. TL-WN8200ND 300Mbps High Power Wireless USB Adapter Figure 3-17 Figure 3-18 3.3 To connect using the SSID) to be connected and then click Connect. 18
The utility will display any available wireless networks in your area. Follow the steps below. 1. Left-click the wireless icon in your system tray (lower-right corner). Highlight the wireless network (displayed using Windows built-in wireless utility 3.3.1 In Windows 7 Windows 7 users may use the built-in wireless utility. TL-WN8200ND 300Mbps High Power Wireless USB Adapter Figure 3-17 Figure 3-18 3.3 To connect using the SSID) to be connected and then click Connect. 18
TL-WN8200ND V1 User Guide
Page 26
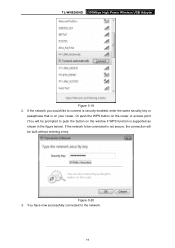
Figure 3-20 3. If the network to the network. 19 You have now successfully connected to be built without entering a key. TL-WN8200ND 300Mbps High Power Wireless USB Adapter Figure 3-19 2. If the network you would like to push the button on your router. Or push the WPS button on the router or access point (You will be prompted to connect is security-enabled, enter the same security key or passphrase that is on the window if WPS function is not secure, the connection will be connected is supported as shown in the figure below).
Figure 3-20 3. If the network to the network. 19 You have now successfully connected to be built without entering a key. TL-WN8200ND 300Mbps High Power Wireless USB Adapter Figure 3-19 2. If the network you would like to push the button on your router. Or push the WPS button on the router or access point (You will be prompted to connect is security-enabled, enter the same security key or passphrase that is on the window if WPS function is not secure, the connection will be connected is supported as shown in the figure below).

TL-WN8200ND V1 User Guide
Page 27
Open the wireless utility by right-clicking on the wireless computer icon in your area. The utility will display any available wireless networks in wireless utility. Select Connect to connect and then click Connect. 20 Highlight the wireless network you would like to a network. Figure 3-22 2. TL-WN8200ND 300Mbps High Power Wireless USB Adapter Figure 3-21 3.3.2 In Windows Vista Windows Vista users may use the built-in your system tray as shown in the figure below . 1. Follow the steps below .
Open the wireless utility by right-clicking on the wireless computer icon in your area. The utility will display any available wireless networks in wireless utility. Select Connect to connect and then click Connect. 20 Highlight the wireless network you would like to a network. Figure 3-22 2. TL-WN8200ND 300Mbps High Power Wireless USB Adapter Figure 3-21 3.3.2 In Windows Vista Windows Vista users may use the built-in your system tray as shown in the figure below . 1. Follow the steps below .
TL-WN8200ND V1 User Guide
Page 29
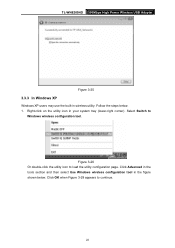
Select Switch to load the utility configuration page. Figure 3-26 Or double-click the utility icon to Windows wireless configuration tool. Click Advanced in the tools section and then select Use Windows wireless configuration tool in your system tray (lower-right corner). Right-click on the utility icon in the figure shown below . 1. Click OK when Figure 3-28 appears to continue. 22 Follow the steps below . TL-WN8200ND 300Mbps High Power Wireless USB Adapter Figure 3-25 3.3.3 In Windows XP Windows XP users may use the built-in wireless utility.
Select Switch to load the utility configuration page. Figure 3-26 Or double-click the utility icon to Windows wireless configuration tool. Click Advanced in the tools section and then select Use Windows wireless configuration tool in your system tray (lower-right corner). Right-click on the utility icon in the figure shown below . 1. Click OK when Figure 3-28 appears to continue. 22 Follow the steps below . TL-WN8200ND 300Mbps High Power Wireless USB Adapter Figure 3-25 3.3.3 In Windows XP Windows XP users may use the built-in wireless utility.
TL-WN8200ND V1 User Guide
Page 32
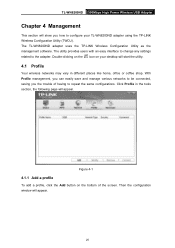
... vary in the tools section, the following page will appear. The TL-WN8200ND adapter uses the TP-LINK Wireless Configuration Utility as the management software. Double-clicking on the icon on the bottom of having to the adapter. Then the configuration window will appear. 25 TL-WN8200ND 300Mbps High Power Wireless USB Adapter Chapter 4 Management This section...
... vary in the tools section, the following page will appear. The TL-WN8200ND adapter uses the TP-LINK Wireless Configuration Utility as the management software. Double-clicking on the icon on the bottom of having to the adapter. Then the configuration window will appear. 25 TL-WN8200ND 300Mbps High Power Wireless USB Adapter Chapter 4 Management This section...
TL-WN8200ND V1 User Guide
Page 34
... point. Unchecking it will see the passphrase. To connect to a desired network, just highlight the network you selected the security type WPA-PSK/WPA2-PSK; TL-WN8200ND 300Mbps High Power Wireless USB Adapter ) Note: You will hide it is on the bottom of the...
... point. Unchecking it will see the passphrase. To connect to a desired network, just highlight the network you selected the security type WPA-PSK/WPA2-PSK; TL-WN8200ND 300Mbps High Power Wireless USB Adapter ) Note: You will hide it is on the bottom of the...
TL-WN8200ND V1 User Guide
Page 35
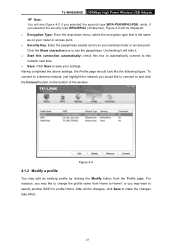
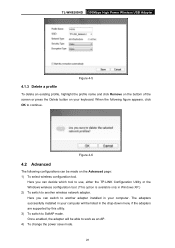
...figure appears, click OK to work as an AP. 4) To change the power save mode. 28 Once enabled, the adapter will be able to continue. TL-WN8200ND 300Mbps High Power Wireless USB Adapter Figure 4-5 4.1.3 Delete a profile To delete an existing profile, highlight the profile name and click Remove on the bottom of... adapters are supported by this utility. 3) To switch to another adapter installed in your computer. Here you can decide which tool to use, either the TP-LINK Configuration Utility or the Windows wireless configuration tool. (This option is available only in your keyboard.
...figure appears, click OK to work as an AP. 4) To change the power save mode. 28 Once enabled, the adapter will be able to continue. TL-WN8200ND 300Mbps High Power Wireless USB Adapter Figure 4-5 4.1.3 Delete a profile To delete an existing profile, highlight the profile name and click Remove on the bottom of... adapters are supported by this utility. 3) To switch to another adapter installed in your computer. Here you can decide which tool to use, either the TP-LINK Configuration Utility or the Windows wireless configuration tool. (This option is available only in your keyboard.
TL-WN8200ND V1 User Guide
Page 40
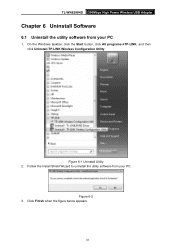
Figure 6-1 Uninstall Utility 2. Click Finish when the figure below appears. 33 On the Windows taskbar, click the Start button, click All programsÆTP-LINK, and then click Uninstall-TP-LINK Wireless Configuration Utility. Follow the Install Shield Wizard to uninstall the utility software from your PC. Figure 6-2 3. TL-WN8200ND 300Mbps High Power Wireless USB Adapter Chapter 6 Uninstall Software 6.1 Uninstall the utility software from your PC 1.
Figure 6-1 Uninstall Utility 2. Click Finish when the figure below appears. 33 On the Windows taskbar, click the Start button, click All programsÆTP-LINK, and then click Uninstall-TP-LINK Wireless Configuration Utility. Follow the Install Shield Wizard to uninstall the utility software from your PC. Figure 6-2 3. TL-WN8200ND 300Mbps High Power Wireless USB Adapter Chapter 6 Uninstall Software 6.1 Uninstall the utility software from your PC 1.

TL-WN8200ND V1 User Guide
Page 41
On the Windows taskbar, click the Start button, click All programsÆTP-LINK, and then click Uninstall-TL-WN8200ND Driver. Figure 6-4 Uninstall Driver 2. Following the steps, then the system will uninstall the driver software of the adapter from your PC. 34 TL-WN8200ND 300Mbps High Power Wireless USB Adapter Figure 6-3 6.2 Uninstall the driver software from your PC 1.
On the Windows taskbar, click the Start button, click All programsÆTP-LINK, and then click Uninstall-TL-WN8200ND Driver. Figure 6-4 Uninstall Driver 2. Following the steps, then the system will uninstall the driver software of the adapter from your PC. 34 TL-WN8200ND 300Mbps High Power Wireless USB Adapter Figure 6-3 6.2 Uninstall the driver software from your PC 1.

TL-WN8200ND V1 User Guide
Page 42
...;~158℉) Working Humidity 10% ~ 90% RH, Non-condensing Storage Humidity 5% ~ 90% RH, Non-condensing 35 WPA/WPA2; TL-WN8200ND 300Mbps High Power Wireless USB Adapter Appendix A: Specifications Normal Interface Standards Button Operating System Throughput Radio Data Rate Modulation Media Access Protocol Data Security... Spectrum Safety & Emissions USB 2.0 Interface IEEE 802.11n, IEEE 802.11g, IEEE 802.11b Wi-fi Protected Setup (WPS) Button Windows XP, Windows Vista, Windows 7 Tx: 150Mbps Rx: 300Mbps 11b: 1/2/5.5/11Mbps 11g: 6/9/12/18/24/36/48/54Mbps 11n: Up to 300Mbps 11b:CCK,QPSK...
...;~158℉) Working Humidity 10% ~ 90% RH, Non-condensing Storage Humidity 5% ~ 90% RH, Non-condensing 35 WPA/WPA2; TL-WN8200ND 300Mbps High Power Wireless USB Adapter Appendix A: Specifications Normal Interface Standards Button Operating System Throughput Radio Data Rate Modulation Media Access Protocol Data Security... Spectrum Safety & Emissions USB 2.0 Interface IEEE 802.11n, IEEE 802.11g, IEEE 802.11b Wi-fi Protected Setup (WPS) Button Windows XP, Windows Vista, Windows 7 Tx: 150Mbps Rx: 300Mbps 11b: 1/2/5.5/11Mbps 11g: 6/9/12/18/24/36/48/54Mbps 11n: Up to 300Mbps 11b:CCK,QPSK...
TL-WN8200ND V1 QIG 7106504015
Page 1
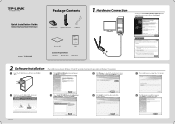
TL-WN8200ND QIG System Requirement · Windows 7 · Windows Vista · Windows XP 1 Hardware Connection You may take 1~2 minutes. 2 Find the model TL-WN8200ND, click it default. Click Finish to specify the destination location or you can leave it , and then select Install Driver&Utility. 4 Select Install TP-LINK Wireless Con guration Utility and Driver, and then click Next. 6 Click...
TL-WN8200ND QIG System Requirement · Windows 7 · Windows Vista · Windows XP 1 Hardware Connection You may take 1~2 minutes. 2 Find the model TL-WN8200ND, click it default. Click Finish to specify the destination location or you can leave it , and then select Install Driver&Utility. 4 Select Install TP-LINK Wireless Con guration Utility and Driver, and then click Next. 6 Click...


