User Guide
Page 2
... approved by turning the equipment off and on a circuit different from TP-LINK TECHNOLOGIES CO., LTD. COPYRIGHT & TRADEMARKS Specifications are designed to provide reasonable protection against harmful interference in a residential installation. This equipment generates, uses and can be reproduced in any form...one or more of their respective holders. Copyright © 2009 TP-LINK TECHNOLOGIES CO., LTD. is subject to radio or television reception, which can radiate radio frequency energy and, if not installed and used to make any interference received, including interference that ...
... approved by turning the equipment off and on a circuit different from TP-LINK TECHNOLOGIES CO., LTD. COPYRIGHT & TRADEMARKS Specifications are designed to provide reasonable protection against harmful interference in a residential installation. This equipment generates, uses and can be reproduced in any form...one or more of their respective holders. Copyright © 2009 TP-LINK TECHNOLOGIES CO., LTD. is subject to radio or television reception, which can radiate radio frequency energy and, if not installed and used to make any interference received, including interference that ...
User Guide
Page 5
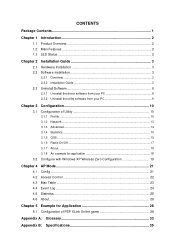
CONTENTS Package Contents ...1 Chapter 1 Introduction 2 1.1 Product Overview 2 1.2 Main Features 2 1.3 LED Status ...2 Chapter 2 Installation Guide 3 2.1 Hardware Installation 3 2.2 Software Installation 3 2.2.1 Overview ...3 2.2.2 Installation Guide 3 2.3 Uninstall Software 8 2.3.1 Uninstall the driver software from your PC 8 2.3.2 Uninstall the utility software from your PC 9 Chapter 3 Configuration 10 3.1 Configuration of Utility 10 3.1.1 Profile ......
CONTENTS Package Contents ...1 Chapter 1 Introduction 2 1.1 Product Overview 2 1.2 Main Features 2 1.3 LED Status ...2 Chapter 2 Installation Guide 3 2.1 Hardware Installation 3 2.2 Software Installation 3 2.2.1 Overview ...3 2.2.2 Installation Guide 3 2.3 Uninstall Software 8 2.3.1 Uninstall the driver software from your PC 8 2.3.2 Uninstall the utility software from your PC 9 Chapter 3 Configuration 10 3.1 Configuration of Utility 10 3.1.1 Profile ......
User Guide
Page 7
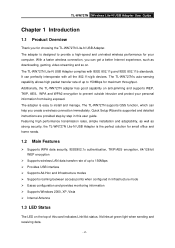
... AES,WPA and WPA2 encryption to install and manage. Featuring high performance transmission rates, simple installation and adaptability, as well as downloading, gaming, video streaming and so on the top of up to 150Mbps for choosing the TL-WN727N Lite-N USB Adapter. The adapter is ...interface ¾ Supports Ad-Hoc and Infrastructure modes ¾ Supports roaming between access points when configured in this card indicates Link/Act status. The TL-WN727N supports QSS function, which can perfectly interoperate with IEEE 802.11g and IEEE 802.11b standards. It can help you create...
... AES,WPA and WPA2 encryption to install and manage. Featuring high performance transmission rates, simple installation and adaptability, as well as downloading, gaming, video streaming and so on the top of up to 150Mbps for choosing the TL-WN727N Lite-N USB Adapter. The adapter is ...interface ¾ Supports Ad-Hoc and Infrastructure modes ¾ Supports roaming between access points when configured in this card indicates Link/Act status. The TL-WN727N supports QSS function, which can perfectly interoperate with IEEE 802.11g and IEEE 802.11b standards. It can help you create...
User Guide
Page 8
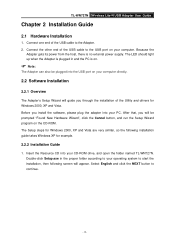
... USB cable to the Adapter. 2. Connect the other end of the USB cable to the USB port on the CD-ROM. TL-WN727N Wireless Lite-N USB Adapter User Guide Chapter 2 Installation Guide 2.1 Hardware Installation 1. Because the Adapter gets its power from the host, there is on. ) Note: The Adapter can also be prompted "Found...
... USB cable to the Adapter. 2. Connect the other end of the USB cable to the USB port on the CD-ROM. TL-WN727N Wireless Lite-N USB Adapter User Guide Chapter 2 Installation Guide 2.1 Hardware Installation 1. Because the Adapter gets its power from the host, there is on. ) Note: The Adapter can also be prompted "Found...
User Guide
Page 9
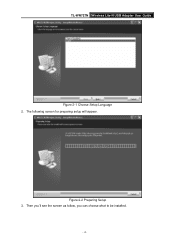
The following screen for preparing setup will appear. TL-WN727N Wireless Lite-N USB Adapter User Guide Figure 2-1 Choose Setup Language 2. Figure 2-2 Preparing Setup 3. Then you'll see the screen as follow, you can choose what to be installed. - 4 -
The following screen for preparing setup will appear. TL-WN727N Wireless Lite-N USB Adapter User Guide Figure 2-1 Choose Setup Language 2. Figure 2-2 Preparing Setup 3. Then you'll see the screen as follow, you can choose what to be installed. - 4 -
User Guide
Page 10
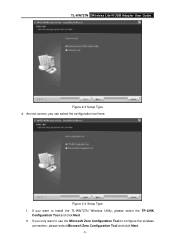
Figure 2-4 Setup Type I. If you only want to configure the wireless connection, please select Microsoft Zero Configuration Tool and click Next. - 5 - If you can select the configuration tool here. TL-WN727N Wireless Lite-N USB Adapter User Guide Figure 2-3 Setup Type 4. II. As next screen, you want to use the Microsoft Zero Configuration Tool to install the TL-WN727N Wireless Utility, please select the TP-LINK Configuration Tool and click Next.
Figure 2-4 Setup Type I. If you only want to configure the wireless connection, please select Microsoft Zero Configuration Tool and click Next. - 5 - If you can select the configuration tool here. TL-WN727N Wireless Lite-N USB Adapter User Guide Figure 2-3 Setup Type 4. II. As next screen, you want to use the Microsoft Zero Configuration Tool to install the TL-WN727N Wireless Utility, please select the TP-LINK Configuration Tool and click Next.
User Guide
Page 11
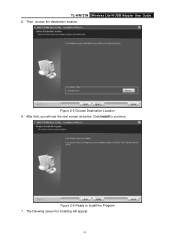
Figure 2-5 Choose Destination Location 6. After that, you will appear. - 6 - Then, choose the destination location. Figure 2-6 Ready to continue. Click Install to Install the Program 7. The following screen for installing will see the next screen as below. TL-WN727N Wireless Lite-N USB Adapter User Guide 5.
Figure 2-5 Choose Destination Location 6. After that, you will appear. - 6 - Then, choose the destination location. Figure 2-6 Ready to continue. Click Install to Install the Program 7. The following screen for installing will see the next screen as below. TL-WN727N Wireless Lite-N USB Adapter User Guide 5.
User Guide
Page 12
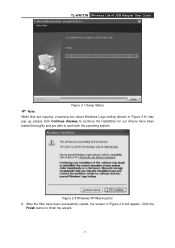
TL-WN727N Wireless Lite-N USB Adapter User Guide ) Note: Figure 2-7 Setup Status While files are able to work with the operating system. Figure 2-8 Windows XP Warning Box 8. Click the Finish button to continue the installation for our drivers have been successfully copied, the screen in Figure 2-8) may pop up, please click Continue Anyway to finish the wizard. - 7 - After the files have been tested thoroughly and are copying, a warning box about Windows Logo testing (shown in Figure 2-9 will appear.
TL-WN727N Wireless Lite-N USB Adapter User Guide ) Note: Figure 2-7 Setup Status While files are able to work with the operating system. Figure 2-8 Windows XP Warning Box 8. Click the Finish button to continue the installation for our drivers have been successfully copied, the screen in Figure 2-8) may pop up, please click Continue Anyway to finish the wizard. - 7 - After the files have been tested thoroughly and are copying, a warning box about Windows Logo testing (shown in Figure 2-9 will appear.
User Guide
Page 13
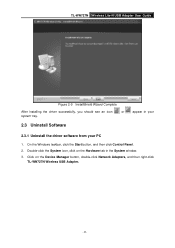
Double-click the System icon, click on the Device Manager button, double-click Network Adapters, and then right-click TL-WN727N Wireless USB Adapter. - 8 - Click on the Hardware tab in your 2.3.1 Uninstall the driver software from your PC 1. TL-WN727N Wireless Lite-N USB Adapter User Guide Figure 2-9 InstallShield Wizard Complete After installing the driver successfully, you should see an icon or system tray. 2.3 Uninstall Software appear in the System window. 3. On the Windows taskbar, click the Start button, and then click Control Panel. 2.
Double-click the System icon, click on the Device Manager button, double-click Network Adapters, and then right-click TL-WN727N Wireless USB Adapter. - 8 - Click on the Hardware tab in your 2.3.1 Uninstall the driver software from your PC 1. TL-WN727N Wireless Lite-N USB Adapter User Guide Figure 2-9 InstallShield Wizard Complete After installing the driver successfully, you should see an icon or system tray. 2.3 Uninstall Software appear in the System window. 3. On the Windows taskbar, click the Start button, and then click Control Panel. 2.
User Guide
Page 14
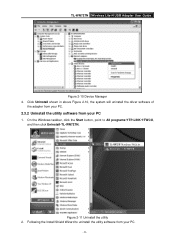
Figure 2-11 Uninstall the utility 2. Following the Install Shield Wizard to All programsÆTP-LINKÆTWCU, and then click Uninstall-TL-WN727N. Click Uninstall shown in above Figure 2-10, the system will uninstall the driver software of the adapter from your PC. 2.3.2 Uninstall the utility software from your PC 1. On the Windows taskbar, click the Start button, point to uninstall the utility software from your PC. - 9 - TL-WN727N Wireless Lite-N USB Adapter User Guide Figure 2-10 Device Manager 4.
Figure 2-11 Uninstall the utility 2. Following the Install Shield Wizard to All programsÆTP-LINKÆTWCU, and then click Uninstall-TL-WN727N. Click Uninstall shown in above Figure 2-10, the system will uninstall the driver software of the adapter from your PC. 2.3.2 Uninstall the utility software from your PC 1. On the Windows taskbar, click the Start button, point to uninstall the utility software from your PC. - 9 - TL-WN727N Wireless Lite-N USB Adapter User Guide Figure 2-10 Device Manager 4.
User Guide
Page 15
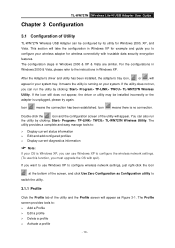
...for example and guide you can also run the utility by clicking: Start> Program> TP-LINK> TWCU> TL-WN727N Wireless Utility. Icon means the connection has been established. After the Adapter's driver and utility has been installed, the adapter's tray icon, or , will appear in Windows 2000 & XP ... a profile ¾ Delete a profile ¾ Activate a profile - 10 - If the utility does not run the utility by clicking: Start> Program> TP-LINK> TWCU> TL-WN727N Wireless Utility. It means the utility is no connection. You can run , you to configure your system.
...for example and guide you can also run the utility by clicking: Start> Program> TP-LINK> TWCU> TL-WN727N Wireless Utility. Icon means the connection has been established. After the Adapter's driver and utility has been installed, the adapter's tray icon, or , will appear in Windows 2000 & XP ... a profile ¾ Delete a profile ¾ Activate a profile - 10 - If the utility does not run the utility by clicking: Start> Program> TP-LINK> TWCU> TL-WN727N Wireless Utility. It means the utility is no connection. You can run , you to configure your system.
User Guide
Page 23
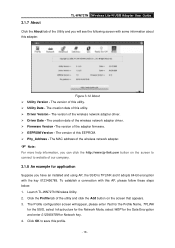
...: 1. The MAC address of the wireless network adapter. ) Note: For more help information, you have an installed and using AP, the SSID is TPLINK and it adopts 64-bit encryption with this utility. ¾ Driver Version... Phy_Address - The version of this profile. - 18 - To establish a connection with the key 0123456789. 3.1.7 About TL-WN727N Wireless Lite-N USB Adapter User Guide Click the About tab of the Utility and you will appear, please enter Test for... 0123456789 for application Suppose you can click the http://www.tp-link.com button on the screen that appears. 3.
...: 1. The MAC address of the wireless network adapter. ) Note: For more help information, you have an installed and using AP, the SSID is TPLINK and it adopts 64-bit encryption with this utility. ¾ Driver Version... Phy_Address - The version of this profile. - 18 - To establish a connection with the key 0123456789. 3.1.7 About TL-WN727N Wireless Lite-N USB Adapter User Guide Click the About tab of the Utility and you will appear, please enter Test for... 0123456789 for application Suppose you can click the http://www.tp-link.com button on the screen that appears. 3.
User Guide
Page 24
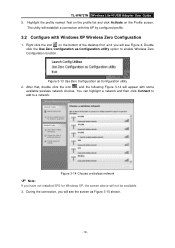
TL-WN727N Wireless Lite-N USB Adapter User Guide 5. The utility will appear with Windows XP Wireless Zero Configuration 1. After that, double click the icon , and the following ... Configuration function. Highlight the profile named Test on the profile list and click Activate on the bottom of the desktop first and you have not installed SP2 for Windows XP, the screen above will see the screen as Configuration utility 2. Figure 3-14 Choose a wireless network ) Note: If you will not be...
TL-WN727N Wireless Lite-N USB Adapter User Guide 5. The utility will appear with Windows XP Wireless Zero Configuration 1. After that, double click the icon , and the following ... Configuration function. Highlight the profile named Test on the profile list and click Activate on the bottom of the desktop first and you have not installed SP2 for Windows XP, the screen above will see the screen as Configuration utility 2. Figure 3-14 Choose a wireless network ) Note: If you will not be...

User Guide
Page 26
With this time, if your PC have Installed other network card (wireless or wire), you will make the APs of them to AP Mode. Figure 4-2 4.1 Config Here you can use the TL-WN727N as a soft AP. ) Note: Figure 4-1 At this function TL-WN727N can do some basic configurations. - 21 - In this mode you ...can serve as wireless router based on the selected card connecting to the Internet, which will be "WAN". TL-WN727N Wireless Lite-N USB Adapter User Guide Chapter 4 AP Mode Click the icon to switch to be prompted "ICS Select WAN Adapter" to select one ...
With this time, if your PC have Installed other network card (wireless or wire), you will make the APs of them to AP Mode. Figure 4-2 4.1 Config Here you can use the TL-WN727N as a soft AP. ) Note: Figure 4-1 At this function TL-WN727N can do some basic configurations. - 21 - In this mode you ...can serve as wireless router based on the selected card connecting to the Internet, which will be "WAN". TL-WN727N Wireless Lite-N USB Adapter User Guide Chapter 4 AP Mode Click the icon to switch to be prompted "ICS Select WAN Adapter" to select one ...
User Guide
Page 33
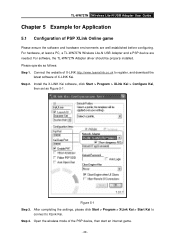
... game Please ensure the software and hardware environments are needed. For hardware, at least a PC, a TL-WN727N Wireless Lite-N USB Adapter and a PSP device are well established before configuring. For software, the TL-WN727N Adapter driver should be properly installed. Install the X-LINK Kai software, click Start > Program > XLink Kai > Configure Kai, then set as follows: Step...
... game Please ensure the software and hardware environments are needed. For hardware, at least a PC, a TL-WN727N Wireless Lite-N USB Adapter and a PSP device are well established before configuring. For software, the TL-WN727N Adapter driver should be properly installed. Install the X-LINK Kai software, click Start > Program > XLink Kai > Configure Kai, then set as follows: Step...


