User Guide
Page 4
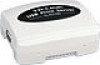
...95/98/Me/NT/2000/XP/2003, User's Guide ․One external AC power adapter ․One Quick Installation Guide ․Built-in Reset Button 4 Network Management The print servers support the Simple Network Management Protocol (SNMP), which help administrator to indicate USB port: Green for USB2.0,...One Setup CD for 10Base-T or 100Base-TX ․1 LED to indicate Status(Orange), 2 LED's to indicate 10M(Orange) and 100M(Green) link lights ․1 LED to setup print server environment. Network configuration The print servers provide an embedded web server that the print server does not ...
...95/98/Me/NT/2000/XP/2003, User's Guide ․One external AC power adapter ․One Quick Installation Guide ․Built-in Reset Button 4 Network Management The print servers support the Simple Network Management Protocol (SNMP), which help administrator to indicate USB port: Green for USB2.0,...One Setup CD for 10Base-T or 100Base-TX ․1 LED to indicate Status(Orange), 2 LED's to indicate 10M(Orange) and 100M(Green) link lights ․1 LED to setup print server environment. Network configuration The print servers provide an embedded web server that the print server does not ...

User Guide
Page 23
...upgrade file is located in order to establish a new connection or for all attached print server(s). 23 Click Reset button just like a picture < >. 2. Select General Upgrade. Refresh 1. Click Reset button just like a picture < >. 2. Refresh searches the network for new settings to upgrade... 2. Click Upgrade button just like a picture < >, as shown as follows: 1. Upgrade Upgrade allows the user to reset the print server device in the same directory as PSAdmin. Reset 1. Reset allows the user to upgrade the print server device.
...upgrade file is located in order to establish a new connection or for all attached print server(s). 23 Click Reset button just like a picture < >. 2. Select General Upgrade. Refresh 1. Click Reset button just like a picture < >. 2. Refresh searches the network for new settings to upgrade... 2. Click Upgrade button just like a picture < >, as shown as follows: 1. Upgrade Upgrade allows the user to reset the print server device in the same directory as PSAdmin. Reset 1. Reset allows the user to upgrade the print server device.
User Guide
Page 24
Run the PSAdmin from their Windows PC systems in minutes. Run the NetWare's PCONSOLE and create additional print queues. 7. Reset the print server by Printer" option (For NetWare 4.x's PCONSOLE, please select "Printers" option and select "Printer 0" instead). 9. Uninstalling ... Please refer to Settings, and select Control Panel. 2. Select the "Print server Configuration" option and select the "Queue Serviced by clicking the "Reset" icon from their Windows PC, and the PSAdmin software comes with the un-installation procedure. Select the "Printer 0" and press the [Insert] key...
Run the PSAdmin from their Windows PC systems in minutes. Run the NetWare's PCONSOLE and create additional print queues. 7. Reset the print server by Printer" option (For NetWare 4.x's PCONSOLE, please select "Printers" option and select "Printer 0" instead). 9. Uninstalling ... Please refer to Settings, and select Control Panel. 2. Select the "Print server Configuration" option and select the "Queue Serviced by clicking the "Reset" icon from their Windows PC, and the PSAdmin software comes with the un-installation procedure. Select the "Printer 0" and press the [Insert] key...

User Guide
Page 69
.... I can do tftp command to ping or tftp the print server, it exactly passed the POST. Please refer to the "Moving the print server to reset the entry. 1. I can 't do the "arp" command. The print server's Node ID you specified in NT's ARP cache table is like moving the print server...
.... I can do tftp command to ping or tftp the print server, it exactly passed the POST. Please refer to the "Moving the print server to reset the entry. 1. I can 't do the "arp" command. The print server's Node ID you specified in NT's ARP cache table is like moving the print server...

User Guide
Page 76
Reset Button Reboot the Print server: 1. Perform a Factory Default: 1. Wait about 5~6 seconds. 4. Verify the power of print server to default and should be performed with caution! 76 Reconnect the external reset button. Hold down the reset button. 3. The print server will restart the print server and stop all settings of print server is turned on -going and pending print jobs! WARNING: This will erase all on . 2. Disconnect the external power adapter. 2. Release the reset button. 5. Press the reset button once, and then release it. WARNING: This will restart.
Reset Button Reboot the Print server: 1. Perform a Factory Default: 1. Wait about 5~6 seconds. 4. Verify the power of print server to default and should be performed with caution! 76 Reconnect the external reset button. Hold down the reset button. 3. The print server will restart the print server and stop all settings of print server is turned on -going and pending print jobs! WARNING: This will erase all on . 2. Disconnect the external power adapter. 2. Release the reset button. 5. Press the reset button once, and then release it. WARNING: This will restart.
User Manual
Page 5
... Page on MAC OS 20 3.4 Printer Installation...27 3.4.1 If You Have Installed A Printer Before 27 3.4.2 If You Never Install A Printer Before 32 Chapter 4. How to Reset the Print Server 47 Appendix B: Troubleshooting 48 Appendix C: Frequently Asked Questions 51 Appendix D: Additional Installation Instructions 53 IV CONTENTS Chapter 1. Introduction 1 1.1 Product Overview ...1 1.2 Components and...
... Page on MAC OS 20 3.4 Printer Installation...27 3.4.1 If You Have Installed A Printer Before 27 3.4.2 If You Never Install A Printer Before 32 Chapter 4. How to Reset the Print Server 47 Appendix B: Troubleshooting 48 Appendix C: Frequently Asked Questions 51 Appendix D: Additional Installation Instructions 53 IV CONTENTS Chapter 1. Introduction 1 1.1 Product Overview ...1 1.2 Components and...

User Manual
Page 6
... print servers enhance capability by letting you place your local dealer for Windows system ¾ One external AC power adapter ¾ Built-in Reset Button ¾ One Quick Installation Guide 1.3 LED Indicator LED Status Indication Status Blinking (Orange) 100Mbps On (Green) 10Mbps On (Orange) USB...1.4 Factory Defaults ¾ Username: admin ¾ IP Address: 192.168.0.10 ¾ Subnet Mask: 255.255.255.0 )Note: The TL-PS110U is produced without password by increasing network printer performance and management. TL-PS110U Single USB2.0 Port Fast Ethernet Print Server Chapter 1.
... print servers enhance capability by letting you place your local dealer for Windows system ¾ One external AC power adapter ¾ Built-in Reset Button ¾ One Quick Installation Guide 1.3 LED Indicator LED Status Indication Status Blinking (Orange) 100Mbps On (Green) 10Mbps On (Orange) USB...1.4 Factory Defaults ¾ Username: admin ¾ IP Address: 192.168.0.10 ¾ Subnet Mask: 255.255.255.0 )Note: The TL-PS110U is produced without password by increasing network printer performance and management. TL-PS110U Single USB2.0 Port Fast Ethernet Print Server Chapter 1.
User Manual
Page 52
Plug in the power adapter of the TL-PS110U; 2. Press and hold the Reset button on the TL-PS110U; 3. Release the Reset button. 5. The print server will restart. 47 Here are the steps for about 10 seconds. 4. Unplug the power adapter of the print server with the TL-PS110U by doing wrong configuration, you need to reset it again. TL-PS110U Single USB2.0 Port Fast Ethernet Print Server Appendix A: How to factory and reconfigure it to Reset the Print Server If you lose the connection with the Reset button pressed for the resetting 1.
Plug in the power adapter of the TL-PS110U; 2. Press and hold the Reset button on the TL-PS110U; 3. Release the Reset button. 5. The print server will restart. 47 Here are the steps for about 10 seconds. 4. Unplug the power adapter of the print server with the TL-PS110U by doing wrong configuration, you need to reset it again. TL-PS110U Single USB2.0 Port Fast Ethernet Print Server Appendix A: How to factory and reconfigure it to Reset the Print Server If you lose the connection with the Reset button pressed for the resetting 1.

User Manual
Page 54
... possible causes: A. "arp -a" If the Node ID shown on the screen doesn't match the print server's Node ID, please follow the instructions below to reset the entry. 1. TL-PS110U Single USB2.0 Port Fast Ethernet Print Server print server's configuration file and save its IP address permanently. The print server's Node ID you specified...
... possible causes: A. "arp -a" If the Node ID shown on the screen doesn't match the print server's Node ID, please follow the instructions below to reset the entry. 1. TL-PS110U Single USB2.0 Port Fast Ethernet Print Server print server's configuration file and save its IP address permanently. The print server's Node ID you specified...
