
tpPLC Utility for Windows V1 User Guide
Page 2
... 14 4. 1. Refresh the Page 16 4. 4. Turn On or Off the LEDs 16 4. 5. Manage an Individual Powerline Device 6 3. 1. Redirect to Know About the tpPLC Utility 2 Chapter 2. View Usage Tips 17 Change Basic Settings 7 3. 1. 1.Rename a Device 7 3. 1. 2.Turn On or Off the LEDs 8 3. 1. 3.Customize ... 3. Change Advanced Settings 10 3. 2. 1.Set Up QoS 10 3. 2. 2.Update the Firmware 11 3. 3. Add a Device to the Network 15 4. 2. Remove a Remote Device 13 Chapter 4. Set a New Powerline Network Name 15 4. 3. Contents About This Guide 1 Chapter 1.
... 14 4. 1. Refresh the Page 16 4. 4. Turn On or Off the LEDs 16 4. 5. Manage an Individual Powerline Device 6 3. 1. Redirect to Know About the tpPLC Utility 2 Chapter 2. View Usage Tips 17 Change Basic Settings 7 3. 1. 1.Rename a Device 7 3. 1. 2.Turn On or Off the LEDs 8 3. 1. 3.Customize ... 3. Change Advanced Settings 10 3. 2. 1.Set Up QoS 10 3. 2. 2.Update the Firmware 11 3. 3. Add a Device to the Network 15 4. 2. Remove a Remote Device 13 Chapter 4. Set a New Powerline Network Name 15 4. 3. Contents About This Guide 1 Chapter 1.
tpPLC Utility for Windows V1 User Guide
Page 3
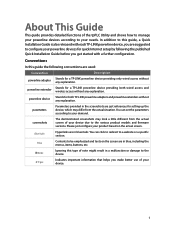
... guide, a Quick Installation Guide is also released with a further configuration. powerline extender powerline device Stands for a TP-LINK powerline device providing both TP-LINK powerline adapters and powerline extenders without any explanation. Indicates important information that helps you get started with eachTP-LINK powerline device, you are used: Convention Description powerline adapter Stands for both wired access and wireless access without any...
... guide, a Quick Installation Guide is also released with a further configuration. powerline extender powerline device Stands for a TP-LINK powerline device providing both TP-LINK powerline adapters and powerline extenders without any explanation. Indicates important information that helps you get started with eachTP-LINK powerline device, you are used: Convention Description powerline adapter Stands for both wired access and wireless access without any...

tpPLC Utility for Windows V1 User Guide
Page 5
... used to the web management interface of your powerline devices. 3 Note that earlier TP-LINK powerline devices (200Mbps series) and non-TP-LINK powerline devices only support the renaming and removing functions. Manage an Individual Powerline Device With this utility, you to conveniently manage all powerline devices. View a Vivid and Intuitive Powerline Network This utility can change the settings for...
... used to the web management interface of your powerline devices. 3 Note that earlier TP-LINK powerline devices (200Mbps series) and non-TP-LINK powerline devices only support the renaming and removing functions. Manage an Individual Powerline Device With this utility, you to conveniently manage all powerline devices. View a Vivid and Intuitive Powerline Network This utility can change the settings for...

tpPLC Utility for Windows V1 User Guide
Page 7
... move either device to install it . Install the utility. 1 ) Go to install the utility. If you the powerline network, with the local powerline device at http://www.tp-link.com and download the tpPLC Utility package. 2 ) Double-click the package and follow the setup wizard to the product... support page at the bottom and remote powerline devices above it . 3 ) Wait until the installation is required for the tpPLC ...
... move either device to install it . Install the utility. 1 ) Go to install the utility. If you the powerline network, with the local powerline device at http://www.tp-link.com and download the tpPLC Utility package. 2 ) Double-click the package and follow the setup wizard to the product... support page at the bottom and remote powerline devices above it . 3 ) Wait until the installation is required for the tpPLC ...

tpPLC Utility for Windows V1 User Guide
Page 8
Chapter 3 Manage an Individual Powerline Device This chapter guides you on how to the Web Management Interface • Remove a Remote Device It contains the following sections: • Change Basic Settings • Change Advanced Settings • Redirect to manage an individual powerline device via the utility.
Chapter 3 Manage an Individual Powerline Device This chapter guides you on how to the Web Management Interface • Remove a Remote Device It contains the following sections: • Change Basic Settings • Change Advanced Settings • Redirect to manage an individual powerline device via the utility.

tpPLC Utility for Windows V1 User Guide
Page 9
... in "Device-XXXX" format by default) are the same as those of the web management interface. 2. Open the utility, move your powerline devices for easy identification. To rename a device, follow the steps below: 1. You can rename your mouse over a device, and click the (Basic) icon. Now the..., and click Save. Change Basic Settings 3. 1. 1. The login username and password (admin/admin by default, in which "XXXX" indicates the last four digits of a powerline extender. Chapter 3 Manage an Individual Powerline Device 3. 1. Go to basic settings of the device's MAC address.
... in "Device-XXXX" format by default) are the same as those of the web management interface. 2. Open the utility, move your powerline devices for easy identification. To rename a device, follow the steps below: 1. You can rename your mouse over a device, and click the (Basic) icon. Now the..., and click Save. Change Basic Settings 3. 1. 1. The login username and password (admin/admin by default, in which "XXXX" indicates the last four digits of a powerline extender. Chapter 3 Manage an Individual Powerline Device 3. 1. Go to basic settings of the device's MAC address.
tpPLC Utility for Windows V1 User Guide
Page 10
... Open the utility, move your first access to other devices. 3. 1. 3. Open the utility, move your first access to the LED status of a powerline extender. Go to know the device working status. The login username and password (admin/admin by default) are the same as those of the web ... page, and click the On or Off icon. Note: Login is required at your mouse over a device, and click the (Basic) icon. Note: Some powerline extenders support Wi-Fi Move. Now the displayed LEDs as well as those of the web management interface. 8 Chapter 3 Manage an Individual...
... Open the utility, move your first access to other devices. 3. 1. 3. Open the utility, move your first access to the LED status of a powerline extender. Go to know the device working status. The login username and password (admin/admin by default) are the same as those of the web ... page, and click the On or Off icon. Note: Login is required at your mouse over a device, and click the (Basic) icon. Note: Some powerline extenders support Wi-Fi Move. Now the displayed LEDs as well as those of the web management interface. 8 Chapter 3 Manage an Individual...
tpPLC Utility for Windows V1 User Guide
Page 11
...details, refer to the User Guide of the web management interface. 9 The login username and password (admin/admin by default) are on a powerline network that on the web management interface. Reset a Device To reset a device to the Wireless > Settings page on the web management interface.... is required at your first access to basic settings of one device will be synchronized to the wireless settings of a powerline extender. Open the utility, move your powerline extender. Keep the Enable Wireless Radio checkbox selected, enter a new SSID and password, and click Save. Chapter 3 ...
...details, refer to the User Guide of the web management interface. 9 The login username and password (admin/admin by default) are on a powerline network that on the web management interface. Reset a Device To reset a device to the Wireless > Settings page on the web management interface.... is required at your first access to basic settings of one device will be synchronized to the wireless settings of a powerline extender. Open the utility, move your powerline extender. Keep the Enable Wireless Radio checkbox selected, enter a new SSID and password, and click Save. Chapter 3 ...
tpPLC Utility for Windows V1 User Guide
Page 12
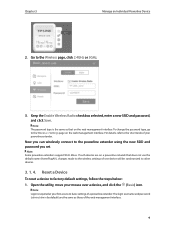
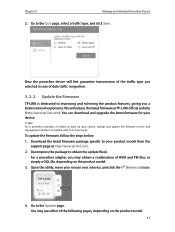
... if this case, refer to the device's Quick Installation Guide to a specific traffic type. Change Advanced Settings 3. 2. 1. The powerline device will be restored to the Reset page, and click Reset. In this network does not use the default name (HomePlugAV). Open ...the utility, move your mouse over a device, and click the (Advanced) icon. 10 Chapter 3 Manage an Individual Powerline Device 2. To set up QoS, follow the steps below: 1. Now this device will first guarantee transmission of the selected traffic type in case of Service...
... if this case, refer to the device's Quick Installation Guide to a specific traffic type. Change Advanced Settings 3. 2. 1. The powerline device will be restored to the Reset page, and click Reset. In this network does not use the default name (HomePlugAV). Open ...the utility, move your mouse over a device, and click the (Advanced) icon. 10 Chapter 3 Manage an Individual Powerline Device 2. To set up QoS, follow the steps below: 1. Now this device will first guarantee transmission of the selected traffic type in case of Service...
tpPLC Utility for Windows V1 User Guide
Page 13
... product model. 3. Go to the Update page. To update the firmware, follow the steps below: 1. Chapter 3 Manage an Individual Powerline Device 2. Now the powerline device will release the latest firmware at http://www.tp-link.com. 2. For details, refer to obtain the update file(s). Decompress the package to its User Guide. Update the Firmware...
... product model. 3. Go to the Update page. To update the firmware, follow the steps below: 1. Chapter 3 Manage an Individual Powerline Device 2. Now the powerline device will release the latest firmware at http://www.tp-link.com. 2. For details, refer to obtain the update file(s). Decompress the package to its User Guide. Update the Firmware...

tpPLC Utility for Windows V1 User Guide
Page 14
Redirect to the Web Management Interface For a powerline extender, you can redirect to its web management interface for the upgrading to complete. Note: During the upgrading process, do not turn off or reset the powerline device. 3. 3. Open the utility, move your mouse over a device, and click the (Website) icon. 12 Wait for more settings. Select the obtained update file(s), and click Update. 6. Chapter 3 Manage an Individual Powerline Device 5.
Redirect to the Web Management Interface For a powerline extender, you can redirect to its web management interface for the upgrading to complete. Note: During the upgrading process, do not turn off or reset the powerline device. 3. 3. Open the utility, move your mouse over a device, and click the (Website) icon. 12 Wait for more settings. Select the obtained update file(s), and click Update. 6. Chapter 3 Manage an Individual Powerline Device 5.

tpPLC Utility for Windows V1 User Guide
Page 15
Chapter 3 Manage an Individual Powerline Device Now a web browser will leave the current powerline network and disappear from the utility. 13 Remove a Remote Device To remove a remote device from the current network: Open the utility, move your mouse over a remote device, and click the icon. (Remove) Now the remote device will pop up and you are redirected to the web management interface. 3. 4.
Chapter 3 Manage an Individual Powerline Device Now a web browser will leave the current powerline network and disappear from the utility. 13 Remove a Remote Device To remove a remote device from the current network: Open the utility, move your mouse over a remote device, and click the icon. (Remove) Now the remote device will pop up and you are redirected to the web management interface. 3. 4.

tpPLC Utility for Windows V1 User Guide
Page 16
It contains the following sections: • Add a Device to manage the whole powerline network via the utility. Chapter 4 Manage the Whole Powerline Network This chapter guides you on how to the Network • Set a New Powerline Network Name • Refresh the Page • Turn On or Off the LEDs • View Usage Tips
It contains the following sections: • Add a Device to manage the whole powerline network via the utility. Chapter 4 Manage the Whole Powerline Network This chapter guides you on how to the Network • Set a New Powerline Network Name • Refresh the Page • Turn On or Off the LEDs • View Usage Tips

tpPLC Utility for Windows V1 User Guide
Page 17
... to join this network. 15 On the Add New Device page, enter the powerline key you wrote down the 16-digit powerline key printed on the same electrical circuit. Set a New Powerline Network Name Powerline network name groups powerline devices into a wall socket and wait until its LEDs become stable. 3. Write... once plugged on the device label. 2. Plug the device into a network. Open the utility, and click Add Device on the utility. 4. 2. TP-LINK powerline devices use the name HomePlugAV by default, and therefore they can change this name to a new one, allowing only the...
... to join this network. 15 On the Add New Device page, enter the powerline key you wrote down the 16-digit powerline key printed on the same electrical circuit. Set a New Powerline Network Name Powerline network name groups powerline devices into a wall socket and wait until its LEDs become stable. 3. Write... once plugged on the device label. 2. Plug the device into a network. Open the utility, and click Add Device on the utility. 4. 2. TP-LINK powerline devices use the name HomePlugAV by default, and therefore they can change this name to a new one, allowing only the...

tpPLC Utility for Windows V1 User Guide
Page 18
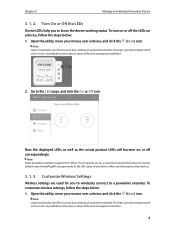
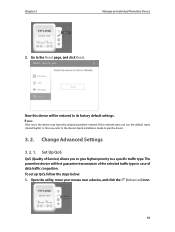
... 4 Manage the Whole Powerline Network To set a new powerline network name, follow the steps below : 1. On the Secure Powerline Network page, enter a new name, or generate a random name. Turn On or Off the LEDs Device LEDs help you to know the device working status. Now only the powerline devices using the same name... can join this network. 4. 3. Refresh the Page To refresh the page, simply click Refresh on all the powerline devices in the current network, follow the steps below : 1. To turn on or off the LEDs on the left column. 4. 4. Open the utility, and ...
... 4 Manage the Whole Powerline Network To set a new powerline network name, follow the steps below : 1. On the Secure Powerline Network page, enter a new name, or generate a random name. Turn On or Off the LEDs Device LEDs help you to know the device working status. Now only the powerline devices using the same name... can join this network. 4. 3. Refresh the Page To refresh the page, simply click Refresh on all the powerline devices in the current network, follow the steps below : 1. To turn on or off the LEDs on the left column. 4. 4. Open the utility, and ...

tpPLC Utility for Windows V1 User Guide
Page 19
Now the displayed LEDs as well as the actual product LEDs will become on the left column. 17 On the LED ON/OFF page, click the On or Off icon. Chapter 4 Manage the Whole Powerline Network 2. View Usage Tips To view the usage tips for using powerline devices, open the utility, and click Usage Tips on or off correspondingly. 4. 5.
Now the displayed LEDs as well as the actual product LEDs will become on the left column. 17 On the LED ON/OFF page, click the On or Off icon. Chapter 4 Manage the Whole Powerline Network 2. View Usage Tips To view the usage tips for using powerline devices, open the utility, and click Usage Tips on or off correspondingly. 4. 5.

tpPLC Utility for Windows V1 User Guide
Page 20
Chapter 4 Manage the Whole Powerline Network 18
Chapter 4 Manage the Whole Powerline Network 18

TL-PA7020 KITEU V1 User Guide
Page 2
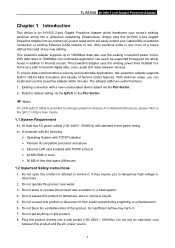
Internet 6 Chapter 3 Advanced Feature: How to Use the Pair Button 8 3.1 Set Up a Secure Powerline Network 8 3.2 Reset ...8 Appendix: Troubleshooting 9 Computer 5 2.4 Hardware Connection - CONTENTS Chapter 1 Introduction 1 1.1 System Requirement 1 1.2 Important Safety Instructions 1 1.3 Conventions ...2 1.4 LED Indicator...2 1.5 Physical Interface 3 Chapter 2 Connecting Mechanism 5 2.1 Introduction...5 2.2 Connection Instruction 5 2.3 Hardware Connection -
Internet 6 Chapter 3 Advanced Feature: How to Use the Pair Button 8 3.1 Set Up a Secure Powerline Network 8 3.2 Reset ...8 Appendix: Troubleshooting 9 Computer 5 2.4 Hardware Connection - CONTENTS Chapter 1 Introduction 1 1.1 System Requirement 1 1.2 Important Safety Instructions 1 1.3 Conventions ...2 1.4 LED Indicator...2 1.5 Physical Interface 3 Chapter 2 Connecting Mechanism 5 2.1 Introduction...5 2.2 Connection Instruction 5 2.3 Hardware Connection -
TL-PA7020 KITEU V1 User Guide
Page 3
... default setting via the tpPLC or the Pair Button. Note: TP-LINK tpPLC Utility is an AV1000 2-port Gigabit Powerline Adapter which will easily extend your house's existing electrical wiring into a wall socket (100-240V~, 50/60Hz). TL-PA7020 AV1000 2-port Gigabit Powerline Adapter Chapter 1 Introduction This device is provided to any new cabling. This...
... default setting via the tpPLC or the Pair Button. Note: TP-LINK tpPLC Utility is an AV1000 2-port Gigabit Powerline Adapter which will easily extend your house's existing electrical wiring into a wall socket (100-240V~, 50/60Hz). TL-PA7020 AV1000 2-port Gigabit Powerline Adapter Chapter 1 Introduction This device is provided to any new cabling. This...
TL-PA7020 KITEU V1 User Guide
Page 4
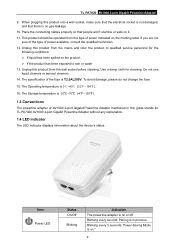
...12. The Operating temperature is -20℃~70℃ (-4℉~158℉). 1.3 Conventions The powerline adapter or AV1000 2-port Gigabit Powerline Adapter mentioned in process. The Storage temperature is 0℃~40℃ (32℉~104℉... To avoid damage, please do not change the fuse. 15. When plugging this guide stands for TL-PA7020 AV1000 2-port Gigabit Powerline Adapter without any explanation. 1.4 LED Indicator The LED indicator displays information about the device's status. ...product has been exposed to rain or water 13. TL-PA7020 AV1000 2-port Gigabit Powerline Adapter 9.
...12. The Operating temperature is -20℃~70℃ (-4℉~158℉). 1.3 Conventions The powerline adapter or AV1000 2-port Gigabit Powerline Adapter mentioned in process. The Storage temperature is 0℃~40℃ (32℉~104℉... To avoid damage, please do not change the fuse. 15. When plugging this guide stands for TL-PA7020 AV1000 2-port Gigabit Powerline Adapter without any explanation. 1.4 LED Indicator The LED indicator displays information about the device's status. ...product has been exposed to rain or water 13. TL-PA7020 AV1000 2-port Gigabit Powerline Adapter 9.