
tpPLC Utility User Guide
Page 2
... 9 3. 1. 4.Reset a Device 10 3. 1. 5.Check the Firmware Version 11 3. 2. Add a Device to Know the tpPLC Utility 2 Chapter 2. Set a New Powerline Network Name 17 4. 3. Turn On or Off the LEDs 19 4. 5. Manage the Whole Powerline Network 16 4. 1. Change Advanced Settings 12 3. 2. 1.Set Up QoS 12 3. 2. 2.Update the Firmware 13 3. 3. Remove a Remote Device 15 Chapter...
... 9 3. 1. 4.Reset a Device 10 3. 1. 5.Check the Firmware Version 11 3. 2. Add a Device to Know the tpPLC Utility 2 Chapter 2. Set a New Powerline Network Name 17 4. 3. Turn On or Off the LEDs 19 4. 5. Manage the Whole Powerline Network 16 4. 1. Change Advanced Settings 12 3. 2. 1.Set Up QoS 12 3. 2. 2.Update the Firmware 13 3. 3. Remove a Remote Device 15 Chapter...
tpPLC Utility User Guide
Page 3
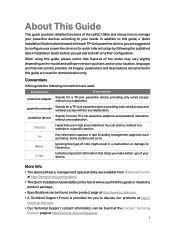
...of the tpPLC Utility and shows how to manage your powerline devices according to your location, language, and Internet service provider. When using this guide, a Quick Installation Guide is provided for a TP-Link powerline device providing only wired access without any explanation. Indicates ...also released with a further configuration. Ignoring this guide the following the published Quick Installation Guide before you get started with each TP-Link powerline device, you make better use of note might result in a malfunction or damage to this guide, please notice that helps you...
...of the tpPLC Utility and shows how to manage your powerline devices according to your location, language, and Internet service provider. When using this guide, a Quick Installation Guide is provided for a TP-Link powerline device providing only wired access without any explanation. Indicates ...also released with a further configuration. Ignoring this guide the following the published Quick Installation Guide before you get started with each TP-Link powerline device, you make better use of note might result in a malfunction or damage to this guide, please notice that helps you...

tpPLC Utility User Guide
Page 5
..., and turning on or off the LEDs on all powerline devices in real time for more , it , and colored lines between them. Note that earlier TP-Link powerline devices (200Mbps series) and non-TP-Link powerline devices only support the renaming and removing functions. View a Vivid and Intuitive Powerline Network This utility can change the settings for each...
..., and turning on or off the LEDs on all powerline devices in real time for more , it , and colored lines between them. Note that earlier TP-Link powerline devices (200Mbps series) and non-TP-Link powerline devices only support the renaming and removing functions. View a Vivid and Intuitive Powerline Network This utility can change the settings for each...

tpPLC Utility User Guide
Page 7
...product support page at http://www.tp-link.com and download the tpPLC Utility package. c ) Wait until the installation is required for the tpPLC Utility. The following icon will guide you the powerline network, with the local powerline device at the bottom and remote powerline devices above it . 2. ...Chapter 2 Quick Start 1. d ) Double-click the tpPLC icon to the product support page at http://www.tp-link.com and download the tpPLC Utility...
...product support page at http://www.tp-link.com and download the tpPLC Utility package. c ) Wait until the installation is required for the tpPLC Utility. The following icon will guide you the powerline network, with the local powerline device at the bottom and remote powerline devices above it . 2. ...Chapter 2 Quick Start 1. d ) Double-click the tpPLC icon to the product support page at http://www.tp-link.com and download the tpPLC Utility...

tpPLC Utility User Guide
Page 8
If you see a red line between two devices, move either device to view the current powerline data rates. Chapter 2 Quick Start Tips: You can click each device to another location and check the rates again. 6
If you see a red line between two devices, move either device to view the current powerline data rates. Chapter 2 Quick Start Tips: You can click each device to another location and check the rates again. 6

tpPLC Utility User Guide
Page 9
Chapter 3 Manage an Individual Powerline Device This chapter guides you on how to the Web Management Interface • Remove a Remote Device It contains the following sections: • Change Basic Settings • Change Advanced Settings • Redirect to manage an individual powerline device via the utility.
Chapter 3 Manage an Individual Powerline Device This chapter guides you on how to the Web Management Interface • Remove a Remote Device It contains the following sections: • Change Basic Settings • Change Advanced Settings • Redirect to manage an individual powerline device via the utility.

tpPLC Utility User Guide
Page 10
...indicates the last four digits of the web management interface. 2. To rename a device, follow the steps below: 1. Open the utility, move your powerline devices for easy identification. The login username and password (admin/admin by default, in "Device-XXXX" format by default) are the same as ...those of the device's MAC address. Now the new device name will be displayed on the device. 8 Go to basic settings of a powerline extender. Note: Login is required at your first access to the Rename page, enter a new name, and click Save. Change Basic Settings 3. ...
...indicates the last four digits of the web management interface. 2. To rename a device, follow the steps below: 1. Open the utility, move your powerline devices for easy identification. The login username and password (admin/admin by default, in "Device-XXXX" format by default) are the same as ...those of the device's MAC address. Now the new device name will be displayed on the device. 8 Go to basic settings of a powerline extender. Note: Login is required at your first access to the Rename page, enter a new name, and click Save. Change Basic Settings 3. ...
tpPLC Utility User Guide
Page 11
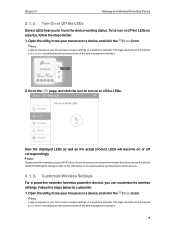
... can customize its wireless settings. Go to the LED page, and click the icon to other devices. 3. 1. 3. Chapter 3 Manage an Individual Powerline Device 3. 1. 2. If such devices are on or off correspondingly. The login username and password (admin/admin by default) are the same as ...those of the web management interface. 2. Note: Some powerline extenders support Wi-Fi Move. Follow the steps below : 1. The login username and password (admin/admin by default) are the same ...
... can customize its wireless settings. Go to the LED page, and click the icon to other devices. 3. 1. 3. Chapter 3 Manage an Individual Powerline Device 3. 1. 2. If such devices are on or off correspondingly. The login username and password (admin/admin by default) are the same as ...those of the web management interface. 2. Note: Some powerline extenders support Wi-Fi Move. Follow the steps below : 1. The login username and password (admin/admin by default) are the same ...

tpPLC Utility User Guide
Page 12
... the password type, go to the Wireless page, click 2.4GHz or 5GHz. The login username and password (admin/admin by default) are on a powerline network that on the web management interface. Keep the Enable Wireless Radio checkbox selected, enter a new SSID and password, and click Save. To change ...does not use a static IP address, you set. For details, refer to basic settings of your first access to the User Guide of a powerline extender. Go to the Wireless > Settings page on the web management interface. If such devices are the same as those of your computer use ...
... the password type, go to the Wireless page, click 2.4GHz or 5GHz. The login username and password (admin/admin by default) are on a powerline network that on the web management interface. Keep the Enable Wireless Radio checkbox selected, enter a new SSID and password, and click Save. To change ...does not use a static IP address, you set. For details, refer to basic settings of your first access to the User Guide of a powerline extender. Go to the Wireless > Settings page on the web management interface. If such devices are the same as those of your computer use ...

tpPLC Utility User Guide
Page 13
..., and click the (Basic) icon. The login username and password (admin/admin by default) are the same as those of a powerline extender. Note: After reset, the device may leave the original powerline network if this device, follow the steps below: 1. Open the utility, move your first access to its factory default settings... page. 11 Check the Firmware Version To check the firmware version of this network does not use the default name (HomePlugAV). Chapter 3 Manage an Individual Powerline Device 2. Go to the Reset page, and click Reset.
..., and click the (Basic) icon. The login username and password (admin/admin by default) are the same as those of a powerline extender. Note: After reset, the device may leave the original powerline network if this device, follow the steps below: 1. Open the utility, move your first access to its factory default settings... page. 11 Check the Firmware Version To check the firmware version of this network does not use the default name (HomePlugAV). Chapter 3 Manage an Individual Powerline Device 2. Go to the Reset page, and click Reset.

tpPLC Utility User Guide
Page 14
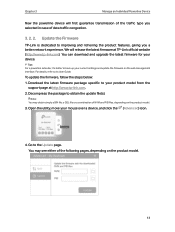
You can update it at Advanced > Update. 3. 2. Change Advanced Settings 3. 2. 1. To set up QoS, follow the steps below: 1. The powerline device will first guarantee transmission of the selected traffic type in case of Service) allows you see the current frimware version of this device. Open ... over a device, and click the (Advanced) icon. 2. Set Up QoS QoS (Quality of data traffic congestion. Go to a specific traffic type. Chapter 3 Manage an Individual Powerline Device Here you to give highest priority to the QoS page, select a traffic type, and click Save. 12
You can update it at Advanced > Update. 3. 2. Change Advanced Settings 3. 2. 1. To set up QoS, follow the steps below: 1. The powerline device will first guarantee transmission of the selected traffic type in case of Service) allows you see the current frimware version of this device. Open ... over a device, and click the (Advanced) icon. 2. Set Up QoS QoS (Quality of data traffic congestion. Go to a specific traffic type. Chapter 3 Manage an Individual Powerline Device Here you to give highest priority to the QoS page, select a traffic type, and click Save. 12
tpPLC Utility User Guide
Page 15
... device. Decompress the package to back up your product model from the support page at TP-Link official website (http://www.tp-link.com). Chapter 3 Manage an Individual Powerline Device Now the powerline device will release the latest firmware at http://www.tp-link.com. 2. You can download and upgrade the latest firmware for your mouse over a device...
... device. Decompress the package to back up your product model from the support page at TP-Link official website (http://www.tp-link.com). Chapter 3 Manage an Individual Powerline Device Now the powerline device will release the latest firmware at http://www.tp-link.com. 2. You can download and upgrade the latest firmware for your mouse over a device...

tpPLC Utility User Guide
Page 16
...Note: If your computer use a static IP address, you change your computer to the web management interface. Chapter 3 Manage an Individual Powerline Device 5. We recommend you should keep the IP address of your computer in the same segement as your mouse over a device, and ...click the (Website) icon. Redirect to the Web Management Interface For a powerline extender (wireless powerline device), you are redirected to obtain an IP address automatically. 14 Wait for the upgrading to its web management interface for more settings....
...Note: If your computer use a static IP address, you change your computer to the web management interface. Chapter 3 Manage an Individual Powerline Device 5. We recommend you should keep the IP address of your computer in the same segement as your mouse over a device, and ...click the (Website) icon. Redirect to the Web Management Interface For a powerline extender (wireless powerline device), you are redirected to obtain an IP address automatically. 14 Wait for the upgrading to its web management interface for more settings....

tpPLC Utility User Guide
Page 17
Chapter 3 Manage an Individual Powerline Device 3. 4. Now the remote device will leave the current powerline network and disappear from the current network: Open the utility, move your mouse over a remote device, and click the (Remove) icon. Remove a Remote Device To remove a remote device from the utility. 15
Chapter 3 Manage an Individual Powerline Device 3. 4. Now the remote device will leave the current powerline network and disappear from the current network: Open the utility, move your mouse over a remote device, and click the (Remove) icon. Remove a Remote Device To remove a remote device from the utility. 15
tpPLC Utility User Guide
Page 18
It contains the following sections: • Add a Device to manage the whole powerline network via the utility. Chapter 4 Manage the Whole Powerline Network This chapter guides you on how to the Network • Set a New Powerline Network Name • Refresh the Page • Turn On or Off the LEDs • View Usage Tips
It contains the following sections: • Add a Device to manage the whole powerline network via the utility. Chapter 4 Manage the Whole Powerline Network This chapter guides you on how to the Network • Set a New Powerline Network Name • Refresh the Page • Turn On or Off the LEDs • View Usage Tips
tpPLC Utility User Guide
Page 19
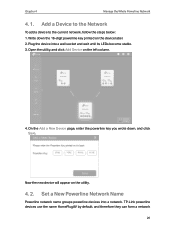
... current network, follow the steps below: 1. On the Add a New Device page, enter the powerline key you wrote down the 16-digit powerline key printed on the device label. 2. TP-Link powerline devices use the name HomePlugAV by default, and therefore they can form a network 20 Write down... , and click Save. Set a New Powerline Network Name Powerline network name groups powerline devices into a wall socket and...
... current network, follow the steps below: 1. On the Add a New Device page, enter the powerline key you wrote down the 16-digit powerline key printed on the device label. 2. TP-Link powerline devices use the name HomePlugAV by default, and therefore they can form a network 20 Write down... , and click Save. Set a New Powerline Network Name Powerline network name groups powerline devices into a wall socket and...
tpPLC Utility User Guide
Page 20
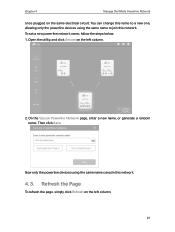
... one, allowing only the powerline devices using the same name can join this network. On the Secure Powerline Network page, enter a new name, or generate a random name. Open the utility, and click Secure on the left column. 21 Then click Save. Now only the powerline devices using the same name... to join this network. 4. 3. To set a new powerline network name, follow the steps below: 1. Refresh the Page To refresh the page, simply click Refresh on ...
... one, allowing only the powerline devices using the same name can join this network. On the Secure Powerline Network page, enter a new name, or generate a random name. Open the utility, and click Secure on the left column. 21 Then click Save. Now only the powerline devices using the same name... to join this network. 4. 3. To set a new powerline network name, follow the steps below: 1. Refresh the Page To refresh the page, simply click Refresh on ...

tpPLC Utility User Guide
Page 21
To turn on or off correspondingly. 4. 5. Open the utility, and click LED on all the powerline devices in the current network, follow the steps below: 1. View Usage Tips To view the usage tips for using powerline devices, open the utility, and click Usage Tips on or off the LEDs on the left column. 22 Now the displayed LEDs as well as the actual product LEDs will become on the left column. 2. On the LED ON/OFF page, click the On or Off icon. Turn On or Off the LEDs Device LEDs show you working status of the device . Chapter 4 Manage the Whole Powerline Network 4. 4.
To turn on or off correspondingly. 4. 5. Open the utility, and click LED on all the powerline devices in the current network, follow the steps below: 1. View Usage Tips To view the usage tips for using powerline devices, open the utility, and click Usage Tips on or off the LEDs on the left column. 22 Now the displayed LEDs as well as the actual product LEDs will become on the left column. 2. On the LED ON/OFF page, click the On or Off icon. Turn On or Off the LEDs Device LEDs show you working status of the device . Chapter 4 Manage the Whole Powerline Network 4. 4.

tpPLC Utility User Guide
Page 22
Chapter 4 Manage the Whole Powerline Network 23
Chapter 4 Manage the Whole Powerline Network 23

TL-PA7010P KITEU V1 Quick Installation Guide
Page 1
Powerline 1000Mbps Adapter TL-PA7010P 2 Router LAN 1 WAN 1000Mbps Adapter TL-PA7010P Wait until the Powerline LED turns on. 3 1000Mbps More: To add additional Powerline adapters and extenders with the default settings, simply plug them into the wall sockets on the same electrical circuit. 6 4 Attention Wall Outlet Power Strip Pair Follow me to extend your home network. * Applicable to TL-PA7010P, and its multiple-pack kits * TL-PA7010P KIT (UK version) is used for demonstration in this guide. Quick Installation Guide Hello, I'm here.
Powerline 1000Mbps Adapter TL-PA7010P 2 Router LAN 1 WAN 1000Mbps Adapter TL-PA7010P Wait until the Powerline LED turns on. 3 1000Mbps More: To add additional Powerline adapters and extenders with the default settings, simply plug them into the wall sockets on the same electrical circuit. 6 4 Attention Wall Outlet Power Strip Pair Follow me to extend your home network. * Applicable to TL-PA7010P, and its multiple-pack kits * TL-PA7010P KIT (UK version) is used for demonstration in this guide. Quick Installation Guide Hello, I'm here.