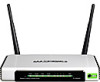

Quick Installation Guide
Page 4
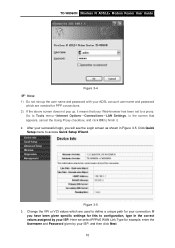
Login Open your web browser, type in 192.168.1.1 in the Troubleshooting guide. Enter the default values and click OK. The web management page will help you if you for the User name and Password. Click Quick Setup 4 User name:admin Password:admin Click OK Note If the dialog box does not pop up, please refer to T3 in the address field and press Enter. T2 will display after a successful login. A dialog box will prompt you forget the password.
Login Open your web browser, type in 192.168.1.1 in the Troubleshooting guide. Enter the default values and click OK. The web management page will help you if you for the User name and Password. Click Quick Setup 4 User name:admin Password:admin Click OK Note If the dialog box does not pop up, please refer to T3 in the address field and press Enter. T2 will display after a successful login. A dialog box will prompt you forget the password.

User Guide
Page 6
... Service ...44 4.4.9 Routing...47 4.4.10 DNS...50 4.4.11 DSL ...52 4.4.12 UPNP ...53 4.4.13 Interface Grouping ...54 4.4.14 LAN Ports...56 Configuring the Router 14 4.1 Login ...14 4.2 Device Info ...14 4.3 Quick Setup...15 4.4 Advanced Setup...15 4.4.1 Layer2 Interface ...15 4.4.2 WAN Service...19 4.4.3 LAN ...29 4.4.4 MAC Address Clone ...31 4.4.5 NAT ...32 4.4.6 Security...
... Service ...44 4.4.9 Routing...47 4.4.10 DNS...50 4.4.11 DSL ...52 4.4.12 UPNP ...53 4.4.13 Interface Grouping ...54 4.4.14 LAN Ports...56 Configuring the Router 14 4.1 Login ...14 4.2 Device Info ...14 4.3 Quick Setup...15 4.4 Advanced Setup...15 4.4.1 Layer2 Interface ...15 4.4.2 WAN Service...19 4.4.3 LAN ...29 4.4.4 MAC Address Clone ...31 4.4.5 NAT ...32 4.4.6 Security...

User Guide
Page 16
...is 192.168.1.1, your PC's IP address must be within the range of LAN ports which you link to on the Router and LEDs on your PC and the Router correct? ) Note: The 1/2/3/4 ...type in the default address http://192.168.1.1 in lower case letters. Figure 3-3 After a moment, a login window will appear, similar to the Figure 3-4. Figure 3-2 Failure result of the browser. The Web-based ...Internet Explorer, Mozilla Firefox or Apple Safari. 1. TD-W8960N Wireless N ADSL2+ Modem Router User Guide and the Router is easy to configure and manage the TD-W8960N Wireless N ADSL2+ Modem Router. Is the TCP...
...is 192.168.1.1, your PC's IP address must be within the range of LAN ports which you link to on the Router and LEDs on your PC and the Router correct? ) Note: The 1/2/3/4 ...type in the default address http://192.168.1.1 in lower case letters. Figure 3-3 After a moment, a login window will appear, similar to the Figure 3-4. Figure 3-2 Failure result of the browser. The Web-based ...Internet Explorer, Mozilla Firefox or Apple Safari. 1. TD-W8960N Wireless N ADSL2+ Modem Router User Guide and the Router is easy to configure and manage the TD-W8960N Wireless N ADSL2+ Modem Router. Is the TCP...
User Guide
Page 17
... Setup menu to define a unique path for your connection. Figure 3-5 3. Change the VPI or VCI values which are used to access Quick Setup Wizard. TD-W8960N Wireless N ADSL2+ Modem Router User Guide Figure 3-4 ) Note: 1) Do not mix up the user name and password with your ADSL account user name ... means that appears, cancel the Using Proxy checkbox, and click OK to finish it. 2. Here we select PPPoE WAN Link Type for this to a proxy. After your successful login, you have been given specific settings for example, enter the Username and Password given by your ISP, and then click ...
... Setup menu to define a unique path for your connection. Figure 3-5 3. Change the VPI or VCI values which are used to access Quick Setup Wizard. TD-W8960N Wireless N ADSL2+ Modem Router User Guide Figure 3-4 ) Note: 1) Do not mix up the user name and password with your ADSL account user name ... means that appears, cancel the Using Proxy checkbox, and click OK to finish it. 2. Here we select PPPoE WAN Link Type for this to a proxy. After your successful login, you have been given specific settings for example, enter the Username and Password given by your ISP, and then click ...
User Guide
Page 21
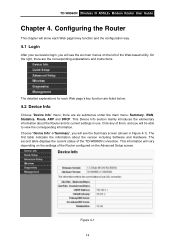
... utility. Choose "Device Info"Æ"Summary", you will vary depending on the settings of the Router configured on the left of the TD-W8960N connection. This information will be able to view the corresponding information. Figure 4-1 14 The detailed explanations for each Web page's key ...function and the configuration way. 4.1 Login After your successful login, you will show each Web page's key function are listed below. 4.2 Device Info Choose "Device Info" menu, there are the...
... utility. Choose "Device Info"Æ"Summary", you will vary depending on the settings of the Router configured on the left of the TD-W8960N connection. This information will be able to view the corresponding information. Figure 4-1 14 The detailed explanations for each Web page's key ...function and the configuration way. 4.1 Login After your successful login, you will show each Web page's key function are listed below. 4.2 Device Info Choose "Device Info" menu, there are the...


