Quick Installation Guide
Page 4
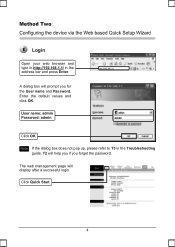
T2 will help you if you for the User name and Password. User name: admin Password: admin Click OK Note If the dialog box does not pop up, please refer to T3 in the address bar and press Enter. The web management page will prompt you forget the password. A dialog box will display after a successful login. Enter the default values and click OK. Click Quick Start 4 Login Open your web browser and type in http://192.168.1.1/ in the Troubleshooting guide.
T2 will help you if you for the User name and Password. User name: admin Password: admin Click OK Note If the dialog box does not pop up, please refer to T3 in the address bar and press Enter. The web management page will prompt you forget the password. A dialog box will display after a successful login. Enter the default values and click OK. Click Quick Start 4 Login Open your web browser and type in http://192.168.1.1/ in the Troubleshooting guide.
Quick Installation Guide
Page 9
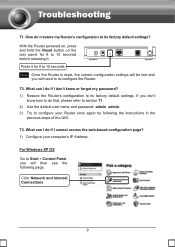
...factory default settings. What can I don't know how to do if I do that, please refer to section T1. 2) Use the default user name and password: admin, admin. 3) Try to its factory default settings? For Windows XP OS Go to Start > Control Panel, you don't know or forgot my... password? 1) Restore the Router's configuration to configure your computer's IP Address. T2. Click Network and Internet Connections 9 T1. With the Router powered on, press and...
...factory default settings. What can I don't know how to do if I do that, please refer to section T1. 2) Use the default user name and password: admin, admin. 3) Try to its factory default settings? For Windows XP OS Go to Start > Control Panel, you don't know or forgot my... password? 1) Restore the Router's configuration to configure your computer's IP Address. T2. Click Network and Internet Connections 9 T1. With the Router powered on, press and...
Quick Installation Guide
Page 15
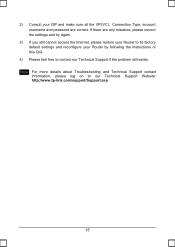
... username and password are any mistakes, please correct the settings and try again. 3) If you still cannot access the Internet, please restore your Router to its factory default settings and reconfigure your Router by following the instructions of this QIG. 4) Please feel free to our Technical Support Website: http://www.tp-link.com...
... username and password are any mistakes, please correct the settings and try again. 3) If you still cannot access the Internet, please restore your Router to its factory default settings and reconfigure your Router by following the instructions of this QIG. 4) Please feel free to our Technical Support Website: http://www.tp-link.com...
User Guide
Page 17
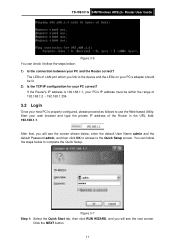
...the screen shown below, enter the default User Name admin and the default Password admin, and then click OK to access to the Quick Setup screen. Figure 3-7 Step 1: Select the Quick Start tab, then click RUN WIZARD, and you link to the device and the LEDs on your PC's adapter should be... your host PC is properly configured, please proceed as follows to use the Web-based Utility: Start your PC correct? Click the NEXT button. 11 TD-W8101G 54M Wireless ADSL2+ Router User Guide Figure 3-6 You can follow the steps below: 1) Is the connection between your PC and the Router correct? You ...
...the screen shown below, enter the default User Name admin and the default Password admin, and then click OK to access to the Quick Setup screen. Figure 3-7 Step 1: Select the Quick Start tab, then click RUN WIZARD, and you link to the device and the LEDs on your PC's adapter should be... your host PC is properly configured, please proceed as follows to use the Web-based Utility: Start your PC correct? Click the NEXT button. 11 TD-W8101G 54M Wireless ADSL2+ Router User Guide Figure 3-6 You can follow the steps below: 1) Is the connection between your PC and the Router correct? You ...
User Guide
Page 18
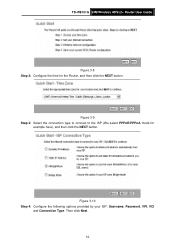
Figure 3-9 Step 3: Select the connection type to connect to the ISP (We select PPPoE/PPPoA mode for the Router, and then click the NEXT button. Figure 3-10 Step 4: Configure the following options provided by your ISP: Username, Password, VPI, VCI and Connection Type. Then click Next. 12 TD-W8101G 54M Wireless ADSL2+ Router User Guide Figure 3-8 Step 2: Configure the time for example here), and then click the NEXT button.
Figure 3-9 Step 3: Select the connection type to connect to the ISP (We select PPPoE/PPPoA mode for the Router, and then click the NEXT button. Figure 3-10 Step 4: Configure the following options provided by your ISP: Username, Password, VPI, VCI and Connection Type. Then click Next. 12 TD-W8101G 54M Wireless ADSL2+ Router User Guide Figure 3-8 Step 2: Configure the time for example here), and then click the NEXT button.
User Guide
Page 25
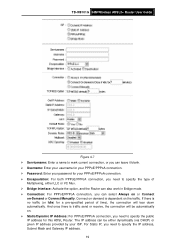
... Router can also work in Bridge mode. ¾ Connection: For PPPoE/PPPoA connection, you need to specify the public IP address for this ADSL Router. TD-W8101G 54M Wireless ADSL2+ Router User Guide Figure 4-7 ¾ Servicename: Enter a name to mark current connection, or you can leave it blank. ¾ Username: Enter your...
... Router can also work in Bridge mode. ¾ Connection: For PPPoE/PPPoA connection, you need to specify the public IP address for this ADSL Router. TD-W8101G 54M Wireless ADSL2+ Router User Guide Figure 4-7 ¾ Servicename: Enter a name to mark current connection, or you can leave it blank. ¾ Username: Enter your...
User Guide
Page 51
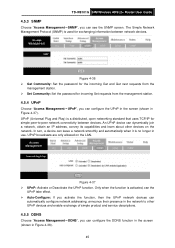
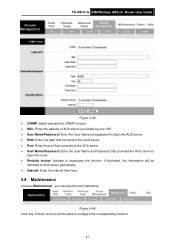
Figure 4-37 ¾ UPnP: Activate or Deactivate the UPnP function. Figure 4-36 ¾ Get Community: Set the password for the incoming Get and Get next requests from the management station. 4.5.4 UPnP Choose "Access Management→UPnP", you can see the...network devices. Only when the function is used for incoming Set requests from the management station. ¾ Set Community: Set the password for exchanging information between devices. TD-W8101G 54M Wireless ADSL2+ Router User Guide 4.5.3 SNMP Choose "Access Management→SNMP", you can configure the UPnP in the screen (...
Figure 4-37 ¾ UPnP: Activate or Deactivate the UPnP function. Figure 4-36 ¾ Get Community: Set the password for the incoming Get and Get next requests from the management station. 4.5.4 UPnP Choose "Access Management→UPnP", you can see the...network devices. Only when the function is used for incoming Set requests from the management station. ¾ Set Community: Set the password for exchanging information between devices. TD-W8101G 54M Wireless ADSL2+ Router User Guide 4.5.3 SNMP Choose "Access Management→SNMP", you can configure the UPnP in the screen (...
User Guide
Page 52
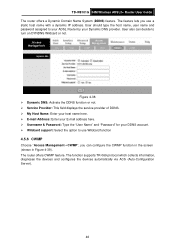
TD-W8101G 54M Wireless ADSL2+ Router User Guide The router offers a Dynamic Domain Name System (DDNS) feature.... Enter your host name here. ¾ E-mail Address: Enter your E-mail address here. ¾ Username & Password: Type the "User Name" and "Password" for your Dynamic DNS provider. The router offers CWMP feature. The function supports TR-069 protocol which collects information,...in the screen (shown in Figure 4-39). User should type the host name, user name and password assigned to your ADSL Router by your DDNS account. ¾ Wildcard support: Select the option to turn on DYNDNS Wildcard...
TD-W8101G 54M Wireless ADSL2+ Router User Guide The router offers a Dynamic Domain Name System (DDNS) feature.... Enter your host name here. ¾ E-mail Address: Enter your E-mail address here. ¾ Username & Password: Type the "User Name" and "Password" for your Dynamic DNS provider. The router offers CWMP feature. The function supports TR-069 protocol which collects information,...in the screen (shown in Figure 4-39). User should type the host name, user name and password assigned to your ADSL Router by your DDNS account. ¾ Wildcard support: Select the option to turn on DYNDNS Wildcard...
User Guide
Page 53
If Activated, the information will be able to login the router. ¾ Periodic Inform: Activate or deactivate the function. TD-W8101G 54M Wireless ADSL2+ Router User Guide Figure 4-39 ¾ CWMP: Select activate the CWMP function. ¾ URL: Enter the website of them, and you will ... Choose "Maintenance", you can see the next submenus: Figure 4-40 Click any of ACS which is provided by your ISP. ¾ User Name/Password: Enter the User Name and password to login the ACS server. ¾ Path: Enter the path that connects to the ACS server. ¾ Port: Enter the port that...
If Activated, the information will be able to login the router. ¾ Periodic Inform: Activate or deactivate the function. TD-W8101G 54M Wireless ADSL2+ Router User Guide Figure 4-39 ¾ CWMP: Select activate the CWMP function. ¾ URL: Enter the website of them, and you will ... Choose "Maintenance", you can see the next submenus: Figure 4-40 Click any of ACS which is provided by your ISP. ¾ User Name/Password: Enter the User Name and password to login the ACS server. ¾ Path: Enter the path that connects to the ACS server. ¾ Port: Enter the port that...
User Guide
Page 54
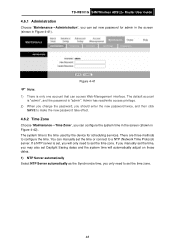
TD-W8101G 54M Wireless ADSL2+ Router User Guide 4.6.1 Administration Choose "Maintenance→Administration", you can set the time zone. 48 Admin has read/write access privilege. 2) When you change the password, you should enter the new password twice, and then click SAVE to make the new password take effect. 4.6.2 Time Zone ... Synchronize time, you can configure the system time in the screen (shown in Figure 4-41). The default account is "admin", and the password is the time used by the device for admin in the screen (shown in Figure 4-42). If a NTP server is only one account...
TD-W8101G 54M Wireless ADSL2+ Router User Guide 4.6.1 Administration Choose "Maintenance→Administration", you can set the time zone. 48 Admin has read/write access privilege. 2) When you change the password, you should enter the new password twice, and then click SAVE to make the new password take effect. 4.6.2 Time Zone ... Synchronize time, you can configure the system time in the screen (shown in Figure 4-41). The default account is "admin", and the password is the time used by the device for admin in the screen (shown in Figure 4-42). If a NTP server is only one account...


