CD-RW890 Manual
Page 4
... recorder is inserted. Use a clean, dry cloth. < Keep this manual in damage to extremes of temperature than ordinary CD players. < Relative humidity should be between 5°C and 35°C (41°F and 95°F). If a foreign object should match the voltage...In Refresh Mode (CD-RW 24 Troubleshooting 25 Messages 26 Specifications 27 Read this before attempting any doubt regarding this matter, consult an electrician. < Choose the installation location of heat. WHEN MOVING THIS UNIT When changing the unit's location or packing the unit for choosing TEAC. Contents Before ...
... recorder is inserted. Use a clean, dry cloth. < Keep this manual in damage to extremes of temperature than ordinary CD players. < Relative humidity should be between 5°C and 35°C (41°F and 95°F). If a foreign object should match the voltage...In Refresh Mode (CD-RW 24 Troubleshooting 25 Messages 26 Specifications 27 Read this before attempting any doubt regarding this matter, consult an electrician. < Choose the installation location of heat. WHEN MOVING THIS UNIT When changing the unit's location or packing the unit for choosing TEAC. Contents Before ...
CD-RW890 Manual
Page 9
...insert the plug from your headphones into the PHONES jack, and adjust the volume by turning the LEVEL knob. O FINALIZE Use this manual refer to the names of the buttons and controls on the front panel only. Note: To simplify explanations, instructions in this button to ...finalize a CD-R/CD-RW disc. P ERASE Use this button to select a source to be recorded. a Numeric buttons Use these buttons to skip tracks. C Disc Tray b ...
...insert the plug from your headphones into the PHONES jack, and adjust the volume by turning the LEVEL knob. O FINALIZE Use this manual refer to the names of the buttons and controls on the front panel only. Note: To simplify explanations, instructions in this button to ...finalize a CD-R/CD-RW disc. P ERASE Use this button to select a source to be recorded. a Numeric buttons Use these buttons to skip tracks. C Disc Tray b ...
CD-RW890 Manual
Page 17
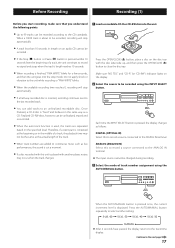
...or in the middle of a track, the playback time may occur when the track changes. 1 Load a recordable CD-R or CD-RW disc into the stop mode. When the AUTO/MANUAL button is pressed once, the current increment level is "fixed" and behaves in length on the specified level. ...changed during recording. 3 Select the mode of a track, the unit continues to the CD standards. Press the AUTO/MANUAL button repeatedly to be recorded using the AUTO/MANUAL button. Make sure "NO TOC" and "CD-R" (or "CD-RW") indicator lights on the disc tray with another setting. When a 100th track ...
...or in the middle of a track, the playback time may occur when the track changes. 1 Load a recordable CD-R or CD-RW disc into the stop mode. When the AUTO/MANUAL button is pressed once, the current increment level is "fixed" and behaves in length on the specified level. ...changed during recording. 3 Select the mode of a track, the unit continues to the CD standards. Press the AUTO/MANUAL button repeatedly to be recorded using the AUTO/MANUAL button. Make sure "NO TOC" and "CD-R" (or "CD-RW") indicator lights on the disc tray with another setting. When a 100th track ...
CD-RW890 Manual
Page 18
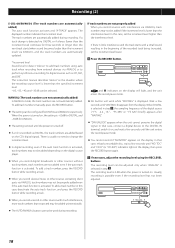
..., the sampling frequency of the recorded track being truncated, set the increment level higher than the interference level. This instruction manual describes "silence" as CD, MD, and DAT. There is usually no need to add track numbers using the REC LEVEL buttons. If there is .../30 (The track numbers are added based on the CD's digital signals. In that case, connect a digital device to perform synchronous recording for DIGITAL and ANALOG respectively. MANUAL (The track numbers are not automatically added) In MANUAL mode, the track numbers are not properly added When you...
..., the sampling frequency of the recorded track being truncated, set the increment level higher than the interference level. This instruction manual describes "silence" as CD, MD, and DAT. There is usually no need to add track numbers using the REC LEVEL buttons. If there is .../30 (The track numbers are added based on the CD's digital signals. In that case, connect a digital device to perform synchronous recording for DIGITAL and ANALOG respectively. MANUAL (The track numbers are not automatically added) In MANUAL mode, the track numbers are not properly added When you...
CD-RW890 Manual
Page 19
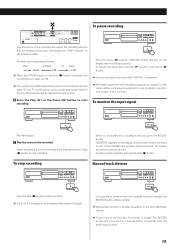
...recording is paused. "MONITOR" appears on the source (record, cassette tape, CD, etc.). Exit the monitor mode by pressing the RECORD button while recording. < Manual track division is possible regardless of the AUTO/MANUAL setting. < A track cannot be less than 10 seconds in length. The...monitor the input signal Recording starts. 7 Play the source to start recording. When the playback of a track. 19 To stop recording Manual track division Press the Stop (H) button to stop recording. The meters show the current input level. "WAITING" briefly appears on the peak...
...recording is paused. "MONITOR" appears on the source (record, cassette tape, CD, etc.). Exit the monitor mode by pressing the RECORD button while recording. < Manual track division is possible regardless of the AUTO/MANUAL setting. < A track cannot be less than 10 seconds in length. The...monitor the input signal Recording starts. 7 Play the source to start recording. When the playback of a track. 19 To stop recording Manual track division Press the Stop (H) button to stop recording. The meters show the current input level. "WAITING" briefly appears on the peak...
CD-RW890 Manual
Page 20
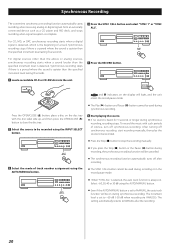
...is selected, the auto track function is heard for 5 seconds or longer during synchronous recording. The setting automatically returns to stop the recording manually. < If you press the Stop (H) button or the Pause (J) button during synchronous recording. Synchronous Recording The convenient synchronous recording function ... CD-RW disc into the unit. To record the music with the disc label side up, and then press the OPEN/CLOSE (L) button to close the disc tray. 2 Select the source to be recorded. < Press the Stop (H) button to MANUAL after recording. < The SYNC 1/...
...is selected, the auto track function is heard for 5 seconds or longer during synchronous recording. The setting automatically returns to stop the recording manually. < If you press the Stop (H) button or the Pause (J) button during synchronous recording. Synchronous Recording The convenient synchronous recording function ... CD-RW disc into the unit. To record the music with the disc label side up, and then press the OPEN/CLOSE (L) button to close the disc tray. 2 Select the source to be recorded. < Press the Stop (H) button to MANUAL after recording. < The SYNC 1/...

CD-RW890 Manual
Page 27
... with your national legislation and the Directives 2002/96/EC and 2006/66/ EC. Specifications Media type CD-RW and CD-R for Digital audio (record and playback) CD (playback only) Frequency converter input sampling frequency 32 kHz, 44.1 kHz, 48 kHz Recording sampling frequency...(9 15/16 lbs) Standard Accessories Remote control unit (RC-1275) x 1 Battery (AA, R6, SUM-3) x 2 RCA cable x 2 Optical digital cable x 1 Owner's manual x 1 Warranty card x 1 < Design and specifications are subject to change without notice. < Weight and dimensions are only valid in the European Union. In this case it...
... with your national legislation and the Directives 2002/96/EC and 2006/66/ EC. Specifications Media type CD-RW and CD-R for Digital audio (record and playback) CD (playback only) Frequency converter input sampling frequency 32 kHz, 44.1 kHz, 48 kHz Recording sampling frequency...(9 15/16 lbs) Standard Accessories Remote control unit (RC-1275) x 1 Battery (AA, R6, SUM-3) x 2 RCA cable x 2 Optical digital cable x 1 Owner's manual x 1 Warranty card x 1 < Design and specifications are subject to change without notice. < Weight and dimensions are only valid in the European Union. In this case it...
