
Help Guide Printable PDF
Page 6
To search, http://helpguide.sony.net/tv/eusltn1/v1/en-003/print.html[4/10/2017 1:08:24 PM] Additionally, you can also refer to use this TV. In this Help ... [2] Getting Started Using the Help Guide This Help Guide explains how to the Setup Guide for descriptions about TV installation, and the Reference Guide for parts descriptions and specifications of the screen sometimes lights up. [169] You want to disable the illumination LED so that it directly.
To search, http://helpguide.sony.net/tv/eusltn1/v1/en-003/print.html[4/10/2017 1:08:24 PM] Additionally, you can also refer to use this TV. In this Help ... [2] Getting Started Using the Help Guide This Help Guide explains how to the Setup Guide for descriptions about TV installation, and the Reference Guide for parts descriptions and specifications of the screen sometimes lights up. [169] You want to disable the illumination LED so that it directly.

Help Guide Printable PDF
Page 91
... colors easily cause image retention. If the TV is turned on, the AC power cord (mains lead) is particularly noticeable. If the whole image or part of the image remains still, the screen will gradually become darker to reduce image retention. Note Perform panel refresh only when image retention is unplugged...
... colors easily cause image retention. If the TV is turned on, the AC power cord (mains lead) is particularly noticeable. If the whole image or part of the image remains still, the screen will gradually become darker to reduce image retention. Note Perform panel refresh only when image retention is unplugged...
Reference Guide
Page 2
... of the TV. Before operating the TV, please read this manual are located on the remote control. For models with AC adapter) (XBR-55/49X900E only) Note This television includes a QAM demodulator which should allow you connect your TV to the internet, the Help feature and...Remote Control Parts Description . . . . . 9 Connection Diagram 11 Installing the TV to the Wall 13 Detaching the Table-Top Stand from the TV 15 Installing the TV against a wall or enclosed area 16 Troubleshooting 17 Troubles and Solutions 17 Specifications 18 Introduction Thank you call upon your Sony dealer ...
... of the TV. Before operating the TV, please read this manual are located on the remote control. For models with AC adapter) (XBR-55/49X900E only) Note This television includes a QAM demodulator which should allow you connect your TV to the internet, the Help feature and...Remote Control Parts Description . . . . . 9 Connection Diagram 11 Installing the TV to the Wall 13 Detaching the Table-Top Stand from the TV 15 Installing the TV against a wall or enclosed area 16 Troubleshooting 17 Troubles and Solutions 17 Specifications 18 Introduction Thank you call upon your Sony dealer ...
Reference Guide
Page 3
...of the FCC rules. However, there is subject to indoor operations only. Safety and Regulatory This device complies with part 15 of the device. and (2) This device must accept any interference received, including interference that may cause undesired ...the television set and supporting furniture. Educating children about the dangers of Conformity Trade Name: SONY Model: XBR-75X900E/XBR-75X850E/XBR-65X900E/ XBR-65X850E/XBR-55X900E/XBR-49X900E Responsible Party: Sony Electronics Inc. High-power radars are restricted to the following measures: • Reorient or relocate ...
...of the FCC rules. However, there is subject to indoor operations only. Safety and Regulatory This device complies with part 15 of the device. and (2) This device must accept any interference received, including interference that may cause undesired ...the television set and supporting furniture. Educating children about the dangers of Conformity Trade Name: SONY Model: XBR-75X900E/XBR-75X850E/XBR-65X900E/ XBR-65X850E/XBR-55X900E/XBR-49X900E Responsible Party: Sony Electronics Inc. High-power radars are restricted to the following measures: • Reorient or relocate ...
Reference Guide
Page 6
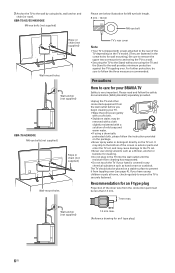
... illustration for M6 eye bolt length. 8 mm - 12 mm M6 eye bolt Rope or chain (not supplied) Wall-mount holes Wall-anchor (not supplied) XBR-75/65X850E M6 eye bolts (not supplied) Rope or chain (not supplied) Wall-mount holes TV's rear cover Note • Your TV is securely fastened. Recommendation for... cause damage to the TV set , and may drip to the bottom of the TV depending on a stable surface to prevent it from the connection part must be sure to ensure the TV is shipped with a solution of the inner wire from toppling over . Unplug the TV and other connected equipment...
... illustration for M6 eye bolt length. 8 mm - 12 mm M6 eye bolt Rope or chain (not supplied) Wall-mount holes Wall-anchor (not supplied) XBR-75/65X850E M6 eye bolts (not supplied) Rope or chain (not supplied) Wall-mount holes TV's rear cover Note • Your TV is securely fastened. Recommendation for... cause damage to the TV set , and may drip to the bottom of the TV depending on a stable surface to prevent it from the connection part must be sure to ensure the TV is shipped with a solution of the inner wire from toppling over . Unplug the TV and other connected equipment...

Reference Guide
Page 8
... The illumination LED lights up or blinks according to change the function, then press + or - When the TV is off, Press to power off. Parts and Controls Controls and Indicators ȩ ̕ (Power) /+/When the TV is on, Press and hold to power on. For more information...
... The illumination LED lights up or blinks according to change the function, then press + or - When the TV is off, Press to power off. Parts and Controls Controls and Indicators ȩ ̕ (Power) /+/When the TV is on, Press and hold to power on. For more information...
Reference Guide
Page 9
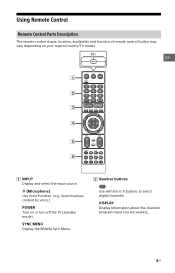
SYNC MENU Display the BRAVIA Sync Menu. Number buttons Use with the 0-9 buttons to select digital channels. Using Remote Control Remote Control Parts Description The remote control shape, location, availability and function of remote control button may vary depending on or turn off the TV (standby mode). DISPLAY ...
SYNC MENU Display the BRAVIA Sync Menu. Number buttons Use with the 0-9 buttons to select digital channels. Using Remote Control Remote Control Parts Description The remote control shape, location, availability and function of remote control button may vary depending on or turn off the TV (standby mode). DISPLAY ...
Installation Guide - Wall-Mount Bracket
Page 3
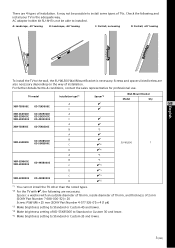
... possible to the wall, the SU-WL500 Wall Mount Bracket is necessary. TV model XBR-75X900E KD-75X9000E XBR-65X900E XBR-55X900E XBR-49X900E KD-65X9000E KD-55X9000E KD-49X9000E XBR-75X850E KD-75X8500E XBR-65X850E KD-65X8500E KD-55X8500E XBR-55X800E XBR-49X800E KD-49X8000E XBR-43X800E KD-43X8000E Installation type*1 A C A C A B A B C D A B C D C D Spacer*2...outside diameter of 18 mm, inside diameter of 10 mm, and thickness of 2 mm (SONY Part Number 7-688-000-32) × 20 Screw: PSW M6 × 25 mm (SONY Part Number 4-577-326-01) × 4 (1 pk) *3 Make brightness setting to ...
... possible to the wall, the SU-WL500 Wall Mount Bracket is necessary. TV model XBR-75X900E KD-75X9000E XBR-65X900E XBR-55X900E XBR-49X900E KD-65X9000E KD-55X9000E KD-49X9000E XBR-75X850E KD-75X8500E XBR-65X850E KD-65X8500E KD-55X8500E XBR-55X800E XBR-49X800E KD-49X8000E XBR-43X800E KD-43X8000E Installation type*1 A C A C A B A B C D A B C D C D Spacer*2...outside diameter of 18 mm, inside diameter of 10 mm, and thickness of 2 mm (SONY Part Number 7-688-000-32) × 20 Screw: PSW M6 × 25 mm (SONY Part Number 4-577-326-01) × 4 (1 pk) *3 Make brightness setting to ...
Installation Guide - Wall-Mount Bracket
Page 5
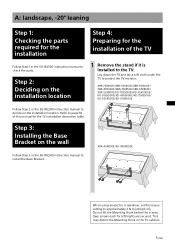
A: landscape, -20° leaning Step 1: Checking the parts required for the installation Step 4: Preparing for the installation of this manual for left/right) are secured. Refer to page 18 of the TV Follow ... 1 Remove the stand if it is installed to decide on the wall Follow Step 3 in the SU-WL500 instruction manual to the TV. XBR-75X900E/XBR-65X900E/XBR-55X900E/ XBR-49X900E/XBR-75X850E/XBR-65X850E/ XBR-55X800E/KD-75X9000E/KD-65X9000E/ KD-55X9000E/KD-49X9000E/KD-75X8500E/ KD-65X8500E/KD-55X8500E Follow Step 2 in the SU-WL500 instruction...
A: landscape, -20° leaning Step 1: Checking the parts required for the installation Step 4: Preparing for the installation of this manual for left/right) are secured. Refer to page 18 of the TV Follow ... 1 Remove the stand if it is installed to decide on the wall Follow Step 3 in the SU-WL500 instruction manual to the TV. XBR-75X900E/XBR-65X900E/XBR-55X900E/ XBR-49X900E/XBR-75X850E/XBR-65X850E/ XBR-55X800E/KD-75X9000E/KD-65X9000E/ KD-55X9000E/KD-49X9000E/KD-75X8500E/ KD-65X8500E/KD-55X8500E Follow Step 2 in the SU-WL500 instruction...
Installation Guide - Wall-Mount Bracket
Page 9
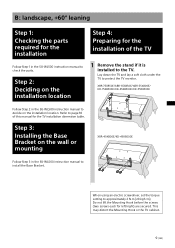
Step 3: Installing the Base Bracket on the wall or mounting XBR-49X800E/KD-49X8000E Follow Step 3 in the SU-WL500 instruction manual to check the parts. B: landscape, +60° leaning Step 1: Checking the parts required for the installation Step 4: Preparing for the installation of this manual for left/... TV monitor. Lay down the TV and lay a soft cloth under the TV to approximately 2 N·m {20 kgf·cm}. XBR-75X850E/XBR-65X850E/XBR-55X800E/ KD-75X8500E/KD-65X8500E/KD-55X8500E Follow Step 2 in the SU-WL500 instruction manual to decide on the installation location 1 Remove...
Step 3: Installing the Base Bracket on the wall or mounting XBR-49X800E/KD-49X8000E Follow Step 3 in the SU-WL500 instruction manual to check the parts. B: landscape, +60° leaning Step 1: Checking the parts required for the installation Step 4: Preparing for the installation of this manual for left/... TV monitor. Lay down the TV and lay a soft cloth under the TV to approximately 2 N·m {20 kgf·cm}. XBR-75X850E/XBR-65X850E/XBR-55X800E/ KD-75X8500E/KD-65X8500E/KD-55X8500E Follow Step 2 in the SU-WL500 instruction manual to decide on the installation location 1 Remove...

Installation Guide - Wall-Mount Bracket
Page 13
... secured. Refer to page 19 of the TV Follow Step 1 in the SU-WL500 instruction manual to check the parts. XBR-75X900E/XBR-65X900E/XBR-55X900E/ XBR-49X900E/XBR-65X850E/XBR-55X800E/ KD-75X9000E/KD-65X9000E/KD-55X9000E/ KD-49X9000E/KD-65X8500E/KD-55X8500E Follow Step 2 in the SU-WL500... instruction manual to decide on the wall or mounting XBR-49X800E/XBR-43X800E/KD-49X8000E/ KD-43X8000E Follow Step 3 in the SU-WL500 ...
... secured. Refer to page 19 of the TV Follow Step 1 in the SU-WL500 instruction manual to check the parts. XBR-75X900E/XBR-65X900E/XBR-55X900E/ XBR-49X900E/XBR-65X850E/XBR-55X800E/ KD-75X9000E/KD-65X9000E/KD-55X9000E/ KD-49X9000E/KD-65X8500E/KD-55X8500E Follow Step 2 in the SU-WL500... instruction manual to decide on the wall or mounting XBR-49X800E/XBR-43X800E/KD-49X8000E/ KD-43X8000E Follow Step 3 in the SU-WL500 ...


