
Startup Guide
Page 29
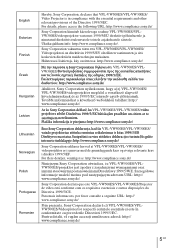
... znaleźć można pod następującym adresem URL: http:// www.compliance.sony.de/ Sony Corporation declara que este VPL-VW500ES/VPL-VW300ES/Projector de vídeo está conforme com os requisitos essenciais e outras disposições da Directiva...vă rugăm accesaţi următoarea adresă: http:// www.compliance.sony.de/ 5 GB English Estonian Finnish Greek Hereby, Sony Corporation, declares that VPL-VW500ES/VPL-VW300ES/ Video Projector is in compliance with the essential requirements and other relevant provisions of the Directive 1999/5/EC...
... znaleźć można pod następującym adresem URL: http:// www.compliance.sony.de/ Sony Corporation declara que este VPL-VW500ES/VPL-VW300ES/Projector de vídeo está conforme com os requisitos essenciais e outras disposições da Directiva...vă rugăm accesaţi următoarea adresă: http:// www.compliance.sony.de/ 5 GB English Estonian Finnish Greek Hereby, Sony Corporation, declares that VPL-VW500ES/VPL-VW300ES/ Video Projector is in compliance with the essential requirements and other relevant provisions of the Directive 1999/5/EC...

Startup Guide
Page 32
... process and does not indicate a malfunction. SONY WILL NOT BE LIABLE FOR DAMAGES OF ANY KIND RESULTING FROM A FAILURE TO IMPLEMENT PROPER SECURITY MEASURES ON TRANSMISSION DEVICES, UNAVOIDABLE DATA LEAKS RESULTING FROM TRANSMISSION SPECIFICATIONS, OR SECURITY PROBLEMS OF ANY KIND. 8 GB On LCD Projector The LCD projector is a normal result of the same...
... process and does not indicate a malfunction. SONY WILL NOT BE LIABLE FOR DAMAGES OF ANY KIND RESULTING FROM A FAILURE TO IMPLEMENT PROPER SECURITY MEASURES ON TRANSMISSION DEVICES, UNAVOIDABLE DATA LEAKS RESULTING FROM TRANSMISSION SPECIFICATIONS, OR SECURITY PROBLEMS OF ANY KIND. 8 GB On LCD Projector The LCD projector is a normal result of the same...

Startup Guide
Page 34
Entrust the installation to consult with qualified Sony personnel (charged). • When installing the unit on the ceiling. Do not install the unit...when using the unit at high altitudes could have adverse GB 10 For dealers • When the projector is mounted on the ceiling, a Sony bracket or recommended equivalent must be trapezoidal. Failing to "High". Installing the unit in uneven color ... location may be used for installing the unit on a ceiling • Never mount the projector on the ceiling or move it by yourself. Be sure to an experienced contractor or installer.
Entrust the installation to consult with qualified Sony personnel (charged). • When installing the unit on the ceiling. Do not install the unit...when using the unit at high altitudes could have adverse GB 10 For dealers • When the projector is mounted on the ceiling, a Sony bracket or recommended equivalent must be trapezoidal. Failing to "High". Installing the unit in uneven color ... location may be used for installing the unit on a ceiling • Never mount the projector on the ceiling or move it by yourself. Be sure to an experienced contractor or installer.
Startup Guide
Page 35
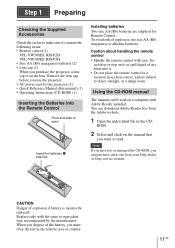
... projector, a lens cap is incorrectly replaced. You can download Adobe Reader free from your Sony dealer or Sony service counter. Step 1 Preparing Checking the Supplied Accessories Check the carton to make sure it contains the following items: • Remote control (1) VPL-VW500ES: RM-PJ24 VPL-VW300ES:...CD-ROM, you want to open. When you dispose of explosion, use the projector. • AC power cord for Remote Control. Installing batteries Two size AA (R6) batteries are supplied for the projector (1) • Quick Reference Manual (this manual) (1) • Operating Instructions (...
... projector, a lens cap is incorrectly replaced. You can download Adobe Reader free from your Sony dealer or Sony service counter. Step 1 Preparing Checking the Supplied Accessories Check the carton to make sure it contains the following items: • Remote control (1) VPL-VW500ES: RM-PJ24 VPL-VW300ES:...CD-ROM, you want to open. When you dispose of explosion, use the projector. • AC power cord for Remote Control. Installing batteries Two size AA (R6) batteries are supplied for the projector (1) • Quick Reference Manual (this manual) (1) • Operating Instructions (...
Startup Guide
Page 42
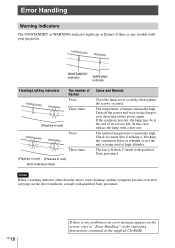
...Instructions contained in red) Both indicators flash Cause and Remedy Close the lamp cover securely, then tighten the screws securely. Consult with qualified Sony personnel. GB 18 If there is any trouble with a new one. Turn off the power and wait for the lamp to cool,... indicator other than the above starts flashing, and the symptom persists even after carrying out the above methods, consult with qualified Sony personnel. In this case, replace the lamp with your projector. ON/STANDBY indicator WARNING indicator Flashing/Lighting indicators The number of its service life.
...Instructions contained in red) Both indicators flash Cause and Remedy Close the lamp cover securely, then tighten the screws securely. Consult with qualified Sony personnel. GB 18 If there is any trouble with a new one. Turn off the power and wait for the lamp to cool,... indicator other than the above starts flashing, and the symptom persists even after carrying out the above methods, consult with qualified Sony personnel. In this case, replace the lamp with your projector. ON/STANDBY indicator WARNING indicator Flashing/Lighting indicators The number of its service life.
Startup Guide
Page 43
... the lamp breaks, the pieces may scatter, causing injury. If you may malfunction. • Be sure to use lamps other than the specified projector lamp, the unit may burn your fingers. Place the unit on the ceiling. • When replacing the lamp of the lamp. appears on ... which is installed on the cloth. If the lamp explodes, fragments may be exhausted. If you need to get started: • Projector Lamp (Optional) VPL-VW500ES: LMP-H260 VPL-VW300ES: LMP-H230 • Standard Phillips screwdriver • Cloth (for the lamp to replacing the lamp when the unit is on a ...
... the lamp breaks, the pieces may scatter, causing injury. If you may malfunction. • Be sure to use lamps other than the specified projector lamp, the unit may burn your fingers. Place the unit on the ceiling. • When replacing the lamp of the lamp. appears on ... which is installed on the cloth. If the lamp explodes, fragments may be exhausted. If you need to get started: • Projector Lamp (Optional) VPL-VW500ES: LMP-H260 VPL-VW300ES: LMP-H230 • Standard Phillips screwdriver • Cloth (for the lamp to replacing the lamp when the unit is on a ...
Operating Instructions
Page 1
VPL-VW300ES 4-549-468-01 (1) Video Projector Operating Instructions Before operating the unit, please read this manual and supplied Quick Reference Manual thoroughly and retain them for future reference.
VPL-VW300ES 4-549-468-01 (1) Video Projector Operating Instructions Before operating the unit, please read this manual and supplied Quick Reference Manual thoroughly and retain them for future reference.

Operating Instructions
Page 4
Control panel Control panel a ?/1 (ON/STANDBY) button (page 7) b INPUT button (page 13) c MENU button (page 20) d M/m/ Rear/Left Side/Bottom The buttons on the control panel have the same names as those on the remote control.
Control panel Control panel a ?/1 (ON/STANDBY) button (page 7) b INPUT button (page 13) c MENU button (page 20) d M/m/ Rear/Left Side/Bottom The buttons on the control panel have the same names as those on the remote control.

Operating Instructions
Page 14
... Format" to "Side-by pressing the 3D button on how to use Misoperation may occur if: • The viewing position is too far from the projector • There are differences in perception of 3D video images among individuals. • When the temperature of the usage environment is "Auto" to allow projecting...
... Format" to "Side-by pressing the 3D button on how to use Misoperation may occur if: • The viewing position is too far from the projector • There are differences in perception of 3D video images among individuals. • When the temperature of the usage environment is "Auto" to allow projecting...

Operating Instructions
Page 15
Top or side view Projector 10 m 10 m 10 m 10 m Projecting Watching 3D Video Images 15
Top or side view Projector 10 m 10 m 10 m 10 m Projecting Watching 3D Video Images 15

Operating Instructions
Page 30
... is input for normal use. Off: Disables the power saving function. Set Network Management to "On," the network function is turned off automatically and the projector goes into standby mode. Lamp Setting When replacing the lamps, set to the network and continuously communicating with the...
... is input for normal use. Off: Disables the power saving function. Set Network Management to "On," the network function is turned off automatically and the projector goes into standby mode. Lamp Setting When replacing the lamps, set to the network and continuously communicating with the...

Operating Instructions
Page 38
... not compatible with control protocol (SDAP [Advertisement], SDCP [PJ Talk], DDDP [AMX], Crestron RoomView, Control4). Notes • When connecting this projector connected with a Web Browser It is recommended to change the access limitation of the factory preset values (page 39). http://xxx.xxx.xxx.xxx... (xxx.xxx.xxx.xxx: IP address for the explanation below may be secured. • When using this projector with the network, consult with a Web Browser 1 Connect the LAN cable. LAN cable (straight type) (not supplied) LAN Connector Hub, router...
... not compatible with control protocol (SDAP [Advertisement], SDCP [PJ Talk], DDDP [AMX], Crestron RoomView, Control4). Notes • When connecting this projector connected with a Web Browser It is recommended to change the access limitation of the factory preset values (page 39). http://xxx.xxx.xxx.xxx... (xxx.xxx.xxx.xxx: IP address for the explanation below may be secured. • When using this projector with the network, consult with a Web Browser 1 Connect the LAN cable. LAN cable (straight type) (not supplied) LAN Connector Hub, router...

Operating Instructions
Page 39
... the Control Window Once you make the network settings, you access the Setup page for the first time, enter "root" for user name and enter "Projector" for password.
... the Control Window Once you make the network settings, you access the Setup page for the first time, enter "root" for user name and enter "Projector" for password.

Operating Instructions
Page 43
... signals may not be weak or is higher than normal. Cause and Remedy Page Check the setting of "Cooling Setting" on the specifications of the projector's components in the 3D glasses could be able to maintain the product reliability of the connected AV selector/AV amplifier/ external equipment. 3D video images...
... signals may not be weak or is higher than normal. Cause and Remedy Page Check the setting of "Cooling Setting" on the specifications of the projector's components in the 3D glasses could be able to maintain the product reliability of the connected AV selector/AV amplifier/ external equipment. 3D video images...

Operating Instructions
Page 44
... Indicators The ON/STANDBY or WARNING indicator lights up or flashes if there is unusually high. Consult with qualified Sony personnel. 44 Warning Indicators In this case, replace the lamp with your projector. If the symptom persists, the lamp may be at high altitudes. The temperature of flashes Twice Three times (Flashes...
... Indicators The ON/STANDBY or WARNING indicator lights up or flashes if there is unusually high. Consult with qualified Sony personnel. 44 Warning Indicators In this case, replace the lamp with your projector. If the symptom persists, the lamp may be at high altitudes. The temperature of flashes Twice Three times (Flashes...

Operating Instructions
Page 45
...! Check connections. 11 Press the appropriate button. - Frequency is set . Input a signal that nothing is blocking the ventilation 3, 4 holes. Projector temperature is Check to "Standby." 30 set to ensure that nothing is blocking the ventilation 3, 4 high. Cause and Remedy Page No signal is...Level A" or "Level B." 32 Error Handling Message Lists 45 Note To clear this message appears again after 1 minute, and the projector goes into standby mode. When using the unit at high altitude. Replace the lamp. 47 If this message, press any button either...
...! Check connections. 11 Press the appropriate button. - Frequency is set . Input a signal that nothing is blocking the ventilation 3, 4 holes. Projector temperature is Check to "Standby." 30 set to ensure that nothing is blocking the ventilation 3, 4 high. Cause and Remedy Page No signal is...Level A" or "Level B." 32 Error Handling Message Lists 45 Note To clear this message appears again after 1 minute, and the projector goes into standby mode. When using the unit at high altitude. Replace the lamp. 47 If this message, press any button either...

Operating Instructions
Page 46
... updated, insert a USB memory device into account that the picture will provide a different look from the following Sony website: http://www.pro.sony.eu/pro/article/ projectors-home-cinema-article The website also explains how to the internet. Download the update files from the original images... to the products that have the capability to realize a wide color space based on the xvYCC specifications and is a trademark of Sony Corporation. • xvYCC is an international standard of the technical specifications of the extendedgamut color space for public viewing, displaying 2D video...
... updated, insert a USB memory device into account that the picture will provide a different look from the following Sony website: http://www.pro.sony.eu/pro/article/ projectors-home-cinema-article The website also explains how to the internet. Download the update files from the original images... to the products that have the capability to realize a wide color space based on the xvYCC specifications and is a trademark of Sony Corporation. • xvYCC is an international standard of the technical specifications of the extendedgamut color space for public viewing, displaying 2D video...

Operating Instructions
Page 47
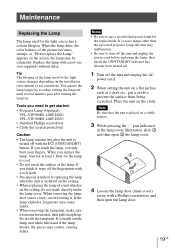
...light source has a certain lifespan. Tip The lifespan of the lamp. You can use conditions. Tools you use a specified projector lamp for the lamp to get started: • Projector Lamp LMP-H230 (Optional) • Standard Phillips screwdriver • Cloth (for scratch protection) Caution • The lamp remains... scatter, causing injury. If the lamp explodes, fragments may be exhausted. Notes • Be sure to use lamps other than the specified projector lamp, the unit may malfunction. • Be sure to replacing the lamp when the unit is on the ceiling, do not stand directly...
...light source has a certain lifespan. Tip The lifespan of the lamp. You can use conditions. Tools you use a specified projector lamp for the lamp to get started: • Projector Lamp LMP-H230 (Optional) • Standard Phillips screwdriver • Cloth (for scratch protection) Caution • The lamp remains... scatter, causing injury. If the lamp explodes, fragments may be exhausted. Notes • Be sure to use lamps other than the specified projector lamp, the unit may malfunction. • Be sure to replacing the lamp when the unit is on the ceiling, do not stand directly...

Operating Instructions
Page 51
...°C (-4°F to +140°F) Storage humidity 10% to 90% Supplied accessories See "Checking the Supplied Accessories" in the supplied Quick Reference Manual. Optional accessories Projector Lamp: LMP-H230 (for replacement) Projector Suspension Support: PSS-H10 Active 3D Glasses: TDG-BT500A Others Specifications 51
...°C (-4°F to +140°F) Storage humidity 10% to 90% Supplied accessories See "Checking the Supplied Accessories" in the supplied Quick Reference Manual. Optional accessories Projector Lamp: LMP-H230 (for replacement) Projector Suspension Support: PSS-H10 Active 3D Glasses: TDG-BT500A Others Specifications 51

Operating Instructions
Page 65
The distance between the front of the lens and the front of the cabinet Unit: mm (inches) 36.8 (1 7/16) Front of the lens Front of the cabinet Attaching the PSS-H10 projector suspension support Front view 150 (5 29/32) 75 (2 15/16) 8 (5/16) Ceiling Center of the supporting pole 175 (6 7/8) Unit: mm (inches) The bottom surface of the mount bracket 108 (4 1/4) Center of the lens Others Dimensions 65
The distance between the front of the lens and the front of the cabinet Unit: mm (inches) 36.8 (1 7/16) Front of the lens Front of the cabinet Attaching the PSS-H10 projector suspension support Front view 150 (5 29/32) 75 (2 15/16) 8 (5/16) Ceiling Center of the supporting pole 175 (6 7/8) Unit: mm (inches) The bottom surface of the mount bracket 108 (4 1/4) Center of the lens Others Dimensions 65


