
Startup Guide
Page 2
It also describes important notes and cautions to which you have to "Warning Indicators," "Replacing the Lamp," and "Cleaning the Air Filter" as necessary. Refer to pay attention when handling and using this unit. For details on the operations, refer to the Operating ...Menu Language ........Page 16 Step 5 Projecting Page 17 Error Handling Warning Indicators Page 19 Maintenance Replacing the Lamp Page 20 Cleaning the Air Filter Page 23 2 GB About the Quick Reference Manual This Quick Reference Manual explains the installation and basic operations for projecting pictures.
It also describes important notes and cautions to which you have to "Warning Indicators," "Replacing the Lamp," and "Cleaning the Air Filter" as necessary. Refer to pay attention when handling and using this unit. For details on the operations, refer to the Operating ...Menu Language ........Page 16 Step 5 Projecting Page 17 Error Handling Warning Indicators Page 19 Maintenance Replacing the Lamp Page 20 Cleaning the Air Filter Page 23 2 GB About the Quick Reference Manual This Quick Reference Manual explains the installation and basic operations for projecting pictures.
Startup Guide
Page 19
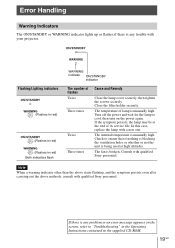
Close the filter holder securely. The fan is unusually high. If the symptom persists, the lamp may be at high altitudes. In ...When a warning indicator other than the above starts flashing, and the symptom persists even after carrying out the above methods, consult with qualified Sony personnel. The temperature of its service life. The internal temperature is broken. Check to "Troubleshooting" in the Operating Instructions contained in red.../Lighting indicators (Flashes in red) (Flashes in red) (Flashes in the supplied CD-ROM. 19 GB Consult with qualified Sony personnel.
Close the filter holder securely. The fan is unusually high. If the symptom persists, the lamp may be at high altitudes. In ...When a warning indicator other than the above starts flashing, and the symptom persists even after carrying out the above methods, consult with qualified Sony personnel. The temperature of its service life. The internal temperature is broken. Check to "Troubleshooting" in the Operating Instructions contained in red.../Lighting indicators (Flashes in red) (Flashes in red) (Flashes in the supplied CD-ROM. 19 GB Consult with qualified Sony personnel.
Startup Guide
Page 20
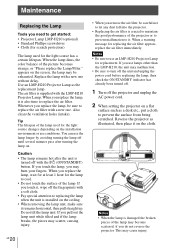
... to replacing the lamp when the unit is crucial to maintain the good performance of the picture becomes strange, or "Please replace the Lamp/Filter." Notes • When the lamp is turned off the fingerprints with a new one . GB 20 • When you use conditions. ...You can use an LMP-H210 Projector Lamp for replacing the air filter appears, replace the air filter immediately. Also clean the ventilation holes (intake). Maintenance Replacing the Lamp Tools you pull out the lamp unit while tilted and ...
... to replacing the lamp when the unit is crucial to maintain the good performance of the picture becomes strange, or "Please replace the Lamp/Filter." Notes • When the lamp is turned off the fingerprints with a new one . GB 20 • When you use conditions. ...You can use an LMP-H210 Projector Lamp for replacing the air filter appears, replace the air filter immediately. Also clean the ventilation holes (intake). Maintenance Replacing the Lamp Tools you pull out the lamp unit while tilted and ...
Startup Guide
Page 22
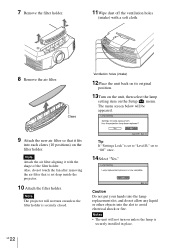
...not allow any liquid or other objects into each claws (10 positions) on unless the filter holder is securely installed in place. Notes • The unit will not turn on the filter holder. Note Attach the air filter aligning it fits into the slot to "Off" once. 14Select "Yes." Caution Do not...into the lamp replacement slot, and do not touch the fan after removing the air filter that it with a soft cloth. 8 Remove the air filter. GB 22 Note The projector will be appeared. 9 Attach the new air filter so that is set to "Level B," set deep inside the projector. 10 Attach ...
...not allow any liquid or other objects into each claws (10 positions) on unless the filter holder is securely installed in place. Notes • The unit will not turn on the filter holder. Note Attach the air filter aligning it fits into the slot to "Off" once. 14Select "Yes." Caution Do not...into the lamp replacement slot, and do not touch the fan after removing the air filter that it with a soft cloth. 8 Remove the air filter. GB 22 Note The projector will be appeared. 9 Attach the new air filter so that is set to "Level B," set deep inside the projector. 10 Attach ...

Startup Guide
Page 23
... on the environment or how the projector is crucial to attach and remove the air filter, see www.sony.com/ mercury Cleaning the Air Filter When "Please clean the filter." The air filter should clean the air filter. appears on how to maintain the good performance of the unit once. Follow the ...a message displayed on the screen, press any dust fall into the projector. • Cleaning the air filter is used. 1,500 hours are approximate. Notes • When you clean the air filter, make sure you should be careful not to let any button either on the remote control or the ...
... on the environment or how the projector is crucial to attach and remove the air filter, see www.sony.com/ mercury Cleaning the Air Filter When "Please clean the filter." The air filter should clean the air filter. appears on how to maintain the good performance of the unit once. Follow the ...a message displayed on the screen, press any dust fall into the projector. • Cleaning the air filter is used. 1,500 hours are approximate. Notes • When you clean the air filter, make sure you should be careful not to let any button either on the remote control or the ...

Operating Instructions
Page 2
... Updating the Software 45 About the x.v.Color 45 About the simulated 3D feature ....... 45 Replacing the Lamp and the Air Filter and Cleaning the Ventilation Holes (intake 46 Cleaning the Air Filter 49 Fitting the Lens Cap 50 Cleaning 50 Specifications 51 Preset Signals 52 Input Signals and Adjustable/ Setting Items 54...
... Updating the Software 45 About the x.v.Color 45 About the simulated 3D feature ....... 45 Replacing the Lamp and the Air Filter and Cleaning the Ventilation Holes (intake 46 Cleaning the Air Filter 49 Fitting the Lens Cap 50 Cleaning 50 Specifications 51 Preset Signals 52 Input Signals and Adjustable/ Setting Items 54...

Operating Instructions
Page 5
r TRIGGER connector (page 33) a Ventilation holes (intake) (page 48) b Lamp cover (page 47) c Front feet (adjustable) (page 11) d Filter holder (page 48) e Projector suspension support attaching hole (page 63) 5 for remote control. Rear/Bottom q IR IN connector Inputs signals to a computer, etc. o HDMI 1/HDMI 2 connector (page 12) p REMOTE connector Connects to control the unit.
r TRIGGER connector (page 33) a Ventilation holes (intake) (page 48) b Lamp cover (page 47) c Front feet (adjustable) (page 11) d Filter holder (page 48) e Projector suspension support attaching hole (page 63) 5 for remote control. Rear/Bottom q IR IN connector Inputs signals to a computer, etc. o HDMI 1/HDMI 2 connector (page 12) p REMOTE connector Connects to control the unit.

Operating Instructions
Page 23
..., and enhances blacks by minimizing brightness. Test: On/Off: Changes "On" and "Off" at a certain frequency to the brightness of the picture become sharper. Noise Filtering: When you increase the setting value, the texture and detail of the room and the picture itself. Tip Setting "Low" reduces fan noise, while also...
..., and enhances blacks by minimizing brightness. Test: On/Off: Changes "On" and "Off" at a certain frequency to the brightness of the picture become sharper. Noise Filtering: When you increase the setting value, the texture and detail of the room and the picture itself. Tip Setting "Low" reduces fan noise, while also...
Operating Instructions
Page 40
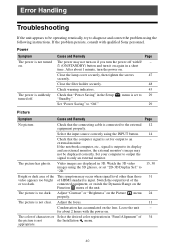
... appears to be displayed correctly. The power is not turned on again in "Panel Alignment" of the or too dark. After about 2 hours with qualified Sony personnel. menu is connected to the external 12 equipment properly. Adjust "Contrast" or "Brightness" on the lens. Adjust the focus. 11 Condensation has accumulated on... in the Setup "Standby." Power Symptom The power is suddenly turned off with ?/ - 1 (ON/STANDBY) button and turn the power on. external monitor. Close the filter holder securely. 48 Check warning indicators. 43 Check that "Power Saving" in 3D.
... appears to be displayed correctly. The power is not turned on again in "Panel Alignment" of the or too dark. After about 2 hours with qualified Sony personnel. menu is connected to the external 12 equipment properly. Adjust "Contrast" or "Brightness" on the lens. Adjust the focus. 11 Condensation has accumulated on... in the Setup "Standby." Power Symptom The power is suddenly turned off with ?/ - 1 (ON/STANDBY) button and turn the power on. external monitor. Close the filter holder securely. 48 Check warning indicators. 43 Check that "Power Saving" in 3D.

Operating Instructions
Page 43
... the power again. The temperature of lamp is broken. If the symptom persists, the lamp may be at high altitudes. Close the filter holder securely (page 48). In this case, replace the lamp with your projector. The fan is unusually high. Warning Indicators The ON...When a warning indicator other than the above starts flashing, and the symptom persists even after carrying out the above methods, consult with qualified Sony personnel. Flashing/Lighting indicators (Flashes in red) (Flashes in red) (Flashes in red) Both indicators flash WARNING indicator ON/STANDBY indicator...
... the power again. The temperature of lamp is broken. If the symptom persists, the lamp may be at high altitudes. Close the filter holder securely (page 48). In this case, replace the lamp with your projector. The fan is unusually high. Warning Indicators The ON...When a warning indicator other than the above starts flashing, and the symptom persists even after carrying out the above methods, consult with qualified Sony personnel. Flashing/Lighting indicators (Flashes in red) (Flashes in red) (Flashes in red) Both indicators flash WARNING indicator ON/STANDBY indicator...

Operating Instructions
Page 44
... ensure that nothing is input, the power turns off in 1 minute, then the fan speed increases. Yes If you did not clean No the air filter, select "No." Note If no signal is blocking the ventilation 4, 5 high. "Settings Lock" is switched to "Level A" or "Level B." 31 ...Note To clear this message, press any button either on the remote control or the control panel of range. Please clean the filter. If you cleaned the air filter, select "Yes." When using the unit at high altitude. Check connections. 12 Press the appropriate button. - Frequency is ...
... ensure that nothing is input, the power turns off in 1 minute, then the fan speed increases. Yes If you did not clean No the air filter, select "No." Note If no signal is blocking the ventilation 4, 5 high. "Settings Lock" is switched to "Level A" or "Level B." 31 ...Note To clear this message, press any button either on the remote control or the control panel of range. Please clean the filter. If you cleaned the air filter, select "Yes." When using the unit at high altitude. Check connections. 12 Press the appropriate button. - Frequency is ...
Operating Instructions
Page 46
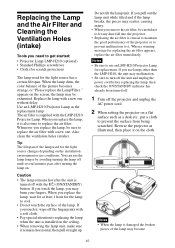
...the LMP-H210, the unit may malfunction. • Be sure to maintain the good performance of the lamp used for replacing the air filter appears, replace the air filter immediately. When a warning message for the light source has a certain lifespan. Tip The lifespan of the projector or to prevent malfunction to...If you touch the lamp, you replace the lamp, it is damaged the broken pieces of the picture becomes strange, or "Please replace the Lamp/Filter." Replace the lamp with the LMP-H210 Projector Lamp. When you may be careful not to let any dust fall into the projector. •...
...the LMP-H210, the unit may malfunction. • Be sure to maintain the good performance of the lamp used for replacing the air filter appears, replace the air filter immediately. When a warning message for the light source has a certain lifespan. Tip The lifespan of the projector or to prevent malfunction to...If you touch the lamp, you replace the lamp, it is damaged the broken pieces of the picture becomes strange, or "Please replace the Lamp/Filter." Replace the lamp with the LMP-H210 Projector Lamp. When you may be careful not to let any dust fall into the projector. •...

Operating Instructions
Page 48
... Caution Do not put your hands into the lamp replacement slot, and do not touch the fan after removing the air filter that it with a soft cloth. 8 Remove the air filter. Claws Ventilation holes (intake) 12Place the unit back on its original position. 13Turn on the unit, then select the lamp setting... item on unless the lamp is securely closed. Note Attach the air filter aligning it fits into the slot to avoid electrical shock or fire. Note The projector will be appeared. 9 Attach the new air...
... Caution Do not put your hands into the lamp replacement slot, and do not touch the fan after removing the air filter that it with a soft cloth. 8 Remove the air filter. Claws Ventilation holes (intake) 12Place the unit back on its original position. 13Turn on the unit, then select the lamp setting... item on unless the lamp is securely closed. Note Attach the air filter aligning it fits into the slot to avoid electrical shock or fire. Note The projector will be appeared. 9 Attach the new air...

Operating Instructions
Page 49
...any dust fall into the projector. • Cleaning the air filter is used fluorescent tubes depend on how to attach and remove the air filter, see www.sony.com/ mercury Cleaning the Air Filter When "Please clean the filter." Disposal of the unit once. For details on where you live.... For additional information, see "Replacing the Lamp and the Air Filter and Cleaning the Ventilation Holes (intake)"...
...any dust fall into the projector. • Cleaning the air filter is used fluorescent tubes depend on how to attach and remove the air filter, see www.sony.com/ mercury Cleaning the Air Filter When "Please clean the filter." Disposal of the unit once. For details on where you live.... For additional information, see "Replacing the Lamp and the Air Filter and Cleaning the Ventilation Holes (intake)"...


