
Operating Instructions
Page 2
... Troubleshooting 35 Warning Indicators 38 Message Lists 39 Others Updating the Software 40 About the x.v.Color 40 About the simulated 3D feature ....... 40 Replacing the Lamp and the Air Filter and Cleaning the Ventilation Holes (intake 41 Cleaning the Air Filter 44 Fitting the Lens Cap 45 Cleaning 45 Specifications 46...
... Troubleshooting 35 Warning Indicators 38 Message Lists 39 Others Updating the Software 40 About the x.v.Color 40 About the simulated 3D feature ....... 40 Replacing the Lamp and the Air Filter and Cleaning the Ventilation Holes (intake 41 Cleaning the Air Filter 44 Fitting the Lens Cap 45 Cleaning 45 Specifications 46...

Operating Instructions
Page 4
for remote control. a Ventilation holes (intake) (page 43) b Lamp cover (page 42) c Front feet (adjustable) (page 10) d Filter holder (page 43) e Projector suspension support attaching hole (page 58) 4 Rear/Bottom p IR IN connector Inputs signals to a computer, etc. o REMOTE connector Connects to control the unit.
for remote control. a Ventilation holes (intake) (page 43) b Lamp cover (page 42) c Front feet (adjustable) (page 10) d Filter holder (page 43) e Projector suspension support attaching hole (page 58) 4 Rear/Bottom p IR IN connector Inputs signals to a computer, etc. o REMOTE connector Connects to control the unit.

Operating Instructions
Page 22
...make adjustments by pressing the CONTRAST +/- Cinema Black Pro Contrast Enhancer [CONTRAST ENHANCER] Corrects the level of the picture. Lamp Control Switches the lamp output. Off: The "Motionflow" function is not applied. You can adjust the contrast enhancer. Test: On/Off: ... and detail of "Reality Creation." The higher the setting, the brighter the picture. Combination: Reduces motion blur while maintaining brightness for longer lamp life. Contrast [CONTRAST] Brightness [BRIGHTNESS] Tips • Select "Off" if the selected "Smooth High," "Smooth Low," "Impulse," ...
...make adjustments by pressing the CONTRAST +/- Cinema Black Pro Contrast Enhancer [CONTRAST ENHANCER] Corrects the level of the picture. Lamp Control Switches the lamp output. Off: The "Motionflow" function is not applied. You can adjust the contrast enhancer. Test: On/Off: ... and detail of "Reality Creation." The higher the setting, the brighter the picture. Combination: Reduces motion blur while maintaining brightness for longer lamp life. Contrast [CONTRAST] Brightness [BRIGHTNESS] Tips • Select "Off" if the selected "Smooth High," "Smooth Low," "Impulse," ...

Operating Instructions
Page 28
...Disables the power saving function. Set to "Off" to "On," the fan noise becomes slightly louder since the fan speed increases. When replacing the lamps, set to turn off automatically and the projector goes into standby mode. Bottom Left: Displays the menu on -screen displays except for 10 minutes, power... is set the desired lamp setting (page 41). 28 On: Use this item is turned off the on the bottom left area of the screen. Setting items Status ...
...Disables the power saving function. Set to "Off" to "On," the fan noise becomes slightly louder since the fan speed increases. When replacing the lamps, set to turn off automatically and the projector goes into standby mode. Bottom Left: Displays the menu on -screen displays except for 10 minutes, power... is set the desired lamp setting (page 41). 28 On: Use this item is turned off the on the bottom left area of the screen. Setting items Status ...

Operating Instructions
Page 31
Sharpness NR MPEG NR Smooth Gradation Film Mode Gamma Correction Color Correction Clear White x.v.Color Color Space Group 2 Setup menu Status Language Menu Position High Altitude Mode Lamp Setting Function menu Dynamic Range Installation menu Image Flip Panel Alignment 31 Items Locked by Settings Lock Group 1 Picture menu Reset Reality Creation Contrast Enhancer Lamp Control Motionflow Contrast Brightness Color Hue Color Temp.
Sharpness NR MPEG NR Smooth Gradation Film Mode Gamma Correction Color Correction Clear White x.v.Color Color Space Group 2 Setup menu Status Language Menu Position High Altitude Mode Lamp Setting Function menu Dynamic Range Installation menu Image Flip Panel Alignment 31 Items Locked by Settings Lock Group 1 Picture menu Reset Reality Creation Contrast Enhancer Lamp Control Motionflow Contrast Brightness Color Hue Color Temp.

Operating Instructions
Page 34
... the signal from the preset memory to adjust it to the signals shown in the Information menu. Displays the type of the lamp. The signal type is input, the unit automatically detects the signal type and recalls the data for input signals appropriately according to... an optimum picture. Signal type Software Version Lamp Timer Description Displays the model name Displays the serial number. Information Menu The Information menu displays the model name, serial number, input...
... the signal from the preset memory to adjust it to the signals shown in the Information menu. Displays the type of the lamp. The signal type is input, the unit automatically detects the signal type and recalls the data for input signals appropriately according to... an optimum picture. Signal type Software Version Lamp Timer Description Displays the model name Displays the serial number. Information Menu The Information menu displays the model name, serial number, input...
Operating Instructions
Page 35
... 3D glasses, or set for about 1 minute, turn it on . After about 2 hours with qualified Sony personnel. Bright or dark area of the This symptom may not be operating erratically, try to an - Close the lamp cover securely, then tighten the screws 42 securely. The color of characters or Select the desired...
... 3D glasses, or set for about 1 minute, turn it on . After about 2 hours with qualified Sony personnel. Bright or dark area of the This symptom may not be operating erratically, try to an - Close the lamp cover securely, then tighten the screws 42 securely. The color of characters or Select the desired...

Operating Instructions
Page 36
Wait until it stops blinking and remains lit in the 3D glasses could be weak. personnel. Insert the batteries with your local dealer or qualified Sony screen. to display the images properly. The model name does not The display mode of - Consult with the correct polarities. Confirm the position of...on . Set "2D-3D Display Sel." Set the zooming magnification to "On." 28 not appear. Symptom Cause and Remedy Page Image is a fluorescent lamp near the remote control detector, the unit may work . The 3D signals may not be able to "Auto" or "3D."
Wait until it stops blinking and remains lit in the 3D glasses could be weak. personnel. Insert the batteries with your local dealer or qualified Sony screen. to display the images properly. The model name does not The display mode of - Consult with the correct polarities. Confirm the position of...on . Set "2D-3D Display Sel." Set the zooming magnification to "On." 28 not appear. Symptom Cause and Remedy Page Image is a fluorescent lamp near the remote control detector, the unit may work . The 3D signals may not be able to "Auto" or "3D."

Operating Instructions
Page 38
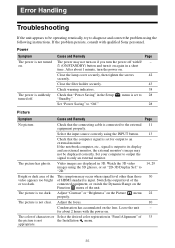
... used at the end of flashes Twice Three times Twice Three times Cause and Remedy Close the lamp cover securely, then tighten the screws securely (page 42). Consult with qualified Sony personnel. 38 Warning Indicators The ON/STANDBY or WARNING indicator lights up or flashes if there is... any trouble with a new one (page 41). Close the filter holder securely (page 43). In this case, replace the lamp with your projector.
... used at the end of flashes Twice Three times Twice Three times Cause and Remedy Close the lamp cover securely, then tighten the screws securely (page 42). Consult with qualified Sony personnel. 38 Warning Indicators The ON/STANDBY or WARNING indicator lights up or flashes if there is... any trouble with a new one (page 41). Close the filter holder securely (page 43). In this case, replace the lamp with your projector.

Operating Instructions
Page 39
... any button either on the remote control or the control panel of range. Clean the air filter. 44 Have you replace the lamp and filter, the lamp replacement process is input in 1 minute. High Altitude holes. Cause and Remedy Page No signal is not complete. Input a signal...Lists Warning messages Symptom Cause and Remedy Page High temp.! When using the unit at high altitude. If you cleaned the air filter, select "Yes." Lamp off the power. - 1 min. "Settings Lock" is set to "Standby." 28 set to clean the air filter. Restart cleaning the ventilation ...
... any button either on the remote control or the control panel of range. Clean the air filter. 44 Have you replace the lamp and filter, the lamp replacement process is input in 1 minute. High Altitude holes. Cause and Remedy Page No signal is not complete. Input a signal...Lists Warning messages Symptom Cause and Remedy Page High temp.! When using the unit at high altitude. If you cleaned the air filter, select "Yes." Lamp off the power. - 1 min. "Settings Lock" is set to "Standby." 28 set to clean the air filter. Restart cleaning the ventilation ...

Operating Instructions
Page 41
...be sure to replace the air filter with the ?/1 (ON/STANDBY) button. Caution • The lamp remains hot after turning the lamp on. Reverse the projector as the replacement lamp. Whenever you replace the lamp, be careful not to let any dust fall into the projector. • Replacing the air filter ... after the unit is crucial to maintain the good performance of the lamp used for replacement. Replace the lamp with the LMP-H210 Projector Lamp. The air filter is installed on the ceiling. • When removing the lamp unit, make sure it is damaged the broken pieces of the picture...
...be sure to replace the air filter with the ?/1 (ON/STANDBY) button. Caution • The lamp remains hot after turning the lamp on. Reverse the projector as the replacement lamp. Whenever you replace the lamp, be careful not to let any dust fall into the projector. • Replacing the air filter ... after the unit is crucial to maintain the good performance of the lamp used for replacement. Replace the lamp with the LMP-H210 Projector Lamp. The air filter is installed on the ceiling. • When removing the lamp unit, make sure it is damaged the broken pieces of the picture...

Operating Instructions
Page 42
Hold up the handle, then pull the lamp straight out. scattered, if you do not reverse the projector. This may cause injury. • Be sure that the projector is placed on a stable surface. 3 Loosen the screw on the lamp cover with a Philips screwdriver, and then open the lamp cover. 4 Loosen the 3 screws on the lamp with the Phillips screwdriver. Note Be careful not to touch the optical block inside the unit. 6 Close the lamp cover, then tighten the screws. 5 Hold the handle of the new lamp and push it in securely until it reaches the end, and then tighten the 3 screws. 42
Hold up the handle, then pull the lamp straight out. scattered, if you do not reverse the projector. This may cause injury. • Be sure that the projector is placed on a stable surface. 3 Loosen the screw on the lamp cover with a Philips screwdriver, and then open the lamp cover. 4 Loosen the 3 screws on the lamp with the Phillips screwdriver. Note Be careful not to touch the optical block inside the unit. 6 Close the lamp cover, then tighten the screws. 5 Hold the handle of the new lamp and push it in securely until it reaches the end, and then tighten the 3 screws. 42

Operating Instructions
Page 43
...a soft cloth. 8 Remove the air filter. Also, do not allow any liquid or other objects into each claws (10 positions) on unless the lamp is securely closed. Tip If "Settings Lock" is set to avoid electrical shock or fire. Claws Ventilation holes (intake) 12Place the unit back on ...its original position. 13Turn on the unit, then select the lamp setting item on unless the filter holder is securely installed in place. 43 Note The projector will not turn on the filter holder. Notes &#...
...a soft cloth. 8 Remove the air filter. Also, do not allow any liquid or other objects into each claws (10 positions) on unless the lamp is securely closed. Tip If "Settings Lock" is set to avoid electrical shock or fire. Claws Ventilation holes (intake) 12Place the unit back on ...its original position. 13Turn on the unit, then select the lamp setting item on unless the filter holder is securely installed in place. 43 Note The projector will not turn on the filter holder. Notes &#...

Operating Instructions
Page 44
... cleaned every 1,500 hours. The disposal rules for cleaning the air filter appears, clean the air filter immediately. 44 For additional information, see "Replacing the Lamp and the Air Filter and Cleaning the Ventilation Holes (intake)" Steps 7 to 10 (page 43). • When you do not damage it in your... area. appears on where you should be careful not to attach and remove the air filter, see www.sony.com/ mercury Cleaning the Air Filter When "Please clean the filter." The air filter should clean the air filter. When a warning message for ...
... cleaned every 1,500 hours. The disposal rules for cleaning the air filter appears, clean the air filter immediately. 44 For additional information, see "Replacing the Lamp and the Air Filter and Cleaning the Ventilation Holes (intake)" Steps 7 to 10 (page 43). • When you do not damage it in your... area. appears on where you should be careful not to attach and remove the air filter, see www.sony.com/ mercury Cleaning the Air Filter When "Please clean the filter." The air filter should clean the air filter. When a warning message for ...
Operating Instructions
Page 46
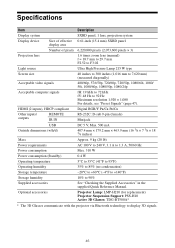
...× 3) Projection lens 1.6 times zoom lens (manual) f = 18.7 mm to 29.7 mm F2.52 to F3.02 Light source Ultra High Pressure Lamp 215 W type Screen size 40 inches to 300 inches (1,016 mm to 7,620 mm) (measured diagonally) Acceptable video signals 480/60p, 576/50p, 720...;F to +140°F) Storage humidity 10% to 92 Hz Maximum resolution 1,920 × 1,080 For details, see "Preset Signals" (page 47). Projector Lamp: LMP-H210 (for replacement) Projector Suspension Support: PSS-H10 Active 3D Glasses: TDG-BT500A* * The 3D Glasses communicate with the projector via Bluetooth technology to...
...× 3) Projection lens 1.6 times zoom lens (manual) f = 18.7 mm to 29.7 mm F2.52 to F3.02 Light source Ultra High Pressure Lamp 215 W type Screen size 40 inches to 300 inches (1,016 mm to 7,620 mm) (measured diagonally) Acceptable video signals 480/60p, 576/50p, 720...;F to +140°F) Storage humidity 10% to 92 Hz Maximum resolution 1,920 × 1,080 For details, see "Preset Signals" (page 47). Projector Lamp: LMP-H210 (for replacement) Projector Suspension Support: PSS-H10 Active 3D Glasses: TDG-BT500A* * The 3D Glasses communicate with the projector via Bluetooth technology to...

Operating Instructions
Page 49
... from a computer, the setting cannot be made only when "x.v.Color" is 16:9 or wider (fixed at "Normal"). 49 z - z - - z - - z z - - Picture menu Item Reality Creation Contrast Enhancer Lamp Control Motionflow*1 Contrast Brightness Color Hue Color Temp. Sharpness NR MPEG NR Smooth Gradation Film Mode Gamma Correction*2 Color Correction Clear White x.v.Color Color Space...
... from a computer, the setting cannot be made only when "x.v.Color" is 16:9 or wider (fixed at "Normal"). 49 z - z - - z - - z z - - Picture menu Item Reality Creation Contrast Enhancer Lamp Control Motionflow*1 Contrast Brightness Color Hue Color Temp. Sharpness NR MPEG NR Smooth Gradation Film Mode Gamma Correction*2 Color Correction Clear White x.v.Color Color Space...

Operating Instructions
Page 50
... the following tables indicate those items. 3D signals Item 720/60p, 1080/60i, 1080/24p 1080/60p, 720/50p 1080/50i 1080/50p Reality Creation Lamp Control Motionflow*1 z z z z z z z z z z z z NR MPEG NR Smooth Gradation - - - - - - - - - - - - The following types of the HDMI standards. 3D Signals and Adjustable/Setting Items Some items on the menus...
... the following tables indicate those items. 3D signals Item 720/60p, 1080/60i, 1080/24p 1080/60p, 720/50p 1080/50i 1080/50p Reality Creation Lamp Control Motionflow*1 z z z z z z z z z z z z NR MPEG NR Smooth Gradation - - - - - - - - - - - - The following types of the HDMI standards. 3D Signals and Adjustable/Setting Items Some items on the menus...

Operating Instructions
Page 51
... the menu as fixed at Normal. 51 The following tables indicate these items. 3D signals Item Over-Under Side-by-Side Simulated 3D Reality Creation Lamp Control Motionflow*1 z z z z z z z z z NR - - The items that cannot be set -: Not adjustable/cannot be selected are not displayed on the menu...
... the menu as fixed at Normal. 51 The following tables indicate these items. 3D signals Item Over-Under Side-by-Side Simulated 3D Reality Creation Lamp Control Motionflow*1 z z z z z z z z z NR - - The items that cannot be set -: Not adjustable/cannot be selected are not displayed on the menu...

Operating Instructions
Page 53
...., D93-D55 and Custom 5 53 Preset For each input connector and Calib. For further details, see the tables below. Preset Reset Reality Creation Contrast Enhancer Lamp Control Motionflow Contrast Brightness Color Hue Color Temp. Storage Conditions of Adjustable/Setting Items Each adjustable/setting item is individually stored for each input signal...
...., D93-D55 and Custom 5 53 Preset For each input connector and Calib. For further details, see the tables below. Preset Reset Reality Creation Contrast Enhancer Lamp Control Motionflow Contrast Brightness Color Hue Color Temp. Storage Conditions of Adjustable/Setting Items Each adjustable/setting item is individually stored for each input signal...
Operating Instructions
Page 76
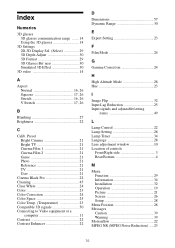
... G Gamma Correction 24 H High Altitude Mode 28 Hue 23 I Image Flip 32 Input Lag Reduction 25 Input signals and adjustable/setting items 49 L Lamp Control 22 Lamp Setting 28 Lamp Timer 34 Language 28 Lens adjustment window 10 Location of controls Front/Right side 3 Rear/Bottom 4 M Menu Function 29 Information 34 Installation 32...
... G Gamma Correction 24 H High Altitude Mode 28 Hue 23 I Image Flip 32 Input Lag Reduction 25 Input signals and adjustable/setting items 49 L Lamp Control 22 Lamp Setting 28 Lamp Timer 34 Language 28 Lens adjustment window 10 Location of controls Front/Right side 3 Rear/Bottom 4 M Menu Function 29 Information 34 Installation 32...


