
Startup Guide
Page 26
Step 1 Preparing Page 18 Step 2 Connecting Page 20 Step 3 Projecting Page 22 Indicators Page 24 Cleaning the Air Filter Page 26 2 GB About the Quick Reference Manual Refer to pay attention when handling and using this unit. About the Quick Reference Manual This Quick Reference Manual explains the basic operations for projecting pictures. It also describes important notes and cautions to which you have to "Indicators" and "Cleaning the Air Filter" as necessary. For details on the operations, refer to the Operating Instructions contained in the supplied CD-ROM.
Step 1 Preparing Page 18 Step 2 Connecting Page 20 Step 3 Projecting Page 22 Indicators Page 24 Cleaning the Air Filter Page 26 2 GB About the Quick Reference Manual Refer to pay attention when handling and using this unit. About the Quick Reference Manual This Quick Reference Manual explains the basic operations for projecting pictures. It also describes important notes and cautions to which you have to "Indicators" and "Cleaning the Air Filter" as necessary. For details on the operations, refer to the Operating Instructions contained in the supplied CD-ROM.
Startup Guide
Page 27
.... All interface cables used in accordance with part 15 of this manual thoroughly and retain it for peripheral device wiring that any changes or modifications not expressly approved in this manual could cause radio interference. If you have excessive voltage to this ... risk of Conformity Trade Name Model Responsible party Address Telephone Number : SONY : VPL-FHZ120L/FHZ90L : Sony Electronics Inc. 16535 Via Esprillo, San Diego, CA 92127 U.S.A. : 858-942-2230 This device complies with the instruction manual, may call; These limits are cautioned that might have questions on ...
.... All interface cables used in accordance with part 15 of this manual thoroughly and retain it for peripheral device wiring that any changes or modifications not expressly approved in this manual could cause radio interference. If you have excessive voltage to this ... risk of Conformity Trade Name Model Responsible party Address Telephone Number : SONY : VPL-FHZ120L/FHZ90L : Sony Electronics Inc. 16535 Via Esprillo, San Diego, CA 92127 U.S.A. : 858-942-2230 This device complies with the instruction manual, may call; These limits are cautioned that might have questions on ...

Startup Guide
Page 42
... gets into the AC IN socket, then attach the plug holder to the AC power cord. Caution When replacing the lens, your dealer or Sony service representative. Before replacing the lens, turn off the projector, then unplug the AC power cord from the wall outlet. Note If you damage... or lose the CD-ROM, you want to the unit. Plug holder (supplied) AC IN socket Using the CD-ROM manuals The manuals can purchase a new one from your eyes may be viewed on a computer with the projector installed suspended from a ceiling. For usable projection...
... gets into the AC IN socket, then attach the plug holder to the AC power cord. Caution When replacing the lens, your dealer or Sony service representative. Before replacing the lens, turn off the projector, then unplug the AC power cord from the wall outlet. Note If you damage... or lose the CD-ROM, you want to the unit. Plug holder (supplied) AC IN socket Using the CD-ROM manuals The manuals can purchase a new one from your eyes may be viewed on a computer with the projector installed suspended from a ceiling. For usable projection...
Startup Guide
Page 44
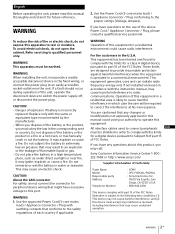
When unplugging a cable, be sure to grip the plug, not the cable itself. For more information, refer also to the instruction manual of the device to be sure to check if "LAN Setting" is used when connecting the projector to a computer with DSD (Direct Stream ...Notes Use HDMI-compatible device which has the HDMI Logo. Use a high speed HDMI cable(s) on which the cable type logo is specified. (Sony products are recommended.) The HDMI terminal of picture signals or cause a malfunction. Step 2 Connecting Notes Turn off all devices before making any ...
When unplugging a cable, be sure to grip the plug, not the cable itself. For more information, refer also to the instruction manual of the device to be sure to check if "LAN Setting" is used when connecting the projector to a computer with DSD (Direct Stream ...Notes Use HDMI-compatible device which has the HDMI Logo. Use a high speed HDMI cable(s) on which the cable type logo is specified. (Sony products are recommended.) The HDMI terminal of picture signals or cause a malfunction. Step 2 Connecting Notes Turn off all devices before making any ...

Startup Guide
Page 47
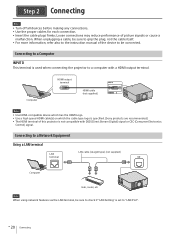
When attaching the Manual focus lens Turn the focus ring. To return the lens to change the pattern and / to the center position of the projected image ...
When attaching the Manual focus lens Turn the focus ring. To return the lens to change the pattern and / to the center position of the projected image ...

Operating Instructions
Page 1
Please check with your local Sony Authorized Dealer. © 2018 Sony Corporation 4-741-332-12 (1) Data Projector Operating Instructions Before operating the unit, please read this manual and supplied Quick Reference Manual thoroughly and retain them for future reference. VPL-FHZ120L/FHZ90L Not all models are available in all countries and area.
Please check with your local Sony Authorized Dealer. © 2018 Sony Corporation 4-741-332-12 (1) Data Projector Operating Instructions Before operating the unit, please read this manual and supplied Quick Reference Manual thoroughly and retain them for future reference. VPL-FHZ120L/FHZ90L Not all models are available in all countries and area.

Operating Instructions
Page 8
When unplugging a cable, be sure to grip the plug and not the cable itself. For more information, also refer to the instruction manual of the device to 1920 × 1200 pixels for each connection. Insert the cable plugs firmly; It is recommended that you set the resolution ...
When unplugging a cable, be sure to grip the plug and not the cable itself. For more information, also refer to the instruction manual of the device to 1920 × 1200 pixels for each connection. Insert the cable plugs firmly; It is recommended that you set the resolution ...

Operating Instructions
Page 17
Use / to change the pattern and / to restore the previous image. 17 When attaching the Manual focus lens Turn the focus ring. Adjusting the image size (Zoom) When attaching the Electric zoom lens Press the ZOOM key on the projector or ...
Use / to change the pattern and / to restore the previous image. 17 When attaching the Manual focus lens Turn the focus ring. Adjusting the image size (Zoom) When attaching the Electric zoom lens Press the ZOOM key on the projector or ...

Operating Instructions
Page 27
... (16:9) (16:9)*4 *5 *4: Depending on the input signal, the image may be projected as illustrated below . In this case, adjust the "Phase," "Pitch," and "Shift" items manually. Computer signal (16:9) (16:10) (4:3) (Full 1)*1 *2 (Full 1)*1 (4:3)*3*5 *2: If you select "Full," the image is projected to fit the projected image size, regardless of the aspect...
... (16:9) (16:9)*4 *5 *4: Depending on the input signal, the image may be projected as illustrated below . In this case, adjust the "Phase," "Pitch," and "Shift" items manually. Computer signal (16:9) (16:10) (4:3) (Full 1)*1 *2 (Full 1)*1 (4:3)*3*5 *2: If you select "Full," the image is projected to fit the projected image size, regardless of the aspect...

Operating Instructions
Page 30
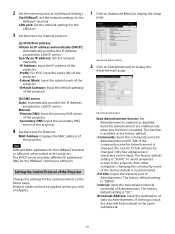
IP Address/ Subnet Mask/ When "Manual" is selected for the HTML viewer. IPv6 Information Displays the IPv6 address information. Auto: Distinguishes the image input level automatically. Full: Set when the image ... brightness is restored. If you turn off automatically, and the unit enters standby mode. This setting provides a convenient way to reduce power consumption. Manual: To specify the IP Address manually. While dimming the light, the message "Light Dimming" appears. Setting items Description Network Setting IPv4 Setting *1 *3 IP Address Setup Auto(DHCP): The...
IP Address/ Subnet Mask/ When "Manual" is selected for the HTML viewer. IPv6 Information Displays the IPv6 address information. Auto: Distinguishes the image input level automatically. Full: Set when the image ... brightness is restored. If you turn off automatically, and the unit enters standby mode. This setting provides a convenient way to reduce power consumption. Manual: To specify the IP Address manually. While dimming the light, the message "Light Dimming" appears. Setting items Description Network Setting IPv4 Setting *1 *3 IP Address Setup Auto(DHCP): The...

Operating Instructions
Page 31
...setting (page 24). *11:When "Standby Mode" is dimmed gradually, you may unplug the AC power cord without going into standby mode. If this unit manually after connecting to the network. If "With No Input" is set, it takes priority. *9: As the light is set the IP address in signal may...part becomes too bright and the darker part becomes too dark. *5: Depending on the input image. When using the LAN terminal should be selected. Set manually according to "via HDBaseT, only the 100BASE-TX can also unplug the AC power cord without going into standby mode when you can connect with...
...setting (page 24). *11:When "Standby Mode" is dimmed gradually, you may unplug the AC power cord without going into standby mode. If this unit manually after connecting to the network. If "With No Input" is set, it takes priority. *9: As the light is set the IP address in signal may...part becomes too bright and the darker part becomes too dark. *5: Depending on the input image. When using the LAN terminal should be selected. Set manually according to "via HDBaseT, only the 100BASE-TX can also unplug the AC power cord without going into standby mode when you can connect with...
Operating Instructions
Page 40
... other computers, changing the community name of the factory default is input, the data will be input. Specify an IP address: Set the network manually. -IP Address: Input the IP address of the projector. -Prefix: For IPv6, input the prefix (bit) of the projector. -Subnet Mask... Service: Set Advertisement to the projector. The factory default setting is "53862." -Interval: Input the transmission interval (seconds) of data via Advertisement. Manual -Primary DNS: Input the primary DNS server of the projector. -Secondary DNS: Input the secondary DNS server of the projector. 4 Set the items...
... other computers, changing the community name of the factory default is input, the data will be input. Specify an IP address: Set the network manually. -IP Address: Input the IP address of the projector. -Prefix: For IPv6, input the prefix (bit) of the projector. -Subnet Mask... Service: Set Advertisement to the projector. The factory default setting is "53862." -Interval: Input the transmission interval (seconds) of data via Advertisement. Manual -Primary DNS: Input the primary DNS server of the projector. -Secondary DNS: Input the secondary DNS server of the projector. 4 Set the items...
Operating Instructions
Page 44
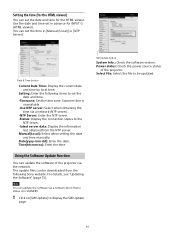
... to set in advance for INPUT G (HTML viewer). For details, see "Updating the Software" (page 51). Manual(Local): Select when setting the date and time manually. Using the Software Update Function You can update the software of the projector. Setting: Enter the following items to the... NTP server. -latest server data: Display the information last obtained from the following Sony website. Time(hh:mm:ss): ...
... to set in advance for INPUT G (HTML viewer). For details, see "Updating the Software" (page 51). Manual(Local): Select when setting the date and time manually. Using the Software Update Function You can update the software of the projector. Setting: Enter the following items to the... NTP server. -latest server data: Display the information last obtained from the following Sony website. Time(hh:mm:ss): ...
Operating Instructions
Page 48
... "Color Calibration" (page 28). The on-screen display does not appear when "Status" in the screen may not be displayed correctly with qualified Sony personnel. Edges of the image may have been performed. Warping is set . When the "Control Key Lock" is correctly selected (page 16). ...are output. To restore the color or the factory default settings, select "Return" or "Reset" in the screen occurs. If you set "Aspect" manually (page 26, 27). Check if an image is connected to "On," you can correct the trapezoidal distortion, using the / key on ...
... "Color Calibration" (page 28). The on-screen display does not appear when "Status" in the screen may not be displayed correctly with qualified Sony personnel. Edges of the image may have been performed. Warping is set . When the "Control Key Lock" is correctly selected (page 16). ...are output. To restore the color or the factory default settings, select "Return" or "Reset" in the screen occurs. If you set "Aspect" manually (page 26, 27). Check if an image is connected to "On," you can correct the trapezoidal distortion, using the / key on ...
Operating Instructions
Page 53
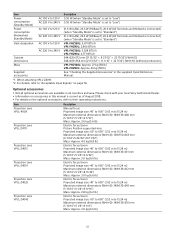
Please check with your local Sony Authorized Dealer. Information on accessories in this manual is set to "Standard") VPL-FHZ120L: 3,671 BTU/h VPL-FHZ90L: 2,866 BTU/h VPL-FHZ120L: 3,524 BTU/h VPL-FHZ90L: 2,777 BTU/h 544×225×572 mm (21 13/32" × 8 27/32" ×...8 1/16" × 22 7/32") (W/H/D) (without protrusions) Mass Supplied accessories VPL-FHZ120L: Approx. 27 kg (58 lb) VPL-FHZ90L: Approx. 26 kg (58 lb) See "Checking the Supplied Accessories" in the supplied Quick Reference Manual. *1: When attaching VPLL-Z4019. *2: For details, refer to "Acceptable Input Signals...
Please check with your local Sony Authorized Dealer. Information on accessories in this manual is set to "Standard") VPL-FHZ120L: 3,671 BTU/h VPL-FHZ90L: 2,866 BTU/h VPL-FHZ120L: 3,524 BTU/h VPL-FHZ90L: 2,777 BTU/h 544×225×572 mm (21 13/32" × 8 27/32" ×...8 1/16" × 22 7/32") (W/H/D) (without protrusions) Mass Supplied accessories VPL-FHZ120L: Approx. 27 kg (58 lb) VPL-FHZ90L: Approx. 26 kg (58 lb) See "Checking the Supplied Accessories" in the supplied Quick Reference Manual. *1: When attaching VPLL-Z4019. *2: For details, refer to "Acceptable Input Signals...

Operating Instructions
Page 62
.... The terms HDMI and HDMI High-Definition Multimedia Interface, and the HDMI Logo are trademarks or registered trademarks of their respective holders. In this manual, ™ and ® marks are not specified.
.... The terms HDMI and HDMI High-Definition Multimedia Interface, and the HDMI Logo are trademarks or registered trademarks of their respective holders. In this manual, ™ and ® marks are not specified.

