
Users Guide
Page 3
Table of Contents Overview 4 Features 4 System Requirements 4 Installing and Uninstalling the Software 4 Configuring Settings 5 Window Construction 7 Main Window 7 [Layout] Tab 8 [Transmission] Tab 8 [Positioning] Tab 9 [Blending] Tab 10 [Specify Correction Zones] Dialog Box 11 [Options] Tab 12 Troubleshooting 13 3
Table of Contents Overview 4 Features 4 System Requirements 4 Installing and Uninstalling the Software 4 Configuring Settings 5 Window Construction 7 Main Window 7 [Layout] Tab 8 [Transmission] Tab 8 [Positioning] Tab 9 [Blending] Tab 10 [Specify Correction Zones] Dialog Box 11 [Options] Tab 12 Troubleshooting 13 3

Users Guide
Page 4
... XP 1 Click the [Start] button. Install the new version of the software after uninstalling the previous version. Follow the instructions in the installer screen. Overview Features When using this software in addition to adjusting the projectors physically, you can only perform installation if you agree to the terms. When updating to...
... XP 1 Click the [Start] button. Install the new version of the software after uninstalling the previous version. Follow the instructions in the installer screen. Overview Features When using this software in addition to adjusting the projectors physically, you can only perform installation if you agree to the terms. When updating to...

Users Guide
Page 5
...the blend area with the [Blending Area Gamma] setting in the [Positioning] tab. To start the software, click [Start] > [All Programs] > [Sony Corporation] > [Projector Station for Blending] > [PS for Blending]. 8 Specify the gamma to the projection positions in the [Blending] tab. Uninstallation starts... 4 Specify the number of the input signals. The [Start] menu appears. 2 Click [Control Panel] in the desktop screen. 2 Click [Programs and Features]. Select the gamma mode in the [Blending] tab. For Windows 8 1 Right-click [Start] in the [Start] menu. The [Add/Remove Programs...
...the blend area with the [Blending Area Gamma] setting in the [Positioning] tab. To start the software, click [Start] > [All Programs] > [Sony Corporation] > [Projector Station for Blending] > [PS for Blending]. 8 Specify the gamma to the projection positions in the [Blending] tab. Uninstallation starts... 4 Specify the number of the input signals. The [Start] menu appears. 2 Click [Control Panel] in the desktop screen. 2 Click [Programs and Features]. Select the gamma mode in the [Blending] tab. For Windows 8 1 Right-click [Start] in the [Start] menu. The [Add/Remove Programs...

Operating Instructions
Page 2
... 22 The Function Menu 26 The Operation Menu 27 The Connection/Power Menu .......... 28 The Installation Menu 29 The Information Menu 32 Network Using Network Features 33 Displaying the Control Window of the Projector with a Web Browser 33 Confirming the Information regarding the Projector 34 Operating the Projector from a Computer 35...
... 22 The Function Menu 26 The Operation Menu 27 The Connection/Power Menu .......... 28 The Installation Menu 29 The Information Menu 32 Network Using Network Features 33 Displaying the Control Window of the Projector with a Web Browser 33 Confirming the Information regarding the Projector 34 Operating the Projector from a Computer 35...

Operating Instructions
Page 13
... Keystone adjustment is low, you can adjust using the front feet (adjustable). To correct any trapezoidal distortion of the projected image, use the Keystone correction feature (pages 14, 29). Notes • Be careful not to restore the previous image.
... Keystone adjustment is low, you can adjust using the front feet (adjustable). To correct any trapezoidal distortion of the projected image, use the Keystone correction feature (pages 14, 29). Notes • Be careful not to restore the previous image.

Operating Instructions
Page 14
... the value using V/v/B/b. Decrease setting Increase the setting Notes • Since the Keystone feature is trapezoidally-distorted in the lateral plane (VPL-FH36/ FH31 only) 1 Press the KEYSTONE key on the position adjusted with the lens shift feature, using the Keystone feature may occur. • Depending on the Remote Commander twice, or select "H Keystone" in...
... the value using V/v/B/b. Decrease setting Increase the setting Notes • Since the Keystone feature is trapezoidally-distorted in the lateral plane (VPL-FH36/ FH31 only) 1 Press the KEYSTONE key on the position adjusted with the lens shift feature, using the Keystone feature may occur. • Depending on the Remote Commander twice, or select "H Keystone" in...

Operating Instructions
Page 15
... select the corner you want to be corrected 1 Move s using V/v/B/b. Projecting/Adjusting an Image Correcting image twist (Warp correction feature) (VPL-FH36/ FH31 only) You can correct image twist with the warp correction feature. 1 Press the KEYSTONE key on the Remote Commander three times, or select "Warping" in all directions Leftward, rightward or downward...
... select the corner you want to be corrected 1 Move s using V/v/B/b. Projecting/Adjusting an Image Correcting image twist (Warp correction feature) (VPL-FH36/ FH31 only) You can correct image twist with the warp correction feature. 1 Press the KEYSTONE key on the Remote Commander three times, or select "Warping" in all directions Leftward, rightward or downward...

Operating Instructions
Page 29
Adjustments and Settings Using a Menu The Installation Menu The Installation menu is used for VPL-FH35/FH30 only *3: Depending on the position adjusted with the lens shift feature, the aspect ratio of the image may change from the original or projected image may be distorted with V/v/B/b buttons. V Keystone*3 *4 The higher the setting, narrower...
Adjustments and Settings Using a Menu The Installation Menu The Installation menu is used for VPL-FH35/FH30 only *3: Depending on the position adjusted with the lens shift feature, the aspect ratio of the image may change from the original or projected image may be distorted with V/v/B/b buttons. V Keystone*3 *4 The higher the setting, narrower...

Operating Instructions
Page 31
Setting items Panel Alignment*7 Color Matching*8 Description This feature allows you adjust "Brightness" and "Color." Adjust: The shift adjustment and zone adjustment of characters or the picture. Reset: The panel alignment settings are initialized ... assigned and adjusted. Shift: Shifts the whole picture and makes adjustments. When set to make adjustments based on the position adjusted with the lens shift feature, the aspect ratio of the image may change from below. Adjust Color: Assigns the desired color to make adjustments from the original or projected image...
Setting items Panel Alignment*7 Color Matching*8 Description This feature allows you adjust "Brightness" and "Color." Adjust: The shift adjustment and zone adjustment of characters or the picture. Reset: The panel alignment settings are initialized ... assigned and adjusted. Shift: Shifts the whole picture and makes adjustments. When set to make adjustments based on the position adjusted with the lens shift feature, the aspect ratio of the image may change from below. Adjust Color: Assigns the desired color to make adjustments from the original or projected image...

Operating Instructions
Page 33
... 6/7/8/9. • The menu displays only English. • If the browser of the factory preset values (page 34). B Network Using Network Features Connection to the network allows you have access to the projector from your computer. LAN cable (straight type) (not supplied) LAN terminal then... press the Enter key on your computer, click the check mark to operate the following window appears in the address field, Using Network Features 33 The network must be different depending on the Connection/Power menu (page 28). Notes • When connecting this projector connected with...
... 6/7/8/9. • The menu displays only English. • If the browser of the factory preset values (page 34). B Network Using Network Features Connection to the network allows you have access to the projector from your computer. LAN cable (straight type) (not supplied) LAN terminal then... press the Enter key on your computer, click the check mark to operate the following window appears in the address field, Using Network Features 33 The network must be different depending on the Connection/Power menu (page 28). Notes • When connecting this projector connected with...

Operating Instructions
Page 34
... your password, consult with qualified Sony personnel. When you access the Setup page for the first time, enter "root" for user name and enter nothing for [User] When you change the password, input a new password after deleting the password (*****) that was set. Information area 34 Using Network Features Administrator: Allowed access to...
... your password, consult with qualified Sony personnel. When you access the Setup page for the first time, enter "root" for user name and enter nothing for [User] When you change the password, input a new password after deleting the password (*****) that was set. Information area 34 Using Network Features Administrator: Allowed access to...

Operating Instructions
Page 35
... function on the Control page. Requires the use of the keys shown in the email report. Maintenance Reminder: Set the timing for POP Using Network Features 35 Required Authentication: Check this check box to be applied unless you click on [Apply]. 1 Click on [Apply]. Operating the Projector from a Computer You can...
... function on the Control page. Requires the use of the keys shown in the email report. Maintenance Reminder: Set the timing for POP Using Network Features 35 Required Authentication: Check this check box to be applied unless you click on [Apply]. 1 Click on [Apply]. Operating the Projector from a Computer You can...

Operating Instructions
Page 36
... to be connected to the SMTP server. • You cannot use the following characters to enter the characters in the text box 36 Using Network Features Check on the Send test mail check box then click on [View] is used for SMTP authentication to be performed before sending e-mail. Password: Enter...
... to be connected to the SMTP server. • You cannot use the following characters to enter the characters in the text box 36 Using Network Features Check on the Send test mail check box then click on [View] is used for SMTP authentication to be performed before sending e-mail. Password: Enter...
Operating Instructions
Page 39
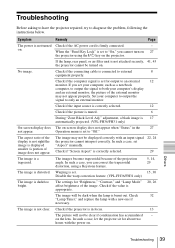
... a case, you can correct the trapezoidal distortion, using the ?/1 key on the projector. Warping is set. 15, 30 Disable the warp correction feature. (VPL-FH36/FH31 only) The image is set for output to "Off." Operation menu is dark/too bright. In such a case, let the projector sit ...set "Aspect" manually. In such a case, set to diagnose the problem, following the instructions below. The image is 17 automatically projected. (VPL-FH36/FH31 only) On-screen display does The on-screen display does not appear when "Status" in focus. 13 The picture will be turned on....
... a case, you can correct the trapezoidal distortion, using the ?/1 key on the projector. Warping is set. 15, 30 Disable the warp correction feature. (VPL-FH36/FH31 only) The image is set for output to "Off." Operation menu is dark/too bright. In such a case, let the projector sit ...set "Aspect" manually. In such a case, set to diagnose the problem, following the instructions below. The image is 17 automatically projected. (VPL-FH36/FH31 only) On-screen display does The on-screen display does not appear when "Status" in focus. 13 The picture will be turned on....

Startup Guide
Page 33
... can adjust using the front feet (adjustable). Projecting an Image 13 GB To correct any trapezoidal distortion of the projected image, use the Keystone correction feature. Notes • Be careful not to restore the previous image. Press the PATTERN key again to let the projector down on your fingers. • Do...
... can adjust using the front feet (adjustable). Projecting an Image 13 GB To correct any trapezoidal distortion of the projected image, use the Keystone correction feature. Notes • Be careful not to restore the previous image. Press the PATTERN key again to let the projector down on your fingers. • Do...
