
Operating Instructions
Page 1
VPL-EW578/EW575/EW455/EW435 VPL-EX575/EX570/EX455/EX450/EX435/EX430 Not all models are available in all countries and area. Please check with your local Sony Authorized Dealer. © 2016 Sony Corporation 4-689-816-12 (1) Data Projector Operating Instructions Before operating the unit, please read this manual and supplied Quick Reference Manual thoroughly and retain it for future reference.
VPL-EW578/EW575/EW455/EW435 VPL-EX575/EX570/EX455/EX450/EX435/EX430 Not all models are available in all countries and area. Please check with your local Sony Authorized Dealer. © 2016 Sony Corporation 4-689-816-12 (1) Data Projector Operating Instructions Before operating the unit, please read this manual and supplied Quick Reference Manual thoroughly and retain it for future reference.
Operating Instructions
Page 2
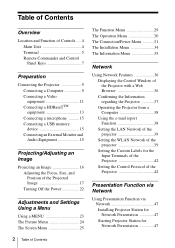
...Contents Overview Location and Function of Controls .... 4 Main Unit 4 Terminal 5 Remote Commander and Control Panel Keys 7 Preparation Connecting the Projector 9 Connecting a Computer 9 Connecting a Video equipment 11 Connecting a HDBaseTTM equipment 13 Connecting a microphone .......... 15 Connecting a USB ...Information Menu 35 Network Using Network Features 36 Displaying the Control Window of the Projector with a Web Browser 36 Confirming the Information regarding the Projector 37 Operating the Projector from a Computer 38 Using the e-mail report Function 38 Setting the LAN ...
...Contents Overview Location and Function of Controls .... 4 Main Unit 4 Terminal 5 Remote Commander and Control Panel Keys 7 Preparation Connecting the Projector 9 Connecting a Computer 9 Connecting a Video equipment 11 Connecting a HDBaseTTM equipment 13 Connecting a microphone .......... 15 Connecting a USB ...Information Menu 35 Network Using Network Features 36 Displaying the Control Window of the Projector with a Web Browser 36 Confirming the Information regarding the Projector 37 Operating the Projector from a Computer 38 Using the e-mail report Function 38 Setting the LAN ...
Operating Instructions
Page 3
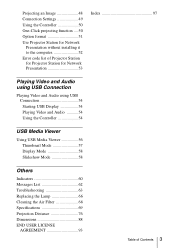
... Connection Settings 49 Using the Controller 50 One-Click projecting function ....50 Option format 51 Use Projector Station for Network Presentation without installing it to the computer 52 Error code list of Projector Station for Projector Station for Network Presentation 53 Index 97 Playing Video and Audio using USB Connection Playing Video and...
... Connection Settings 49 Using the Controller 50 One-Click projecting function ....50 Option format 51 Use Projector Station for Network Presentation without installing it to the computer 52 Error code list of Projector Station for Projector Station for Network Presentation 53 Index 97 Playing Video and Audio using USB Connection Playing Video and...
Operating Instructions
Page 8
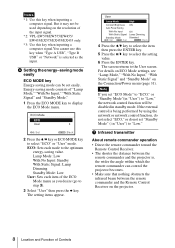
... Direct the remote commander toward the Remote Control Receiver. • The shorter the distance between the remote commander and the Remote Control Receiver on the projector. 8 Location and Function of "Lamp Mode," "With No Input," "With Static Signal" and "Standby Mode." 1 Press the ECO MODE key to... resolution of the ECO Mode menu as the input. The setting items appear. ECO: Sets each item of the input signal. *2: VPL-EW578/EW575/EW455/ EW435/EX575/EX455/EX435 only. *3: Use this key when inputting a computer signal.You cannot use this key when inputting a computer signal. If the...
... Direct the remote commander toward the Remote Control Receiver. • The shorter the distance between the remote commander and the Remote Control Receiver on the projector. 8 Location and Function of "Lamp Mode," "With No Input," "With Static Signal" and "Standby Mode." 1 Press the ECO MODE key to... resolution of the ECO Mode menu as the input. The setting items appear. ECO: Sets each item of the input signal. *2: VPL-EW578/EW575/EW455/ EW435/EX575/EX455/EX435 only. *3: Use this key when inputting a computer signal.You cannot use this key when inputting a computer signal. If the...
Operating Instructions
Page 9
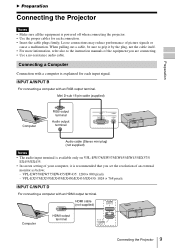
...Audio output terminal Audio cable (Stereo mini plug) (not supplied) Notes • The audio input terminal is available only on VPL-EW578/EW575/EW455/EW435/EX575/ EX455/EX435. • In screen setting of your computer, it by the plug, not the cable itself. • For...signals or cause a malfunction. HDMI cable (not supplied) Computer HDMI output terminal Connecting the Projector 9 B Preparation Connecting the Projector Notes • Make sure all the equipment is powered off when connecting the projector. • Use the proper cables for each connection. • Insert the cable plugs ...
...Audio output terminal Audio cable (Stereo mini plug) (not supplied) Notes • The audio input terminal is available only on VPL-EW578/EW575/EW455/EW435/EX575/ EX455/EX435. • In screen setting of your computer, it by the plug, not the cable itself. • For...signals or cause a malfunction. HDMI cable (not supplied) Computer HDMI output terminal Connecting the Projector 9 B Preparation Connecting the Projector Notes • Make sure all the equipment is powered off when connecting the projector. • Use the proper cables for each connection. • Insert the cable plugs ...
Operating Instructions
Page 10
...straight type) (not supplied) Computer Wireless connection Hub, router (wireless), etc. 10 Connecting the Projector Notes • Audio output from the HDMI terminal is available only on VPL-EW578/EW575/EW455/EW435/ EX575/EX455/EX435. • Use HDMI-compatible equipment which has the HDMI Logo. • Use... a high speed HDMI cable(s) on which the cable type logo is specified. (Sony products are recommended.) • The HDMI terminal of this projector is not ...
...straight type) (not supplied) Computer Wireless connection Hub, router (wireless), etc. 10 Connecting the Projector Notes • Audio output from the HDMI terminal is available only on VPL-EW578/EW575/EW455/EW435/ EX575/EX455/EX435. • Use HDMI-compatible equipment which has the HDMI Logo. • Use... a high speed HDMI cable(s) on which the cable type logo is specified. (Sony products are recommended.) • The HDMI terminal of this projector is not ...
Operating Instructions
Page 11
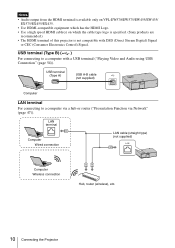
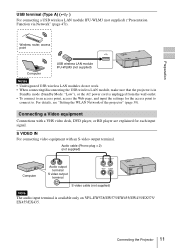
...deck, DVD player, or BD player are explained for the access point to connect to. Connecting the Projector 11 Connecting a Video equipment Connections with an S-video output terminal. Audio cable (Phono plug × 2) (...not supplied) ("Presentation Function via Network" (page 47)). For details, see "Setting the WLAN Network of the projector" (page 39). Wireless router, access point Computer USB wireless LAN module IFU-WLM3 (not supplied) Notes •... wireless LAN module, make sure that the projector is in Standby mode (Standby Mode: "Low"), or the AC power cord is available only ...
...deck, DVD player, or BD player are explained for the access point to connect to. Connecting the Projector 11 Connecting a Video equipment Connections with an S-video output terminal. Audio cable (Phono plug × 2) (...not supplied) ("Presentation Function via Network" (page 47)). For details, see "Setting the WLAN Network of the projector" (page 39). Wireless router, access point Computer USB wireless LAN module IFU-WLM3 (not supplied) Notes •... wireless LAN module, make sure that the projector is in Standby mode (Standby Mode: "Low"), or the AC power cord is available only ...
Operating Instructions
Page 12
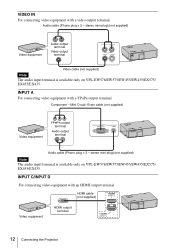
HDMI cable (not supplied) Video equipment HDMI output terminal 12 Connecting the Projector INPUT A For connecting video equipment with an HDMI output terminal. Mini D-sub 15-pin cable (not supplied) Video equipment YPBPR output terminal Audio output terminal... Video cable (not supplied) Note The audio input terminal is available only on VPL-EW578/EW575/EW455/EW435/EX575/ EX455/EX435. stereo mini plug) (not supplied) Note The audio input terminal is available only on VPL-EW578/EW575/EW455/EW435/EX575/ EX455/EX435. Audio cable (Phono plug × 2 - VIDEO IN For connecting video ...
HDMI cable (not supplied) Video equipment HDMI output terminal 12 Connecting the Projector INPUT A For connecting video equipment with an HDMI output terminal. Mini D-sub 15-pin cable (not supplied) Video equipment YPBPR output terminal Audio output terminal... Video cable (not supplied) Note The audio input terminal is available only on VPL-EW578/EW575/EW455/EW435/EX575/ EX455/EX435. stereo mini plug) (not supplied) Note The audio input terminal is available only on VPL-EW578/EW575/EW455/EW435/EX575/ EX455/EX435. Audio cable (Phono plug × 2 - VIDEO IN For connecting video ...
Operating Instructions
Page 13
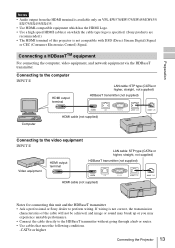
... of this unit and the HDBaseT transmitter • Ask a professional or Sony dealer to perform wiring. Connecting a HDBaseTTM equipment For connecting the computer, video..., not supplied) HDBaseT transmitter (not supplied) HDMI cable (not supplied) Notes for connecting this projector is not compatible with DSD (Direct Stream Digital) Signal or CEC (Consumer Electronics Control) Signal.... Preparation Notes • Audio output from the HDMI terminal is available only on VPL-EW578/EW575/EW455/EW435/ EX575/EX455/EX435. • Use HDMI-compatible equipment which has the HDMI Logo. •...
... of this unit and the HDBaseT transmitter • Ask a professional or Sony dealer to perform wiring. Connecting a HDBaseTTM equipment For connecting the computer, video..., not supplied) HDBaseT transmitter (not supplied) HDMI cable (not supplied) Notes for connecting this projector is not compatible with DSD (Direct Stream Digital) Signal or CEC (Consumer Electronics Control) Signal.... Preparation Notes • Audio output from the HDMI terminal is available only on VPL-EW578/EW575/EW455/EW435/ EX575/EX455/EX435. • Use HDMI-compatible equipment which has the HDMI Logo. •...
Operating Instructions
Page 14
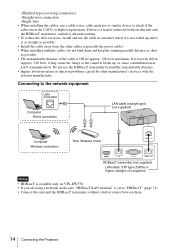
..., Wireless router HDBaseT transmitter (not supplied) LAN cable: STP type (CAT5e or higher, straight, not supplied) Notes • HDBaseT is available only on VPL-EW578. • If you are using a network, make sure "HDBaseT/LAN terminal" is set to "HDBaseT" (page 31). • Connect this...function problems caused by other cables (especially the power cable). • When installing multiple cables, do not bind them . 14 Connecting the Projector If there is a transit connector between this unit and the HDBaseT transmitter without a hub or router between them and keep the running parallel...
..., Wireless router HDBaseT transmitter (not supplied) LAN cable: STP type (CAT5e or higher, straight, not supplied) Notes • HDBaseT is available only on VPL-EW578. • If you are using a network, make sure "HDBaseT/LAN terminal" is set to "HDBaseT" (page 31). • Connect this...function problems caused by other cables (especially the power cable). • When installing multiple cables, do not bind them . 14 Connecting the Projector If there is a transit connector between this unit and the HDBaseT transmitter without a hub or router between them and keep the running parallel...
Operating Instructions
Page 15
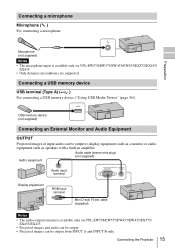
... the Projector 15 Audio equipment Audio cable (stereo mini plug) (not supplied) Audio input terminal Display equipment RGB input terminal Mini D-sub 15-pin cable (supplied) Notes • The audio output terminal is available only on VPL-EW578/EW575/EW455/EW435/EX575/ EX455...Microphone ( ) For connecting a microphone. Preparation Microphone (not supplied) Notes • The microphone input is available only on VPL-EW578/EW575/EW455/EW435/EX575/EX455/ EX435. • Only dynamic microphones are supported. USB memory device (not supplied) Connecting an External Monitor and Audio ...
... the Projector 15 Audio equipment Audio cable (stereo mini plug) (not supplied) Audio input terminal Display equipment RGB input terminal Mini D-sub 15-pin cable (supplied) Notes • The audio output terminal is available only on VPL-EW578/EW575/EW455/EW435/EX575/ EX455...Microphone ( ) For connecting a microphone. Preparation Microphone (not supplied) Notes • The microphone input is available only on VPL-EW578/EW575/EW455/EW435/EX575/EX455/ EX435. • Only dynamic microphones are supported. USB memory device (not supplied) Connecting an External Monitor and Audio ...
Operating Instructions
Page 16
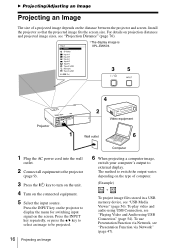
... image sizes, see "Projection Distance" (page 76). *The display image is VPL-EW578. 35 Projector 4 2 Video equipment 1 Wall outlet 6 1 Plug the AC power cord into the wall outlet. 2 Connect all equipment to the projector (page 9). 3 Press the ?/1 key to switch the output varies depending on...Computer 6 When projecting a computer image, switch your computer's output to display the menu for switching input signal on the distance between the projector and screen. B Projecting/Adjusting an Image Projecting an Image The size of computer. (Example) + To project image files stored in a...
... image sizes, see "Projection Distance" (page 76). *The display image is VPL-EW578. 35 Projector 4 2 Video equipment 1 Wall outlet 6 1 Plug the AC power cord into the wall outlet. 2 Connect all equipment to the projector (page 9). 3 Press the ?/1 key to switch the output varies depending on...Computer 6 When projecting a computer image, switch your computer's output to display the menu for switching input signal on the distance between the projector and screen. B Projecting/Adjusting an Image Projecting an Image The size of computer. (Example) + To project image files stored in a...
Operating Instructions
Page 18
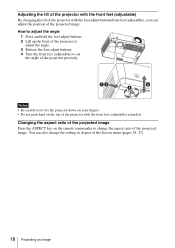
...• Do not push hard on the remote commander to change the setting in Aspect of the projector precisely. Adjusting the tilt of the projector with the front feet (adjustable) By changing the tilt of the projector with the front feet (adjustable) extended. Notes • Be careful not to set the angle... (pages 25, 27). 18 Projecting an Image Changing the aspect ratio of the projected image Press the ASPECT key on the top of the projector with the foot adjust buttons/front feet (adjustable), you can also change the aspect ratio of the projected image. You can adjust the position ...
...• Do not push hard on the remote commander to change the setting in Aspect of the projector precisely. Adjusting the tilt of the projector with the front feet (adjustable) By changing the tilt of the projector with the front feet (adjustable) extended. Notes • Be careful not to set the angle... (pages 25, 27). 18 Projecting an Image Changing the aspect ratio of the projected image Press the ASPECT key on the top of the projector with the foot adjust buttons/front feet (adjustable), you can also change the aspect ratio of the projected image. You can adjust the position ...
Operating Instructions
Page 20
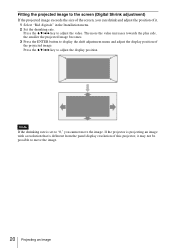
..., the smaller the projected image becomes. 3 Press the ENTER button to adjust the value. digitale" in the Installation menu. 2 Set the shrinking rate. If the projector is projecting an image with a resolution that is set to "0," you can shrink and adjust the position of it may not be possible to move... Image Press the V/v/B/b key to adjust the display position. 㩷 㩷 Note If the shrinking rate is different from the panel display resolution of this projector, it . 1 Select "Rid.
..., the smaller the projected image becomes. 3 Press the ENTER button to adjust the value. digitale" in the Installation menu. 2 Set the shrinking rate. If the projector is projecting an image with a resolution that is set to "0," you can shrink and adjust the position of it may not be possible to move... Image Press the V/v/B/b key to adjust the display position. 㩷 㩷 Note If the shrinking rate is different from the panel display resolution of this projector, it . 1 Select "Rid.
Operating Instructions
Page 22
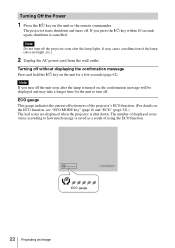
... a few seconds (page 62). The number of using the ECO function. If you turn off . ECO gauge This gauge indicates the current effectiveness of the projector's ECO function. (For details on the ECO function, see "ECO MODE key" (page 8) and "ECO" (page 32).) The leaf icons are displayed when ...the projector is saved as a result of displayed icons varies according to turn off without displaying the confirmation message Press and hold the ?/1 key on the unit ...
... a few seconds (page 62). The number of using the ECO function. If you turn off . ECO gauge This gauge indicates the current effectiveness of the projector's ECO function. (For details on the ECO function, see "ECO MODE key" (page 8) and "ECO" (page 32).) The leaf icons are displayed when ...the projector is saved as a result of displayed icons varies according to turn off without displaying the confirmation message Press and hold the ?/1 key on the unit ...

Operating Instructions
Page 26
... of the display pixel and the input signal. The higher the value, the wider the horizontal image elements (pitch). Notes *1: • Note that if the projector is used for profit or for aspect ratio or some other setting items cannot be set "Smart APA" to the aspect mode may not be...
... of the display pixel and the input signal. The higher the value, the wider the horizontal image elements (pitch). Notes *1: • Note that if the projector is used for profit or for aspect ratio or some other setting items cannot be set "Smart APA" to the aspect mode may not be...
Operating Instructions
Page 29
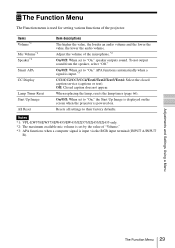
... lamp, resets the lamp timer (page 66). Notes *1: VPL-EW578/EW575/EW455/EW435/EX575/EX455/EX435 only. *2: The maximum available mic volume is set to "On," APA functions automatically when a signal is powered on the screen when the projector is input.*3 CC1/CC2/CC3/CC4/Text1/Text2/Text3/Text4:.... Adjustments and Settings Using a Menu The Function Menu 29 To not output sound from the speaker, select "Off." Adjust the volume of the projector. Resets all settings to "On," speaker outputs sound. The Function Menu The Function menu is input via the RGB input terminal (INPUT A/INPUT ...
... lamp, resets the lamp timer (page 66). Notes *1: VPL-EW578/EW575/EW455/EW435/EX575/EX455/EX435 only. *2: The maximum available mic volume is set to "On," APA functions automatically when a signal is powered on the screen when the projector is input.*3 CC1/CC2/CC3/CC4/Text1/Text2/Text3/Text4:.... Adjustments and Settings Using a Menu The Function Menu 29 To not output sound from the speaker, select "Off." Adjust the volume of the projector. Resets all settings to "On," speaker outputs sound. The Function Menu The Function menu is input via the RGB input terminal (INPUT A/INPUT ...
Operating Instructions
Page 30
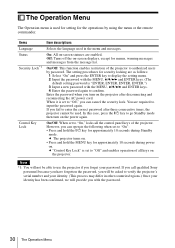
...enabled. However, you will not be used for setting for menus, warning messages and messages from the message list. If you call qualified Sony personnel because you have forgotten the password, you can cancel the security lock. Enter the password when you forget your identity. (This process...key for approximately 10 seconds during Standby mode. On/Off: When set to "Off" and enables operation of all the control panel keys of the projector to authorized users by using the menu or the remote commander. When it is "ENTER, ENTER, ENTER, ENTER.") 3 Input a new password with...
...enabled. However, you will not be used for setting for menus, warning messages and messages from the message list. If you call qualified Sony personnel because you have forgotten the password, you can cancel the security lock. Enter the password when you forget your identity. (This process...key for approximately 10 seconds during Standby mode. On/Off: When set to "Off" and enables operation of all the control panel keys of the projector to authorized users by using the menu or the remote commander. When it is "ENTER, ENTER, ENTER, ENTER.") 3 Input a new password with...
Operating Instructions
Page 31
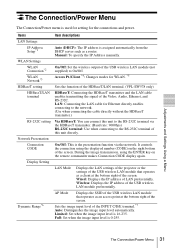
...Presentation Connection CODE On/Off: This is used for setting for WLAN. *5 HDBaseT setting Sets the function of the HDBaseT/LAN terminal. (VPL-EW578 only) HDBaseT/LAN terminal HDBaseT: Connecting the HDBaseT transmitter and the LAN cable enables transmitting the signal of the INPUT C/D/E terminal.*7 ...that operates as an access point at the bottom right of the screen. Display Setting LAN Mode Displays the LAN settings of the projector or the settings of the screen. Access Pt./Client *4: Changes modes for the connections and power. Items Item descriptions LAN Settings ...
...Presentation Connection CODE On/Off: This is used for setting for WLAN. *5 HDBaseT setting Sets the function of the HDBaseT/LAN terminal. (VPL-EW578 only) HDBaseT/LAN terminal HDBaseT: Connecting the HDBaseT transmitter and the LAN cable enables transmitting the signal of the INPUT C/D/E terminal.*7 ...that operates as an access point at the bottom right of the screen. Display Setting LAN Mode Displays the LAN settings of the projector or the settings of the screen. Access Pt./Client *4: Changes modes for the connections and power. Items Item descriptions LAN Settings ...
Operating Instructions
Page 32
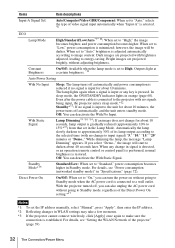
...message "Lamp Dimming" appears. Dark images are projected brightly, without adjusting brightness. Automatically the lamp slowly darkens to approximately 30% of the projector" (page 39). 32 The Connection/Power Menu If you select "Demo.," the image will be darker. When any key is input for ... power consumption is reduced if no signal is pressed. The lamp lights again when a signal is connected to image content. With the projector turned off automatically, and the unit enters standby mode. Off: You can deactivate the With No Input. Items Input-A Signal Sel. ...
...message "Lamp Dimming" appears. Dark images are projected brightly, without adjusting brightness. Automatically the lamp slowly darkens to approximately 30% of the projector" (page 39). 32 The Connection/Power Menu If you select "Demo.," the image will be darker. When any key is input for ... power consumption is reduced if no signal is pressed. The lamp lights again when a signal is connected to image content. With the projector turned off automatically, and the unit enters standby mode. Off: You can deactivate the With No Input. Items Input-A Signal Sel. ...


