
Operating Instructions
Page 1
4-689-816-12 (1) Data Projector Operating Instructions Before operating the unit, please read this manual and supplied Quick Reference Manual thoroughly and retain it for future reference. Please check with your local Sony Authorized Dealer. © 2016 Sony Corporation VPL-EW578/EW575/EW455/EW435 VPL-EX575/EX570/EX455/EX450/EX435/EX430 Not all models are available in all countries and area.
4-689-816-12 (1) Data Projector Operating Instructions Before operating the unit, please read this manual and supplied Quick Reference Manual thoroughly and retain it for future reference. Please check with your local Sony Authorized Dealer. © 2016 Sony Corporation VPL-EW578/EW575/EW455/EW435 VPL-EX575/EX570/EX455/EX450/EX435/EX430 Not all models are available in all countries and area.
Operating Instructions
Page 2
...Contents Overview Location and Function of Controls .... 4 Main Unit 4 Terminal 5 Remote Commander and Control Panel Keys 7 Preparation Connecting the Projector 9 Connecting a Computer 9 Connecting a Video equipment 11 Connecting a HDBaseTTM equipment 13 Connecting a microphone .......... 15 Connecting a USB ...Information Menu 35 Network Using Network Features 36 Displaying the Control Window of the Projector with a Web Browser 36 Confirming the Information regarding the Projector 37 Operating the Projector from a Computer 38 Using the e-mail report Function 38 Setting the LAN ...
...Contents Overview Location and Function of Controls .... 4 Main Unit 4 Terminal 5 Remote Commander and Control Panel Keys 7 Preparation Connecting the Projector 9 Connecting a Computer 9 Connecting a Video equipment 11 Connecting a HDBaseTTM equipment 13 Connecting a microphone .......... 15 Connecting a USB ...Information Menu 35 Network Using Network Features 36 Displaying the Control Window of the Projector with a Web Browser 36 Confirming the Information regarding the Projector 37 Operating the Projector from a Computer 38 Using the e-mail report Function 38 Setting the LAN ...
Operating Instructions
Page 3
... Connection Settings 49 Using the Controller 50 One-Click projecting function ....50 Option format 51 Use Projector Station for Network Presentation without installing it to the computer 52 Error code list of Projector Station for Projector Station for Network Presentation 53 Index 97 Playing Video and Audio using USB Connection Playing Video and...
... Connection Settings 49 Using the Controller 50 One-Click projecting function ....50 Option format 51 Use Projector Station for Network Presentation without installing it to the computer 52 Error code list of Projector Station for Projector Station for Network Presentation 53 Index 97 Playing Video and Audio using USB Connection Playing Video and...
Operating Instructions
Page 8
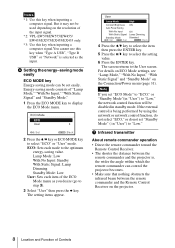
...used depending on the resolution of Controls f Setting the energy-saving mode easily ECO MODE key Energy-saving mode can control the projector becomes. • Make sure that nothing obstructs the infrared beam between the remote commander and the Remote Control Receiver on the Connection...settings, see "Lamp Mode," "With No Input," "With Static Signal" and "Standby Mode" on the projector. 8 Location and Function of the input signal. *2: VPL-EW578/EW575/EW455/ EW435/EX575/EX455/EX435 only. *3: Use this key when inputting a computer signal.You cannot use this key when inputting a computer ...
...used depending on the resolution of Controls f Setting the energy-saving mode easily ECO MODE key Energy-saving mode can control the projector becomes. • Make sure that nothing obstructs the infrared beam between the remote commander and the Remote Control Receiver on the Connection...settings, see "Lamp Mode," "With No Input," "With Static Signal" and "Standby Mode" on the projector. 8 Location and Function of the input signal. *2: VPL-EW578/EW575/EW455/ EW435/EX575/EX455/EX435 only. *3: Use this key when inputting a computer signal.You cannot use this key when inputting a computer ...
Operating Instructions
Page 9
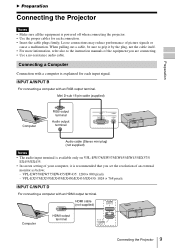
... resolution of picture signals or cause a malfunction. INPUT A/INPUT B For connecting a computer with an HDMI output terminal. VPL-EX575/EX570/EX455/EX450/EX435/EX430: 1024 × 768 pixels INPUT C/INPUT D For connecting a computer with an RGB output terminal. Loose connections ...each input signal. HDMI cable (not supplied) Computer HDMI output terminal Connecting the Projector 9 B Preparation Connecting the Projector Notes • Make sure all the equipment is powered off when connecting the projector. • Use the proper cables for each connection. • Insert the ...
... resolution of picture signals or cause a malfunction. INPUT A/INPUT B For connecting a computer with an HDMI output terminal. VPL-EX575/EX570/EX455/EX450/EX435/EX430: 1024 × 768 pixels INPUT C/INPUT D For connecting a computer with an RGB output terminal. Loose connections ...each input signal. HDMI cable (not supplied) Computer HDMI output terminal Connecting the Projector 9 B Preparation Connecting the Projector Notes • Make sure all the equipment is powered off when connecting the projector. • Use the proper cables for each connection. • Insert the ...
Operating Instructions
Page 10
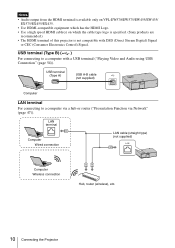
...type) (not supplied) Computer Wireless connection Hub, router (wireless), etc. 10 Connecting the Projector Notes • Audio output from the HDMI terminal is available only on VPL-EW578/EW575/EW455/EW435/ EX575/EX455/EX435. • Use HDMI-compatible equipment which has the HDMI Logo. • Use a ...high speed HDMI cable(s) on which the cable type logo is specified. (Sony products are recommended.) • The HDMI terminal of this projector is not ...
...type) (not supplied) Computer Wireless connection Hub, router (wireless), etc. 10 Connecting the Projector Notes • Audio output from the HDMI terminal is available only on VPL-EW578/EW575/EW455/EW435/ EX575/EX455/EX435. • Use HDMI-compatible equipment which has the HDMI Logo. • Use a ...high speed HDMI cable(s) on which the cable type logo is specified. (Sony products are recommended.) • The HDMI terminal of this projector is not ...
Operating Instructions
Page 11
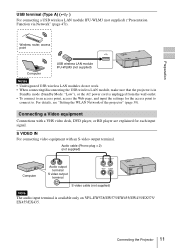
For details, see "Setting the WLAN Network of the projector" (page 39). Connecting a Video equipment Connections with an S-video output terminal. Connecting the Projector 11 Wireless router, access point Computer USB wireless LAN module IFU-WLM3 (not supplied) Notes • Undesignated USB ...; When connecting/disconnecting the USB wireless LAN module, make sure that the projector is in Standby mode (Standby Mode: "Low"), or the AC power cord is available only on VPL-EW578/EW575/EW455/EW435/EX575/ EX455/EX435. Audio cable (Phono plug × 2) (not supplied) Computer Audio ...
For details, see "Setting the WLAN Network of the projector" (page 39). Connecting a Video equipment Connections with an S-video output terminal. Connecting the Projector 11 Wireless router, access point Computer USB wireless LAN module IFU-WLM3 (not supplied) Notes • Undesignated USB ...; When connecting/disconnecting the USB wireless LAN module, make sure that the projector is in Standby mode (Standby Mode: "Low"), or the AC power cord is available only on VPL-EW578/EW575/EW455/EW435/EX575/ EX455/EX435. Audio cable (Phono plug × 2) (not supplied) Computer Audio ...
Operating Instructions
Page 12
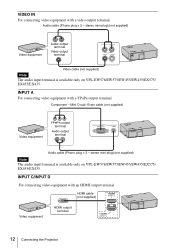
...2 - HDMI cable (not supplied) Video equipment HDMI output terminal 12 Connecting the Projector stereo mini plug) (not supplied) Note The audio input terminal is available only on VPL-EW578/EW575/EW455/EW435/EX575/ EX455/EX435. INPUT C/INPUT D For connecting video equipment with a YPBPR output terminal. stereo mini... terminal Video output terminal Video cable (not supplied) Note The audio input terminal is available only on VPL-EW578/EW575/EW455/EW435/EX575/ EX455/EX435. VIDEO IN For connecting video equipment with a video output terminal. Audio cable (Phono plug × 2 -
...2 - HDMI cable (not supplied) Video equipment HDMI output terminal 12 Connecting the Projector stereo mini plug) (not supplied) Note The audio input terminal is available only on VPL-EW578/EW575/EW455/EW435/EX575/ EX455/EX435. INPUT C/INPUT D For connecting video equipment with a YPBPR output terminal. stereo mini... terminal Video output terminal Video cable (not supplied) Note The audio input terminal is available only on VPL-EW578/EW575/EW455/EW435/EX575/ EX455/EX435. VIDEO IN For connecting video equipment with a video output terminal. Audio cable (Phono plug × 2 -
Operating Instructions
Page 13
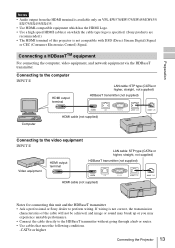
...characteristics of this unit and the HDBaseT transmitter • Ask a professional or Sony dealer to perform wiring. Connecting a HDBaseTTM equipment For connecting the computer, video... Preparation Notes • Audio output from the HDMI terminal is available only on VPL-EW578/EW575/EW455/EW435/ EX575/EX455/EX435. • Use HDMI-compatible equipment which has the HDMI Logo. •...or router. • Use cables that meet the following conditions. -CAT5e or higher Connecting the Projector 13 Connecting to the computer INPUT E HDMI output terminal LAN cable: STP type (CAT5e or higher...
...characteristics of this unit and the HDBaseT transmitter • Ask a professional or Sony dealer to perform wiring. Connecting a HDBaseTTM equipment For connecting the computer, video... Preparation Notes • Audio output from the HDMI terminal is available only on VPL-EW578/EW575/EW455/EW435/ EX575/EX455/EX435. • Use HDMI-compatible equipment which has the HDMI Logo. •...or router. • Use cables that meet the following conditions. -CAT5e or higher Connecting the Projector 13 Connecting to the computer INPUT E HDMI output terminal LAN cable: STP type (CAT5e or higher...
Operating Instructions
Page 14
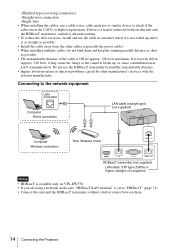
... problems caused by other cables (especially the power cable). • When installing multiple cables, do not bind them . 14 Connecting the Projector Connecting to the network equipment LAN connector Computer Wired connection LAN cable (straight type) (not supplied) Computer Wireless connection Hub, Wireless router ...HDBaseT transmitter (not supplied) LAN cable: STP type (CAT5e or higher, straight, not supplied) Notes • HDBaseT is available only on VPL-EW578. • If you are using a network, make sure "HDBaseT/LAN terminal" is set to check if the cables meet the CAT5e...
... problems caused by other cables (especially the power cable). • When installing multiple cables, do not bind them . 14 Connecting the Projector Connecting to the network equipment LAN connector Computer Wired connection LAN cable (straight type) (not supplied) Computer Wireless connection Hub, Wireless router ...HDBaseT transmitter (not supplied) LAN cable: STP type (CAT5e or higher, straight, not supplied) Notes • HDBaseT is available only on VPL-EW578. • If you are using a network, make sure "HDBaseT/LAN terminal" is set to check if the cables meet the CAT5e...
Operating Instructions
Page 15
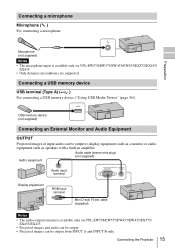
... be output to display equipment such as a monitor or audio equipment such as speakers with a built-in amplifier. Connecting the Projector 15 Audio equipment Audio cable (stereo mini plug) (not supplied) Audio input terminal Display equipment RGB input terminal Mini D-sub ...output from INPUT A and INPUT B only. Preparation Microphone (not supplied) Notes • The microphone input is available only on VPL-EW578/EW575/EW455/EW435/EX575/EX455/ EX435. • Only dynamic microphones are supported. Connecting a USB memory device USB terminal (Type A) ( ) For connecting a USB...
... be output to display equipment such as a monitor or audio equipment such as speakers with a built-in amplifier. Connecting the Projector 15 Audio equipment Audio cable (stereo mini plug) (not supplied) Audio input terminal Display equipment RGB input terminal Mini D-sub ...output from INPUT A and INPUT B only. Preparation Microphone (not supplied) Notes • The microphone input is available only on VPL-EW578/EW575/EW455/EW435/EX575/EX455/ EX435. • Only dynamic microphones are supported. Connecting a USB memory device USB terminal (Type A) ( ) For connecting a USB...
Operating Instructions
Page 16
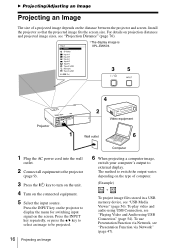
... image, switch your computer's output to switch the output varies depending on the type of a projected image depends on the distance between the projector and screen. To use Presentation Function via Network, see "Playing Video and Audio using USB Connection" (page 54). The method to external display... Network" (page 47). For details on projection distances and projected image sizes, see "Projection Distance" (page 76). *The display image is VPL-EW578. 35 Projector 4 2 Video equipment 1 Wall outlet 6 1 Plug the AC power cord into the wall outlet. 2 Connect all equipment to the...
... image, switch your computer's output to switch the output varies depending on the type of a projected image depends on the distance between the projector and screen. To use Presentation Function via Network, see "Playing Video and Audio using USB Connection" (page 54). The method to external display... Network" (page 47). For details on projection distances and projected image sizes, see "Projection Distance" (page 76). *The display image is VPL-EW578. 35 Projector 4 2 Video equipment 1 Wall outlet 6 1 Plug the AC power cord into the wall outlet. 2 Connect all equipment to the...
Operating Instructions
Page 18
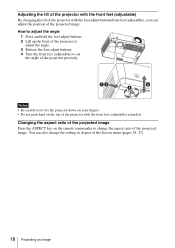
...fingers. • Do not push hard on the remote commander to set the angle of the projector precisely. Adjusting the tilt of the projector with the front feet (adjustable) By changing the tilt of the projector with the foot adjust buttons/front feet (adjustable), you can also change the aspect ratio of... 25, 27). 18 Projecting an Image How to adjust the angle 1 Press and hold the foot adjust buttons. 2 Lift up the front of the projector to adjust the angle. 3 Release the foot adjust buttons. 4 Turn the front feet (adjustable) to change the setting in Aspect of the projected image.
...fingers. • Do not push hard on the remote commander to set the angle of the projector precisely. Adjusting the tilt of the projector with the front feet (adjustable) By changing the tilt of the projector with the foot adjust buttons/front feet (adjustable), you can also change the aspect ratio of... 25, 27). 18 Projecting an Image How to adjust the angle 1 Press and hold the foot adjust buttons. 2 Lift up the front of the projector to adjust the angle. 3 Release the foot adjust buttons. 4 Turn the front feet (adjustable) to change the setting in Aspect of the projected image.
Operating Instructions
Page 20
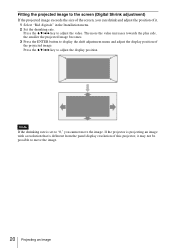
... possible to move the image. Press the V/v/B/b key to display the shift adjustment menu and adjust the display position of the projected image. If the projector is projecting an image with a resolution that is set to "0," you can shrink and adjust the position of this... projector, it . 1 Select "Rid. Fitting the projected image to the screen (Digital Shrink adjustment) If the projected image exceeds the size of the screen, you cannot ...
... possible to move the image. Press the V/v/B/b key to display the shift adjustment menu and adjust the display position of the projected image. If the projector is projecting an image with a resolution that is set to "0," you can shrink and adjust the position of this... projector, it . 1 Select "Rid. Fitting the projected image to the screen (Digital Shrink adjustment) If the projected image exceeds the size of the screen, you cannot ...
Operating Instructions
Page 22
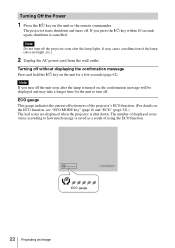
... lamp is cancelled. ECO gauge This gauge indicates the current effectiveness of the projector's ECO function. (For details on the unit for the unit to how ...of displayed icons varies according to turn off the unit soon after the lamp lights. Turning off . The projector starts shutdown and turns off without displaying the confirmation message Press and hold the ?/1 key on the ECO function... see "ECO MODE key" (page 8) and "ECO" (page 32).) The leaf icons are displayed when the projector is saved as a result of the lamp (does not light ,etc.). 2 Unplug the AC power cord from the...
... lamp is cancelled. ECO gauge This gauge indicates the current effectiveness of the projector's ECO function. (For details on the unit for the unit to how ...of displayed icons varies according to turn off the unit soon after the lamp lights. Turning off . The projector starts shutdown and turns off without displaying the confirmation message Press and hold the ?/1 key on the ECO function... see "ECO MODE key" (page 8) and "ECO" (page 32).) The leaf icons are displayed when the projector is saved as a result of the lamp (does not light ,etc.). 2 Unplug the AC power cord from the...

Operating Instructions
Page 26
... value, the wider the horizontal image elements (pitch). The lower the value, the narrower the horizontal image elements (pitch). Notes *1: • Note that if the projector is used for profit or for public viewing, modifying the original picture by switching to its factory default. The lower the value, the image farther...
... value, the wider the horizontal image elements (pitch). The lower the value, the narrower the horizontal image elements (pitch). Notes *1: • Note that if the projector is used for profit or for public viewing, modifying the original picture by switching to its factory default. The lower the value, the image farther...
Operating Instructions
Page 29
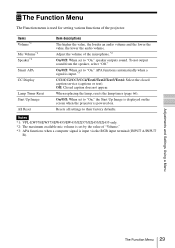
..."Volume." *3: APA functions when a computer signal is used for setting various functions of the projector. On/Off: When set to "On," the Start Up Image is displayed on the screen when the projector is input.*3 CC1/CC2/CC3/CC4/Text1/Text2/Text3/Text4: Select the closed caption service (...Menu The Function Menu 29 The Function Menu The Function menu is input via the RGB input terminal (INPUT A/INPUT B). Notes *1: VPL-EW578/EW575/EW455/EW435/EX575/EX455/EX435 only. *2: The maximum available mic volume is set to their factory defaults. When replacing the lamp, resets the lamp timer (...
..."Volume." *3: APA functions when a computer signal is used for setting various functions of the projector. On/Off: When set to "On," the Start Up Image is displayed on the screen when the projector is input.*3 CC1/CC2/CC3/CC4/Text1/Text2/Text3/Text4: Select the closed caption service (...Menu The Function Menu 29 The Function Menu The Function menu is input via the RGB input terminal (INPUT A/INPUT B). Notes *1: VPL-EW578/EW575/EW455/EW435/EX575/EX455/EX435 only. *2: The maximum available mic volume is set to their factory defaults. When replacing the lamp, resets the lamp timer (...
Operating Instructions
Page 30
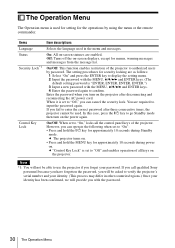
...to enter the correct password after disconnecting and reconnecting the AC power cord. Note *1: You will provide you turn on the projector after three consecutive times, the projector cannot be able to authorized users by using the menu or the remote commander. On/Off: When set to "Off" ...the ?/1 key for menus, warning messages and messages from the message list. If you call qualified Sony personnel because you have forgotten the password, you will be asked to verify the projector's serial number and your identity has been confirmed, we will not be used for setting for ...
...to enter the correct password after disconnecting and reconnecting the AC power cord. Note *1: You will provide you turn on the projector after three consecutive times, the projector cannot be able to authorized users by using the menu or the remote commander. On/Off: When set to "Off" ...the ?/1 key for menus, warning messages and messages from the message list. If you call qualified Sony personnel because you have forgotten the password, you will be asked to verify the projector's serial number and your identity has been confirmed, we will not be used for setting for ...
Operating Instructions
Page 31
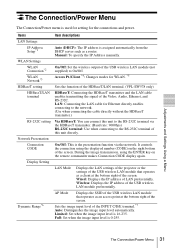
... transmitter.) RS-232C setting Via HDBaseT: You can connect this unit directly. Display Setting LAN Mode Displays the LAN settings of the projector or the settings of the USB wireless LAN module that operates as a router. Dynamic Range*6 AP Mode Displays the SSID of the...Connection/Power Menu The Connection/Power menu is used for setting for WLAN. *5 HDBaseT setting Sets the function of the HDBaseT/LAN terminal. (VPL-EW578 only) HDBaseT/LAN terminal HDBaseT: Connecting the HDBaseT transmitter and the LAN cable enables transmitting the signal of the Video, Audio, Ethernet...
... transmitter.) RS-232C setting Via HDBaseT: You can connect this unit directly. Display Setting LAN Mode Displays the LAN settings of the projector or the settings of the USB wireless LAN module that operates as a router. Dynamic Range*6 AP Mode Displays the SSID of the...Connection/Power Menu The Connection/Power menu is used for setting for WLAN. *5 HDBaseT setting Sets the function of the HDBaseT/LAN terminal. (VPL-EW578 only) HDBaseT/LAN terminal HDBaseT: Connecting the HDBaseT transmitter and the LAN cable enables transmitting the signal of the Video, Audio, Ethernet...
Operating Instructions
Page 32
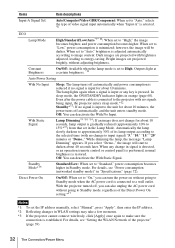
...When any key is established. If you can turn the power on without adjusting brightness. Even after the power cable is connected to the projector with brightness adjusted, leading to "Low," power consumption is connected to image content. The lamp lights again when a signal is input or.... For details, see "Power consumption (networked standby mode)" in Standby mode. Bright images are projected with no signals being input, the projector enters sleep mode.*12 Standby*13: If no signal is set to High. Constant Brightness On/Off: Available when the lamp mode is ...
...When any key is established. If you can turn the power on without adjusting brightness. Even after the power cable is connected to the projector with brightness adjusted, leading to "Low," power consumption is connected to image content. The lamp lights again when a signal is input or.... For details, see "Power consumption (networked standby mode)" in Standby mode. Bright images are projected with no signals being input, the projector enters sleep mode.*12 Standby*13: If no signal is set to High. Constant Brightness On/Off: Available when the lamp mode is ...


