
User Manual
Page 2
...CAUTION Danger of the unit, operate the disconnect device to switch the power supply off and on, the user is incorrectly replaced. However, there is subject to provide reasonable protection against harmful interference in a residential installation. Increase the separation between the equipment... should occur during operation of explosion if battery is encouraged to try to Part 15 of Conformity Trade Name: SONY Model: VPL-EW5, VPL-EX50,VPLEX5, VPL-ES5 Responsible Party: Sony Electronics Inc. For the customers in the fixed wiring, or connect the power plug to comply with part 15...
...CAUTION Danger of the unit, operate the disconnect device to switch the power supply off and on, the user is incorrectly replaced. However, there is subject to provide reasonable protection against harmful interference in a residential installation. Increase the separation between the equipment... should occur during operation of explosion if battery is encouraged to try to Part 15 of Conformity Trade Name: SONY Model: VPL-EW5, VPL-EX50,VPLEX5, VPL-ES5 Responsible Party: Sony Electronics Inc. For the customers in the fixed wiring, or connect the power plug to comply with part 15...
User Manual
Page 4
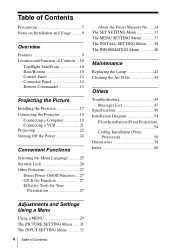
...Right Side/Front 10 Rear/Bottom 10 Control Panel 12 Connector Panel 14 Remote Commander 15 Projecting the Picture Installing the Projector 17 Connecting the Projector 19 Connecting a Computer 19 Connecting a VCR 21 Projecting 22 Turning Off the Power 24 Convenient Functions Selecting the Menu...34 The SET SETTING Menu 35 The MENU SETTING Menu ...........37 The INSTALL SETTING Menu .......38 The INFORMATION Menu 40 Maintenance Replacing the Lamp 42 Cleaning the Air Filter 44 Others Troubleshooting 45 Messages List 47 Specifications 49 Installation Diagram 54 Floor Installation (...
...Right Side/Front 10 Rear/Bottom 10 Control Panel 12 Connector Panel 14 Remote Commander 15 Projecting the Picture Installing the Projector 17 Connecting the Projector 19 Connecting a Computer 19 Connecting a VCR 21 Projecting 22 Turning Off the Power 24 Convenient Functions Selecting the Menu...34 The SET SETTING Menu 35 The MENU SETTING Menu ...........37 The INSTALL SETTING Menu .......38 The INFORMATION Menu 40 Maintenance Replacing the Lamp 42 Cleaning the Air Filter 44 Others Troubleshooting 45 Messages List 47 Specifications 49 Installation Diagram 54 Floor Installation (...
User Manual
Page 5
If voltage adaptation is required, consult with qualified Sony personnel. • Should any windows that face the screen with opaque draperies. &#...sure to the following: • Avoid touching the lens. As incorrect maintenance may impair the performance of the projector, take care with respect to disconnect the AC power cord from the wall outlet if it is not to ... of your hand or objects near the ventilation holes. Cleaning the air filter • Clean the air filter whenever you replace the lamp. • Refer to the "Cleaning the Air Filter" on the lens, use a damp cloth, detergent ...
If voltage adaptation is required, consult with qualified Sony personnel. • Should any windows that face the screen with opaque draperies. &#...sure to the following: • Avoid touching the lens. As incorrect maintenance may impair the performance of the projector, take care with respect to disconnect the AC power cord from the wall outlet if it is not to ... of your hand or objects near the ventilation holes. Cleaning the air filter • Clean the air filter whenever you replace the lamp. • Refer to the "Cleaning the Air Filter" on the lens, use a damp cloth, detergent ...
User Manual
Page 7
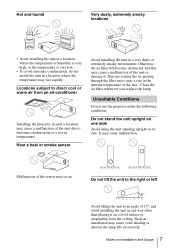
... right or left Avoid tilting the unit to direct cool or warm air from the ceiling. Unsuitable Conditions Do not use the projector under the following conditions. Malfunction of the unit or damage it on a level surface or suspending from an air-conditioner Installing the... projector in such a location may cause a malfunction of the sensor may rise rapidly. Clean the air filter whenever you replace the lamp. Hot and humid Very dusty, extremely smoky locations • Avoid installing the ...
... right or left Avoid tilting the unit to direct cool or warm air from the ceiling. Unsuitable Conditions Do not use the projector under the following conditions. Malfunction of the unit or damage it on a level surface or suspending from an air-conditioner Installing the... projector in such a location may cause a malfunction of the sensor may rise rapidly. Clean the air filter whenever you replace the lamp. Hot and humid Very dusty, extremely smoky locations • Avoid installing the ...
User Manual
Page 9
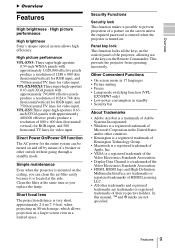
.... Panel key lock This function locks all the keys on the control panel of the projector, allowing use of a breaker or other switch without going through a standby mode. EX50... when projecting an 80-inch image, which allows projection on the ceiling, you replace the lamp. VPL-ES5:Three super-high-aperture 0.63inch SVGA panels with approximately 480,000 effective pixels produce a resolution of 1024 ×... B Overview Features High brightness · High picture performance High brightness Sony's unique optical system allows high efficiency. Clean the filter at the side. Other Convenient Functions...
.... Panel key lock This function locks all the keys on the control panel of the projector, allowing use of a breaker or other switch without going through a standby mode. EX50... when projecting an 80-inch image, which allows projection on the ceiling, you replace the lamp. VPL-ES5:Three super-high-aperture 0.63inch SVGA panels with approximately 480,000 effective pixels produce a resolution of 1024 ×... B Overview Features High brightness · High picture performance High brightness Sony's unique optical system allows high efficiency. Clean the filter at the side. Other Convenient Functions...
User Manual
Page 11
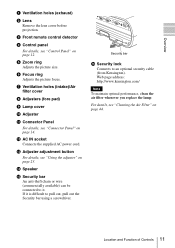
... 14. If it is difficult to it. Web page address: http://www.kensington.com/ Note To maintain optimal performance, clean the air filter whenever you replace the lamp. Overview a Ventilation holes (exhaust) b Lens Remove the lens cover before projection. e Zoom ring Adjusts the picture size. f Focus ring Adjusts the picture focus...
... 14. If it is difficult to it. Web page address: http://www.kensington.com/ Note To maintain optimal performance, clean the air filter whenever you replace the lamp. Overview a Ventilation holes (exhaust) b Lens Remove the lens cover before projection. e Zoom ring Adjusts the picture size. f Focus ring Adjusts the picture focus...

User Manual
Page 16
...D ZOOM (Digital Zoom) +/- keys Before using the Remote Commander Pull out the clear film from the Remote Commander. 2 Install the lithium battery. To replace a battery 1 Release the lock of Controls Direct the Remote Commander toward the remote control detector. • The operation range is , the wider the ... adjustment. d RESET key Resets the value of children. • Should the battery be swallowed, immediately consult a doctor. Notes on the projector. Do not use batteries other than CR2025. • Keep the lithium battery out of the reach of an item to its factory preset value...
...D ZOOM (Digital Zoom) +/- keys Before using the Remote Commander Pull out the clear film from the Remote Commander. 2 Install the lithium battery. To replace a battery 1 Release the lock of Controls Direct the Remote Commander toward the remote control detector. • The operation range is , the wider the ... adjustment. d RESET key Resets the value of children. • Should the battery be swallowed, immediately consult a doctor. Notes on the projector. Do not use batteries other than CR2025. • Keep the lithium battery out of the reach of an item to its factory preset value...
User Manual
Page 36
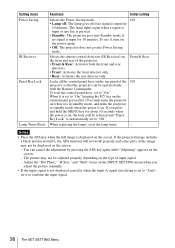
... signal is input for about 10 seconds when the power is automatically set it to conform the input signal. 36 The SET SETTING Menu When replacing the lamps, reset the lamp timer. - The picture may not be adjusted properly depending on , the lock will not work properly and some... parts of the projector. • Front & Rear: Activates both the front and rear detectors. • Front: Activates the front detector only. • Rear: Activates the rear detector...
... signal is input for about 10 seconds when the power is automatically set it to conform the input signal. 36 The SET SETTING Menu When replacing the lamps, reset the lamp timer. - The picture may not be adjusted properly depending on , the lock will not work properly and some... parts of the projector. • Front & Rear: Activates both the front and rear detectors. • Front: Activates the front detector only. • Rear: Activates the rear detector...
User Manual
Page 42
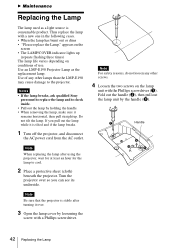
Notes • If the lamp breaks, ask qualified Sony personnel to replace the lamp and to check inside. • Pull out ... out the lamp unit by loosening the screw with a Phillips screwdriver. Use of use. Note When replacing the lamp after turning it remains horizontal, then pull straight up (repeats flashing three times) The lamp...• "Please replace the Lamp." B Maintenance Replacing the Lamp The lamp used as the replacement lamp. Thus replace the lamp with the Phillips screwdriver (a). Do not tilt the lamp. If you can see its underside. Turn the projector over . 3...
Notes • If the lamp breaks, ask qualified Sony personnel to replace the lamp and to check inside. • Pull out ... out the lamp unit by loosening the screw with a Phillips screwdriver. Use of use. Note When replacing the lamp after turning it remains horizontal, then pull straight up (repeats flashing three times) The lamp...• "Please replace the Lamp." B Maintenance Replacing the Lamp The lamp used as the replacement lamp. Thus replace the lamp with the Phillips screwdriver (a). Do not tilt the lamp. If you can see its underside. Turn the projector over . 3...
User Manual
Page 43
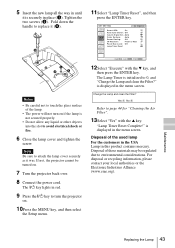
...these materials may be turned on . 10Press the MENU key, and then select the Setup menu. 12Select "Execute" with the v key. If not, the projector cannot be regulated due to avoid electrical shock or fire. 6 Close the lamp cover and tighten the screw. The ?/1 key lights in red. 9 Press... Off Lamp Timer Reset Notes • Be careful not to replace it was. Maintenance Replacing the Lamp 43 Fold down the handle to touch the glass surface of the lamp. • The power will not turn the projector on . 7 Turn the projector back over. 8 Connect the power cord. Change the Lamp and...
...these materials may be turned on . 10Press the MENU key, and then select the Setup menu. 12Select "Execute" with the v key. If not, the projector cannot be regulated due to avoid electrical shock or fire. 6 Close the lamp cover and tighten the screw. The ?/1 key lights in red. 9 Press... Off Lamp Timer Reset Notes • Be careful not to replace it was. Maintenance Replacing the Lamp 43 Fold down the handle to touch the glass surface of the lamp. • The power will not turn the projector on . 7 Turn the projector back over. 8 Connect the power cord. Change the Lamp and...

User Manual
Page 44
... and wash it. 1 Turn the power off and unplug the power cord. 2 Draw out the air filter cover and remove it . Notes • If you replace the lamp. Cleaning the Air Filter The air filter should be turned on if it fits in a shaded place. 44 Cleaning the Air Filter Air... air filter. Claws 4 Wash the air filter with a mild detergent solution and dry it fits into the each claws on the air filter cover and replace the cover. The time needed to attach the air filter cover firmly; Place the air filter so that it in a notch on the environment or...
... and wash it. 1 Turn the power off and unplug the power cord. 2 Draw out the air filter cover and remove it . Notes • If you replace the lamp. Cleaning the Air Filter The air filter should be turned on if it fits in a shaded place. 44 Cleaning the Air Filter Air... air filter. Claws 4 Wash the air filter with a mild detergent solution and dry it fits into the each claws on the air filter cover and replace the cover. The time needed to attach the air filter cover firmly; Place the air filter so that it in a notch on the environment or...
User Manual
Page 46
Color balance is out of focus. c Leave the projector for about two hours with the power on the INPUT SETTING menu has not been adjusted properly. c Set the output setting to SVGA (VPL-ES5), XGA (VPL-EX50/ EX5) or WXGA (VPL-EW5) (see page 19). • The sound is not adjusted properly. The... picture has not been adjusted properly. c Adjust "Shift" on the INPUT SETTING menu properly (see page 31). • The projector is set to "Off." c Replace the lamp with the VOLUME +/- The image extends beyond the screen. • The APA key has been pressed even though there ...
Color balance is out of focus. c Leave the projector for about two hours with the power on the INPUT SETTING menu has not been adjusted properly. c Set the output setting to SVGA (VPL-ES5), XGA (VPL-EX50/ EX5) or WXGA (VPL-EW5) (see page 19). • The sound is not adjusted properly. The... picture has not been adjusted properly. c Adjust "Shift" on the INPUT SETTING menu properly (see page 31). • The projector is set to "Off." c Replace the lamp with the VOLUME +/- The image extends beyond the screen. • The APA key has been pressed even though there ...
User Manual
Page 47
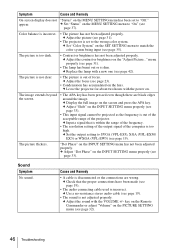
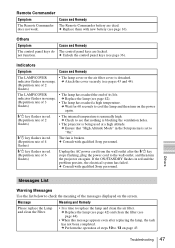
...cover securely (see page 16). c Wait for 60 seconds to "On." :/1 key flashes in red. (Repetition rate of its life. c Replace them with qualified Sony personnel. c Unlock the control panel keys (see that "High Altitude Mode" in the Setup menu is set to cool the lamp and then...holes. • The projector is unusually high. Others Symptom The control panel keys do not function. Cause and Remedy The control panel keys are dead. c Consult with qualified Sony personnel. :/1 key flashes in red and the problem persists, the electrical system has failed. c Replace the lamp (see page...
...cover securely (see page 16). c Wait for 60 seconds to "On." :/1 key flashes in red. (Repetition rate of its life. c Replace them with qualified Sony personnel. c Unlock the control panel keys (see that "High Altitude Mode" in the Setup menu is set to cool the lamp and then...holes. • The projector is unusually high. Others Symptom The control panel keys do not function. Cause and Remedy The control panel keys are dead. c Consult with qualified Sony personnel. :/1 key flashes in red and the problem persists, the electrical system has failed. c Replace the lamp (see page...

User Manual
Page 51
For details, please consult your nearest Sony dealer. Pin assignment INPUT A connector (HD D-sub 15-pin, female) INPUT B connector (HD D-sub 15-pin, female) (VPL-EX50 only) 1 R 9 Power supply input for DDC 2 G 10 GND 3 B 11 GND 4 RESERVE 12 DDC/SDA 5 GND 13 HD 6 ...GND (G) 15 DDC/SCL 8 GND (B) RS-232C connector (D-sub 9 pin, female) (VPL-EW5/EX50/EX5 only) 1 R/R-Y 9 Power supply input for replacement) Some of the items may not be available in some areas. Optional accessories Projector Lamp LMP-E190(for DDC 2 G/Y 10 GND 3 B/B-Y 11 GND 4 RESERVE 12 DDC...
For details, please consult your nearest Sony dealer. Pin assignment INPUT A connector (HD D-sub 15-pin, female) INPUT B connector (HD D-sub 15-pin, female) (VPL-EX50 only) 1 R 9 Power supply input for DDC 2 G 10 GND 3 B 11 GND 4 RESERVE 12 DDC/SDA 5 GND 13 HD 6 ...GND (G) 15 DDC/SCL 8 GND (B) RS-232C connector (D-sub 9 pin, female) (VPL-EW5/EX50/EX5 only) 1 R/R-Y 9 Power supply input for replacement) Some of the items may not be available in some areas. Optional accessories Projector Lamp LMP-E190(for DDC 2 G/Y 10 GND 3 B/B-Y 11 GND 4 RESERVE 12 DDC...
User Manual
Page 60
... Mode 38 Hue 31 I Image Flip 38 Input-A Signal Sel 35 Installation 17 notes 6 unsuitable conditions 7 unsuitable installation 6 IR Receiver 36 L Lamp Mode 38 Lamp replacement 42 Lamp Timer 40 Lamp Timer Reset 36 Language 37 selecting the menu language 25 Lens 11 Location and function of controls connector panel 14...
... Mode 38 Hue 31 I Image Flip 38 Input-A Signal Sel 35 Installation 17 notes 6 unsuitable conditions 7 unsuitable installation 6 IR Receiver 36 L Lamp Mode 38 Lamp replacement 42 Lamp Timer 40 Lamp Timer Reset 36 Language 37 selecting the menu language 25 Lens 11 Location and function of controls connector panel 14...


