
User Manual
Page 2
..., if not installed and used in a particular installation. If used in order to Part 15 of the FCC Rules. If a fault should occur during operation of Conformity Trade Name: SONY Model: VPL-EW5, VPL-EX50,VPLEX5, VPL-ES5 Responsible Party: Sony Electronics Inc. Telephone Number: 858-942-2230 This device complies with the limits for help. All interface cables used batteries according to switch the power supply off and on...
..., if not installed and used in a particular installation. If used in order to Part 15 of the FCC Rules. If a fault should occur during operation of Conformity Trade Name: SONY Model: VPL-EW5, VPL-EX50,VPLEX5, VPL-ES5 Responsible Party: Sony Electronics Inc. Telephone Number: 858-942-2230 This device complies with the limits for help. All interface cables used batteries according to switch the power supply off and on...
User Manual
Page 4
... Tools for Your Presentation 27 About the Preset Memory No. ....34 The SET SETTING Menu 35 The MENU SETTING Menu ...........37 The INSTALL SETTING Menu .......38 The INFORMATION Menu 40 Maintenance Replacing the Lamp 42 Cleaning the Air Filter 44 Others Troubleshooting 45 Messages List 47 Specifications 49 Installation Diagram 54 Floor Installation (Front Projection 54 Ceiling Installation (Front Projection 56 Dimensions 58 Index 60 Adjustments and Settings Using a Menu Using a MENU 29 The PICTURE SETTING Menu ...... 31 The INPUT SETTING Menu .......... 33 4 Table of Contents
... Tools for Your Presentation 27 About the Preset Memory No. ....34 The SET SETTING Menu 35 The MENU SETTING Menu ...........37 The INSTALL SETTING Menu .......38 The INFORMATION Menu 40 Maintenance Replacing the Lamp 42 Cleaning the Air Filter 44 Others Troubleshooting 45 Messages List 47 Specifications 49 Installation Diagram 54 Floor Installation (Front Projection 54 Ceiling Installation (Front Projection 56 Dimensions 58 Index 60 Adjustments and Settings Using a Menu Using a MENU 29 The PICTURE SETTING Menu ...... 31 The INPUT SETTING Menu .......... 33 4 Table of Contents
User Manual
Page 5
... personnel before operating it further. • Unplug the unit from the AC outlet. To remove dust on page 44 for several days. • To disconnect the cord, pull it is recommended that face the screen with water. • Never use a soft dry cloth. Cleaning the air filter • Clean the air filter whenever you replace the lamp. • Refer to the AC power source (mains...
... personnel before operating it further. • Unplug the unit from the AC outlet. To remove dust on page 44 for several days. • To disconnect the cord, pull it is recommended that face the screen with water. • Never use a soft dry cloth. Cleaning the air filter • Clean the air filter whenever you replace the lamp. • Refer to the AC power source (mains...
User Manual
Page 9
... video input. Clean the filter at the side. Panel key lock This function locks all the keys on the control panel of the projector, allowing use of the Video Electronics Standards Association. • Display Data Channel is very short, approximately 2.4 m (7.9 feet), when projecting an 80-inch image, which allows projection on the ceiling, you replace the lamp. Direct Power On/Power Off function The AC power for video input. Short focal lens The projection distance is a trademark of HDMI...
... video input. Clean the filter at the side. Panel key lock This function locks all the keys on the control panel of the projector, allowing use of the Video Electronics Standards Association. • Display Data Channel is very short, approximately 2.4 m (7.9 feet), when projecting an 80-inch image, which allows projection on the ceiling, you replace the lamp. Direct Power On/Power Off function The AC power for video input. Short focal lens The projection distance is a trademark of HDMI...
User Manual
Page 12
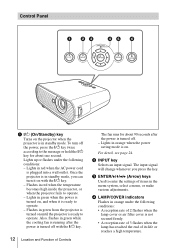
... cooling fan is running after the power is plugged into a wall outlet. Also, flashes in red when the AC power cord is turned off. - d LAMP/COVER indicators Flashes in green from the projector is ready to operate. Flashes in orange under the following conditions: • A reception rate of its life or reaches a high temperature. b INPUT key Selects an input signal. c ENTER/V/v/B/b (Arrow) keys Used to operate. - Lights in the menu system, select a menu, or make various adjustments. Control Panel 1 23...
... cooling fan is running after the power is plugged into a wall outlet. Also, flashes in red when the AC power cord is turned off. - d LAMP/COVER indicators Flashes in green from the projector is ready to operate. Flashes in orange under the following conditions: • A reception rate of its life or reaches a high temperature. b INPUT key Selects an input signal. c ENTER/V/v/B/b (Arrow) keys Used to operate. - Lights in the menu system, select a menu, or make various adjustments. Control Panel 1 23...
User Manual
Page 19
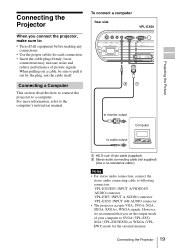
.../ES5: INPUT A/VIDEO IN AUDIO connector VPL-EW5: INPUT A AUDIO connector VPL-EX50: INPUT A/B AUDIO connector • The projector accepts VGA, SVGA, XGA, SXGA, SXGA+, WXGA signals. However, we recommend that you connect the projector, make sure to SVGA (VPL-ES5), XGA (VPL-EX5/EX50) or WXGA (VPLEW5) mode for each connection. • Insert the cable plugs firmly; To connect a computer Rear side to monitor output VPL-EX50 Computer to audio output 1 HD D-sub 15-pin cable (supplied) 2 Stereo audio connecting cable (not supplied) (Use...
.../ES5: INPUT A/VIDEO IN AUDIO connector VPL-EW5: INPUT A AUDIO connector VPL-EX50: INPUT A/B AUDIO connector • The projector accepts VGA, SVGA, XGA, SXGA, SXGA+, WXGA signals. However, we recommend that you connect the projector, make sure to SVGA (VPL-ES5), XGA (VPL-EX5/EX50) or WXGA (VPLEW5) mode for each connection. • Insert the cable plugs firmly; To connect a computer Rear side to monitor output VPL-EX50 Computer to audio output 1 HD D-sub 15-pin cable (supplied) 2 Stereo audio connecting cable (not supplied) (Use...
User Manual
Page 21
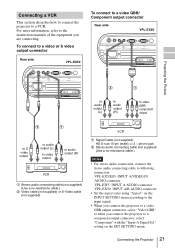
... S-Video cable (not supplied) VCR 1 Signal Cable (not supplied) HD D-sub 15-pin (male) ↔ 3 × phono jack 2 Stereo audio connecting cable (not supplied) (Use a no-resistance cable.) Notes • For stereo audio connection, connect the stereo audio connecting cable to following connectors: VPL-EX5/ES5: INPUT A/VIDEO IN AUDIO connector VPL-EW5: INPUT A AUDIO connector VPL-EX50: INPUT A/B AUDIO connector • Set the aspect ratio using "Aspect" on the SET SETTING menu. For more information, refer to the instruction manuals of the equipment you connect the projector...
... S-Video cable (not supplied) VCR 1 Signal Cable (not supplied) HD D-sub 15-pin (male) ↔ 3 × phono jack 2 Stereo audio connecting cable (not supplied) (Use a no-resistance cable.) Notes • For stereo audio connection, connect the stereo audio connecting cable to following connectors: VPL-EX5/ES5: INPUT A/VIDEO IN AUDIO connector VPL-EW5: INPUT A AUDIO connector VPL-EX50: INPUT A/B AUDIO connector • Set the aspect ratio using "Aspect" on the SET SETTING menu. For more information, refer to the instruction manuals of the equipment you connect the projector...
User Manual
Page 22
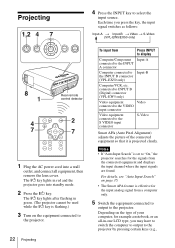
... lights after flashing in -one LCD type, you press the key, the input signal switches as follows: Input-A t Input-B t Video t S-Video (VPL-EW5/EX50 only) Rear remote control detector APA INPUT KEY STONE ENTER RESET PIC MUTING D ZOOM FREEZE MENU VOLUME 1 Plug the AC power cord into standby mode. 2 Press the ?/1 key. Depending on the type of the connected equipment so that it is set to "On," the projector searches for the signals from the connected...
... lights after flashing in -one LCD type, you press the key, the input signal switches as follows: Input-A t Input-B t Video t S-Video (VPL-EW5/EX50 only) Rear remote control detector APA INPUT KEY STONE ENTER RESET PIC MUTING D ZOOM FREEZE MENU VOLUME 1 Plug the AC power cord into standby mode. 2 Press the ?/1 key. Depending on the type of the connected equipment so that it is set to "On," the projector searches for the signals from the connected...
User Manual
Page 23
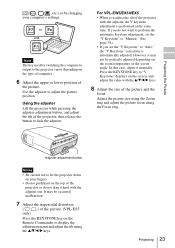
... the projector down on your computer's settings. It may not be occurred malfunction. 7 Adjust the trapezoidal distortion ( ) of the picture. (VPL-ES5 only) Press the KEYSTONE key on the top of the picture and the focus. Use the adjuster to display the adjustment menu and adjust the tilt using the Focus ring. Projecting the Picture / , LCD VGA / , etc.), or by changing your fingers. • Do not push hard on the Remote Commander to adjust the picture...
... the projector down on your computer's settings. It may not be occurred malfunction. 7 Adjust the trapezoidal distortion ( ) of the picture. (VPL-ES5 only) Press the KEYSTONE key on the top of the picture and the focus. Use the adjuster to display the adjustment menu and adjust the tilt using the Focus ring. Projecting the Picture / , LCD VGA / , etc.), or by changing your fingers. • Do not push hard on the Remote Commander to adjust the picture...
User Manual
Page 29
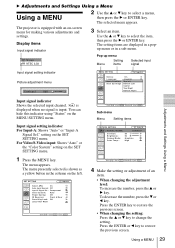
... this indicator using "Status" on the SET SETTING menu. setting on the MENU SETTING menu. The menu presently selected is shown as a yellow button in a sub menu. SET SETTING Input-A Smar t APA: On Auto Input Search: Off Input-A Signal Sel.: Component Color System: Auto Power Saving: Off IR Receiver: Front & Rear Panel Key Lock: Off Lamp Timer Reset Sub menu Menu Setting items PICTURE SETTING Input A ADJUST PICTURE Contrast: Brightness: Gamma Mode: Color Temp.: Standard 80 50 Graphics High 4 Make the setting or adjustment of an item. • When changing the adjustment...
... this indicator using "Status" on the SET SETTING menu. setting on the MENU SETTING menu. The menu presently selected is shown as a yellow button in a sub menu. SET SETTING Input-A Smar t APA: On Auto Input Search: Off Input-A Signal Sel.: Component Color System: Auto Power Saving: Off IR Receiver: Front & Rear Panel Key Lock: Off Lamp Timer Reset Sub menu Menu Setting items PICTURE SETTING Input A ADJUST PICTURE Contrast: Brightness: Gamma Mode: Color Temp.: Standard 80 50 Graphics High 4 Make the setting or adjustment of an item. • When changing the adjustment...
User Manual
Page 34
... 2", a part of the screen may be smaller. • Zoom*1: Select to the wide mode may constitute an infringement of the rights of input signal is used for profit or for input signals (the preset memory). Setting items Functions Initial setting Aspect (When the PC signal is input) You can also adjust the preset data through the INPUT SETTING menu. This projector has 45 types of preset data for public viewing, modifying...
... 2", a part of the screen may be smaller. • Zoom*1: Select to the wide mode may constitute an infringement of the rights of input signal is used for profit or for input signals (the preset memory). Setting items Functions Initial setting Aspect (When the PC signal is input) You can also adjust the preset data through the INPUT SETTING menu. This projector has 45 types of preset data for public viewing, modifying...
User Manual
Page 36
... only. If you adjust the picture manually. • If the input signal is not displayed correctly when the input A signal classifying is on the screen. - When replacing the lamps, reset the lamp timer. - When it is set to "Auto", set to "Off." If the projected image includes a black portion around it is in standby mode, and turns the projector to standby mode when the power is set to conform the input signal. 36 The SET SETTING Menu Selects the remote control detectors (IR Receiver...
... only. If you adjust the picture manually. • If the input signal is not displayed correctly when the input A signal classifying is on the screen. - When replacing the lamps, reset the lamp timer. - When it is set to "Auto", set to "Off." If the projected image includes a black portion around it is in standby mode, and turns the projector to standby mode when the power is set to conform the input signal. 36 The SET SETTING Menu Selects the remote control detectors (IR Receiver...
User Manual
Page 38
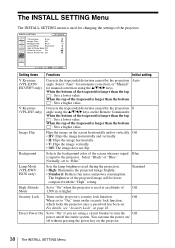
...SETTING Menu Off When set to the projector. Direct Power On Set to "On" if you are using the v/V/b/B keys on the security lock function, which locks the projector once a password has been set to turn the power on the projector's security lock function. Auto V Keystone (VPL-ES5 only) Corrects the trapezoidal distortion caused by the projection angle. INSTALL SETTING V Keystone: Auto Image Flip: Off Background: Blue Lamp Mode: Standard High Altitude Mode:Off Security Lock: Off Direct Power On: Off Input-A Setting items Functions Initial setting V Keystone...
...SETTING Menu Off When set to the projector. Direct Power On Set to "On" if you are using the v/V/b/B keys on the security lock function, which locks the projector once a password has been set to turn the power on the projector's security lock function. Auto V Keystone (VPL-ES5 only) Corrects the trapezoidal distortion caused by the projection angle. INSTALL SETTING V Keystone: Auto Image Flip: Off Background: Blue Lamp Mode: Standard High Altitude Mode:Off Security Lock: Off Direct Power On: Off Input-A Setting items Functions Initial setting V Keystone...
User Manual
Page 42
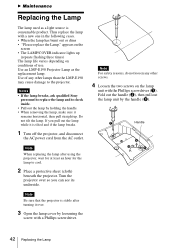
... dims • "Please replace the Lamp." Notes • If the lamp breaks, ask qualified Sony personnel to replace the lamp and to cool. 2 Place a protective sheet (cloth) beneath the projector. Handle 42 Replacing the Lamp Use an LMP-E190 Projector Lamp as a light source is consumable product. Note When replacing the lamp after turning it remains horizontal, then pull straight up (repeats flashing three times) The lamp life varies depending on...
... dims • "Please replace the Lamp." Notes • If the lamp breaks, ask qualified Sony personnel to replace the lamp and to cool. 2 Place a protective sheet (cloth) beneath the projector. Handle 42 Replacing the Lamp Use an LMP-E190 Projector Lamp as a light source is consumable product. Note When replacing the lamp after turning it remains horizontal, then pull straight up (repeats flashing three times) The lamp life varies depending on...
User Manual
Page 43
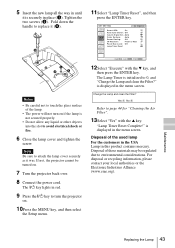
... displayed in the menu screen. Yes: No: Refer to attach the lamp cover securely as it was. 5 Insert the new lamp all the way in until it (c). 11Select "Lamp Timer Reset", and then press the ENTER key. The ?/1 key lights in this product contains mercury. Disposal of these materials may be turned on. 7 Turn the projector back over. 8 Connect the power cord. SET SETTING Input-A Smar t APA: On Auto Input Search: Off Input-A Signal...
... displayed in the menu screen. Yes: No: Refer to attach the lamp cover securely as it was. 5 Insert the new lamp all the way in until it (c). 11Select "Lamp Timer Reset", and then press the ENTER key. The ?/1 key lights in this product contains mercury. Disposal of these materials may be turned on. 7 Turn the projector back over. 8 Connect the power cord. SET SETTING Input-A Smar t APA: On Auto Input Search: Off Input-A Signal...
User Manual
Page 45
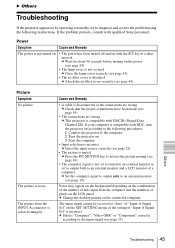
... air filter cover is incorrect. The picture from the computer and the numbers of pixels on with DDC2B (Digital Data Channel 2B). Noise may appear on the background depending on the SET SETTING menu, or the setting of a computer. c Change the desktop pattern on according to the following instructions. The picture is compatible with qualified Sony personnel. c This projector is compatible with the ?/1 key at "Auto" of "Input-A Signal...
... air filter cover is incorrect. The picture from the computer and the numbers of pixels on with DDC2B (Digital Data Channel 2B). Noise may appear on the background depending on the SET SETTING menu, or the setting of a computer. c Change the desktop pattern on according to the following instructions. The picture is compatible with qualified Sony personnel. c This projector is compatible with the ?/1 key at "Auto" of "Input-A Signal...
User Manual
Page 46
... VOLUME +/- c Set the output setting to SVGA (VPL-ES5), XGA (VPL-EX50/ EX5) or WXGA (VPL-EW5) (see page 42). The picture flickers. c Check that is within the range of the frequency. • The resolution setting of the output signal of the computer is out of the projector. key on the Remote Commander or adjust "Volume" on the lens. The picture is not clear. • The picture is too high. c Adjust the focus (see...
... VOLUME +/- c Set the output setting to SVGA (VPL-ES5), XGA (VPL-EX50/ EX5) or WXGA (VPL-EW5) (see page 42). The picture flickers. c Check that is within the range of the frequency. • The resolution setting of the output signal of the computer is out of the projector. key on the Remote Commander or adjust "Volume" on the lens. The picture is not clear. • The picture is too high. c Adjust the focus (see...
User Manual
Page 47
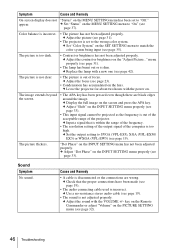
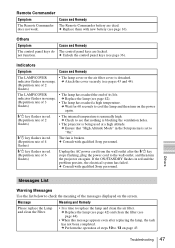
... turn the projector on the screen. does not work. c Replace the lamp (see page 44). • When this message appears even after the :/1 key stops flashing, plug the power cord to replace the lamp and clean the air filter. c Replace the lamp (see page 42) and clean the filter (see page 42). • The lamp has reached a high temperature. Cause and Remedy The control panel keys are dead. c Attach the cover securely (see that "High Altitude Mode...
... turn the projector on the screen. does not work. c Replace the lamp (see page 44). • When this message appears even after the :/1 key stops flashing, plug the power cord to replace the lamp and clean the air filter. c Replace the lamp (see page 42) and clean the filter (see page 42). • The lamp has reached a high temperature. Cause and Remedy The control panel keys are dead. c Attach the cover securely (see that "High Altitude Mode...

User Manual
Page 49
Specifications Optical characteristics Projection system 3 LCD panels, 1 lens, projection system LCD panel VPL-ES5: 0.63-inch SVGA panel, about 1,440,000 pixels (800 × 600 × 3) VPL-EX50/EX5: 0.63-inch XGA panel, about 2,360,000 pixels (1024 × 768 × 3) VPL-EW5: 0.59-inchvWXGA panel, about 3,070,000 pixels (1280 × 800 × 3) Lens 1.2 times zoom lens f 18.53 to 22.18 mm/F1.65 to 1.93 Lamp 190 W Ultra high pressure lamp Projected picture size 40...
Specifications Optical characteristics Projection system 3 LCD panels, 1 lens, projection system LCD panel VPL-ES5: 0.63-inch SVGA panel, about 1,440,000 pixels (800 × 600 × 3) VPL-EX50/EX5: 0.63-inch XGA panel, about 2,360,000 pixels (1024 × 768 × 3) VPL-EW5: 0.59-inchvWXGA panel, about 3,070,000 pixels (1280 × 800 × 3) Lens 1.2 times zoom lens f 18.53 to 22.18 mm/F1.65 to 1.93 Lamp 190 W Ultra high pressure lamp Projected picture size 40...
User Manual
Page 60
... Lamp Timer 40 Lamp Timer Reset 36 Language 37 selecting the menu language 25 Lens 11 Location and function of controls connector panel 14 control panel 12 rear/bottom 10 Remote Commander 15 top/right side/front 10 M Menu clearing the menu display 30 INFORMATION Menu 40 INPUT SETTING menu 33 INSTALL SETTING menu 38 MENU SETTING menu 37 PICTURE SETTING menu 31 SET SETTING menu 35 using a menu 29 Menu Position 37 Message List caution 48 warning 47 O Optional accessories 51 P Panel Key Lock 36 Picture Mode 31 Pin assignment 51 Power turn...
... Lamp Timer 40 Lamp Timer Reset 36 Language 37 selecting the menu language 25 Lens 11 Location and function of controls connector panel 14 control panel 12 rear/bottom 10 Remote Commander 15 top/right side/front 10 M Menu clearing the menu display 30 INFORMATION Menu 40 INPUT SETTING menu 33 INSTALL SETTING menu 38 MENU SETTING menu 37 PICTURE SETTING menu 31 SET SETTING menu 35 using a menu 29 Menu Position 37 Message List caution 48 warning 47 O Optional accessories 51 P Panel Key Lock 36 Picture Mode 31 Pin assignment 51 Power turn...


