User Manual
Page 2
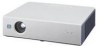
... not expose the unit to the following measures: - For the customers in the USA If you have any questions about this manual could void your authority to correct the interference by turning the equipment off and on a circuit different from that may cause undesired...instructions in a residential installation. This equipment has been tested and found to comply with Part 15 of Conformity Trade Name: SONY Model No.: VPL-CS7/VPL-ES2 Responsible Party: Sony Electronics Inc. This symbol is connected. - Consult the dealer or an experienced radio/ TV technician for FCC related matters...
... not expose the unit to the following measures: - For the customers in the USA If you have any questions about this manual could void your authority to correct the interference by turning the equipment off and on a circuit different from that may cause undesired...instructions in a residential installation. This equipment has been tested and found to comply with Part 15 of Conformity Trade Name: SONY Model No.: VPL-CS7/VPL-ES2 Responsible Party: Sony Electronics Inc. This symbol is connected. - Consult the dealer or an experienced radio/ TV technician for FCC related matters...
User Manual
Page 14
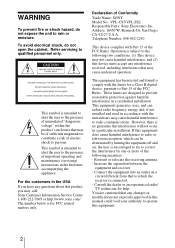
... • Should the battery be swallowed, immediately consult a doctor. Use the arrow key (v/V/b/B) for the adjustment. 14 Location and Function of the image manually. Before using the Remote Commander Pull out the clear film from the Remote Commander. 2 Install the lithium battery. + side facing upward 3 Put the ... on page 33. 9 D KEYSTONE key Used to its factory preset value or returns the enlarged image back to adjust the tilt of the projector, or the trapezoidal distortion of Controls q; To replace battery 1 Release the lock of an item back to its original size. RESET key Resets...
... • Should the battery be swallowed, immediately consult a doctor. Use the arrow key (v/V/b/B) for the adjustment. 14 Location and Function of the image manually. Before using the Remote Commander Pull out the clear film from the Remote Commander. 2 Install the lithium battery. + side facing upward 3 Put the ... on page 33. 9 D KEYSTONE key Used to its factory preset value or returns the enlarged image back to adjust the tilt of the projector, or the trapezoidal distortion of Controls q; To replace battery 1 Release the lock of an item back to its original size. RESET key Resets...
User Manual
Page 17
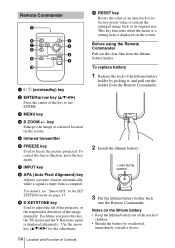
... cable (supplied) 2Stereo audio connecting cable (not supplied) (Use a no-resistance cable) Notes • The projector accepts VGA, SVGA, XGA signals. Connecting the Projector 17 However, we recommend that you set the output mode of picture signals. to audio output Computer to the ...instruction manual. Set your computer's display and the external monitor, the picture of the external monitor may increase noise and reduce performance of your computer. Projecting the Picture Connecting the Projector To connect a computer Ex. loose connections may not appear properly. VPL-CS7 ...
... cable (supplied) 2Stereo audio connecting cable (not supplied) (Use a no-resistance cable) Notes • The projector accepts VGA, SVGA, XGA signals. Connecting the Projector 17 However, we recommend that you set the output mode of picture signals. to audio output Computer to the ...instruction manual. Set your computer's display and the external monitor, the picture of the external monitor may increase noise and reduce performance of your computer. Projecting the Picture Connecting the Projector To connect a computer Ex. loose connections may not appear properly. VPL-CS7 ...
User Manual
Page 18
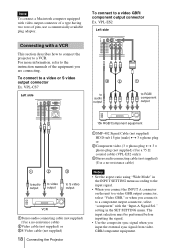
... the equipment you connect it to a component output connector, select "component" with a VCR This section describes how to connect the projector to a VCR. To connect to a video or S video output connector Ex. VPL-ES2 Left side Connecting with the "Input-A Signal Sel." For more information, refer to a video GBR output connector, select "Video... equipment. setting in the INPUT SETTING menu according to the input signal. • When you connect the INPUT A connector on the unit to the instruction manuals of pins, use a commercially available plug adaptor.
... the equipment you connect it to a component output connector, select "component" with a VCR This section describes how to connect the projector to a VCR. To connect to a video or S video output connector Ex. VPL-ES2 Left side Connecting with the "Input-A Signal Sel." For more information, refer to a video GBR output connector, select "Video... equipment. setting in the INPUT SETTING menu according to the input signal. • When you connect the INPUT A connector on the unit to the instruction manuals of pins, use a commercially available plug adaptor.
User Manual
Page 19
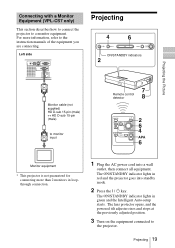
...The ON/STANDBY indicator lights in red and the projector goes into a wall outlet, then connect all equipment. Projecting the Picture Connecting with a Monitor Equipment (VPL-CS7 only) This section describes how to connect the projector to the projector. The ON/STANDBY indicator lights in green and the...HD D-sub 15-pin (male) to monitor input Remote control detector 8 Monitor equipment * This projector is not guaranteed for connecting more information, refer to the instruction manuals of the equipment you are connecting. The lens protector opens, and the powered tilt adjuster rises ...
...The ON/STANDBY indicator lights in red and the projector goes into a wall outlet, then connect all equipment. Projecting the Picture Connecting with a Monitor Equipment (VPL-CS7 only) This section describes how to connect the projector to the projector. The ON/STANDBY indicator lights in green and the...HD D-sub 15-pin (male) to monitor input Remote control detector 8 Monitor equipment * This projector is not guaranteed for connecting more information, refer to the instruction manuals of the equipment you are connecting. The lens protector opens, and the powered tilt adjuster rises ...
User Manual
Page 20
...LCD type, you press the key, the input signal switches as follows: INPUT A t Component t VIDEO t S VIDEO (VPL-ES2 only) t To input from Press INPUT to display Computer connected to the INPUT A INPUT A connector Equipment connected to the component connector Component (VPL-ES2...of the picture. Depending on F of the TILT key to "On," the projector searches for example a notebook, or an all-in the SET SETTING menu on... Powered tilt adjuster Notes • When you set the "V Keystone" adjustment to "Manual." (See page 36.) • If you adjust the powered tilt adjuster with the...
...LCD type, you press the key, the input signal switches as follows: INPUT A t Component t VIDEO t S VIDEO (VPL-ES2 only) t To input from Press INPUT to display Computer connected to the INPUT A INPUT A connector Equipment connected to the component connector Component (VPL-ES2...of the picture. Depending on F of the TILT key to "On," the projector searches for example a notebook, or an all-in the SET SETTING menu on... Powered tilt adjuster Notes • When you set the "V Keystone" adjustment to "Manual." (See page 36.) • If you adjust the powered tilt adjuster with the...

User Manual
Page 21
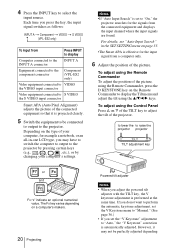
...seconds (VPL-ES2) to light up again the ON/STANDBY indicator with the I / 1 key. 3 Unplug the AC power cord from the wall outlet after the fan has stopped running and the ON/STANDBY indicator has light in the projector and the lens protector closes. During this case, adjust it manually. It... may cause injury to adjust the focus. Note A message disappears if you press any key for about 70 seconds (VPL-CS7)/for the first 60 seconds. Attention Looking...
...seconds (VPL-ES2) to light up again the ON/STANDBY indicator with the I / 1 key. 3 Unplug the AC power cord from the wall outlet after the fan has stopped running and the ON/STANDBY indicator has light in the projector and the lens protector closes. During this case, adjust it manually. It... may cause injury to adjust the focus. Note A message disappears if you press any key for about 70 seconds (VPL-CS7)/for the first 60 seconds. Attention Looking...
User Manual
Page 34
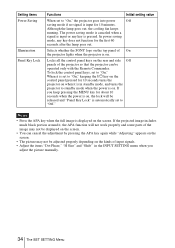
... key on the control panel pressed for 10 minutes. Selects whether the SONY logo on the top panel of input signals. • Adjust the items "Dot Phase," "H Size" and "Shift" in standby mode, and turns the projector to standby mode when the power is on. Seittng items Power Saving Illumination... that the projector can cancel the adjustment by pressing the APA key again while "Adjusting" appears on the screen. • The picture may not be operated only with the Remote Commander. If you adjust the picture manually. 34 The SET SETTING Menu If the projected image includes much black...
... key on the control panel pressed for 10 minutes. Selects whether the SONY logo on the top panel of input signals. • Adjust the items "Dot Phase," "H Size" and "Shift" in standby mode, and turns the projector to standby mode when the power is on. Seittng items Power Saving Illumination... that the projector can cancel the adjustment by pressing the APA key again while "Adjusting" appears on the screen. • The picture may not be operated only with the Remote Commander. If you adjust the picture manually. 34 The SET SETTING Menu If the projected image includes much black...
User Manual
Page 36
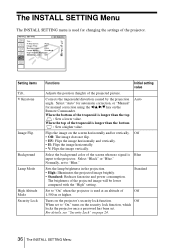
..." setting. Normally, set . The brightness of the projected picture. INSTALL SETTING Tilt... Select "Auto" for automatic correction, or "Manual" for changing the settings of the projector. Off • Off: The image does not flip. • HV: Flips the image horizontally and vertically. • H: Flips...24. 36 The INSTALL SETTING Menu Select the background color of the screen when no signal is used for manual correction using the b/v/B/V key on the projector's security lock function. The INSTALL SETTING Menu The INSTALL SETTING menu is used at an altitude of Off ...
..." setting. Normally, set . The brightness of the projected picture. INSTALL SETTING Tilt... Select "Auto" for automatic correction, or "Manual" for changing the settings of the projector. Off • Off: The image does not flip. • HV: Flips the image horizontally and vertically. • H: Flips...24. 36 The INSTALL SETTING Menu Select the background color of the screen when no signal is used for manual correction using the b/v/B/V key on the projector's security lock function. The INSTALL SETTING Menu The INSTALL SETTING menu is used at an altitude of Off ...
User Manual
Page 47
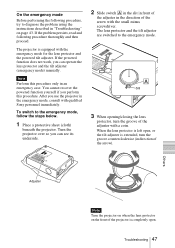
... following procedure, try to diagnose the problem using the instructions described in direction of the projector is completely open , or the tilt adjuster is equipped with qualified Sony personnel immediately. You cannot recover the powered function yourself if you can operate the lens ...protector and the tilt adjuster (emergency mode) manually. Others Adjuster Note Turn the projector on when the lens protector on page 43. A...
... following procedure, try to diagnose the problem using the instructions described in direction of the projector is completely open , or the tilt adjuster is equipped with qualified Sony personnel immediately. You cannot recover the powered function yourself if you can operate the lens ...protector and the tilt adjuster (emergency mode) manually. Others Adjuster Note Turn the projector on when the lens protector on page 43. A...
User Manual
Page 48
...LCD panels, 1 lens, projection system LCD panel Superhigh-aperture 0.62-inch SVGA panel, 1,440,000 pixels (480,000 pixels × 3) Lens 1.2 times zoom lens (manual) f 18.0 to 21.6 mm/F 2.2 to 2.4 Lamp VPL-CS7: 185 W UHP VPL-ES2: 157 W UHP Projection picture size Range: 40 to 300 inches (diagonal measure) Light output VPL-CS7: 1800 ANSI1) lm VPL-ES2...feet) 300-inch: 8.8 to 10.6 m (23 to "High") Throwing distance (When placing on the floor) When the SVGA signal is a measuring method of American National Standard IT 7.228. 2) Set the resolution and the frequency of the signal ...
...LCD panels, 1 lens, projection system LCD panel Superhigh-aperture 0.62-inch SVGA panel, 1,440,000 pixels (480,000 pixels × 3) Lens 1.2 times zoom lens (manual) f 18.0 to 21.6 mm/F 2.2 to 2.4 Lamp VPL-CS7: 185 W UHP VPL-ES2: 157 W UHP Projection picture size Range: 40 to 300 inches (diagonal measure) Light output VPL-CS7: 1800 ANSI1) lm VPL-ES2...feet) 300-inch: 8.8 to 10.6 m (23 to "High") Throwing distance (When placing on the floor) When the SVGA signal is a measuring method of American National Standard IT 7.228. 2) Set the resolution and the frequency of the signal ...

User Manual
Page 49
... Commander (1) Lithium battery CR2025 (1) HD D-sub 15 pin cable (2 m) (1) (1-791-992-21) Soft case (1) AC power cord (1) Air filter (for VPL-ES2 only) Signal Cable SMF-402 (HD D-sub 15-pin (male) y 3 × phono type (male)) Pin assignment INPUT A connector (HD D-sub 15... GND (G) 15 DDC/SCL 8 GND (B) Specifications 49 Others Optional accessories Projector Lamp (for replacement) LMP-E180 (for VPL-CS7 only) LMP-E150 (for replacement) (1) Operating Instructions (CD-ROM) (1) Quick Reference Manual (1) Security Label (1) Design and specifications are subject to change without notice....
... Commander (1) Lithium battery CR2025 (1) HD D-sub 15 pin cable (2 m) (1) (1-791-992-21) Soft case (1) AC power cord (1) Air filter (for VPL-ES2 only) Signal Cable SMF-402 (HD D-sub 15-pin (male) y 3 × phono type (male)) Pin assignment INPUT A connector (HD D-sub 15... GND (G) 15 DDC/SCL 8 GND (B) Specifications 49 Others Optional accessories Projector Lamp (for replacement) LMP-E180 (for VPL-CS7 only) LMP-E150 (for replacement) (1) Operating Instructions (CD-ROM) (1) Quick Reference Manual (1) Security Label (1) Design and specifications are subject to change without notice....

