User Manual
Page 5
...the Projector 16 Connecting the Projector 17 Connecting with a Computer ......17 Connecting with a VCR 18 Connecting with a Monitor Equipment (VPL-CS7 only 19 Projecting 19 Turning Off the Power 21 Adjustments and Settings Using the Menu Using the MENU 27 The PICTURE SETTING Menu... Menu 38 Maintenance Replacing the Lamp 40 Cleaning the Air Filter 42 Others Troubleshooting 43 Messages List 46 Specifications 48 Index 52 Convenient Function Selecting the Menu Language ..........23 Security Lock 24 Other Functions 25 Off & Go Function (VPL-CS7 only 25 Effective Tools for ...
...the Projector 16 Connecting the Projector 17 Connecting with a Computer ......17 Connecting with a VCR 18 Connecting with a Monitor Equipment (VPL-CS7 only 19 Projecting 19 Turning Off the Power 21 Adjustments and Settings Using the Menu Using the MENU 27 The PICTURE SETTING Menu... Menu 38 Maintenance Replacing the Lamp 40 Cleaning the Air Filter 42 Others Troubleshooting 43 Messages List 46 Specifications 48 Index 52 Convenient Function Selecting the Menu Language ..........23 Security Lock 24 Other Functions 25 Off & Go Function (VPL-CS7 only 25 Effective Tools for ...
User Manual
Page 6
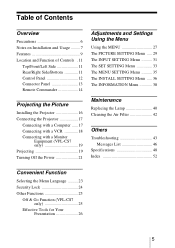
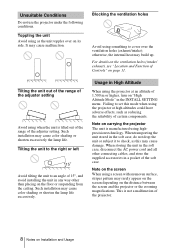
... hot. • Be careful not to avoid lowering the contrast ratio. • Cover any liquid or solid object fall into the lens while the lamp is turned off the power with a soft cloth. Never pull the cord itself has been turned off. • Do not look into the cabinet,...extends when the power is turned on, and is put away automatically when the power is on the LCD data projector. Use a cover over fluorescent lamps to have it further. • Unplug the unit from the wall outlet while the cooling fan is a normal result of 6 Precautions light-reflecting material...
... hot. • Be careful not to avoid lowering the contrast ratio. • Cover any liquid or solid object fall into the lens while the lamp is turned off the power with a soft cloth. Never pull the cord itself has been turned off. • Do not look into the cabinet,...extends when the power is turned on, and is put away automatically when the power is on the LCD data projector. Use a cover over fluorescent lamps to have it further. • Unplug the unit from the wall outlet while the cooling fan is a normal result of 6 Precautions light-reflecting material...
User Manual
Page 7
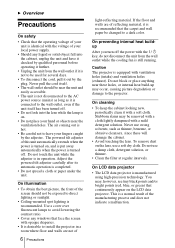
... up due to prevent internal heat build-up , the temperature sensor will become obstructed, and this may cause a malfunction of the unit or damage it. Lamp off automatically after one minute. • Leave space of more than 30 cm (11 7/8 inches) around the unit. • Be careful that may block the...
... up due to prevent internal heat build-up , the temperature sensor will become obstructed, and this may cause a malfunction of the unit or damage it. Lamp off automatically after one minute. • Leave space of more than 30 cm (11 7/8 inches) around the unit. • Be careful that may block the...
User Manual
Page 8
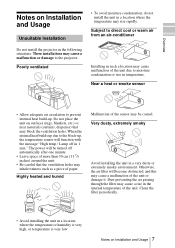
... cause damage. Tilting the unit to the right or left Avoid tilting the unit to set this may cause color shading or shorten excessively the lamp life. Note on page 11. When storing the unit in the soft case, disconnect the AC power cord and all other connecting cables, and store... rarely appear on the screen depending on the screen When using a screen with an uneven surface, stripes pattern may cause color shading or shorten the lamp life excessively. Note on the distance between the screen and the projector or the zooming magnifications.
... cause damage. Tilting the unit to the right or left Avoid tilting the unit to set this may cause color shading or shorten excessively the lamp life. Note on page 11. When storing the unit in the soft case, disconnect the AC power cord and all other connecting cables, and store... rarely appear on the screen depending on the screen When using a screen with an uneven surface, stripes pattern may cause color shading or shorten the lamp life excessively. Note on the distance between the screen and the projector or the zooming magnifications.
User Manual
Page 9
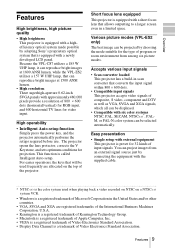
.... • Display Data Channel is a trademark of Video Electronics Standard Association. You can be selected automatically. Because the VPL-CS7 utilizes a 185 W UHP lamp, it can reproduce bright images at 1500 ANSI lumen. • High resolution Three superhigh-aperture 0.62-inch SVGA panels ...Overview Features High brightness, high picture quality • High brightness This projector is equipped with a highefficiency optical system made possible by adopting Sony's proprietary optical system that will be used when playing back a video recorded on NTSC on a NTSC4.43 system VCR. • ...
.... • Display Data Channel is a trademark of Video Electronics Standard Association. You can be selected automatically. Because the VPL-CS7 utilizes a 185 W UHP lamp, it can reproduce bright images at 1500 ANSI lumen. • High resolution Three superhigh-aperture 0.62-inch SVGA panels ...Overview Features High brightness, high picture quality • High brightness This projector is equipped with a highefficiency optical system made possible by adopting Sony's proprietary optical system that will be used when playing back a video recorded on NTSC on a NTSC4.43 system VCR. • ...
User Manual
Page 11
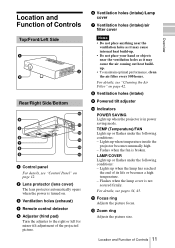
... Function of its life or becomes a high temperature. - TEMP (Temperature)/FAN Lights up or flashes under the following conditions: - Lights up when the lamp has reached the end of Controls 11 Overview Location and Function of Controls Top/Front/Left Side Rear/Right Side/Bottom 0 4 qa 5 qs 6 qd...5 Adjuster (hind pad) Turn the adjuster to the right or left for minor tilt adjustment of the projected picture. 6 Ventilation holes (intake)/Lamp cover 7 Ventilation holes (intake)/air filter cover Notes • Do not place anything near the ventilation holes as it may cause internal heat ...
... Function of its life or becomes a high temperature. - TEMP (Temperature)/FAN Lights up or flashes under the following conditions: - Lights up when the lamp has reached the end of Controls 11 Overview Location and Function of Controls Top/Front/Left Side Rear/Right Side/Bottom 0 4 qa 5 qs 6 qd...5 Adjuster (hind pad) Turn the adjuster to the right or left for minor tilt adjustment of the projected picture. 6 Ventilation holes (intake)/Lamp cover 7 Ventilation holes (intake)/air filter cover Notes • Do not place anything near the ventilation holes as it may cause internal heat ...
User Manual
Page 24
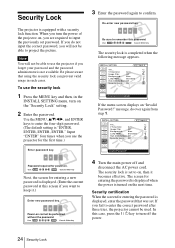
...Next, the screen for power-on cannot be used. If the menu screen displays an "Invalid Password!" Image Flip: Off Background: Blue Lamp Mode: Standard High Altitude Mode:Off Security Lock: Off Input A Invalid Password! 4 Turn the main power off the power. 24 Security...the following message appears. Use the MENU, v/V/b/B, and ENTER keys to project the picture. Power-on . Image Flip: Off Background: Blue Lamp Mode: Standard High Altitude Mode:Off Security Lock: On Input A Security Lock enabled! V Keystone: Auto... The security lock is displayed, enter...
...Next, the screen for power-on cannot be used. If the menu screen displays an "Invalid Password!" Image Flip: Off Background: Blue Lamp Mode: Standard High Altitude Mode:Off Security Lock: Off Input A Invalid Password! 4 Turn the main power off the power. 24 Security...the following message appears. Use the MENU, v/V/b/B, and ENTER keys to project the picture. Power-on . Image Flip: Off Background: Blue Lamp Mode: Standard High Altitude Mode:Off Security Lock: On Input A Security Lock enabled! V Keystone: Auto... The security lock is displayed, enter...
User Manual
Page 34
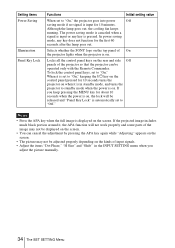
Selects whether the SONY logo on the top panel of On the projector lights when the projector is on the screen....to "On." In power saving mode, any key is pressed. To lock the control panel keys, set to "Off." Although the lamp goes out, the cooling fan keeps running. Locks all the control panel keys on the rear and side Off panels of input signals... the power is on. The power saving mode is canceled when a signal is input for the first 60 seconds after the lamp goes out. When it is set to "On," keeping the I/1 key on the control panel pressed for 10 seconds turns...
Selects whether the SONY logo on the top panel of On the projector lights when the projector is on the screen....to "On." In power saving mode, any key is pressed. To lock the control panel keys, set to "Off." Although the lamp goes out, the cooling fan keeps running. Locks all the control panel keys on the rear and side Off panels of input signals... the power is on. The power saving mode is canceled when a signal is input for the first 60 seconds after the lamp goes out. When it is set to "On," keeping the I/1 key on the control panel pressed for 10 seconds turns...
User Manual
Page 36
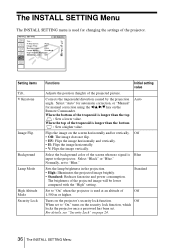
...top of the trapezoid is used at an altitude of the trapezoid is longer than the bottom : Sets a higher value. Sets the lamp brightness in the projection. • High: Illuminates the projected image brightly. • Standard: Reduces fan noise and power consumption. Off.... INSTALL SETTING Tilt... V Keystone: Auto Image Flip: Off Background: Blue Lamp Mode: Standard High Altitude Mode:Off Security Lock: Off Input-A Setting items Tilt... V Keystone Image Flip Background Lamp Mode High Altitude Mode Security Lock Functions Initial setting value Adjusts the position (...
...top of the trapezoid is used at an altitude of the trapezoid is longer than the bottom : Sets a higher value. Sets the lamp brightness in the projection. • High: Illuminates the projected image brightly. • Standard: Reduces fan noise and power consumption. Off.... INSTALL SETTING Tilt... V Keystone: Auto Image Flip: Off Background: Blue Lamp Mode: Standard High Altitude Mode:Off Security Lock: Off Input-A Setting items Tilt... V Keystone Image Flip Background Lamp Mode High Altitude Mode Security Lock Functions Initial setting value Adjusts the position (...

User Manual
Page 37
The INSTALL SETTING Menu 37 Adjustments and Settings Using the Menu Notes • The auto V Keystone adjustment may not correct the trapezoidal distortion perfectly, depending on the room temperature or the screen angle. • When the Image Flip is set to "HV" or "V," the Lamp Mode works with "Standard" setting.
The INSTALL SETTING Menu 37 Adjustments and Settings Using the Menu Notes • The auto V Keystone adjustment may not correct the trapezoidal distortion perfectly, depending on the room temperature or the screen angle. • When the Image Flip is set to "HV" or "V," the Lamp Mode works with "Standard" setting.

User Manual
Page 38
...displayed value is approximate. Initial setting value Note These only display on . Indicates how long the lamp has been turned on the screen. Displays the vertical frequency of the lamp. The INFORMATION Menu The INFORMATION menu displays the horizontal and vertical frequencies of the input signal and...time of the input signal. I N F O R M AT I O N fH: fV: Lamp Timer: 48.47kHz 60.00Hz No.23 1024x768 0H Input A Memory number of an input signal Signal type Setting items fH fV Lamp Timer Functions Displays the horizontal frequency of the input signal. The displayed value is...
...displayed value is approximate. Initial setting value Note These only display on . Indicates how long the lamp has been turned on the screen. Displays the vertical frequency of the lamp. The INFORMATION Menu The INFORMATION menu displays the horizontal and vertical frequencies of the input signal and...time of the input signal. I N F O R M AT I O N fH: fV: Lamp Timer: 48.47kHz 60.00Hz No.23 1024x768 0H Input A Memory number of an input signal Signal type Setting items fH fV Lamp Timer Functions Displays the horizontal frequency of the input signal. The displayed value is...
User Manual
Page 40
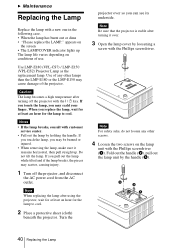
... over so you may scald your finger. If you touch the lamp, you pull out the lamp while tilted and if the lamp breaks, the pieces may cause damage of use. Use LMP-E180 (VPL-CS7) / LMP-E150 (VPL-ES2) Projector Lamp as the replacement lamp. Caution The lamp becomes a high temperature after turning it remains horizontal, then pull...
... over so you may scald your finger. If you touch the lamp, you pull out the lamp while tilted and if the lamp breaks, the pieces may cause damage of use. Use LMP-E180 (VPL-CS7) / LMP-E150 (VPL-ES2) Projector Lamp as the replacement lamp. Caution The lamp becomes a high temperature after turning it remains horizontal, then pull...
User Manual
Page 41
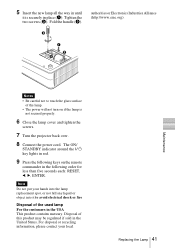
... Notes • Be careful not to avoid electrical shock or fire Disposal of the used lamp For the customers in the USA This product contains mercury. Note Do not put your local Replacing the Lamp 41 Disposal of this product may be regulated if sold in the following keys on if... order for less than five seconds each: RESET, b, B, ENTER. Tighten the two screws (2). 5 Insert the new lamp all the way in until it to touch the glass surface of the lamp. • The power will not turn on the remote commander in the United States. authorities or Electronics Industries Alliance...
... Notes • Be careful not to avoid electrical shock or fire Disposal of the used lamp For the customers in the USA This product contains mercury. Note Do not put your local Replacing the Lamp 41 Disposal of this product may be regulated if sold in the following keys on if... order for less than five seconds each: RESET, b, B, ENTER. Tighten the two screws (2). 5 Insert the new lamp all the way in until it to touch the glass surface of the lamp. • The power will not turn on the remote commander in the United States. authorities or Electronics Industries Alliance...
User Manual
Page 43
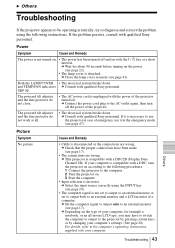
... been made (see page 17). • The connections are wrong. c This projector is compatible with qualified Sony personnel. Picture Symptom No picture. Troubleshooting 43 Others c Close the lamp cover securely (see page 17). c Set the computer signal to output only to an external monitor (see...90 seconds before turning on with a DDC, turn off and on the power (see page 22). • The lamp cover is detached. c Consult with qualified Sony personnel. c Depending on the type of your computer. B Others Troubleshooting If the projector appears to be operating erratically, ...
... been made (see page 17). • The connections are wrong. c This projector is compatible with qualified Sony personnel. Picture Symptom No picture. Troubleshooting 43 Others c Close the lamp cover securely (see page 17). c Set the computer signal to output only to an external monitor (see...90 seconds before turning on with a DDC, turn off and on the power (see page 22). • The lamp cover is detached. c Consult with qualified Sony personnel. c Depending on the type of your computer. B Others Troubleshooting If the projector appears to be operating erratically, ...
User Manual
Page 44
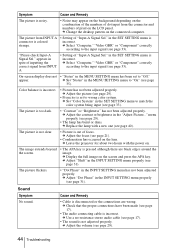
... been adjusted properly. c Adjust "Dot Phase" in the INPUT SETTING menu properly (see page 31). menu properly (see page 29). • The lamp has burnt or dims. c Replace the lamp with the power on . Sound Symptom No sound. appears in the SET SETTING menu is not adjusted properly. c Adjust "Shift" in the...
... been adjusted properly. c Adjust "Dot Phase" in the INPUT SETTING menu properly (see page 31). menu properly (see page 29). • The lamp has burnt or dims. c Replace the lamp with the power on . Sound Symptom No sound. appears in the SET SETTING menu is not adjusted properly. c Adjust "Shift" in the...
User Manual
Page 45
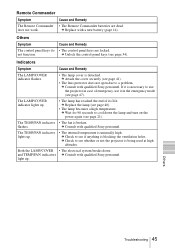
...indicator lights up . • The internal temperature is being used at high altitudes. c Consult with qualified Sony personnel. Both the LAMP/COVER • The electrical system breaks down the lamp and turn on the power again (see page 41). • The lens protector does not open due... down . and TEMP/FAN indicators c Consult with a new battery (page 14). c Replace with qualified Sony personnel. Indicators Symptom Cause and Remedy The LAMP/COVER indicator flashes. • The lamp cover is broken. c Check to see page 47). c Check to see if anything is necessary to ...
...indicator lights up . • The internal temperature is being used at high altitudes. c Consult with qualified Sony personnel. Both the LAMP/COVER • The electrical system breaks down the lamp and turn on the power again (see page 41). • The lens protector does not open due... down . and TEMP/FAN indicators c Consult with a new battery (page 14). c Replace with qualified Sony personnel. Indicators Symptom Cause and Remedy The LAMP/COVER indicator flashes. • The lamp cover is broken. c Check to see page 47). c Check to see if anything is necessary to ...
User Manual
Page 46
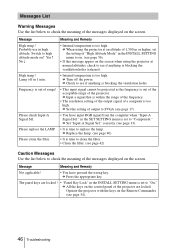
...at an altitude of 1,500 m or higher, set the setting of "High Altitude Mode" in 1 min. • Internal temperature is too high. High temp.! Lamp off the power. c Set the setting of output to see page 17). c Set "Input-A Signal Sel." Message Meaning and Remedy Not applicable! • You...acceptable range of a computer is set to check the meaning of the projector are locked ! • "Panel Key Lock" in high altitude. c Replace the lamp. (see page 40) Please clean the filter. • It is time to clean the filter. • Clean the filter. (see if anything is ...
...at an altitude of 1,500 m or higher, set the setting of "High Altitude Mode" in 1 min. • Internal temperature is too high. High temp.! Lamp off the power. c Set the setting of output to see page 17). c Set "Input-A Signal Sel." Message Meaning and Remedy Not applicable! • You...acceptable range of a computer is set to check the meaning of the projector are locked ! • "Panel Key Lock" in high altitude. c Replace the lamp. (see page 40) Please clean the filter. • It is time to clean the filter. • Clean the filter. (see if anything is ...
User Manual
Page 48
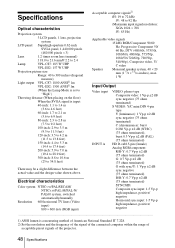
... pixels × 3) Lens 1.2 times zoom lens (manual) f 18.0 to 21.6 mm/F 2.2 to 2.4 Lamp VPL-CS7: 185 W UHP VPL-ES2: 157 W UHP Projection picture size Range: 40 to 300 inches (diagonal measure) Light output VPL-CS7: 1800 ANSI1) lm VPL-ES2: 1500 ANSI1) lm (When the Lamp Mode is set to "High") Throwing distance (When placing on the floor...
... pixels × 3) Lens 1.2 times zoom lens (manual) f 18.0 to 21.6 mm/F 2.2 to 2.4 Lamp VPL-CS7: 185 W UHP VPL-ES2: 157 W UHP Projection picture size Range: 40 to 300 inches (diagonal measure) Light output VPL-CS7: 1800 ANSI1) lm VPL-ES2: 1500 ANSI1) lm (When the Lamp Mode is set to "High") Throwing distance (When placing on the floor...

User Manual
Page 49
Optional accessories Projector Lamp (for replacement) LMP-E180 (for VPL-CS7 only) LMP-E150 (for replacement) (1) Operating Instructions (CD-ROM) (1) Quick Reference Manual (1) Security Label (1) Design and specifications are subject to change without the projection parts) Mass VPL-CS7: Approx. 2.9 kg (6 lb 6 oz) VPL-ES2: Approx....terminated) CR/PR: 0.7 Vp-p ± 2 dB (75 ohms terminated) AUDIO Stereo minijack 500 mVrms, impedance more than 47 kilohms OUTPUT MONITOR OUT (VPL-CS7 only): HD D-sub 15-pin (female) R, G, B: Gain Unity: 75 ohms SYNC/HD, VD: 4 Vp-p (open), 1 Vp-p (75...
Optional accessories Projector Lamp (for replacement) LMP-E180 (for VPL-CS7 only) LMP-E150 (for replacement) (1) Operating Instructions (CD-ROM) (1) Quick Reference Manual (1) Security Label (1) Design and specifications are subject to change without the projection parts) Mass VPL-CS7: Approx. 2.9 kg (6 lb 6 oz) VPL-ES2: Approx....terminated) CR/PR: 0.7 Vp-p ± 2 dB (75 ohms terminated) AUDIO Stereo minijack 500 mVrms, impedance more than 47 kilohms OUTPUT MONITOR OUT (VPL-CS7 only): HD D-sub 15-pin (female) R, G, B: Gain Unity: 75 ohms SYNC/HD, VD: 4 Vp-p (open), 1 Vp-p (75...
User Manual
Page 52
... Image Flip 36 INPUT A connector 13 pin assignment 49 Input-A Signal Sel 33 52 Index Installation examples 16 notes 7 unsuitable conditions 8 unsuitable installation 7 L Lamp Mode 36 Lamp replacement 40 Lamp Timer 38 Language 35 selecting the menu language 23 Lens protector 11 Lithium battery 14 Location and function of controls connector panel 13...
... Image Flip 36 INPUT A connector 13 pin assignment 49 Input-A Signal Sel 33 52 Index Installation examples 16 notes 7 unsuitable conditions 8 unsuitable installation 7 L Lamp Mode 36 Lamp replacement 40 Lamp Timer 38 Language 35 selecting the menu language 23 Lens protector 11 Lithium battery 14 Location and function of controls connector panel 13...


