
Operating Instructions
Page 2
... NOT USE ANY OTHER POWER CORD. Connect the equipment into an outlet on the bottom. WARNING: THIS WARNING IS APPLICABLE FOR USA ONLY. If used in USA, use of each country if applicable. 2. This equipment has been tested and found to comply with the instructions, may require the use size AA (R6) manganese or alkaline batteries. These limits are supplied for help. Plug...
... NOT USE ANY OTHER POWER CORD. Connect the equipment into an outlet on the bottom. WARNING: THIS WARNING IS APPLICABLE FOR USA ONLY. If used in USA, use of each country if applicable. 2. This equipment has been tested and found to comply with the instructions, may require the use size AA (R6) manganese or alkaline batteries. These limits are supplied for help. Plug...

Operating Instructions
Page 4
...24 Projecting Projecting the Picture on the Screen 26 Turning Off the Power 27 Selecting the Wide Screen Mode ..... 28 Selecting the Picture Viewing Mode 30 Adjusting the Picture Quality .......... 31 Using Other Functions 32 Using the Menus Operation through the Menus ...........33 PICTURE SETTING Menu 35 INPUT SETTING Menu 37 About the Preset Memory No. ....38 SET SETTING Menu 39 MENU SETTING Menu 41 INSTALL SETTING Menu 42 INFORMATION Menu 44 Input Signals and Adjustable/ Setting Items 45 Others Troubleshooting 46 Message Lists 48 Replacing the Lamp 49 Cleaning the Air Filter...
...24 Projecting Projecting the Picture on the Screen 26 Turning Off the Power 27 Selecting the Wide Screen Mode ..... 28 Selecting the Picture Viewing Mode 30 Adjusting the Picture Quality .......... 31 Using Other Functions 32 Using the Menus Operation through the Menus ...........33 PICTURE SETTING Menu 35 INPUT SETTING Menu 37 About the Preset Memory No. ....38 SET SETTING Menu 39 MENU SETTING Menu 41 INSTALL SETTING Menu 42 INFORMATION Menu 44 Input Signals and Adjustable/ Setting Items 45 Others Troubleshooting 46 Message Lists 48 Replacing the Lamp 49 Cleaning the Air Filter...

Operating Instructions
Page 5
... be used for several days. • To disconnect the cord, pull it is connected to the wall outlet, even if the unit itself . • The wall outlet should be removed with a soft cloth such as a cleaning cloth or glass cleaning cloth lightly dampened with a soft cloth. Never pull the cord itself has been turned off the power with the ?/1 (On/standby) switch...
... be used for several days. • To disconnect the cord, pull it is connected to the wall outlet, even if the unit itself . • The wall outlet should be removed with a soft cloth such as a cleaning cloth or glass cleaning cloth lightly dampened with a soft cloth. Never pull the cord itself has been turned off the power with the ?/1 (On/standby) switch...

Operating Instructions
Page 7
... ready to operate. -Flashes in orange when the power saving mode is plugged into a wall outlet. The fan runs for about 90 seconds after the projector is in standby mode, you press the button. e INPUT button Selects an input signal. Location of Controls a Ventilation holes (exhaust) b Lens Remove the lens cover before projection. To turn it on the projector when the projector is in red when the AC power cord is on . c Front remote control detector d ?/1 (On/standby) switch Turns on with...
... ready to operate. -Flashes in orange when the power saving mode is plugged into a wall outlet. The fan runs for about 90 seconds after the projector is in standby mode, you press the button. e INPUT button Selects an input signal. Location of Controls a Ventilation holes (exhaust) b Lens Remove the lens cover before projection. To turn it on the projector when the projector is in red when the AC power cord is on . c Front remote control detector d ?/1 (On/standby) switch Turns on with...

Operating Instructions
Page 11
d M/m/ a LIGHT button Illuminates the buttons on the remote control. To cancel the frozen picture, press the button again. b INPUT button c FREEZE key Freezes the projected picture.
d M/m/ a LIGHT button Illuminates the buttons on the remote control. To cancel the frozen picture, press the button again. b INPUT button c FREEZE key Freezes the projected picture.
Operating Instructions
Page 27
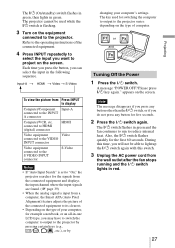
... light up the ?/1 switch again with this time, you will not be used for five seconds. 2 Press the ?/1 switch again. connected to HDMI (digital) connector HDMI Video equipment Video connected to the VIDEO INPUT connector Video equipment connected to the S VIDEO INPUT connector S-Video Notes • If "Auto Input Search" is set to "On," the projector searches for the signals from Press INPUT to display Computer/Component Input-A connected to the projector by pressing certain keys (e.g., / , LCD VGA / , etc.), or by changing...
... light up the ?/1 switch again with this time, you will not be used for five seconds. 2 Press the ?/1 switch again. connected to HDMI (digital) connector HDMI Video equipment Video connected to the VIDEO INPUT connector Video equipment connected to the S VIDEO INPUT connector S-Video Notes • If "Auto Input Search" is set to "On," the projector searches for the signals from Press INPUT to display Computer/Component Input-A connected to the projector by pressing certain keys (e.g., / , LCD VGA / , etc.), or by changing...

Operating Instructions
Page 28
... it using the menu. (1 page 37) Wide Zoom (When the SD signal is input) A 4:3 aspect ratio picture is operated WIDE MODE button Press WIDE MODE. The upper and lower portions of the screen to fill the vertical screen size. Each time you press the button, you can change the "Wide Mode" setting in the center of the screen are slightly cut off. A 4:3 picture is enlarged horizontally to a 4:3 picture. 28 Original image When...
... it using the menu. (1 page 37) Wide Zoom (When the SD signal is input) A 4:3 aspect ratio picture is operated WIDE MODE button Press WIDE MODE. The upper and lower portions of the screen to fill the vertical screen size. Each time you press the button, you can change the "Wide Mode" setting in the center of the screen are slightly cut off. A 4:3 picture is enlarged horizontally to a 4:3 picture. 28 Original image When...

Operating Instructions
Page 29
... Wide Mode is input) Displays a 1280 × 720 dot picture on the whole of the screen. Projecting Zoom (When the SD or PC signal is input) A normal 16:9 aspect ratio picture is used for profit or for public viewing, modifying the original picture by switching to view a letterbox picture or a letterbox picture with side panels When the Wide Mode is operated Letterbox picture Full 1 (When the PC signal is input) Displays a picture on the screen without changing the...
... Wide Mode is input) Displays a 1280 × 720 dot picture on the whole of the screen. Projecting Zoom (When the SD or PC signal is input) A normal 16:9 aspect ratio picture is used for profit or for public viewing, modifying the original picture by switching to view a letterbox picture or a letterbox picture with side panels When the Wide Mode is operated Letterbox picture Full 1 (When the PC signal is input) Displays a picture on the screen without changing the...

Operating Instructions
Page 33
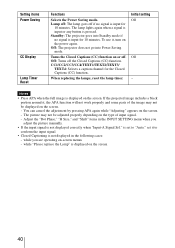
... Input-A Signal Sel.: Component Color System: Auto Power Saving: Off CC Display: Off Lamp Timer Reset 2 Press M/m to make various adjustments and settings using "Status" in the column on -screen menu for making various adjustments and settings. Operation through the Menus The projector is input. setting in the SET SETTING menu. 1 Press MENU. The items that can hide this indicator using the menus. If you want to select an item you select an item name followed by dots...
... Input-A Signal Sel.: Component Color System: Auto Power Saving: Off CC Display: Off Lamp Timer Reset 2 Press M/m to make various adjustments and settings using "Status" in the column on -screen menu for making various adjustments and settings. Operation through the Menus The projector is input. setting in the SET SETTING menu. 1 Press MENU. The items that can hide this indicator using the menus. If you want to select an item you select an item name followed by dots...

Operating Instructions
Page 35
... settings. PICTURE SETTING Menu The PICTURE SETTING menu is used for more natural picture than the picture with the adjusted picture quality by pressing CONTRAST+/- Initial setting Set according to the factory settings, select "Picture Mode," and press RESET on the remote control. • Some items may not be displayed in the menus. Standard: Select this for bright picture suitable for watching movies, etc. To reset everything to the input signal To store the settings 1 Select User 1, User 2, or User 3. 2 Adjust...
... settings. PICTURE SETTING Menu The PICTURE SETTING menu is used for more natural picture than the picture with the adjusted picture quality by pressing CONTRAST+/- Initial setting Set according to the factory settings, select "Picture Mode," and press RESET on the remote control. • Some items may not be displayed in the menus. Standard: Select this for bright picture suitable for watching movies, etc. To reset everything to the input signal To store the settings 1 Select User 1, User 2, or User 3. 2 Adjust...

Operating Instructions
Page 38
... dot picture on the whole of the screen without changing the aspect ratio of the LCD. Hides the outer edges of the picture. Select this setting when noise appears along the edge of the picture. The memory number and signal type of that signal are displayed on the screen according to the wide mode may be smaller. Zoom: A normal 16:9 aspect ratio picture is input, the projector automatically...
... dot picture on the whole of the screen without changing the aspect ratio of the LCD. Hides the outer edges of the picture. Select this setting when noise appears along the edge of the picture. The memory number and signal type of that signal are displayed on the screen according to the wide mode may be smaller. Zoom: A normal 16:9 aspect ratio picture is input, the projector automatically...

Operating Instructions
Page 39
... "Input-A" with the INPUT button. When set to the input signal. Color System Functions The APA (Auto Pixel Alignment) automatically adjusts "Dot Phase," "H Size" and "Shift" in the following order: Input-A, HDMI, Video and SVideo. Detects the input signal and displays the detected input signal automatically when the INPUT button is distorted or colorless, select the color system according to "On." SET SETTING Smar t APA: On Auto Input Search: Off Input-A Signal Sel.: Auto Color System: Auto Power Saving: Off CC Display: Off Lamp Timer Reset Input-A Using...
... "Input-A" with the INPUT button. When set to the input signal. Color System Functions The APA (Auto Pixel Alignment) automatically adjusts "Dot Phase," "H Size" and "Shift" in the following order: Input-A, HDMI, Video and SVideo. Detects the input signal and displays the detected input signal automatically when the INPUT button is distorted or colorless, select the color system according to "On." SET SETTING Smar t APA: On Auto Input Search: Off Input-A Signal Sel.: Auto Color System: Auto Power Saving: Off CC Display: Off Lamp Timer Reset Input-A Using...
Operating Instructions
Page 40
... Power Saving mode. Off: Turns off if no signal is displayed on the screen 40 If the projected image includes a black portion around it, the APA function will not work properly and some parts of input signal. - Adjust the "Dot Phase," "H Size," and "Shift" items in the following cases: - Off: The projector does not go into Standby mode if no signal is input for 10 minutes. To use it to "Auto," set it , turn...
... Power Saving mode. Off: Turns off if no signal is displayed on the screen 40 If the projected image includes a black portion around it, the APA function will not work properly and some parts of input signal. - Adjust the "Dot Phase," "H Size," and "Shift" items in the following cases: - Off: The projector does not go into Standby mode if no signal is input for 10 minutes. To use it to "Auto," set it , turn...

Operating Instructions
Page 46
... DDC2B (Digital Data Channel 2B). Cause and Remedy • The power has been turned off and on the power (1 page 27). • The lamp cover is not set to output to an external monitor or set to output both to replace the lamp and air filter, etc. c Wait for about 90 seconds before turning on with DDC, turn the projector on according to the following instructions. c Press...
... DDC2B (Digital Data Channel 2B). Cause and Remedy • The power has been turned off and on the power (1 page 27). • The lamp cover is not set to output to an external monitor or set to output both to replace the lamp and air filter, etc. c Wait for about 90 seconds before turning on with DDC, turn the projector on according to the following instructions. c Press...

Operating Instructions
Page 47
... burnt out or is incorrect. c Display the full image on the lens. c Set the output setting to the input signal (1 page 39). Cause and Remedy Batteries are black edges around the image. Remote control Symptom The remote control does not work. Color balance is dim. c Replace the lamp with a new one (1 page 49). • The picture is out of "Input-A Signal Sel" is incorrect. c Adjust the focus using the focus ring (1 page 23). •...
... burnt out or is incorrect. c Display the full image on the lens. c Set the output setting to the input signal (1 page 39). Cause and Remedy Batteries are black edges around the image. Remote control Symptom The remote control does not work. Color balance is dim. c Replace the lamp with a new one (1 page 49). • The picture is out of "Input-A Signal Sel" is incorrect. c Adjust the focus using the focus ring (1 page 23). •...
Operating Instructions
Page 48
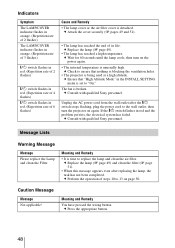
... lamp (1 page 49). • The lamp has reached a high temperature. c Check to "On." Message Lists Warning Message Message Please replace the Lamp and clean the Filter. Caution Message Message Not applicable! The fan is set to ensure that "High Altitude Mode" in red and the problem persists, the electrical system has failed. c Ensure that nothing is blocking the ventilation holes. • The projector is time to 13 on again. If the :/1 switch flashes in the INSTALL SETTING menu...
... lamp (1 page 49). • The lamp has reached a high temperature. c Check to "On." Message Lists Warning Message Message Please replace the Lamp and clean the Filter. Caution Message Message Not applicable! The fan is set to ensure that "High Altitude Mode" in red and the problem persists, the electrical system has failed. c Ensure that nothing is blocking the ventilation holes. • The projector is time to 13 on again. If the :/1 switch flashes in the INSTALL SETTING menu...

Operating Instructions
Page 49
... sure it remains horizontal, then pull straight up (repeats flashing three times) The lamp life varies depending on the screen • The LAMP/COVER indicator lights up . Turn the projector over so you pull out the lamp while tilted and if the lamp breaks, the pieces may cause damage to check inside. • Pull out the lamp by the handle (c). Note Be sure that the...
... sure it remains horizontal, then pull straight up (repeats flashing three times) The lamp life varies depending on the screen • The LAMP/COVER indicator lights up . Turn the projector over so you pull out the lamp while tilted and if the lamp breaks, the pieces may cause damage to check inside. • Pull out the lamp by the handle (c). Note Be sure that the...

Operating Instructions
Page 50
... turned on. 7 Turn the projector back over. 8 Connect the power cord. Change the Lamp and clean the Filter? "Lamp Timer Reset Complete!" SET SETTING Smar t APA: On Auto Input Search: Off Input-A Signal Sel.: Auto Color System: Auto Power Saving: Off CC Display: Off Lamp Timer Reset Input-A Notes • Be careful not to touch the glass surface of the lamp. • The power will not turn the projector on. 10Press MENU, and select the SET SETTING menu. 11Select "Lamp Timer Reset", and press . 12Select "Execute" with M. The ?/1 switch lights in red...
... turned on. 7 Turn the projector back over. 8 Connect the power cord. Change the Lamp and clean the Filter? "Lamp Timer Reset Complete!" SET SETTING Smar t APA: On Auto Input Search: Off Input-A Signal Sel.: Auto Color System: Auto Power Saving: Off CC Display: Off Lamp Timer Reset Input-A Notes • Be careful not to touch the glass surface of the lamp. • The power will not turn the projector on. 10Press MENU, and select the SET SETTING menu. 11Select "Lamp Timer Reset", and press . 12Select "Execute" with M. The ?/1 switch lights in red...
Operating Instructions
Page 52
... 2." Specifications Optical characteristics Projection system 3 LCD panels, 1 lens, projection system LCD panel 0.59-inch WXGA panel, about 3,070,000 pixels (1280 × 800 × 3) Lens 1.2 times zoom lens f 18.53 to 22.18 mm/F1.65 to 1.93 Lamp 195 W Ultra high pressure lamp Projected picture size 40 to 300 inches (measured diagonally) Light output1) 2000 lm 1) When the Lamp Mode is the color system used when playing back a video recorded in the INPUT SETTING menu is set to "High...
... 2." Specifications Optical characteristics Projection system 3 LCD panels, 1 lens, projection system LCD panel 0.59-inch WXGA panel, about 3,070,000 pixels (1280 × 800 × 3) Lens 1.2 times zoom lens f 18.53 to 22.18 mm/F1.65 to 1.93 Lamp 195 W Ultra high pressure lamp Projected picture size 40 to 300 inches (measured diagonally) Light output1) 2000 lm 1) When the Lamp Mode is the color system used when playing back a video recorded in the INPUT SETTING menu is set to "High...

Operating Instructions
Page 53
...;F to 95°F) Operating humidity 35% to 85% (no condensation) Storage temperature -20°C to +60°C (-4°F to +140°F) Storage humidity 10% to 90% Supplied accessories Remote control (1) Size AA (R6) manganese batteries (2) Signal cable (HD D-sub 15-pin y 3 × phono plug) (1) (9-885-125-47, SONY) AC power cord (1) Lens cap (1) Operating Instructions (1) Warranty card (1) Design and specifications are subject to change without notice.
...;F to 95°F) Operating humidity 35% to 85% (no condensation) Storage temperature -20°C to +60°C (-4°F to +140°F) Storage humidity 10% to 90% Supplied accessories Remote control (1) Size AA (R6) manganese batteries (2) Signal cable (HD D-sub 15-pin y 3 × phono plug) (1) (9-885-125-47, SONY) AC power cord (1) Lens cap (1) Operating Instructions (1) Warranty card (1) Design and specifications are subject to change without notice.


