Operating Instructions
Page 2
...: Sony Customer Information Service Center 1-800-222-7669 or http://www.sony.com/ Declaration of Conformity Trade Name: SONY Model: VPL-BW5 Responsible Party: Sony Electronics Inc. WARNING THIS APPARATUS MUST BE EARTHED. Connect the equipment into an outlet on , the user is encouraged to try to Subpart B of Part 15 of explosion if battery is incorrectly replaced. If a fault should occur during operation...
...: Sony Customer Information Service Center 1-800-222-7669 or http://www.sony.com/ Declaration of Conformity Trade Name: SONY Model: VPL-BW5 Responsible Party: Sony Electronics Inc. WARNING THIS APPARATUS MUST BE EARTHED. Connect the equipment into an outlet on , the user is encouraged to try to Subpart B of Part 15 of explosion if battery is incorrectly replaced. If a fault should occur during operation...

Operating Instructions
Page 4
... 24 Projecting Projecting the Picture on the Screen 26 Turning Off the Power 27 Selecting the Wide Screen Mode ..... 28 Selecting the Picture Viewing Mode 30 Adjusting the Picture Quality .......... 31 Using Other Functions 32 Using the Menus Operation through the Menus .......... 33 PICTURE SETTING Menu 35 INPUT SETTING Menu 37 About the Preset Memory No. ....38 SET SETTING Menu 39 MENU SETTING Menu 41 INSTALL SETTING Menu 42 INFORMATION Menu 44 Input Signals and Adjustable/ Setting Items 45 Others Troubleshooting 46 Message Lists 48 Replacing the Lamp 49 Cleaning the Air Filter...
... 24 Projecting Projecting the Picture on the Screen 26 Turning Off the Power 27 Selecting the Wide Screen Mode ..... 28 Selecting the Picture Viewing Mode 30 Adjusting the Picture Quality .......... 31 Using Other Functions 32 Using the Menus Operation through the Menus .......... 33 PICTURE SETTING Menu 35 INPUT SETTING Menu 37 About the Preset Memory No. ....38 SET SETTING Menu 39 MENU SETTING Menu 41 INSTALL SETTING Menu 42 INFORMATION Menu 44 Input Signals and Adjustable/ Setting Items 45 Others Troubleshooting 46 Message Lists 48 Replacing the Lamp 49 Cleaning the Air Filter...

Operating Instructions
Page 5
... cleaner, scouring powder, or volatile solvent, such as they will damage the lens surface. Precautions On safety • Check that continuously appear on the screen The projector is manufactured using highprecision technology. Never pull the cord itself has been turned off the power with the ?/1 (On/standby) switch, do not disconnect the unit from the cabinet, wipe gently with ventilation...
... cleaner, scouring powder, or volatile solvent, such as they will damage the lens surface. Precautions On safety • Check that continuously appear on the screen The projector is manufactured using highprecision technology. Never pull the cord itself has been turned off the power with the ?/1 (On/standby) switch, do not disconnect the unit from the cabinet, wipe gently with ventilation...

Operating Instructions
Page 7
.... Location of Controls a Ventilation holes (exhaust) b Lens Remove the lens cover before projection. The fan runs for about 90 seconds after the power is turned off the power, press the ?/1 switch twice according to operate after the power is turned off with the ?/1 switch. -Flashes in red when the temperature becomes high inside the projector, or when the projector fails to operate. -Lights in standby mode. To turn it is ready to operate. -Flashes in standby mode, you press the button. c Front remote control...
.... Location of Controls a Ventilation holes (exhaust) b Lens Remove the lens cover before projection. The fan runs for about 90 seconds after the power is turned off the power, press the ?/1 switch twice according to operate after the power is turned off with the ?/1 switch. -Flashes in red when the temperature becomes high inside the projector, or when the projector fails to operate. -Lights in standby mode. To turn it is ready to operate. -Flashes in standby mode, you press the button. c Front remote control...

Operating Instructions
Page 11
d M/m/ b INPUT button c FREEZE key Freezes the projected picture. To cancel the frozen picture, press the button again. a LIGHT button Illuminates the buttons on the remote control.
d M/m/ b INPUT button c FREEZE key Freezes the projected picture. To cancel the frozen picture, press the button again. a LIGHT button Illuminates the buttons on the remote control.
Operating Instructions
Page 14
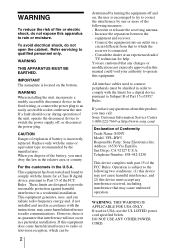
... MUTING button to an angle of 15°, and avoid installing the unit in any object just in front of the lens that covers the ventilation holes (exhaust/ intake); Avoid using a thick-piled carpet or anything that may cause the projector to set this mode when using Do not place a blocking object just in the INSTALL SETTING menu. Heat from the ceiling. Do...
... MUTING button to an angle of 15°, and avoid installing the unit in any object just in front of the lens that covers the ventilation holes (exhaust/ intake); Avoid using a thick-piled carpet or anything that may cause the projector to set this mode when using Do not place a blocking object just in the INSTALL SETTING menu. Heat from the ceiling. Do...

Operating Instructions
Page 27
... Turning Off the Power 1 Press the ?/1 switch. A message "POWER OFF? Please press ?/1 switch again." The ?/1 (On/standby) switch flashes in green, then lights in the following sequence. The key used while the ?/1 switch is input from a computer, the Smart APA (Auto Pixel Alignment) feature adjusts the picture of the connected equipment to project on the screen. appears on the screen. The ?/1 switch flashes in -one LCD type, you can select the input in green. Input-A t HDMI t Video t S-Video To view the picture...
... Turning Off the Power 1 Press the ?/1 switch. A message "POWER OFF? Please press ?/1 switch again." The ?/1 (On/standby) switch flashes in green, then lights in the following sequence. The key used while the ?/1 switch is input from a computer, the Smart APA (Auto Pixel Alignment) feature adjusts the picture of the connected equipment to project on the screen. appears on the screen. The ?/1 switch flashes in -one LCD type, you can select the input in green. Input-A t HDMI t Video t S-Video To view the picture...

Operating Instructions
Page 28
... Zoom (When the SD signal is input) A 4:3 aspect ratio picture is operated WIDE MODE button Press WIDE MODE. Original image Squeezed When the Wide Mode is operated Tip Squeezed: An original 16:9 aspect ratio picture is operated Full A picture squeezed to fit the 16:9 screen. Selecting the Wide Screen Mode You can enjoy various wide screen modes according to a 4:3 picture. 28 Each time you press the button, you can change the "Wide Mode" setting in...
... Zoom (When the SD signal is input) A 4:3 aspect ratio picture is operated WIDE MODE button Press WIDE MODE. Original image Squeezed When the Wide Mode is operated Tip Squeezed: An original 16:9 aspect ratio picture is operated Full A picture squeezed to fit the 16:9 screen. Selecting the Wide Screen Mode You can enjoy various wide screen modes according to a 4:3 picture. 28 Each time you press the button, you can change the "Wide Mode" setting in...

Operating Instructions
Page 33
... 24) RESET button 2,3,4 1 Display items The input signal and input signal setting indicators are displayed on the upper right corner of the adjustable/setting items are displayed in a pop-up menu, adjustment menu, or in the next menu window. Input signal setting indicator When Input-A is input. SET SETTING Input-A Smar t APA: On Auto Input Search: Off Input-A Signal Sel.: Component Color System: Auto Power Saving: Off IR Receiver: Front & Rear Lamp Timer Reset 2 Press M/m to make various adjustments and settings using "Status" in the column on -screen menu for...
... 24) RESET button 2,3,4 1 Display items The input signal and input signal setting indicators are displayed on the upper right corner of the adjustable/setting items are displayed in a pop-up menu, adjustment menu, or in the next menu window. Input signal setting indicator When Input-A is input. SET SETTING Input-A Smar t APA: On Auto Input Search: Off Input-A Signal Sel.: Component Color System: Auto Power Saving: Off IR Receiver: Front & Rear Lamp Timer Reset 2 Press M/m to make various adjustments and settings using "Status" in the column on -screen menu for...

Operating Instructions
Page 35
... each picture mode separately. User 1, User 2, User 3: You can store the setting values of picture or the environment. Initial setting Set according to the factory settings, select "Picture Mode," and press RESET on the remote control. • Some items may not be displayed in the PICTURE SETTING menu, depending on the type of input signal. For details, see "Input Signals and Adjustable/Setting Items" (1 page 45). The lower the setting, the lower the contrast. PICTURE SETTING Menu The PICTURE SETTING menu is used for...
... each picture mode separately. User 1, User 2, User 3: You can store the setting values of picture or the environment. Initial setting Set according to the factory settings, select "Picture Mode," and press RESET on the remote control. • Some items may not be displayed in the PICTURE SETTING menu, depending on the type of input signal. For details, see "Input Signals and Adjustable/Setting Items" (1 page 45). The lower the setting, the lower the contrast. PICTURE SETTING Menu The PICTURE SETTING menu is used for...

Operating Instructions
Page 38
... ratio to 63) is input. The picture will be clear but the picture size will be displayed for public viewing, modifying the original picture by switching to that of that signal are not displayed on the screen according to the input signal. • Note that if the projector is used for profit or for the current input signal. The memory number and signal type of the LCD. This item is...
... ratio to 63) is input. The picture will be clear but the picture size will be displayed for public viewing, modifying the original picture by switching to that of that signal are not displayed on the screen according to the input signal. • Note that if the projector is used for profit or for the current input signal. The memory number and signal type of the LCD. This item is...

Operating Instructions
Page 39
... displays the detected input signal automatically when the INPUT button is set to "On," the projector detects input signals in the INPUT SETTING menu for changing the settings of signal input from a computer. Initial setting On Off Auto 39 Video GBR: Inputs the signal from a DVD player/recorder, Blu-ray Disc player, digital tuner, etc. SET SETTING Input-A Smar t APA: On Auto Input Search: Off Input-A Signal Sel.: Auto Color System: Auto Power Saving: Off IR Receiver: Front & Rear Lamp Timer Reset Setting items Smart APA Auto Input Search Input-A Signal...
... displays the detected input signal automatically when the INPUT button is set to "On," the projector detects input signals in the INPUT SETTING menu for changing the settings of signal input from a computer. Initial setting On Off Auto 39 Video GBR: Inputs the signal from a DVD player/recorder, Blu-ray Disc player, digital tuner, etc. SET SETTING Input-A Smar t APA: On Auto Input Search: Off Input-A Signal Sel.: Auto Color System: Auto Power Saving: Off IR Receiver: Front & Rear Lamp Timer Reset Setting items Smart APA Auto Input Search Input-A Signal...
Operating Instructions
Page 40
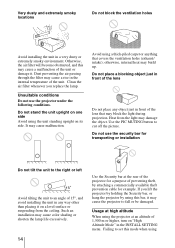
... input signal. 40 Front: Activates the front detector only. Adjust the "Dot Phase," "H Size," and "Shift" items in the INPUT SETTING menu when you select "Auto," the projector detects the color system of the input signal automatically. Selects the Power Saving mode. Selects the remote control detectors (IR Receiver) on the front and rear of the image may not be displayed on the power again. When replacing the lamps, reset the lamp timer. If the projected image...
... input signal. 40 Front: Activates the front detector only. Adjust the "Dot Phase," "H Size," and "Shift" items in the INPUT SETTING menu when you select "Auto," the projector detects the color system of the input signal automatically. Selects the Power Saving mode. Selects the remote control detectors (IR Receiver) on the front and rear of the image may not be displayed on the power again. When replacing the lamps, reset the lamp timer. If the projected image...

Operating Instructions
Page 46
... replace the lamp and air filter, etc. c Attach the air filter cover securely (1 page 51). c This projector is incorrect. Power Symptom The power is muted. Cause and Remedy • The power has been turned off and on the power (1 page 27). • The lamp cover is detached. c Select the input source correctly (1 page 27). • The picture is not turned on . 3 Start the computer. • Input selection is compatible with the ?/1 switch...
... replace the lamp and air filter, etc. c Attach the air filter cover securely (1 page 51). c This projector is incorrect. Power Symptom The power is muted. Cause and Remedy • The power has been turned off and on the power (1 page 27). • The lamp cover is detached. c Select the input source correctly (1 page 27). • The picture is not turned on . 3 Start the computer. • Input selection is compatible with the ?/1 switch...

Operating Instructions
Page 47
... screen and press APA. c Leave the projector for about two hours with new batteries (1 page 12). 47 The input signal cannot be projected as the frequency is out of the acceptable range of "Input-A Signal Sel" is too high. c Adjust the picture (1 page 31). • The projector is out of "Input-A Signal Sel" in the SET SETTING menu to "Off." c Display the full image on the lens. Remote control Symptom The remote control does not work...
... screen and press APA. c Leave the projector for about two hours with new batteries (1 page 12). 47 The input signal cannot be projected as the frequency is out of the acceptable range of "Input-A Signal Sel" is too high. c Adjust the picture (1 page 31). • The projector is out of "Input-A Signal Sel" in the SET SETTING menu to "Off." c Display the full image on the lens. Remote control Symptom The remote control does not work...
Operating Instructions
Page 48
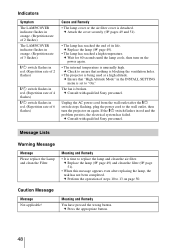
... Sony personnel. Message Lists Warning Message Message Please replace the Lamp and clean the Filter. c Press the appropriate button. 48 c Replace the lamp (1 page 49). • The lamp has reached a high temperature. If the :/1 switch flashes in red and the problem persists, the electrical system has failed. c Wait for 60 seconds until the lamp cools, then turn the projector on again. Caution Message Message Not applicable! Indicators Symptom The LAMP/COVER indicator flashes in orange. (Repetition rate of 2 flashes) The LAMP/COVER indicator flashes in orange...
... Sony personnel. Message Lists Warning Message Message Please replace the Lamp and clean the Filter. c Press the appropriate button. 48 c Replace the lamp (1 page 49). • The lamp has reached a high temperature. If the :/1 switch flashes in red and the problem persists, the electrical system has failed. c Wait for 60 seconds until the lamp cools, then turn the projector on again. Caution Message Message Not applicable! Indicators Symptom The LAMP/COVER indicator flashes in orange. (Repetition rate of 2 flashes) The LAMP/COVER indicator flashes in orange...

Operating Instructions
Page 49
... the lamp breaks, ask qualified Sony personnel to replace the lamp and to replace it is securely in the following cases. • When the lamp has burnt out or dims • "Please replace the Lamp and clean the Filter" appears on a stable surface. 3 Loosen the screw with a new one in place (a). Use an LMP-E190 Projector Lamp as a light source is placed on the screen • The LAMP/COVER indicator lights up...
... the lamp breaks, ask qualified Sony personnel to replace the lamp and to replace it is securely in the following cases. • When the lamp has burnt out or dims • "Please replace the Lamp and clean the Filter" appears on a stable surface. 3 Loosen the screw with a new one in place (a). Use an LMP-E190 Projector Lamp as a light source is placed on the screen • The LAMP/COVER indicator lights up...

Operating Instructions
Page 50
... be turned on. 7 Turn the projector back over. 8 Connect the power cord. SET SETTING Input-A Smar t APA: On Auto Input Search: Off Input-A Signal Sel.: Auto Color System: Auto Power Saving: Off IR Receiver: Front & Rear Lamp Timer Reset Notes • Be careful not to touch the glass surface of the lamp. • The power will not turn the projector on. 10Press MENU, and select the SET SETTING menu. 11Select "Lamp Timer Reset", and press . 12Select "Execute" with M. Change the Lamp and clean the Filter? "Lamp Timer Reset...
... be turned on. 7 Turn the projector back over. 8 Connect the power cord. SET SETTING Input-A Smar t APA: On Auto Input Search: Off Input-A Signal Sel.: Auto Color System: Auto Power Saving: Off IR Receiver: Front & Rear Lamp Timer Reset Notes • Be careful not to touch the glass surface of the lamp. • The power will not turn the projector on. 10Press MENU, and select the SET SETTING menu. 11Select "Lamp Timer Reset", and press . 12Select "Execute" with M. Change the Lamp and clean the Filter? "Lamp Timer Reset...
Operating Instructions
Page 52
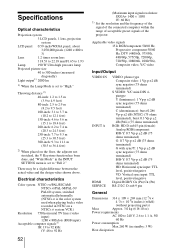
... design value shown above. Specifications Optical characteristics Projection system 3 LCD panels, 1 lens, projection system LCD panel 0.59-inchvWXGA panel, about 3,070,000 pixels (1280 × 800 × 3) Lens 1.2 times zoom lens f 18.53 to 22.18 mm/F1.65 to 1.93 Lamp 190 W Ultra high pressure lamp Projected picture size 40 to 300 inches (measured diagonally) Light output1) 2000 lm 1) When the Lamp Mode is set to "High." Electrical characteristics Color system NTSC3.58/PAL...
... design value shown above. Specifications Optical characteristics Projection system 3 LCD panels, 1 lens, projection system LCD panel 0.59-inchvWXGA panel, about 3,070,000 pixels (1280 × 800 × 3) Lens 1.2 times zoom lens f 18.53 to 22.18 mm/F1.65 to 1.93 Lamp 190 W Ultra high pressure lamp Projected picture size 40 to 300 inches (measured diagonally) Light output1) 2000 lm 1) When the Lamp Mode is set to "High." Electrical characteristics Color system NTSC3.58/PAL...

Operating Instructions
Page 53
...;C to +60°C (-4°F to +140°F) Storage humidity 10% to 90% Supplied accessories Remote control (1) Size AA (R6) batteries (2) Signal cable (HD D-sub 15-pin y 3 × phono plug) (1) (9-885-125-47, SONY) AC power cord (1) Lens cap (1) Operating Instructions (1) Warranty card (1) Design and specifications are subject to change without notice. Optional accessory Projector Lamp LMP-E190 (for DDC 2 G/Y 10 GND 3 B/B-Y 11 GND 4 RESERVE 12 DDC...
...;C to +60°C (-4°F to +140°F) Storage humidity 10% to 90% Supplied accessories Remote control (1) Size AA (R6) batteries (2) Signal cable (HD D-sub 15-pin y 3 × phono plug) (1) (9-885-125-47, SONY) AC power cord (1) Lens cap (1) Operating Instructions (1) Warranty card (1) Design and specifications are subject to change without notice. Optional accessory Projector Lamp LMP-E190 (for DDC 2 G/Y 10 GND 3 B/B-Y 11 GND 4 RESERVE 12 DDC...


