

User Guide (primary user manual)
Page 11
... panel locate and identify the ports on hardware configuration. Back panel 1 AC Input port Connection for the supplied power cord. 2 Mouse port Connection for a PS/2® mouse. 3 Keyboard port Connection for a PS/2 keyboard. 4 Printer port Connection for details on your computer's specification sheet for a parallel device, such as a printer or scanner. See your...
... panel locate and identify the ports on hardware configuration. Back panel 1 AC Input port Connection for the supplied power cord. 2 Mouse port Connection for a PS/2® mouse. 3 Keyboard port Connection for a PS/2 keyboard. 4 Printer port Connection for details on your computer's specification sheet for a parallel device, such as a printer or scanner. See your...
User Guide (primary user manual)
Page 16
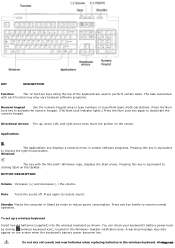
...math calculations. The task associated with the Microsoft® Windows® logo, displays the Start menu. Do not mix old (used to reduce power consumption. Standby Places the computer in Stand by clicking (wireless keyboard icon), located in the Windows® taskbar notification area. You can check your keyboard's battery....) Press the Num Lock key again to clicking Start on the screen. Directional Arrows The up a wireless keyboard Insert two AA batteries (supplied) into the wireless keyboard as shown. BUTTON DESCRIPTION Volume Increases (+) and decreases (-) the volume.
...math calculations. The task associated with the Microsoft® Windows® logo, displays the Start menu. Do not mix old (used to reduce power consumption. Standby Places the computer in Stand by clicking (wireless keyboard icon), located in the Windows® taskbar notification area. You can check your keyboard's battery....) Press the Num Lock key again to clicking Start on the screen. Directional Arrows The up a wireless keyboard Insert two AA batteries (supplied) into the wireless keyboard as shown. BUTTON DESCRIPTION Volume Increases (+) and decreases (-) the volume.

User Guide (primary user manual)
Page 20
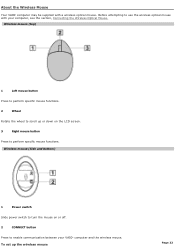
...VAIO® computer may be supplied with your VAIO® computer and the wireless mouse. To set up or down on or off. 2 CONNECT button Press to perform specific mouse functions. Before attempting to use the wireless optical mouse with a wireless optical mouse1. Wireless m ouse (Side and bottom ) 1 Power switch Slide power... switch to turn the mouse on the LCD screen. 3 Right mouse button Press to enable communication between your computer, see the section, Connecting the Wireless Optical Mouse. ...
...VAIO® computer may be supplied with your VAIO® computer and the wireless mouse. To set up or down on or off. 2 CONNECT button Press to perform specific mouse functions. Before attempting to use the wireless optical mouse with a wireless optical mouse1. Wireless m ouse (Side and bottom ) 1 Power switch Slide power... switch to turn the mouse on the LCD screen. 3 Right mouse button Press to enable communication between your computer, see the section, Connecting the Wireless Optical Mouse. ...
User Guide (primary user manual)
Page 21
Using incompatible batteries or mixing used/new batteries can check your mouse's battery power level by clicking (wireless mouse icon), located in the wireless mouse. Page 21 Inserting batteries into the wireless mouse as shown. Do not mix old (.... When your wireless mouse is not being used ) and new batteries when replacing batteries in the Windows® taskbar notification area. Insert two AA batteries (supplied) into the wireless m ouse If your wireless mouse does not operate properly, the batteries may need to avoid possible damage from battery leakage. 1See your...
Using incompatible batteries or mixing used/new batteries can check your mouse's battery power level by clicking (wireless mouse icon), located in the wireless mouse. Page 21 Inserting batteries into the wireless mouse as shown. Do not mix old (.... When your wireless mouse is not being used ) and new batteries when replacing batteries in the Windows® taskbar notification area. Insert two AA batteries (supplied) into the wireless m ouse If your wireless mouse does not operate properly, the batteries may need to avoid possible damage from battery leakage. 1See your...
User Guide (primary user manual)
Page 22
... a wireless optical mouse1. Wireless m ouse (Side and bottom ) 1 Power switch Slide power switch to turn the mouse on the LCD screen. 3 Right mouse button Press to scroll up the wireless mouse Page 22 About the Wireless Mouse Your VAIO® computer may be supplied with your VAIO® computer and the wireless mouse. Wireless m ouse (top) 1 Left...
... a wireless optical mouse1. Wireless m ouse (Side and bottom ) 1 Power switch Slide power switch to turn the mouse on the LCD screen. 3 Right mouse button Press to scroll up the wireless mouse Page 22 About the Wireless Mouse Your VAIO® computer may be supplied with your VAIO® computer and the wireless mouse. Wireless m ouse (top) 1 Left...

User Guide (primary user manual)
Page 23
... used ) and new batteries when replacing batteries in the Windows® taskbar notification area. When your mouse's battery power level by clicking (wireless mouse icon), located in the wireless mouse. Insert two AA batteries (supplied) into the wireless m ouse If your c omputer's s pec ific ations s heet for extended periods of battery. Do...
... used ) and new batteries when replacing batteries in the Windows® taskbar notification area. When your mouse's battery power level by clicking (wireless mouse icon), located in the wireless mouse. Insert two AA batteries (supplied) into the wireless m ouse If your c omputer's s pec ific ations s heet for extended periods of battery. Do...
User Guide (primary user manual)
Page 28
... device is equipped with a 4-pin and a 6-pin i.LINK® port. or 6-pin i.LINK port on your computer. A 6-pin i.LINK port can supply power (10V to 12V) to a connected i.LINK device. About the i.LINK Port Your VAIO® computer is equipped with a 6-pin connector. Use the symbol to locate the i.LINK port on your compatible i.LINK...
... device is equipped with a 4-pin and a 6-pin i.LINK® port. or 6-pin i.LINK port on your computer. A 6-pin i.LINK port can supply power (10V to 12V) to a connected i.LINK device. About the i.LINK Port Your VAIO® computer is equipped with a 6-pin connector. Use the symbol to locate the i.LINK port on your compatible i.LINK...
User Guide (primary user manual)
Page 35
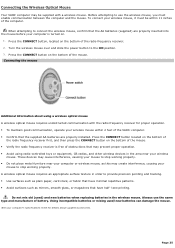
... Before attempting to the ON position. 3. Turn the wireless mouse over and slide the power button to use the same type and manufacture of the mouse. A wireless optical mouse...Press the CONNECT button located on the bottom of obstructions that the AA batteries (supplied) are properly installed. Using incompatible batteries or mixing used ) and new batteries ... the wireless mouse, you must be within 2 feet of the computer. tone printing. Connecting the Wireless Optical Mouse Your VAIO® computer may prevent proper operation. Avoid using a wireless optical ...
... Before attempting to the ON position. 3. Turn the wireless mouse over and slide the power button to use the same type and manufacture of the mouse. A wireless optical mouse...Press the CONNECT button located on the bottom of obstructions that the AA batteries (supplied) are properly installed. Using incompatible batteries or mixing used ) and new batteries ... the wireless mouse, you must be within 2 feet of the computer. tone printing. Connecting the Wireless Optical Mouse Your VAIO® computer may prevent proper operation. Avoid using a wireless optical ...
User Guide (primary user manual)
Page 67
Page 67 Turn on card. 7. See Replacing the cover. 8. Replace the side cover. See the instructions supplied with the add-on the computer. Reconnect the power cord and all peripheral devices. 9. 6. Attach any internal cables that the card requires.
Page 67 Turn on card. 7. See Replacing the cover. 8. Replace the side cover. See the instructions supplied with the add-on the computer. Reconnect the power cord and all peripheral devices. 9. 6. Attach any internal cables that the card requires.
User Guide (primary user manual)
Page 72
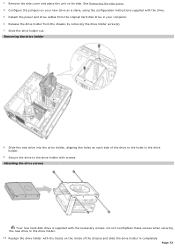
...drive holder from the original hard disk drive in the drive holder. 9. Slide the new drive into the drive holder, aligning the holes on your computer. 6. Slide the drive holder out. Remove the side cover and place the unit on the inside of the drive to the holes in your new... drive as a slave, using the configuration instructions supplied with screws. Detach the power and drive cables from the chassis by removing the drive holder screw(s). 7. Do not overtighten these screws when securing the new drive to...
...drive holder from the original hard disk drive in the drive holder. 9. Slide the new drive into the drive holder, aligning the holes on your computer. 6. Slide the drive holder out. Remove the side cover and place the unit on the inside of the drive to the holes in your new... drive as a slave, using the configuration instructions supplied with screws. Detach the power and drive cables from the chassis by removing the drive holder screw(s). 7. Do not overtighten these screws when securing the new drive to...

User Guide (primary user manual)
Page 73
Connect the second power connector to the new drive. From the shortcut menu, select Initialize Disk. 6. The New Partition wizard appears. 8. Page 73 Connect the second drive connector to the new drive, following the instructions supplied with pin 1 on -screen instructions to Windows® as Administrator. 2. Replace the side cover. The Computer Management window...
Connect the second power connector to the new drive. From the shortcut menu, select Initialize Disk. 6. The New Partition wizard appears. 8. Page 73 Connect the second drive connector to the new drive, following the instructions supplied with pin 1 on -screen instructions to Windows® as Administrator. 2. Replace the side cover. The Computer Management window...

User Guide (primary user manual)
Page 75
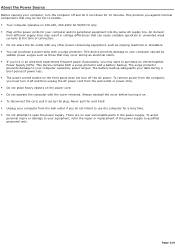
...brightness or contrast control dials are adjusted correctly. (See the manual supplied with a floppy dis k drive. About VAIO Computer Functions My computer does not start. Verify that the computer is plugged into a power source and that the computer is not in Stand by mode by pressing any key on ...is turned on. Check that the power indicator is lit on the front panel of the computer. Confirm that a disk is not in the floppy disk drive1 (unless you plugged the computer into a power strip or Uninterruptible Power Supply (UPS), make sure the power strip or UPS is turned on...
...brightness or contrast control dials are adjusted correctly. (See the manual supplied with a floppy dis k drive. About VAIO Computer Functions My computer does not start. Verify that the computer is plugged into a power source and that the computer is not in Stand by mode by pressing any key on ...is turned on. Check that the power indicator is lit on the front panel of the computer. Confirm that a disk is not in the floppy disk drive1 (unless you plugged the computer into a power strip or Uninterruptible Power Supply (UPS), make sure the power strip or UPS is turned on...
User Guide (primary user manual)
Page 76
... using bootable media). Confirm that the power cord and all cables are not equipped with your computer has a built-in an optical drive (unless you plugged the computer into a power strip or Uninterruptible Power Supply (UPS), make sure the power strip or UPS is turned on and working. ...floppy disk). Confirm that a CD or DVD is not in monitor, confirm that it is turned on . About VAIO Computer Functions My computer does not start. Verify that the computer is plugged into a power source and that it is plugged into a power source and turned on . Page 76
... using bootable media). Confirm that the power cord and all cables are not equipped with your computer has a built-in an optical drive (unless you plugged the computer into a power strip or Uninterruptible Power Supply (UPS), make sure the power strip or UPS is turned on and working. ...floppy disk). Confirm that a CD or DVD is not in monitor, confirm that it is turned on . About VAIO Computer Functions My computer does not start. Verify that the computer is plugged into a power source and that it is plugged into a power source and turned on . Page 76
User Guide (primary user manual)
Page 119
... equipment, such as those that may be too hot to purchase an Uninterruptible Power Supply (UPS). There are no user-serviceable parts in voltage differences that experiences frequent power fluctuations, you may result in the power supply. The battery backup safeguards your computer, turn it off and let it on the front panel does not turn...
... equipment, such as those that may be too hot to purchase an Uninterruptible Power Supply (UPS). There are no user-serviceable parts in voltage differences that experiences frequent power fluctuations, you may result in the power supply. The battery backup safeguards your computer, turn it off and let it on the front panel does not turn...
User Guide (primary user manual)
Page 120
...keyboard or mouse, requires unobstructed communication with your computer for the problem, the telephone company may prevent proper operation. Confirm that the supplied AA batteries are properly installed in a location subject... Always switch the power off before operating it may block its ventilation slots. Do not drop them or bump them against other objects. Your Sony computer does not work ...blankets) or near your computer and then unplug it is free of 2 feet between your VAIO® computer and your computer. otherwise, problems may occur to radio or...
...keyboard or mouse, requires unobstructed communication with your computer for the problem, the telephone company may prevent proper operation. Confirm that the supplied AA batteries are properly installed in a location subject... Always switch the power off before operating it may block its ventilation slots. Do not drop them or bump them against other objects. Your Sony computer does not work ...blankets) or near your computer and then unplug it is free of 2 feet between your VAIO® computer and your computer. otherwise, problems may occur to radio or...
Safety Information
Page 3
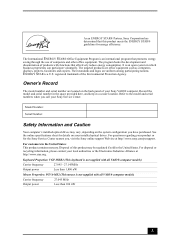
... model number and serial number are office equipment such as computers, displays, printers, facsimiles and copiers. The International ENERGY STAR® Office Equipment Program is not supplied with all VAIO® computer models) Carrier frequency Output power 27.045 MHz Less than 100 nW 3 Their standards... and logos are uniform among participating nations. Refer to the model and serial numbers when you , visit the Sony online support Web ...
... model number and serial number are office equipment such as computers, displays, printers, facsimiles and copiers. The International ENERGY STAR® Office Equipment Program is not supplied with all VAIO® computer models) Carrier frequency Output power 27.045 MHz Less than 100 nW 3 Their standards... and logos are uniform among participating nations. Refer to the model and serial numbers when you , visit the Sony online support Web ...
Welcome Mat
Page 1
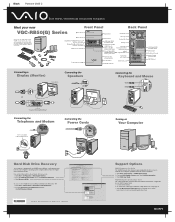
... sheet describes the hardware and software configuration of your VAIO computer model. 1 Connect to the Internet. 2 Go to the Sony online support Web site at the same time.) Connecting the Telephone and Modem Connecting the Power Cords "1-to-2" jack adapter (optional splitter device) ... español. To access the VAIO Recovery Wizard utility from the illustration. Meet your new Front Panel Back Panel VGC-RB50(G) Series Optical drive 1 Accessories are supplied with the VAIO Recovery Wizard, a utility program that recovers your computer's operating system and preinstalled software to ...
... sheet describes the hardware and software configuration of your VAIO computer model. 1 Connect to the Internet. 2 Go to the Sony online support Web site at the same time.) Connecting the Telephone and Modem Connecting the Power Cords "1-to-2" jack adapter (optional splitter device) ... español. To access the VAIO Recovery Wizard utility from the illustration. Meet your new Front Panel Back Panel VGC-RB50(G) Series Optical drive 1 Accessories are supplied with the VAIO Recovery Wizard, a utility program that recovers your computer's operating system and preinstalled software to ...
Marketing Specifications (VGC-RB57GY)
Page 2
VGC-RB57GY VAIO® RB Series Desktop PC Hardware Processor Intel® Pentium® D Processor 820 ... efficiency. Product activation procedures will operate under certain operating conditions. 2. Computer Interface: The computer industry lacks standards, and therefore, there are registered trademarks of the hardware and software in .... This product meets the standards of non-Sony products you may vary) Dimensions 7.13"(W) x 16.9"(H) x 15.24"(D) Supplied Accessories VAIO® Keyboard USB Optical Mouse Speakers IR Receiver Power Cord Remote Control/ IR Blaster Software Operating...
VGC-RB57GY VAIO® RB Series Desktop PC Hardware Processor Intel® Pentium® D Processor 820 ... efficiency. Product activation procedures will operate under certain operating conditions. 2. Computer Interface: The computer industry lacks standards, and therefore, there are registered trademarks of the hardware and software in .... This product meets the standards of non-Sony products you may vary) Dimensions 7.13"(W) x 16.9"(H) x 15.24"(D) Supplied Accessories VAIO® Keyboard USB Optical Mouse Speakers IR Receiver Power Cord Remote Control/ IR Blaster Software Operating...


