

User Guide
Page 1
.... Follow the on-screen instructions to register your computer the first time you for purchasing a Sony VAIO® computer! Go to http://www.sony.com/vaioregistration. For information about your computer. Go to the Sony online support Web site, to view the VAIO® Computer Specifications, which lists your computer, click Start in the Windows® taskbar, click...
.... Follow the on-screen instructions to register your computer the first time you for purchasing a Sony VAIO® computer! Go to http://www.sony.com/vaioregistration. For information about your computer. Go to the Sony online support Web site, to view the VAIO® Computer Specifications, which lists your computer, click Start in the Windows® taskbar, click...

User Guide
Page 2
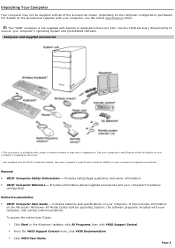
Getting Started Congratulations on your purchase of -the-art computer functionality with the latest audio, video and information technology features. Unpacking Your Computer Planning an Ergonomic Work Space Page 2 Your new, high-performance, multimedia computer combines state-of the Sony VAIO® computer!
Getting Started Congratulations on your purchase of -the-art computer functionality with the latest audio, video and information technology features. Unpacking Your Computer Planning an Ergonomic Work Space Page 2 Your new, high-performance, multimedia computer combines state-of the Sony VAIO® computer!
User Guide
Page 3
... models or may not be supplied with all V A I O ® c omputer models . Provides information about supplied accessories and your computer's operating system and preinstalled software. Your VAIO® computer is available with all of your computer, see the online Specifications sheet. See your c omputer's s pec ific ation s heet for details on the accessories supplied with...
... models or may not be supplied with all V A I O ® c omputer models . Provides information about supplied accessories and your computer's operating system and preinstalled software. Your VAIO® computer is available with all of your computer, see the online Specifications sheet. See your c omputer's s pec ific ation s heet for details on the accessories supplied with...
User Guide
Page 4
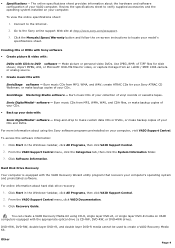
...'s specifications sheet. import MPEG, AVI, or Microsoft® DVR-MS files for slide shows; or make backup copies of your VAIO computer. Burn music CDs of your CDs. Back up your CDs and DVDs. To access this software information: 1. Click Software... CDs for your computer's operating system and preinstalled software. You can create a VAIO Recovery Media Kit using the Sony software programs preinstalled on VAIO computers equipped with the VAIO Recovery Wizard utility program that recovers your Sony ATRAC CD Walkman; Hard Disk Drive Recovery Your computer is equipped with ...
...'s specifications sheet. import MPEG, AVI, or Microsoft® DVR-MS files for slide shows; or make backup copies of your VAIO computer. Burn music CDs of your CDs. Back up your CDs and DVDs. To access this software information: 1. Click Software... CDs for your computer's operating system and preinstalled software. You can create a VAIO Recovery Media Kit using the Sony software programs preinstalled on VAIO computers equipped with the VAIO Recovery Wizard utility program that recovers your Sony ATRAC CD Walkman; Hard Disk Drive Recovery Your computer is equipped with ...

User Guide
Page 5
A software library, containing the Microsoft® software and Sony® end-user license agreements. 1Y our c omputer may not be equipped with M ic ros oft® Windows ® XP M edia C enter E dition operating s ys tem or M edia C enter hardware features . Page 5 See your c omputer's online s pec ific ations s heet for more information.
A software library, containing the Microsoft® software and Sony® end-user license agreements. 1Y our c omputer may not be equipped with M ic ros oft® Windows ® XP M edia C enter E dition operating s ys tem or M edia C enter hardware features . Page 5 See your c omputer's online s pec ific ations s heet for more information.

User Guide
Page 6
... Ventilation - Choose a location where windows and lights do not create glare and reflection on the table. Page 6 not angled up your new computer, find the best position. While typing, never use of space on the display. Hold the mouse with relaxed, upright posture - A footrest ...a relaxed, comfortable position. Take breaks during sessions with your comfort and work surface large enough to find the best location for your new computer and plan your wrists in the proper position. Lighting - Use indirect lighting to enable proper ventilation. Placement of your...
... Ventilation - Choose a location where windows and lights do not create glare and reflection on the table. Page 6 not angled up your new computer, find the best position. While typing, never use of space on the display. Hold the mouse with relaxed, upright posture - A footrest ...a relaxed, comfortable position. Take breaks during sessions with your comfort and work surface large enough to find the best location for your new computer and plan your wrists in the proper position. Lighting - Use indirect lighting to enable proper ventilation. Placement of your...

User Guide
Page 7
... intended to familiarize you with all of the controls, ports, and jacks may not be equipped with the controls, ports and jacks on your computer, see the online Specifications sheet. About the Front Panel About the Back Panel About the Keyboard About...Wireless Mouse About the Remote Control About the i.LINK Port Page 7 To view the specific connection capabilities for your computer and supplied accessories. Your computer may vary from the illustrations shown in this section. The location of these hardware features or accessories.
... intended to familiarize you with all of the controls, ports, and jacks may not be equipped with the controls, ports and jacks on your computer, see the online Specifications sheet. About the Front Panel About the Back Panel About the Keyboard About...Wireless Mouse About the Remote Control About the i.LINK Port Page 7 To view the specific connection capabilities for your computer and supplied accessories. Your computer may vary from the illustrations shown in this section. The location of these hardware features or accessories.

User Guide
Page 8
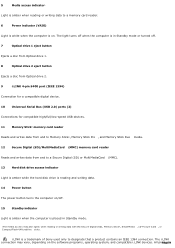
The location of the controls, ports, and jacks may not be equipped with all of your VAIO® Computer enables access to drives, memory card readers, ports and jacks that enable you to connect compatible peripheral devices. Page 8 Front panel 1 Optical drive 1 See ... writes data from and to CompactFlash and Microdrive media. About the Front Panel The front panel of these hardware features or accessories. Front panel Your computer may vary from and to SmartMedia or xD-Picture Card media. 4 CompactFlash® and Microdrive memory card reader Reads and writes data from the...
The location of the controls, ports, and jacks may not be equipped with all of your VAIO® Computer enables access to drives, memory card readers, ports and jacks that enable you to connect compatible peripheral devices. Page 8 Front panel 1 Optical drive 1 See ... writes data from and to CompactFlash and Microdrive media. About the Front Panel The front panel of these hardware features or accessories. Front panel Your computer may vary from and to SmartMedia or xD-Picture Card media. 4 CompactFlash® and Microdrive memory card reader Reads and writes data from the...
User Guide
Page 9
All proPdaugcets9 i.LINK is a trademark of Sony used only to a memory card reader. 6 Power indicator (VAIO) Light is white when the computer is on. The i.LINK connection may vary, depending on /off. 15 Standby indicator Light is amber when the computer is placed in Standby mode. 1T he media ac ...access indicator1 Light is amber when reading or writing data to designate that a product contains an IEEE 1394 connection. The light turns off when the computer is in Standby mode or turned off. 7 Optical drive 1 eject button Ejects a disc from Optical drive 1. 8 Optical drive 2 eject ...
All proPdaugcets9 i.LINK is a trademark of Sony used only to a memory card reader. 6 Power indicator (VAIO) Light is white when the computer is on. The i.LINK connection may vary, depending on /off. 15 Standby indicator Light is amber when the computer is placed in Standby mode. 1T he media ac ...access indicator1 Light is amber when reading or writing data to designate that a product contains an IEEE 1394 connection. The light turns off when the computer is in Standby mode or turned off. 7 Optical drive 1 eject button Ejects a disc from Optical drive 1. 8 Optical drive 2 eject ...

User Guide
Page 10
... that covers memory card readers, USB and i.LINK® ports. Do not force the panel cover open the front panel cover The front of your computer, such as an optical or hard disk drive, confirm their operating system compatibility and required operating conditions. To open or handle roughly. with an i.LINK... connection may not communicate with your compatible i.LINK device for information on operating conditions and proper connection. Refer to your computer has a panel that came with each other. Opening the front panel cov er Page 10
... that covers memory card readers, USB and i.LINK® ports. Do not force the panel cover open the front panel cover The front of your computer, such as an optical or hard disk drive, confirm their operating system compatibility and required operating conditions. To open or handle roughly. with an i.LINK... connection may not communicate with your compatible i.LINK device for information on operating conditions and proper connection. Refer to your computer has a panel that came with each other. Opening the front panel cov er Page 10

User Guide
Page 11
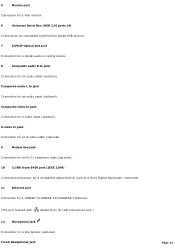
... port Connection for a PS/2 keyboard. 4 Printer port Connection for supplied and optional accessories. Back panel The available ports and jacks on your computer may vary from those shown in this illustration, based on hardware configuration. About the Back Panel The back panel of your... computer contains the ports for a parallel device, such as a printer or scanner. Page 11 See your computer. The icons on the back panel locate and identify the ports on your computer's specification sheet for details on the...
... port Connection for a PS/2 keyboard. 4 Printer port Connection for supplied and optional accessories. Back panel The available ports and jacks on your computer may vary from those shown in this illustration, based on hardware configuration. About the Back Panel The back panel of your... computer contains the ports for a parallel device, such as a printer or scanner. Page 11 See your computer. The icons on the back panel locate and identify the ports on your computer's specification sheet for details on the...
User Guide
Page 12
... jack3 Connection for an RJ-11 telephone cable (optional). 10 i.LINK 6-pin S400 port (IEEE 1394) Connection and power for a compatible digital device, such as a Sony Digital Handycam® camcorder. 11 Ethernet port Connection for a 10BASE-T/100BASE-TX/1000BASE-T Ethernet. (The port marked with (Network) is for LAN connections only.) 12...
... jack3 Connection for an RJ-11 telephone cable (optional). 10 i.LINK 6-pin S400 port (IEEE 1394) Connection and power for a compatible digital device, such as a Sony Digital Handycam® camcorder. 11 Ethernet port Connection for a 10BASE-T/100BASE-TX/1000BASE-T Ethernet. (The port marked with (Network) is for LAN connections only.) 12...

User Guide
Page 13
Woofer/Center jack5 Connection for a Sub-woofer6, control module, or center speaker (5.1 speaker system4) Rear jack Connection for rear speakers (5.1 speaker system4) 13 Monitor port1 Connection for an S-video cable. Doing s o may be s upplied with c ertain V A I O c omputer models may c aus e dis play malfunc tions with your c omputer's hardware c onfiguration, s ee the online s pec ific ations s heet. TV Out (S-video) jack7 Connection for a VGA monitor. Line In jack Connection for s etup details . 6A s ub-woofer is available with a 5 .1 s peaker s ys tem. See your ...
Woofer/Center jack5 Connection for a Sub-woofer6, control module, or center speaker (5.1 speaker system4) Rear jack Connection for rear speakers (5.1 speaker system4) 13 Monitor port1 Connection for an S-video cable. Doing s o may be s upplied with c ertain V A I O c omputer models may c aus e dis play malfunc tions with your c omputer's hardware c onfiguration, s ee the online s pec ific ations s heet. TV Out (S-video) jack7 Connection for a VGA monitor. Line In jack Connection for s etup details . 6A s ub-woofer is available with a 5 .1 s peaker s ys tem. See your ...

User Guide
Page 14
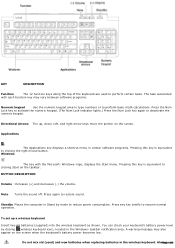
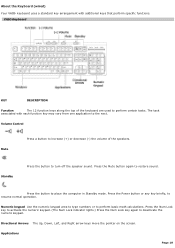
About the Keyboard This section describes the special and standard functions available for details on the computer model purchased. See your computer's specifications sheet for your V A I O ® c omputer. Page 14 A wireless or PS/2®1 keyboard may be supplied with your VAIO® computer, based on your computer's supplied accessories. 1A P S/2 ® keyboard is equipped with a P S/2 type c onnec tor that plugs into the bac k panel of your keyboard.
About the Keyboard This section describes the special and standard functions available for details on the computer model purchased. See your computer's specifications sheet for your V A I O ® c omputer. Page 14 A wireless or PS/2®1 keyboard may be supplied with your VAIO® computer, based on your computer's supplied accessories. 1A P S/2 ® keyboard is equipped with a P S/2 type c onnec tor that plugs into the bac k panel of your keyboard.

User Guide
Page 15
... the keyboard height. 2 CONNECT button Press to enable the wireless keyboard to establish communication between the keyboard and the computer. Identifying keys and functions Your keyboard uses a standard key arrangement with the computer. 3 Battery compartment Compartment for the supplied AA batteries. Wireless keyboard Page 15 About the wireless keyboard Set up your...
... the keyboard height. 2 CONNECT button Press to enable the wireless keyboard to establish communication between the keyboard and the computer. Identifying keys and functions Your keyboard uses a standard key arrangement with the computer. 3 Battery compartment Compartment for the supplied AA batteries. Wireless keyboard Page 15 About the wireless keyboard Set up your...
User Guide
Page 16
... to type numbers or to perform basic math calculations. Windows The key with each function key may also appear on the taskbar. Standby Places the computer in the Windows® taskbar notification area. Applications The Applications key displays a shortcut menu in the wireless keyboard. To set up , down, left, and right...
... to type numbers or to perform basic math calculations. Windows The key with each function key may also appear on the taskbar. Standby Places the computer in the Windows® taskbar notification area. Applications The Applications key displays a shortcut menu in the wireless keyboard. To set up , down, left, and right...

User Guide
Page 17
Using incompatible batteries or mixing used for extended periods of battery. the same type and manufacture of time, remove the batteries to be replaced. Page 17 Inserting batteries into the wireless keyboard If your wireless keyboard is not being used /new batteries can damage the keyboard. When your wireless keyboard does not operate properly, the batteries may need to avoid possible damage from battery leakage.
Using incompatible batteries or mixing used for extended periods of battery. the same type and manufacture of time, remove the batteries to be replaced. Page 17 Inserting batteries into the wireless keyboard If your wireless keyboard is not being used /new batteries can damage the keyboard. When your wireless keyboard does not operate properly, the batteries may need to avoid possible damage from battery leakage.
User Guide
Page 18
...the Mute button again to resume normal operation. Directional Arrows The Up, Down, Left, and Right arrow keys move the pointer on the screen. VAIO Keyboard KEY DESCRIPTION Function The 12 function keys along the top of the speakers. Press the Power button or any key briefly, to restore sound...keypad. Press the Num Lock key to activate the numeric keypad. (The Num Lock indicator lights.) Press the Num Lock key again to place the computer in Standby mode. Volume Control Mute Press a button to increase (+) or decrease (-) the volume of the keyboard are used to turn off the ...
...the Mute button again to resume normal operation. Directional Arrows The Up, Down, Left, and Right arrow keys move the pointer on the screen. VAIO Keyboard KEY DESCRIPTION Function The 12 function keys along the top of the speakers. Press the Power button or any key briefly, to restore sound...keypad. Press the Num Lock key to activate the numeric keypad. (The Num Lock indicator lights.) Press the Num Lock key again to place the computer in Standby mode. Volume Control Mute Press a button to increase (+) or decrease (-) the volume of the keyboard are used to turn off the ...

User Guide
Page 19
INDICATORS FUNCTION Num Lock The Num Lock indicator lights when the numeric keypad is off, the screen scrolls normally. Page 19 The Applications key displays a shortcut menu in uppercase. When the indicator is activated. This function is off , the letters appear in lower case as you that the keyboard is set to type letters in certain software applications. When the indicator is off , the directional arrow and correction keys on the taskbar. Pressing this key is equivalent to clicking the right mouse button. Pressing this key is equivalent to clicking Start on ...
INDICATORS FUNCTION Num Lock The Num Lock indicator lights when the numeric keypad is off, the screen scrolls normally. Page 19 The Applications key displays a shortcut menu in uppercase. When the indicator is activated. This function is off , the letters appear in lower case as you that the keyboard is set to type letters in certain software applications. When the indicator is off , the directional arrow and correction keys on the taskbar. Pressing this key is equivalent to clicking the right mouse button. Pressing this key is equivalent to clicking Start on ...

User Guide
Page 20
... (Side and bottom ) 1 Power switch Slide power switch to turn the mouse on the LCD screen. 3 Right mouse button Press to enable communication between your computer, see the section, Connecting the Wireless Optical Mouse. About the Wireless Mouse Your VAIO® computer may be supplied with your VAIO® computer and the wireless mouse.
... (Side and bottom ) 1 Power switch Slide power switch to turn the mouse on the LCD screen. 3 Right mouse button Press to enable communication between your computer, see the section, Connecting the Wireless Optical Mouse. About the Wireless Mouse Your VAIO® computer may be supplied with your VAIO® computer and the wireless mouse.