Operating Instructions
Page 4
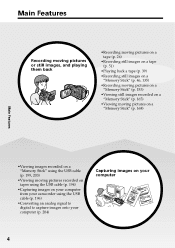
... the USB cable (p. 199, 203) •Viewing moving pictures recorded on tapes using the USB cable (p. 194) •Capturing images on your computer from your camcorder using the USB cable (p. 196) •Converting an analog signal to digital to capture images onto your computer (p. 204) Capturing images on your computer 4
... the USB cable (p. 199, 203) •Viewing moving pictures recorded on tapes using the USB cable (p. 194) •Capturing images on your computer from your camcorder using the USB cable (p. 196) •Converting an analog signal to digital to capture images onto your computer (p. 204) Capturing images on your computer 4
Operating Instructions
Page 5
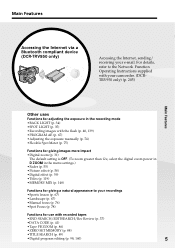
...TRV950 only) Accessing the Internet, sending/ receiving your recordings •Sports lesson (p. 67) •Landscape (p. 67) •Manual focus (p. 76) •Spot Focus (p. 78) Functions for giving a natural appearance to your e-mail. For details, refer to the Network Function Operating Instructions supplied with your camcorder... 74) •Flexible Spot Meter (p. 75) Functions for giving images more impact •Digital zoom (p. 31) The default setting is OFF. (To zoom greater than 12×, select the digital zoom power in D ZOOM in the menu settings.) •Fader (p. 55) •...
...TRV950 only) Accessing the Internet, sending/ receiving your recordings •Sports lesson (p. 67) •Landscape (p. 67) •Manual focus (p. 76) •Spot Focus (p. 78) Functions for giving a natural appearance to your e-mail. For details, refer to the Network Function Operating Instructions supplied with your camcorder... 74) •Flexible Spot Meter (p. 75) Functions for giving images more impact •Digital zoom (p. 31) The default setting is OFF. (To zoom greater than 12×, select the digital zoom power in D ZOOM in the menu settings.) •Fader (p. 55) •...
Operating Instructions
Page 7
... Signal convert function 204 Using the Network function (DCR-TRV950 only) Accessing the network 205 For the details, refer to your computer using the USB cable - Customizing Your Camcorder Changing the default settings with your camcorder. MEMORY MIX 148 Recording moving picture - For Macintosh ...186 Viewing images recorded on a tape on your computer - PHOTO SAVE 163 Viewing still images - Image protection 176 Deleting images - Digital program editing (on a "Memory Stick" - Table of trouble and how to correct trouble 218 Self-diagnosis display 225 Warning indicators ...
... Signal convert function 204 Using the Network function (DCR-TRV950 only) Accessing the network 205 For the details, refer to your computer using the USB cable - Customizing Your Camcorder Changing the default settings with your camcorder. MEMORY MIX 148 Recording moving picture - For Macintosh ...186 Viewing images recorded on a tape on your computer - PHOTO SAVE 163 Viewing still images - Image protection 176 Deleting images - Digital program editing (on a "Memory Stick" - Table of trouble and how to correct trouble 218 Self-diagnosis display 225 Warning indicators ...
Operating Instructions
Page 8
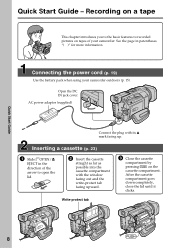
... goes down completely, close the lid until it clicks. Connecting the power cord (p. 19) Use the battery pack when using your camcorder. See the page in the direction of your camcorder outdoors (p. 15). AC power adaptor (supplied) Connect the plug with the window facing out and the write-protect tab facing upward...
... goes down completely, close the lid until it clicks. Connecting the power cord (p. 19) Use the battery pack when using your camcorder. See the page in the direction of your camcorder outdoors (p. 15). AC power adaptor (supplied) Connect the plug with the window facing out and the write-protect tab facing upward...
Operating Instructions
Page 9
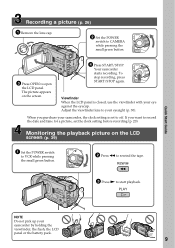
...9 When you want to record the date and time for a picture, set to VCR while pressing the small green button. If you purchase your camcorder, the clock setting is closed, use the viewfinder with your eye against the eyecup. MEMORY/ NETWORK 2 Press m to start playback. POWER VCR ...OFF(CHG) CAMERA Your camcorder starts recording. Monitoring the playback picture on the screen. 4 Press START/STOP. The picture appears on the LCD screen (p. 39) VCR OFF(CHG) ...
...9 When you want to record the date and time for a picture, set to VCR while pressing the small green button. If you purchase your camcorder, the clock setting is closed, use the viewfinder with your eye against the eyecup. MEMORY/ NETWORK 2 Press m to start playback. POWER VCR ...OFF(CHG) CAMERA Your camcorder starts recording. Monitoring the playback picture on the screen. 4 Press START/STOP. The picture appears on the LCD screen (p. 39) VCR OFF(CHG) ...
Operating Instructions
Page 10
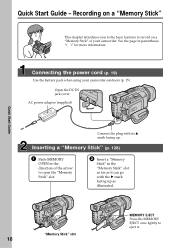
See the page in the direction of your camcorder outdoors (p. 15). Quick Start Guide - AC power adaptor (supplied) Quick Start Guide Connect the plug with the B mark facing up . "Memory Stick" slot 10 MEMORY ... cover. Inserting a "Memory Stick" (p. 128) 1 Slide MEMORY OPEN in parentheses "( )" for more information. Connecting the power cord (p. 19) Use the battery pack when using your camcorder. Recording on a "Memory Stick" This chapter introduces you to the basic features to record on a "Memory Stick" of the arrow to eject it can go...
See the page in the direction of your camcorder outdoors (p. 15). Quick Start Guide - AC power adaptor (supplied) Quick Start Guide Connect the plug with the B mark facing up . "Memory Stick" slot 10 MEMORY ... cover. Inserting a "Memory Stick" (p. 128) 1 Slide MEMORY OPEN in parentheses "( )" for more information. Connecting the power cord (p. 19) Use the battery pack when using your camcorder. Recording on a "Memory Stick" This chapter introduces you to the basic features to record on a "Memory Stick" of the arrow to eject it can go...

Operating Instructions
Page 11
... viewfinder with your camcorder by holding the viewfinder, the flash, the LCD panel or the battery pack. 2 Press PLAY or PB. The last recorded image is recorded on the "Memory Stick." When you want to POWER VCR OFF(CHG) CAMERA MEMORY/NETWORK (DCR-TRV950 only) while pressing... the POWER switch to open the LCD panel. Recording a still image on a "Memory Stick" (p. 135) 3 Press OPEN to POWER MEMORY/NETWORK (DCR-TRV950 only) or VCR while pressing the small green button. MEMORY/ NETWORK 4 Press PHOTO lightly. MEMORY/ NETWORK Quick Start Guide VCR OFF(CHG) CAMERA NOTE Do...
... viewfinder with your camcorder by holding the viewfinder, the flash, the LCD panel or the battery pack. 2 Press PLAY or PB. The last recorded image is recorded on the "Memory Stick." When you want to POWER VCR OFF(CHG) CAMERA MEMORY/NETWORK (DCR-TRV950 only) while pressing... the POWER switch to open the LCD panel. Recording a still image on a "Memory Stick" (p. 135) 3 Press OPEN to POWER MEMORY/NETWORK (DCR-TRV950 only) or VCR while pressing the small green button. MEMORY/ NETWORK 4 Press PHOTO lightly. MEMORY/ NETWORK Quick Start Guide VCR OFF(CHG) CAMERA NOTE Do...

Operating Instructions
Page 12
... memory. Types of cassette types, see this manual and operating your camcorder. END SEARCH (p. 37) - - The DCR-TRV950 is indicated in capital letters. e.g. TRV950 MEMORY/NETWORK z z Provided - Not provided Note on Cassette Memory Your camcorder is being carried out. You can use a tape with the cassette... has a cassette memory are clearly indicated in the text, for the two models listed in the introduction of your camcorder are for example, "DCR-TRV950 only". As you start reading this mark in the table below. You see page 228. Before you read through ...
... memory. Types of cassette types, see this manual and operating your camcorder. END SEARCH (p. 37) - - The DCR-TRV950 is indicated in capital letters. e.g. TRV950 MEMORY/NETWORK z z Provided - Not provided Note on Cassette Memory Your camcorder is being carried out. You can use a tape with the cassette... has a cassette memory are clearly indicated in the text, for the two models listed in the introduction of your camcorder are for example, "DCR-TRV950 only". As you start reading this mark in the table below. You see page 228. Before you read through ...
Operating Instructions
Page 13
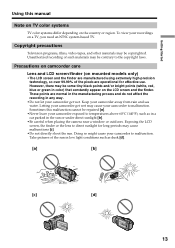
...to the copyright laws. Exposing the LCD screen, the finder or the lens to direct sunlight for effective use. Keep your camcorder to malfunction. Letting your camcorder get wet. Take pictures of the pixels are normal in the manufacturing process and do not affect the recording in color)... that constantly appear on the LCD screen and the finder. Precautions on camcorder care Lens and LCD screen/finder (on mounted models only) •The LCD screen and the finder are manufactured using extremely high-precision...
...to the copyright laws. Exposing the LCD screen, the finder or the lens to direct sunlight for effective use. Keep your camcorder to malfunction. Letting your camcorder get wet. Take pictures of the pixels are normal in the manufacturing process and do not affect the recording in color)... that constantly appear on the LCD screen and the finder. Precautions on camcorder care Lens and LCD screen/finder (on mounted models only) •The LCD screen and the finder are manufactured using extremely high-precision...
Operating Instructions
Page 14
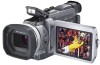
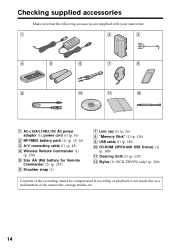
Checking supplied accessories Make sure that the following accessories are supplied with your camcorder. 1 2 3 4 5 6 7 8 9 q; qa qs 1 AC-L10A/L10B/L10C AC power adaptor (1), power cord (1) (p. 16) 2 NP-FM50 battery pack (1) (p. 15, 16) 3 A/V connecting cable (1) (p. 45) 4 Wireless ... cap (1) (p. 26) 8 "Memory Stick" (1) (p. 126) 9 USB cable (1) (p. 183) 0 CD-ROM (SPVD-008 USB Driver) (1) (p. 188) qa Cleaning cloth (1) (p. 237) qs Stylus (1) (DCR-TRV950 only) (p. 206) Contents of the recording cannot be compensated if recording or playback is not made due to a malfunction of the...
Checking supplied accessories Make sure that the following accessories are supplied with your camcorder. 1 2 3 4 5 6 7 8 9 q; qa qs 1 AC-L10A/L10B/L10C AC power adaptor (1), power cord (1) (p. 16) 2 NP-FM50 battery pack (1) (p. 15, 16) 3 A/V connecting cable (1) (p. 45) 4 Wireless ... cap (1) (p. 26) 8 "Memory Stick" (1) (p. 126) 9 USB cable (1) (p. 183) 0 CD-ROM (SPVD-008 USB Driver) (1) (p. 188) qa Cleaning cloth (1) (p. 237) qs Stylus (1) (DCR-TRV950 only) (p. 206) Contents of the recording cannot be compensated if recording or playback is not made due to a malfunction of the...
Operating Instructions
Page 15
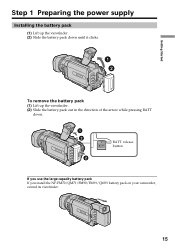
Getting Started Step 1 Preparing the power supply Installing the battery pack (1) Lift up the viewfinder. (2) Slide the battery pack down until it clicks. 1 2 To remove the battery pack (1) Lift up the viewfinder. (2) Slide the battery pack out in the direction of the arrow while pressing BATT down. 1 2 2 BATT release button If you use the large capacity battery pack If you install the NP-FM70/QM71/FM90/FM91/QM91 battery pack on your camcorder, extend its viewfinder. 15
Getting Started Step 1 Preparing the power supply Installing the battery pack (1) Lift up the viewfinder. (2) Slide the battery pack down until it clicks. 1 2 To remove the battery pack (1) Lift up the viewfinder. (2) Slide the battery pack out in the direction of the arrow while pressing BATT down. 1 2 2 BATT release button If you use the large capacity battery pack If you install the NP-FM70/QM71/FM90/FM91/QM91 battery pack on your camcorder, extend its viewfinder. 15
Operating Instructions
Page 16
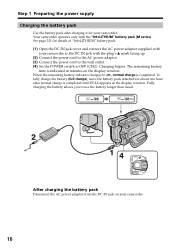
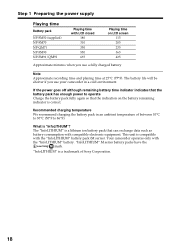
...Step 1 Preparing the power supply Charging the battery pack Use the battery pack after normal charge is completed until FULL appears in minutes on your camcorder. Your camcorder operates only with the plug's v mark facing up. (2) Connect the power cord to the AC power adaptor. (3) Connect the power cord...charging it for details of "InfoLITHIUM" battery pack. (1) Open the DC IN jack cover and connect the AC power adaptor supplied with your camcorder to OFF (CHG). The remaining battery time is completed. Fully charging the battery allows you to , normal charge is indicated in the display ...
...Step 1 Preparing the power supply Charging the battery pack Use the battery pack after normal charge is completed until FULL appears in minutes on your camcorder. Your camcorder operates only with the plug's v mark facing up. (2) Connect the power cord to the AC power adaptor. (3) Connect the power cord...charging it for details of "InfoLITHIUM" battery pack. (1) Open the DC IN jack cover and connect the AC power adaptor supplied with your camcorder to OFF (CHG). The remaining battery time is completed. Fully charging the battery allows you to , normal charge is indicated in the display ...
Operating Instructions
Page 17
Until your camcorder calculates the actual remaining battery time "---- If any trouble occurs with this unit, disconnect the plug from coming into contact with the metal parts of ...
Until your camcorder calculates the actual remaining battery time "---- If any trouble occurs with this unit, disconnect the plug from coming into contact with the metal parts of ...
Operating Instructions
Page 18
... that the battery pack has enough power to 86°F). The battery life will be shorter if you use your camcorder in an ambient temperature of Sony Corporation. 18 "InfoLITHIUM" M series battery packs have the mark. The "InfoLITHIUM" is compatible with compatible electronic equipment... (77°F). Recommended charging temperature We recommend charging the battery pack in a cold environment. TM SERIES "InfoLITHIUM" is "InfoLITHIUM"? Your camcorder operates only with the "InfoLITHIUM" battery. What is a trademark of between 10°C to 30°C (50°F to operate ...
... that the battery pack has enough power to 86°F). The battery life will be shorter if you use your camcorder in an ambient temperature of Sony Corporation. 18 "InfoLITHIUM" M series battery packs have the mark. The "InfoLITHIUM" is compatible with compatible electronic equipment... (77°F). Recommended charging temperature We recommend charging the battery pack in a cold environment. TM SERIES "InfoLITHIUM" is "InfoLITHIUM"? Your camcorder operates only with the "InfoLITHIUM" battery. What is a trademark of between 10°C to 30°C (50°F to operate ...
Operating Instructions
Page 19
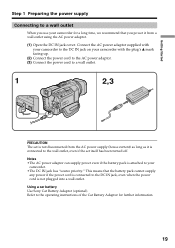
... power adaptor. (1) Open the DC IN jack cover. Connect the AC power adaptor supplied with your camcorder to the DC IN jack on your camcorder for further information. 19 Using a car battery Use Sony Car Battery Adaptor (optional). Getting Started Step 1 Preparing the power supply Connecting to a wall outlet... When you power it is connected to the wall outlet, even if the set itself has been turned off. Refer to your camcorder. •The DC IN jack...
... power adaptor. (1) Open the DC IN jack cover. Connect the AC power adaptor supplied with your camcorder to the DC IN jack on your camcorder for further information. 19 Using a car battery Use Sony Car Battery Adaptor (optional). Getting Started Step 1 Preparing the power supply Connecting to a wall outlet... When you power it is connected to the wall outlet, even if the set itself has been turned off. Refer to your camcorder. •The DC IN jack...
Operating Instructions
Page 20
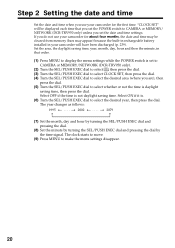
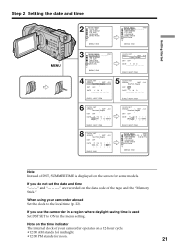
... Step 2 Setting the date and time Set the date and time when you do not use your camcorder will be cleared from memory (bars may be displayed each time that order. (1) Press MENU to display... the menu settings while the POWER switch is set to CAMERA or MEMORY/NETWORK (DCR-TRV950 only). (2) Turn the SEL/PUSH EXEC dial to select , then press the dial. (3) Turn the SEL... dial to select the desired area (where you set the POWER switch to CAMERA or MEMORY/ NETWORK (DCR-TRV950 only) unless you are), then press the dial. (5) Turn the SEL/PUSH EXEC dial to select whether or...
... Step 2 Setting the date and time Set the date and time when you do not use your camcorder will be cleared from memory (bars may be displayed each time that order. (1) Press MENU to display... the menu settings while the POWER switch is set to CAMERA or MEMORY/NETWORK (DCR-TRV950 only). (2) Turn the SEL/PUSH EXEC dial to select , then press the dial. (3) Turn the SEL... dial to select the desired area (where you set the POWER switch to CAMERA or MEMORY/ NETWORK (DCR-TRV950 only) unless you are), then press the dial. (5) Turn the SEL/PUSH EXEC dial to select whether or...
Operating Instructions
Page 21
... Set the clock to ON in a region where daylight saving time is displayed on the screen for noon. 21 If you use the camcorder in the menu setting. If you do not set the date and time "--:--:--" and are recorded on a 12-hour cycle. •12:00 AM stands ...for midnight. •12:00 PM stands for some models. When using your camcorder operates on the data code of DST, SUMMERTIME is used Set DST SET to the local time (p. 22). USB STREAM LTR SIZE LANGUAGE DEMO MODE...
... Set the clock to ON in a region where daylight saving time is displayed on the screen for noon. 21 If you use the camcorder in the menu setting. If you do not set the date and time "--:--:--" and are recorded on a 12-hour cycle. •12:00 AM stands ...for midnight. •12:00 PM stands for some models. When using your camcorder operates on the data code of DST, SUMMERTIME is used Set DST SET to the local time (p. 22). USB STREAM LTR SIZE LANGUAGE DEMO MODE...

Operating Instructions
Page 24
... PAGE2 to go to FN Press EXIT. To execute settings Press OK. Touch the LCD screen directly with your finger or the supplied stylus (DCR-TRV950 only) to operate each function. 5,6 When the POWER switch is set to CAMERA PAGE1 PAGE2 EXIT SPOT DIG FOCUS EFFT END SCH MEM SPOT M I X METER... this manual for each function. Operation buttons appear on the LCD screen. The display returns to PAGE1/PAGE2. 24 Step 4 Using the touch panel Your camcorder has operation buttons on the LCD screen. (6) Press a desired operation item.
... PAGE2 to go to FN Press EXIT. To execute settings Press OK. Touch the LCD screen directly with your finger or the supplied stylus (DCR-TRV950 only) to operate each function. 5,6 When the POWER switch is set to CAMERA PAGE1 PAGE2 EXIT SPOT DIG FOCUS EFFT END SCH MEM SPOT M I X METER... this manual for each function. Operation buttons appear on the LCD screen. The display returns to PAGE1/PAGE2. 24 Step 4 Using the touch panel Your camcorder has operation buttons on the LCD screen. (6) Press a desired operation item.

Operating Instructions
Page 25
... of it appear. When executing each item The green bar appears above the item. You can control the display with DISPLAY/TOUCH PANEL on your camcorder. •When operation buttons do not work even if you press them, an adjustment is required (CALIBRATION) (p. 238). •When the LCD screen gets dirty..., clean it with wet hands. •If FN is set to MEMORY/NETWORK (DCR-TRV950 only). 25 Press FN to display the following buttons: When the POWER switch is set to CAMERA PAGE1 END SCH, SPOT FOCUS, DIG EFFT, MEM...
... of it appear. When executing each item The green bar appears above the item. You can control the display with DISPLAY/TOUCH PANEL on your camcorder. •When operation buttons do not work even if you press them, an adjustment is required (CALIBRATION) (p. 238). •When the LCD screen gets dirty..., clean it with wet hands. •If FN is set to MEMORY/NETWORK (DCR-TRV950 only). 25 Press FN to display the following buttons: When the POWER switch is set to CAMERA PAGE1 END SCH, SPOT FOCUS, DIG EFFT, MEM...

Operating Instructions
Page 26
See "Step 1" to "Step 3" for you. (1) Remove the lens cap by pressing both knobs on the front of your camcorder to the standby. (4) Press OPEN to open the LCD panel. The REC indicator appears. VCR OFF(CHG) CAMERA 3 LOCK switch POWER LOCK NMEETMWOORRYK/... recording lamp VCR OFF(CHG) CAMERA MEMORY/ NETWORK 26 To stop recording, press START/STOP again. Your camcorder starts recording. This sets your camcorder lights up. Basics - Recording a picture Your camcorder automatically focuses for more information (p. 15 to 23). (3) Set the POWER switch to fix it. (2) Prepare...
See "Step 1" to "Step 3" for you. (1) Remove the lens cap by pressing both knobs on the front of your camcorder to the standby. (4) Press OPEN to open the LCD panel. The REC indicator appears. VCR OFF(CHG) CAMERA 3 LOCK switch POWER LOCK NMEETMWOORRYK/... recording lamp VCR OFF(CHG) CAMERA MEMORY/ NETWORK 26 To stop recording, press START/STOP again. Your camcorder starts recording. This sets your camcorder lights up. Basics - Recording a picture Your camcorder automatically focuses for more information (p. 15 to 23). (3) Set the POWER switch to fix it. (2) Prepare...


