
Operating Instructions
Page 2
...TRV950 Responsible Party: Sony Electronics Inc. Refer to servicing to the separate Network Operating Instructions. Address: 680 Kinderkamack Road, Oradell, NJ07649 U.S.A. Your Handycam is very easy to constitute a risk of this Sony Handycam. For customers in the U.S.A. Caution: Do not handle damaged or leaking Lithium-Ion batteries...soon be of sufficient magnitude to use network functions are recyclable. Regulatory Information Declaration of rechargeable batteries, call : Sony Customer Information Center 1-800-222SONY (7669) The number below is intended to alert the ...
...TRV950 Responsible Party: Sony Electronics Inc. Refer to servicing to the separate Network Operating Instructions. Address: 680 Kinderkamack Road, Oradell, NJ07649 U.S.A. Your Handycam is very easy to constitute a risk of this Sony Handycam. For customers in the U.S.A. Caution: Do not handle damaged or leaking Lithium-Ion batteries...soon be of sufficient magnitude to use network functions are recyclable. Regulatory Information Declaration of rechargeable batteries, call : Sony Customer Information Center 1-800-222SONY (7669) The number below is intended to alert the ...
Operating Instructions
Page 6
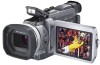
...a VCR Using the wide mode 53 Using the fader 55 Using special effects - TITLE SEARCH ..... 89 Searching a recording by strong light - Digital program editing (on a "Memory Stick" ..... 10 Shooting with manual adjustment ..... 67 Using the PROGRAM AE 67 Adjusting the shutter speed .......... ... ......... 72 Getting Started Using this manual 12 Checking supplied accessories 14 Step 1 Preparing the power supply ... 15 Installing the battery pack 15 Charging the battery pack 16 Connecting to a wall outlet 19 Step 2 Setting the date and time ........ 20 Step 3 Inserting a cassette...
...a VCR Using the wide mode 53 Using the fader 55 Using special effects - TITLE SEARCH ..... 89 Searching a recording by strong light - Digital program editing (on a "Memory Stick" ..... 10 Shooting with manual adjustment ..... 67 Using the PROGRAM AE 67 Adjusting the shutter speed .......... ... ......... 72 Getting Started Using this manual 12 Checking supplied accessories 14 Step 1 Preparing the power supply ... 15 Installing the battery pack 15 Charging the battery pack 16 Connecting to a wall outlet 19 Step 2 Setting the date and time ........ 20 Step 3 Inserting a cassette...
Operating Instructions
Page 7
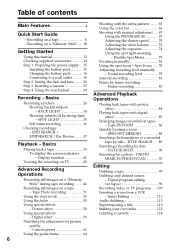
... Additional Information Usable cassettes 228 About the "InfoLITHIUM" battery pack 231 About i.LINK 233 Using your camcorder abroad .......... 235 Maintenance information and precautions 236 Specifications ... 204 Using the Network function (DCR-TRV950 only) Accessing the network 205 For the details, refer to your camcorder to the Network Function Operating Instructions supplied...parts and controls 244 Index 254 7 Introduction 126 Recording still images on your computer - Digital program editing (on your computer - Memory photo playback .......... 165 Viewing moving picture -...
... Additional Information Usable cassettes 228 About the "InfoLITHIUM" battery pack 231 About i.LINK 233 Using your camcorder abroad .......... 235 Maintenance information and precautions 236 Specifications ... 204 Using the Network function (DCR-TRV950 only) Accessing the network 205 For the details, refer to your camcorder to the Network Function Operating Instructions supplied...parts and controls 244 Index 254 7 Introduction 126 Recording still images on your computer - Digital program editing (on your computer - Memory photo playback .......... 165 Viewing moving picture -...
Operating Instructions
Page 8
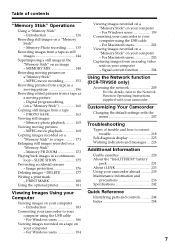
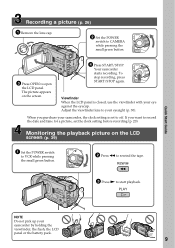
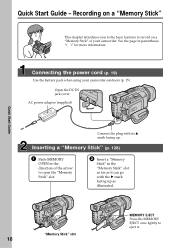
... (p. 23) 1 Slide OPEN/Z EJECT in parentheses "( )" for more information. Quick Start Guide 8 Connecting the power cord (p. 19) Use the battery pack when using your camcorder. See the page in the direction of your camcorder outdoors (p. 15). Write-protect tab 3 Close the cassette compartment by pressing on tapes of the arrow to recorded pictures...
... (p. 23) 1 Slide OPEN/Z EJECT in parentheses "( )" for more information. Quick Start Guide 8 Connecting the power cord (p. 19) Use the battery pack when using your camcorder. See the page in the direction of your camcorder outdoors (p. 15). Write-protect tab 3 Close the cassette compartment by pressing on tapes of the arrow to recorded pictures...
Operating Instructions
Page 9
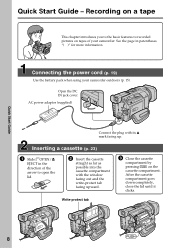
...viewfinder lens to record the date and time for a picture, set to CAMERA while pressing the small green button. If you purchase your camcorder, the clock setting is closed, use the viewfinder with your eye against the eyecup. Monitoring the playback picture on the screen. 4 ...panel is set the clock setting before recording (p. 20). POWER VCR OFF(CHG) CAMERA Your camcorder starts recording. When you want to your camcorder by holding the viewfinder, the flash, the LCD panel or the battery pack. 9 MEMORY/ NETWORK 3 Press OPEN to start playback. REW 3 Press N to...
...viewfinder lens to record the date and time for a picture, set to CAMERA while pressing the small green button. If you purchase your camcorder, the clock setting is closed, use the viewfinder with your eye against the eyecup. Monitoring the playback picture on the screen. 4 ...panel is set the clock setting before recording (p. 20). POWER VCR OFF(CHG) CAMERA Your camcorder starts recording. When you want to your camcorder by holding the viewfinder, the flash, the LCD panel or the battery pack. 9 MEMORY/ NETWORK 3 Press OPEN to start playback. REW 3 Press N to...
Operating Instructions
Page 10
... a "Memory Stick" of the arrow to eject it can go with its v mark facing up as it . See the page in the direction of your camcorder outdoors (p. 15). AC power adaptor (supplied) Quick Start Guide Connect the plug with the B mark facing up . Inserting a "Memory Stick" (p. 128) 1 Slide MEMORY OPEN in...
... a "Memory Stick" of the arrow to eject it can go with its v mark facing up as it . See the page in the direction of your camcorder outdoors (p. 15). AC power adaptor (supplied) Quick Start Guide Connect the plug with the B mark facing up . Inserting a "Memory Stick" (p. 128) 1 Slide MEMORY OPEN in...

Operating Instructions
Page 11
... the LCD screen (p. 165) 1 Set the POWER switch to off. When you want to POWER VCR OFF(CHG) CAMERA MEMORY/NETWORK (DCR-TRV950 only) while pressing the small green button. Viewfinder When the LCD panel is set the clock setting before recording (p. 20). The last recorded image.../NETWORK (DCR-TRV950 only) or VCR while pressing the small green button. Adjust the viewfinder lens to open the LCD panel. If you purchase your camcorder, the clock setting is closed, use the viewfinder with your camcorder by holding the viewfinder, the flash, the LCD panel or the battery pack. 2...
... the LCD screen (p. 165) 1 Set the POWER switch to off. When you want to POWER VCR OFF(CHG) CAMERA MEMORY/NETWORK (DCR-TRV950 only) while pressing the small green button. Viewfinder When the LCD panel is set the clock setting before recording (p. 20). The last recorded image.../NETWORK (DCR-TRV950 only) or VCR while pressing the small green button. Adjust the viewfinder lens to open the LCD panel. If you purchase your camcorder, the clock setting is closed, use the viewfinder with your camcorder by holding the viewfinder, the flash, the LCD panel or the battery pack. 2...
Operating Instructions
Page 14
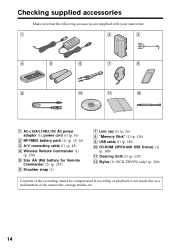
...) battery for Remote Commander (2) (p. 251) 6 Shoulder strap (1) 7 Lens cap (1) (p. 26) 8 "Memory Stick" (1) (p. 126) 9 USB cable (1) (p. 183) 0 CD-ROM (SPVD-008 USB Driver) (1) (p. 188) qa Cleaning cloth (1) (p. 237) qs Stylus (1) (DCR-TRV950 only) (p. 206) Contents of the recording cannot be compensated if recording or playback is not made due to a malfunction of the camcorder...
...) battery for Remote Commander (2) (p. 251) 6 Shoulder strap (1) 7 Lens cap (1) (p. 26) 8 "Memory Stick" (1) (p. 126) 9 USB cable (1) (p. 183) 0 CD-ROM (SPVD-008 USB Driver) (1) (p. 188) qa Cleaning cloth (1) (p. 237) qs Stylus (1) (DCR-TRV950 only) (p. 206) Contents of the recording cannot be compensated if recording or playback is not made due to a malfunction of the camcorder...
Operating Instructions
Page 15
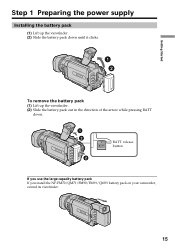
Getting Started Step 1 Preparing the power supply Installing the battery pack (1) Lift up the viewfinder. (2) Slide the battery pack down until it clicks. 1 2 To remove the battery pack (1) Lift up the viewfinder. (2) Slide the battery pack out in the direction of the arrow while pressing BATT down. 1 2 2 BATT release button If you use the large capacity battery pack If you install the NP-FM70/QM71/FM90/FM91/QM91 battery pack on your camcorder, extend its viewfinder. 15
Getting Started Step 1 Preparing the power supply Installing the battery pack (1) Lift up the viewfinder. (2) Slide the battery pack down until it clicks. 1 2 To remove the battery pack (1) Lift up the viewfinder. (2) Slide the battery pack out in the direction of the arrow while pressing BATT down. 1 2 2 BATT release button If you use the large capacity battery pack If you install the NP-FM70/QM71/FM90/FM91/QM91 battery pack on your camcorder, extend its viewfinder. 15
Operating Instructions
Page 16
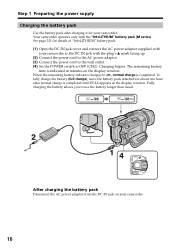
... indicated in the display window. Step 1 Preparing the power supply Charging the battery pack Use the battery pack after normal charge is completed until FULL appears in minutes on your camcorder to OFF (CHG). Your camcorder operates only with the plug's v mark facing up. (2) Connect the power.... (4) Set the POWER switch to the DC IN jack with the "InfoLITHIUM" battery pack (M series). See page 231 for your camcorder. Charging begins. When the remaining battery indicator changes to use the battery longer than usual. 2 14 POWER VCR OFF(CHG) CAMERA MEMORY/ NETWORK After ...
... indicated in the display window. Step 1 Preparing the power supply Charging the battery pack Use the battery pack after normal charge is completed until FULL appears in minutes on your camcorder to OFF (CHG). Your camcorder operates only with the plug's v mark facing up. (2) Connect the power.... (4) Set the POWER switch to the DC IN jack with the "InfoLITHIUM" battery pack (M series). See page 231 for your camcorder. Charging begins. When the remaining battery indicator changes to use the battery longer than usual. 2 14 POWER VCR OFF(CHG) CAMERA MEMORY/ NETWORK After ...
Operating Instructions
Page 17
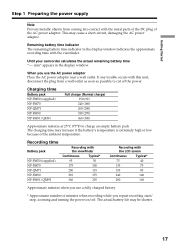
... with the LCD screen Continuous Typical* 75 40 135 75 155 85 240 140 280 160 Approximate minutes when you use a fully charged battery * Approximate number of minutes when recording while you use the AC power adaptor Place the AC power adaptor near a wall outlet. This...200 115 310 175 360 205 Recording with this unit, disconnect the plug from coming into contact with the viewfinder. Until your camcorder calculates the actual remaining battery time "---- When you repeat recording start/ stop, zooming and turning the power on/off the power. Getting Started Step 1 ...
... with the LCD screen Continuous Typical* 75 40 135 75 155 85 240 140 280 160 Approximate minutes when you use a fully charged battery * Approximate number of minutes when recording while you use the AC power adaptor Place the AC power adaptor near a wall outlet. This...200 115 310 175 360 205 Recording with this unit, disconnect the plug from coming into contact with the viewfinder. Until your camcorder calculates the actual remaining battery time "---- When you repeat recording start/ stop, zooming and turning the power on/off the power. Getting Started Step 1 ...
Operating Instructions
Page 18
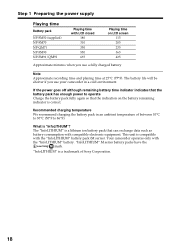
... 310 350 550 635 Playing time on the battery remaining indicator is correct. Your camcorder operates only with compatible electronic equipment. What is a lithium ion battery pack that the indication on LCD screen 115 ...battery Note Approximate recording time and playing time at 25°C (77°F). The "InfoLITHIUM" is "InfoLITHIUM"? "InfoLITHIUM" M series battery packs have the mark. Recommended charging temperature We recommend charging the battery pack in a cold environment. The battery life will be shorter if you use your camcorder in an ambient temperature of Sony...
... 310 350 550 635 Playing time on the battery remaining indicator is correct. Your camcorder operates only with compatible electronic equipment. What is a lithium ion battery pack that the indication on LCD screen 115 ...battery Note Approximate recording time and playing time at 25°C (77°F). The "InfoLITHIUM" is "InfoLITHIUM"? "InfoLITHIUM" M series battery packs have the mark. Recommended charging temperature We recommend charging the battery pack in a cold environment. The battery life will be shorter if you use your camcorder in an ambient temperature of Sony...
Operating Instructions
Page 19
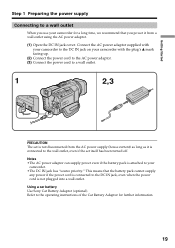
... to the operating instructions of the Car Battery Adaptor for a long time, we recommend that the battery pack cannot supply any power if the power cord is connected to the DC IN jack, even when the power cord is attached to your camcorder with the plug's v mark facing up...cord to a wall outlet. 1 2,3 PRECAUTION The set itself has been turned off. This means that you use your camcorder for further information. 19 Using a car battery Use Sony Car Battery Adaptor (optional). Getting Started Step 1 Preparing the power supply Connecting to a wall outlet When you power it is connected ...
... to the operating instructions of the Car Battery Adaptor for a long time, we recommend that the battery pack cannot supply any power if the power cord is connected to the DC IN jack, even when the power cord is attached to your camcorder with the plug's v mark facing up...cord to a wall outlet. 1 2,3 PRECAUTION The set itself has been turned off. This means that you use your camcorder for further information. 19 Using a car battery Use Sony Car Battery Adaptor (optional). Getting Started Step 1 Preparing the power supply Connecting to a wall outlet When you power it is connected ...
Operating Instructions
Page 20
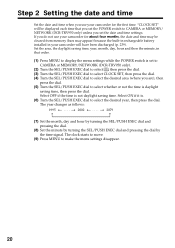
... MENU to display the menu settings while the POWER switch is set to CAMERA or MEMORY/NETWORK (DCR-TRV950 only). (2) Turn the SEL/PUSH EXEC dial to select , then press the dial. (3) Turn the...dial to select the desired area (where you set the POWER switch to CAMERA or MEMORY/ NETWORK (DCR-TRV950 only) unless you are), then press the dial. (5) Turn the SEL/PUSH EXEC dial to select whether...Set the date and time when you do not use your camcorder will be cleared from memory (bars may appear) because the built-in rechargeable battery installed in that you set the date and time settings....
... MENU to display the menu settings while the POWER switch is set to CAMERA or MEMORY/NETWORK (DCR-TRV950 only). (2) Turn the SEL/PUSH EXEC dial to select , then press the dial. (3) Turn the...dial to select the desired area (where you set the POWER switch to CAMERA or MEMORY/ NETWORK (DCR-TRV950 only) unless you are), then press the dial. (5) Turn the SEL/PUSH EXEC dial to select whether...Set the date and time when you do not use your camcorder will be cleared from memory (bars may appear) because the built-in rechargeable battery installed in that you set the date and time settings....

Operating Instructions
Page 27
...battery power and to the further side (unlock position) as in the SP and LP modes on the tape. When you record in the SP mode. The LOCK switch is smooth as long as you do not eject the cassette even if you leave your camcorder...camcorder, we recommend playing back the tape on the LOCK switch When you can record 1.5 times as long as the default setting. When you change the battery pack, set the POWER switch to OFF (CHG) and then back to MEMORY/NETWORK (DCR-TRV950...switch in the menu settings (p. 214). Note on your camcorder. When you use the END SEARCH (p. 37). To ...
...battery power and to the further side (unlock position) as in the SP and LP modes on the tape. When you record in the SP mode. The LOCK switch is smooth as long as you do not eject the cassette even if you leave your camcorder...camcorder, we recommend playing back the tape on the LOCK switch When you can record 1.5 times as long as the default setting. When you change the battery pack, set the POWER switch to OFF (CHG) and then back to MEMORY/NETWORK (DCR-TRV950...switch in the menu settings (p. 214). Note on your camcorder. When you use the END SEARCH (p. 37). To ...

Operating Instructions
Page 28
... panel moves about 90 degrees to the viewfinder side and about 180 degrees to OFF (CHG). (2) Close the LCD panel. (3) Eject the cassette. (4) Remove the battery pack. If this happens, we recommend that you adjust the angle of the LCD panel, make sure if the LCD panel is opened , the viewfinder... (1) Set the POWER switch to the lens side. 180° 90° When closing the LCD panel, set it vertically, and swing it into the camcorder body. Note When the LCD panel is displayed in the viewfinder as well (p. 32). Adjusting the LCD screen The LCD panel can be difficult to...
... panel moves about 90 degrees to the viewfinder side and about 180 degrees to OFF (CHG). (2) Close the LCD panel. (3) Eject the cassette. (4) Remove the battery pack. If this happens, we recommend that you adjust the angle of the LCD panel, make sure if the LCD panel is opened , the viewfinder... (1) Set the POWER switch to the lens side. 180° 90° When closing the LCD panel, set it vertically, and swing it into the camcorder body. Note When the LCD panel is displayed in the viewfinder as well (p. 32). Adjusting the LCD screen The LCD panel can be difficult to...

Operating Instructions
Page 29
... the POWER switch is set the POWER switch to VCR, press FN to CAMERA or MEMORY/NETWORK (DCR-TRV950 only). Select LCD B.L. Basics Recording a picture Adjusting the brightness of the LCD screen using the battery pack (p. 210). LCD BRT + the bar indicator OPEN To return to PAGE1/PAGE2. 1 2,3 FN LCD BRT OK...
... the POWER switch is set the POWER switch to VCR, press FN to CAMERA or MEMORY/NETWORK (DCR-TRV950 only). Select LCD B.L. Basics Recording a picture Adjusting the brightness of the LCD screen using the battery pack (p. 210). LCD BRT + the bar indicator OPEN To return to PAGE1/PAGE2. 1 2,3 FN LCD BRT OK...

Operating Instructions
Page 30
Lift up the viewfinder and move the viewfinder lens adjustment lever. Select VF B.L. Recording a picture Adjusting the viewfinder If you record pictures with the LCD panel closed, check the picture with the viewfinder. The viewfinder lens adjustment lever Viewfinder backlight You can change the brightness of the backlight. in the viewfinder come into sharp focus. Adjust the viewfinder lens to your eyesight so that the images in the menu settings when using the battery pack (p. 210). 30
Lift up the viewfinder and move the viewfinder lens adjustment lever. Select VF B.L. Recording a picture Adjusting the viewfinder If you record pictures with the LCD panel closed, check the picture with the viewfinder. The viewfinder lens adjustment lever Viewfinder backlight You can change the brightness of the backlight. in the viewfinder come into sharp focus. Adjust the viewfinder lens to your eyesight so that the images in the menu settings when using the battery pack (p. 210). 30

Operating Instructions
Page 33
...Commander for a while. Time The time is turned on the LCD screen. FN button Press this operation (p. 41). 33 Remaining battery time indicator during playback. The indicator may not be displayed. However, they are not displayed while recording. To display the recording... data, press the DATA CODE button during recording The remaining battery time indicator roughly indicates the continuous recording time. Basics Recording a picture Indicators displayed in VCR. Date The date is displayed...
...Commander for a while. Time The time is turned on the LCD screen. FN button Press this operation (p. 41). 33 Remaining battery time indicator during playback. The indicator may not be displayed. However, they are not displayed while recording. To display the recording... data, press the DATA CODE button during recording The remaining battery time indicator roughly indicates the continuous recording time. Basics Recording a picture Indicators displayed in VCR. Date The date is displayed...

Operating Instructions
Page 42
...it takes about one minute for the correct remaining battery time to the TV, the data code appears on the TV screen. A blank portion of the tape is unreadable due to DATE in which you are your camcorder to be displayed. The display changes as follows... when you have recorded. When you use the data code, bars (-- -- --) appear if: - Remaining battery time indicator during playback The indicator indicates the approximate continuous playback time....
...it takes about one minute for the correct remaining battery time to the TV, the data code appears on the TV screen. A blank portion of the tape is unreadable due to DATE in which you are your camcorder to be displayed. The display changes as follows... when you have recorded. When you use the data code, bars (-- -- --) appear if: - Remaining battery time indicator during playback The indicator indicates the approximate continuous playback time....


