
Operating Instructions
Page 5
.../Rec Review 26 Playback - Insert Editing 76 Customizing Your Camcorder Changing the menu settings 78 "Memory Stick" operations Using "Memory Stick"-introduction .......... 88 Recording still images on "Memory Stick"s - PRINT MARK ...... 136 Using the external printer 137 Troubleshooting Types of contents Getting started Main Features 4 Quick Start Guide 6 Getting started Using this manual 8 Checking supplied accessories 10 Step 1 Preparing the power supply 11 Installing the battery pack 11 Charging the battery pack 12 Connecting to tapes 127 Enlarging still images recorded...
.../Rec Review 26 Playback - Insert Editing 76 Customizing Your Camcorder Changing the menu settings 78 "Memory Stick" operations Using "Memory Stick"-introduction .......... 88 Recording still images on "Memory Stick"s - PRINT MARK ...... 136 Using the external printer 137 Troubleshooting Types of contents Getting started Main Features 4 Quick Start Guide 6 Getting started Using this manual 8 Checking supplied accessories 10 Step 1 Preparing the power supply 11 Installing the battery pack 11 Charging the battery pack 12 Connecting to tapes 127 Enlarging still images recorded...

Operating Instructions
Page 7
... N to VCR while pressing the small green button. PLAY OFCFR(CHG) 1 Set the POWER switch to start playback. The picture appears on the LCD screen (p. 27) 2 Press m to CAMERA while pressing the small green button. To stop recording, press START/STOP button again. When you want to record the date and time for a picture, set to off. Your camcorder starts recording. E ERMAORY E ERMAORY Quick Start Guide Recording a picture (p. 19) 1 Remove the lens cap. 2 Set the POWER switch to rewind the tape. The picture in...
... N to VCR while pressing the small green button. PLAY OFCFR(CHG) 1 Set the POWER switch to start playback. The picture appears on the LCD screen (p. 27) 2 Press m to CAMERA while pressing the small green button. To stop recording, press START/STOP button again. When you want to record the date and time for a picture, set to off. Your camcorder starts recording. E ERMAORY E ERMAORY Quick Start Guide Recording a picture (p. 19) 1 Remove the lens cap. 2 Set the POWER switch to rewind the tape. The picture in...
Operating Instructions
Page 8
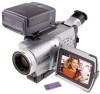
... DCRLCD screen TRV730 6.2 cm (2.5 type) TRV828 8.8 cm (3.5 type) TRV830 8.8 cm (3.5 type) Before using your camcorder With your recordings on a tape. To view your digital camcorder, you do not mix pictures recorded in capital letters. Otherwise, the model name is being carried out. Any differences in operation are clearly indicated in the Hi8 /standard 8 (analog) system. Note on your camcorder plays back tapes recorded in the text, for illustration purposes. Set the POWER switch...
... DCRLCD screen TRV730 6.2 cm (2.5 type) TRV828 8.8 cm (3.5 type) TRV830 8.8 cm (3.5 type) Before using your camcorder With your recordings on a tape. To view your digital camcorder, you do not mix pictures recorded in capital letters. Otherwise, the model name is being carried out. Any differences in operation are clearly indicated in the Hi8 /standard 8 (analog) system. Note on your camcorder plays back tapes recorded in the text, for illustration purposes. Set the POWER switch...

Operating Instructions
Page 20
... degrees to prevent battery and tape wear. This is released as you do not eject the cassette if you turn the LCD panel over so that you use the LCD screen outdoors in the viewfinder (Mirror mode). 180° 90° When closing the LCD panel, set to MEMORY accidentally. Note When using the LCD screen except in the mirror mode The picture on the LCD is opened Recording time becomes shorter...
... degrees to prevent battery and tape wear. This is released as you do not eject the cassette if you turn the LCD panel over so that you use the LCD screen outdoors in the viewfinder (Mirror mode). 180° 90° When closing the LCD panel, set to MEMORY accidentally. Note When using the LCD screen except in the mirror mode The picture on the LCD is opened Recording time becomes shorter...

Operating Instructions
Page 22
... the POWER switch is set to CAMERA or MEMORY. Date indicator This is displayed for five seconds after the POWER switch is set to your eyesight so that the indicators in minutes to CAMERA or MEMORY. When you play back tapes recorded in which you record pictures with the LCD panel closed, check the picture with the viewfinder - You cannot reset the time code or the tape counter. in the menu settings. (p. 78) Indicators displayed in VCR mode. Remaining battery time...
... the POWER switch is set to CAMERA or MEMORY. Date indicator This is displayed for five seconds after the POWER switch is set to your eyesight so that the indicators in minutes to CAMERA or MEMORY. When you play back tapes recorded in which you record pictures with the LCD panel closed, check the picture with the viewfinder - You cannot reset the time code or the tape counter. in the menu settings. (p. 78) Indicators displayed in VCR mode. Remaining battery time...

Operating Instructions
Page 31
... type Connect the yellow plug of the A/V connecting cable to the video input jack and the white or the red plug to the audio input jack on the VCR or the TV. If your camcorder and the TV or the VCR. If you monitor playback pictures on the LCD screen. Connect an S video cable (optional) to the S video jacks on both your TV or VCR is L (left) signal. You can operate the playback control buttons in the menu settings (p. 78). Connect...
... type Connect the yellow plug of the A/V connecting cable to the video input jack and the white or the red plug to the audio input jack on the VCR or the TV. If your camcorder and the TV or the VCR. If you monitor playback pictures on the LCD screen. Connect an S video cable (optional) to the S video jacks on both your TV or VCR is L (left) signal. You can operate the playback control buttons in the menu settings (p. 78). Connect...

Operating Instructions
Page 32
... your camcorder. Turn the TV's main switch on the SUPER LASER LINK button goes out. SUPER LASER LINK Super laser link emitter Before operation Attach the power supply such as follow in the menu settings. - With some models, however, the picture and sound may not work on and set AUTO TV ON to ON and TV INPUT to your camcorder, and insert the recorded tape. (1) After connecting your camcorder at...
... your camcorder. Turn the TV's main switch on the SUPER LASER LINK button goes out. SUPER LASER LINK Super laser link emitter Before operation Attach the power supply such as follow in the menu settings. - With some models, however, the picture and sound may not work on and set AUTO TV ON to ON and TV INPUT to your camcorder, and insert the recorded tape. (1) After connecting your camcorder at...
Operating Instructions
Page 33
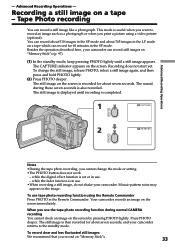
... image such as a photograph or when you use tape photo recording function using a video printer (optional). Press PHOTO deeper. Advanced Recording Operations - The still image on a tape which can record about 510 images in the SP mode and about seven seconds. The sound during normal CAMERA recording You cannot check an image on "Memory Stick"s . 33 while the fader function is also recorded. Advanced Recording Operations - Recording does not start yet. To change the mode or setting. •The PHOTO button does not work...
... image such as a photograph or when you use tape photo recording function using a video printer (optional). Press PHOTO deeper. Advanced Recording Operations - The still image on a tape which can record about 510 images in the SP mode and about seven seconds. The sound during normal CAMERA recording You cannot check an image on "Memory Stick"s . 33 while the fader function is also recorded. Advanced Recording Operations - Recording does not start yet. To change the mode or setting. •The PHOTO button does not work...

Operating Instructions
Page 52
... • The picture effect function works only for tapes recorded in the Digital8 system. • You cannot process externally input scenes using the picture effect function. • You cannot record pictures that you have processed using the picture effect functions: NEG.ART, SEPIA, B&W and SOLARIZE. (1) Press MENU to display the menu settings in the menu settings. Advanced Playback Operations - Playing back a tape with this camcorder. AR T SEP I A B&W SOLAR I ZE [ MENU ] : END MENU To cancel the picture effect function Set P EFFECT to...
... • The picture effect function works only for tapes recorded in the Digital8 system. • You cannot process externally input scenes using the picture effect function. • You cannot record pictures that you have processed using the picture effect functions: NEG.ART, SEPIA, B&W and SOLARIZE. (1) Press MENU to display the menu settings in the menu settings. Advanced Playback Operations - Playing back a tape with this camcorder. AR T SEP I A B&W SOLAR I ZE [ MENU ] : END MENU To cancel the picture effect function Set P EFFECT to...

Operating Instructions
Page 70
... part of the program mark changes to light blue. (9) Set the program by repeating steps 5 to 8. Digital program editing Operation 1: Making the program (1) Insert the tape for playback into your camcorder, and insert a tape for recording into the VCR. (2) Press MENU to display the menu. (3) Turn the SEL/PUSH EXEC dial to select , then press the dial. (4) Turn the SEL/PUSH EXEC dial to insert using the video operation buttons, then pause playback...
... part of the program mark changes to light blue. (9) Set the program by repeating steps 5 to 8. Digital program editing Operation 1: Making the program (1) Insert the tape for playback into your camcorder, and insert a tape for recording into the VCR. (2) Press MENU to display the menu. (3) Turn the SEL/PUSH EXEC dial to select , then press the dial. (4) Turn the SEL/PUSH EXEC dial to insert using the video operation buttons, then pause playback...

Operating Instructions
Page 85
... the LP mode in the menu settings. Use the Hi8 tapes for the LP mode. Customizing Your Camcorder Changing the menu settings Icon/item REC MODE Mode z SP LP AUDIO MODE z 12BIT 16BIT q REMAIN z AUTO ON Meaning To record in the SP (Standard Play) mode To increase the recording time to 1.5 times the SP mode To record or play back in the 12-bit mode (two stereo sounds) To record or play back the tape on other camcorders or VCRs, noise may...
... the LP mode in the menu settings. Use the Hi8 tapes for the LP mode. Customizing Your Camcorder Changing the menu settings Icon/item REC MODE Mode z SP LP AUDIO MODE z 12BIT 16BIT q REMAIN z AUTO ON Meaning To record in the SP (Standard Play) mode To increase the recording time to 1.5 times the SP mode To record or play back in the 12-bit mode (two stereo sounds) To record or play back the tape on other camcorders or VCRs, noise may...

Operating Instructions
Page 97
.... 1 V POWER OFCFR(CHG) E ERMAORY CAM M 2 1152 FINE 21 / 40 Number of images can record still images on the "Memory Stick" Number of the image and are adjusted, being targeted for the middle of recorded images PHOTO 3 1152 FINE "Memory Stick" operations PHOTO 97 Recording does not start yet. (3) Press PHOTO deeper. The brightness of the image and focus are fixed. The green z mark stops flashing, then lights up. Recording is set to MEMORY. The image displayed on the screen will be recorded on "Memory Stick"s. Recording...
.... 1 V POWER OFCFR(CHG) E ERMAORY CAM M 2 1152 FINE 21 / 40 Number of images can record still images on the "Memory Stick" Number of the image and are adjusted, being targeted for the middle of recorded images PHOTO 3 1152 FINE "Memory Stick" operations PHOTO 97 Recording does not start yet. (3) Press PHOTO deeper. The brightness of the image and focus are fixed. The green z mark stops flashing, then lights up. Recording is set to MEMORY. The image displayed on the screen will be recorded on "Memory Stick"s. Recording...

Operating Instructions
Page 102
... , eject the "Memory Stick" or remove the battery pack. If you press PHOTO on the Remote Commander Your camcorder immediately records the image that is incompatible with your camcorder because its format does not comform with your camcorder. (1) Set the POWER switch to 640 × 480. Sound recorded on the screen. When you press PHOTO lightly in moving image data recorded on a tape and record it as a still image on a "Memory Stick." Your camcorder can also take in the playback mode Your camcorder stops...
... , eject the "Memory Stick" or remove the battery pack. If you press PHOTO on the Remote Commander Your camcorder immediately records the image that is incompatible with your camcorder because its format does not comform with your camcorder. (1) Set the POWER switch to 640 × 480. Sound recorded on the screen. When you press PHOTO lightly in moving image data recorded on a tape and record it as a still image on a "Memory Stick." Your camcorder can also take in the playback mode Your camcorder stops...

Operating Instructions
Page 106
... picture data recorded on a tape and record it as a moving picture on the tape is not recorded. 106 Recording time can also take in the menu settings is set to VCR. (2) Press N. Recording moving pictures from . (3) Press START/STOP. Your camcorder can be recorded on a "Memory Stick." When IMAGESIZE in moving picture data through the input connector and record it as a moving picture on the "Memory Stick." This indicator is played back. This indicator is 15 seconds. 2 REW PLAY FF PAUSE 1 V POWER...
... picture data recorded on a tape and record it as a moving picture on the tape is not recorded. 106 Recording time can also take in the menu settings is set to VCR. (2) Press N. Recording moving pictures from . (3) Press START/STOP. Your camcorder can be recorded on a "Memory Stick." When IMAGESIZE in moving picture data through the input connector and record it as a moving picture on the "Memory Stick." This indicator is played back. This indicator is 15 seconds. 2 REW PLAY FF PAUSE 1 V POWER...

Operating Instructions
Page 107
... power off , eject a "Memory Stick" or remove the battery pack. As well do not turn the POWER switch during recording - Connect the A/V connecting cable to input images from an external unit used to monaural sound when recording from a tape to "Memory Stick"s. •Sound recorded in stereo is converted to play back the image. The picture may occur. If " AUDIO ERROR" is lit or flashing Do not shake or strike the unit. you press any video control buttons during recording - "Memory Stick" operations Recording moving pictures from a tape Notes •Sound recorded...
... power off , eject a "Memory Stick" or remove the battery pack. As well do not turn the POWER switch during recording - Connect the A/V connecting cable to input images from an external unit used to monaural sound when recording from a tape to "Memory Stick"s. •Sound recorded in stereo is converted to play back the image. The picture may occur. If " AUDIO ERROR" is lit or flashing Do not shake or strike the unit. you press any video control buttons during recording - "Memory Stick" operations Recording moving pictures from a tape Notes •Sound recorded...

Operating Instructions
Page 123
... hard disk containing the OS to install the USB driver. (5) Connect the (USB) jack on -screen messages to open the window. (4) Double-click the icon of your camcorder. The Add Hardware Wizard starts twice because 2 different USB drivers are installed. USB driver installation starts. (4) Follow the on your camcorder with your computer. 123 Be sure to insert a "Memory Stick" into your camcorder, connect the AC power adaptor and set the POWER switch to the computer. For Macintosh users (1) Turn...
... hard disk containing the OS to install the USB driver. (5) Connect the (USB) jack on -screen messages to open the window. (4) Double-click the icon of your camcorder. The Add Hardware Wizard starts twice because 2 different USB drivers are installed. USB driver installation starts. (4) Follow the on your camcorder with your computer. 123 Be sure to insert a "Memory Stick" into your camcorder, connect the AC power adaptor and set the POWER switch to the computer. For Macintosh users (1) Turn...

Operating Instructions
Page 125
... Special menu. (3) Eject the "Memory Stick." "Memory Stick" operations Viewing images using a retouch software from your computer to the camcorder or when you directly modify the image on the camcorder, the image format will shorten the "Memory Stick" life. •Do not compress the data on the "Memory Stick." This will differ so a file error indicator may appear and you load an image modified using your computer Unplug the USB cable/Eject the "Memory Stick" To unplug the USB cable or eject the "Memory Stick", follow...
... Special menu. (3) Eject the "Memory Stick." "Memory Stick" operations Viewing images using a retouch software from your computer to the camcorder or when you directly modify the image on the camcorder, the image format will shorten the "Memory Stick" life. •Do not compress the data on the "Memory Stick." This will differ so a file error indicator may appear and you load an image modified using your computer Unplug the USB cable/Eject the "Memory Stick" To unplug the USB cable or eject the "Memory Stick", follow...

Operating Instructions
Page 145
Troubleshooting Warning indicators and messages Warning messages •CLOCK SET •FOR "InfoLITHIUM" BATTERY ONLY •8mm TAPE t SP REC Hi8 TAPE t LP/SP REC •Q Z TAPE END •Q NO TAPE • CLEANING CASSETTE** •COPY INHIBIT • FULL • - • NO FILE • NO MEMORY STICK • AUDIO ERROR • MEMORY STICK ERROR • FORMAT ERROR • - DIRECTORY ERROR • NO PRINT MARK • NO STILL IMAGE FILE • DELETING • FORMATTING • NOW CHARGING Set the date and time. (p. 17) Use an "InfoLITHIUM...
Troubleshooting Warning indicators and messages Warning messages •CLOCK SET •FOR "InfoLITHIUM" BATTERY ONLY •8mm TAPE t SP REC Hi8 TAPE t LP/SP REC •Q Z TAPE END •Q NO TAPE • CLEANING CASSETTE** •COPY INHIBIT • FULL • - • NO FILE • NO MEMORY STICK • AUDIO ERROR • MEMORY STICK ERROR • FORMAT ERROR • - DIRECTORY ERROR • NO PRINT MARK • NO STILL IMAGE FILE • DELETING • FORMATTING • NOW CHARGING Set the date and time. (p. 17) Use an "InfoLITHIUM...

Operating Instructions
Page 157
...) DCR-TRV828/TRV830: 1 130 g (2 lb 7 oz) including the battery pack NP-FM50, 120min. Hi8 cassette, and shoulder strap Supplied accessories See page 10. Specifications Video camera recorder System Video recording system 2 rotary heads Helical scaning system Audio recording system Rotary heads, PCM system Quantization: 12 bits (Fs 32 kHz, stereo 1, stereo 2), 16 bits (Fs 48 kHz, stereo) Video signal NTSC color, EIA standards Recommended cassette Hi8/Digital8 video cassette Recording/playback time (using 120...
...) DCR-TRV828/TRV830: 1 130 g (2 lb 7 oz) including the battery pack NP-FM50, 120min. Hi8 cassette, and shoulder strap Supplied accessories See page 10. Specifications Video camera recorder System Video recording system 2 rotary heads Helical scaning system Audio recording system Rotary heads, PCM system Quantization: 12 bits (Fs 32 kHz, stereo 1, stereo 2), 16 bits (Fs 48 kHz, stereo) Video signal NTSC color, EIA standards Recommended cassette Hi8/Digital8 video cassette Recording/playback time (using 120...

Operating Instructions
Page 167
... Memory overlap 110 Memory PB ZOOM 129 Memory photo recording ...... 97 "Memory Stick 88 Menu settings 78 Mirror mode 20 Moisture condensation ........ 152 Monaural 31 MONOTONE 37 MPEG 88 MPEG movie recording ....... 104 NIGHTSHOT 23 NTSC system 151 O, P, Q OLD MOVIE 40 Operation indicators 166 OVERLAP 37 Photo save 115 Photo scan 58 Photo search 57 Picture effect 39, 52 Picture search 29 Playback pause 29 Print mark 136 PROGRAM AE 43 R Recording time 14 Rec Review 26 Remaining battery time...
... Memory overlap 110 Memory PB ZOOM 129 Memory photo recording ...... 97 "Memory Stick 88 Menu settings 78 Mirror mode 20 Moisture condensation ........ 152 Monaural 31 MONOTONE 37 MPEG 88 MPEG movie recording ....... 104 NIGHTSHOT 23 NTSC system 151 O, P, Q OLD MOVIE 40 Operation indicators 166 OVERLAP 37 Photo save 115 Photo scan 58 Photo search 57 Picture effect 39, 52 Picture search 29 Playback pause 29 Print mark 136 PROGRAM AE 43 R Recording time 14 Rec Review 26 Remaining battery time...


