Operating Instructions
Page 1
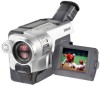
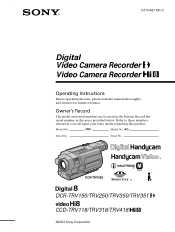
3-079-467-13 (1) Digital Video Camera Recorder Video Camera Recorder Operating Instructions Before operating the unit, please read this product. Model No. -TRV Model No. Serial No. Refer to these numbers whenever you call upon your Sony dealer regarding this manual thoroughly, and retain it for future reference. Owner's Record The model and serial numbers are located on the bottom. Record the serial number in the space provided below. Serial No. DCR-TRV350 TM SERIES DCR-TRV150/TRV250/TRV350/TRV351 CCD-TRV118/TRV318/TRV418 ©2003 Sony Corporation AC-
3-079-467-13 (1) Digital Video Camera Recorder Video Camera Recorder Operating Instructions Before operating the unit, please read this product. Model No. -TRV Model No. Serial No. Refer to these numbers whenever you call upon your Sony dealer regarding this manual thoroughly, and retain it for future reference. Owner's Record The model and serial numbers are located on the bottom. Record the serial number in the space provided below. Serial No. DCR-TRV350 TM SERIES DCR-TRV150/TRV250/TRV350/TRV351 CCD-TRV118/TRV318/TRV418 ©2003 Sony Corporation AC-
Operating Instructions
Page 2
... Regulatory Information Declaration of Conformity Trade Name: SONY Model No.: DCR-TRV350 Responsible Party: Sony Electronics Inc. Declaration of Conformity Trade Name: SONY Model No.: DCR-TRV150, DCR-TRV250 Responsible Party: Sony Electronics Inc. Operation is very easy to ...Sony Handycam. For the customers in this manual could void your authority to the presence of this equipment. 2 Telephone No.: 201-930-6972 This device complies with superior picture and sound quality. With your purchase of important operating and maintenance (servicing) instructions...
... Regulatory Information Declaration of Conformity Trade Name: SONY Model No.: DCR-TRV350 Responsible Party: Sony Electronics Inc. Declaration of Conformity Trade Name: SONY Model No.: DCR-TRV150, DCR-TRV250 Responsible Party: Sony Electronics Inc. Operation is very easy to ...Sony Handycam. For the customers in this manual could void your authority to the presence of this equipment. 2 Telephone No.: 201-930-6972 This device complies with superior picture and sound quality. With your purchase of important operating and maintenance (servicing) instructions...
Operating Instructions
Page 3
... the following measures: - Connect the equipment into an outlet on , the user is connected. - These limits are recyclable. For the customers in accordance with the instructions, may cause harmful interference to radio communications. Note: This equipment has been tested and found to comply with the limits for a digital device pursuant to...
... the following measures: - Connect the equipment into an outlet on , the user is connected. - These limits are recyclable. For the customers in accordance with the instructions, may cause harmful interference to radio communications. Note: This equipment has been tested and found to comply with the limits for a digital device pursuant to...

Operating Instructions
Page 4
Main Features On the model name indication In this manual, check the model name of your camcorder. CCD-TRV118 : CCD-TRV318 : CCD-TRV418 : DCR-TRV150 : DCR-TRV250 : DCR-TRV350 : DCR-TRV351 : Instructions with icons are used to capture images onto your computer (p. 208) 4 Capturing images on your computer - USB Streaming (p. 183) •Capturing images...
Main Features On the model name indication In this manual, check the model name of your camcorder. CCD-TRV118 : CCD-TRV318 : CCD-TRV418 : DCR-TRV150 : DCR-TRV250 : DCR-TRV350 : DCR-TRV351 : Instructions with icons are used to capture images onto your computer (p. 208) 4 Capturing images on your computer - USB Streaming (p. 183) •Capturing images...

Operating Instructions
Page 14
... manual The instructions in this manual are for illustration purposes. z z z - z - - Otherwise, the model name is the model used for the seven models listed in the illustrations. z - z z z z - As you read through this manual and operating your camcorder, check the... z Provided - Before you can hear a beep to CAMERA. When you carry out an operation, you start reading this manual, buttons and settings on your camcorder. z - Hi8 Hi8/8 OUT OUT - - - - z z - - - - - Set the POWER switch to indicate that the operation is being carried out. z z...
... manual The instructions in this manual are for illustration purposes. z z z - z - - Otherwise, the model name is the model used for the seven models listed in the illustrations. z - z z z z - As you read through this manual and operating your camcorder, check the... z Provided - Before you can hear a beep to CAMERA. When you carry out an operation, you start reading this manual, buttons and settings on your camcorder. z - Hi8 Hi8/8 OUT OUT - - - - z z - - - - - Set the POWER switch to indicate that the operation is being carried out. z z...
Operating Instructions
Page 16
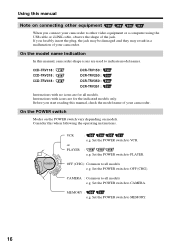
... jack may be damaged and they may result in a malfunction of your camcorder. Consider this when following the operating instructions. Set the POWER switch to VCR. : e.g. CCD-TRV118 : CCD-TRV318 : CCD-TRV418 : DCR-TRV150 : DCR-TRV250 : DCR-TRV350 : DCR-TRV351 : Instructions with icons are for all models. On the POWER switch Modes on the...
... jack may be damaged and they may result in a malfunction of your camcorder. Consider this when following the operating instructions. Set the POWER switch to VCR. : e.g. CCD-TRV118 : CCD-TRV318 : CCD-TRV418 : DCR-TRV150 : DCR-TRV250 : DCR-TRV350 : DCR-TRV351 : Instructions with icons are for all models. On the POWER switch Modes on the...

Operating Instructions
Page 25
... a wall outlet. •Place the AC Adaptor near a wall outlet. Using a car battery Use Sony Car Battery Adaptor (optional). Notes •The AC Adaptor can supply power even if the battery pack is attached to the operating instructions of the Car Battery Adaptor for further information. 25 Getting Started Step 1 Preparing the... trouble occurs with this unit, disconnect the plug from the AC power source (house current) as long as possible to cut off . Refer to your camcorder. •The DC IN jack has "source priority."
... a wall outlet. •Place the AC Adaptor near a wall outlet. Using a car battery Use Sony Car Battery Adaptor (optional). Notes •The AC Adaptor can supply power even if the battery pack is attached to the operating instructions of the Car Battery Adaptor for further information. 25 Getting Started Step 1 Preparing the... trouble occurs with this unit, disconnect the plug from the AC power source (house current) as long as possible to cut off . Refer to your camcorder. •The DC IN jack has "source priority."
Operating Instructions
Page 51
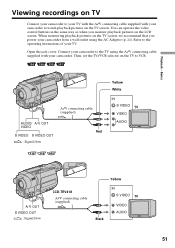
...the TV to watch playback pictures on the TV screen, we recommend that you power your camcorder. Then, set the TV/VCR selector on the LCD screen. Refer to your TV with the A/V connecting cable supplied with your camcorder from a wall outlet using the A/V connecting cable supplied with your TV. Playback - Connect... V OUT S VIDEO OUT : Signal flow CCD-TRV418 A/V connecting cable (supplied) Yellow IN S VIDEO TV Black VIDEO AUDIO 51 Basics Viewing recordings on TV Connect your camcorder to the operating instructions of your camcorder to VCR. Open the jack cover.
...the TV to watch playback pictures on the TV screen, we recommend that you power your camcorder. Then, set the TV/VCR selector on the LCD screen. Refer to your TV with the A/V connecting cable supplied with your camcorder from a wall outlet using the A/V connecting cable supplied with your TV. Playback - Connect... V OUT S VIDEO OUT : Signal flow CCD-TRV418 A/V connecting cable (supplied) Yellow IN S VIDEO TV Black VIDEO AUDIO 51 Basics Viewing recordings on TV Connect your camcorder to the operating instructions of your camcorder to VCR. Open the jack cover.
Operating Instructions
Page 52
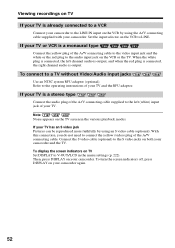
... to the video input jack and the white or the red plug to the audio input jack on the VCR or the TV. If your camcorder. When the white plug is connected, the left channel audio is output, and when the red plug is connected, the right channel audio is a stereo... the left (white) input jack of your camcorder and the TV. If your TV and the RFU adaptor. Note Noise appears on both your TV. Set the input selector on TV Set DISPLAY to the operating instructions of the A/V connecting cable. Refer to V-OUT/LCD in the various playback modes. To display the...
... to the video input jack and the white or the red plug to the audio input jack on the VCR or the TV. If your camcorder. When the white plug is connected, the left channel audio is output, and when the red plug is connected, the right channel audio is a stereo... the left (white) input jack of your camcorder and the TV. If your TV and the RFU adaptor. Note Noise appears on both your TV. Set the input selector on TV Set DISPLAY to the operating instructions of the A/V connecting cable. Refer to V-OUT/LCD in the various playback modes. To display the...

Operating Instructions
Page 59
... a cinema-like picture (CINEMA) or a 16:9 wide picture (16:9FULL) to watch on a wide TV In the standby mode, set 16:9WIDE to the operating instructions of your TV. [b] CINEMA CINEMA [a] [c] [d] [b] 16:9FULL 16:9FULL [e] [c] [f] [a]: Recording in the CINEMA mode [b]: Playback on a normal TV [c]: Playback on a wide TV in the normal...
... a cinema-like picture (CINEMA) or a 16:9 wide picture (16:9FULL) to watch on a wide TV In the standby mode, set 16:9WIDE to the operating instructions of your TV. [b] CINEMA CINEMA [a] [c] [d] [b] 16:9FULL 16:9FULL [e] [c] [f] [a]: Recording in the CINEMA mode [b]: Playback on a normal TV [c]: Playback on a wide TV in the normal...
Operating Instructions
Page 94
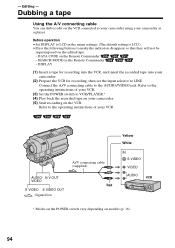
Before operation • Set DISPLAY to LCD in the menu settings. (The default setting is LCD.) • Press the following buttons to your camcorder using your VCR. Dubbing a tape Using the A/V connecting cable You can dub or edit on the VCR connected to... into the VCR, and insert the recorded tape into your camcorder. (2) Prepare the VCR for recording, then set the input selector to the operating instructions of your camcorder. (5) Start recording on the edited tape: - Refer to the operating instructions of your camcorder as a player. - Connect the A/V connecting cable to VCR...
Before operation • Set DISPLAY to LCD in the menu settings. (The default setting is LCD.) • Press the following buttons to your camcorder using your VCR. Dubbing a tape Using the A/V connecting cable You can dub or edit on the VCR connected to... into the VCR, and insert the recorded tape into your camcorder. (2) Prepare the VCR for recording, then set the input selector to the operating instructions of your camcorder. (5) Start recording on the edited tape: - Refer to the operating instructions of your camcorder as a player. - Connect the A/V connecting cable to VCR...
Operating Instructions
Page 96
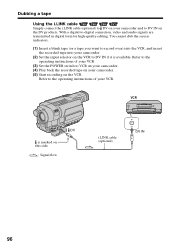
...is available. Dubbing a tape Using the i.LINK cable Simply connect the i.LINK cable (optional) to DV on your camcorder and to DV IN on the VCR. Refer to the operating instructions of your camcorder. (2) Set the input selector on this side. : Signal flow i.LINK cable (optional) DV DV IN 96 Refer... to the operating instructions of your VCR. (3) Set the POWER switch to record over) into the VCR, and insert ...
...is available. Dubbing a tape Using the i.LINK cable Simply connect the i.LINK cable (optional) to DV on your camcorder and to DV IN on the VCR. Refer to the operating instructions of your camcorder. (2) Set the input selector on this side. : Signal flow i.LINK cable (optional) DV DV IN 96 Refer... to the operating instructions of your VCR. (3) Set the POWER switch to record over) into the VCR, and insert ...
Operating Instructions
Page 98
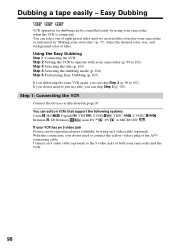
... an S video jack Picture can be controlled easily by using the same VCR again, you can edit on VCRs that support the following systems: 8 mm , Hi8 , Digital8 , VHS , S-VHS , VHSC , S-VHSC , Betamax , ED Betamax , mini DV , DV , or MICRO MV . If you dub using an S video ...tape easily - You can skip Step 3 (p. 103). Select the desired color, size, and background color of both your camcorder when the VCR is connected. Step 1: Connecting the VCR Connect the devices as instructed in page 95. Connect an S video cable (optional) to 102). You can skip Step 2 (p. 99 to the...
... an S video jack Picture can be controlled easily by using the same VCR again, you can edit on VCRs that support the following systems: 8 mm , Hi8 , Digital8 , VHS , S-VHS , VHSC , S-VHSC , Betamax , ED Betamax , mini DV , DV , or MICRO MV . If you dub using an S video ...tape easily - You can skip Step 3 (p. 103). Select the desired color, size, and background color of both your camcorder when the VCR is connected. Step 1: Connecting the VCR Connect the devices as instructed in page 95. Connect an S video cable (optional) to 102). You can skip Step 2 (p. 99 to the...
Operating Instructions
Page 102
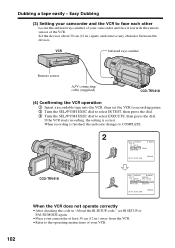
Easy Dubbing (3) Setting your camcorder and the VCR to select EXECUTE, then press the dial. Set the devices about 30 cm (12 in "About the IR SETUP code," set the ... a recordable tape into the VCR, then set IR SETUP or PAUSE MODE again. • Place your camcorder at least 30 cm (12 in.) away from the VCR. • Refer to the operating instructions of your camcorder and face it towards the remote sensor of your VCR. If the VCR starts recording, the setting...
Easy Dubbing (3) Setting your camcorder and the VCR to select EXECUTE, then press the dial. Set the devices about 30 cm (12 in "About the IR SETUP code," set the ... a recordable tape into the VCR, then set IR SETUP or PAUSE MODE again. • Place your camcorder at least 30 cm (12 in.) away from the VCR. • Refer to the operating instructions of your camcorder and face it towards the remote sensor of your VCR. If the VCR starts recording, the setting...

Operating Instructions
Page 103
... SEL/PUSH EXEC dial to select the desired item, then press the dial. 3 Repeat steps 1 and 2 until the title is laid out as instructed in "Making your camcorder as desired. (4) Press the SEL/PUSH EXEC dial again to select the color, size, or background color, then press the dial. CUSTOM1 and CUSTOM2...
... SEL/PUSH EXEC dial to select the desired item, then press the dial. 3 Repeat steps 1 and 2 until the title is laid out as instructed in "Making your camcorder as desired. (4) Press the SEL/PUSH EXEC dial again to select the color, size, or background color, then press the dial. CUSTOM1 and CUSTOM2...
Operating Instructions
Page 109
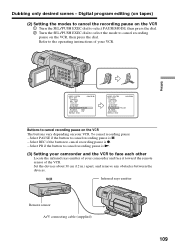
..."CUT-IN" "CUT-OUT" IR SETUP PAUSEMODE PAUSE IR TEST RETURN [MENU] : END Buttons to face each other Locate the infrared rays emitter of your camcorder and face it toward the remote sensor of your VCR. To cancel recording pause: - Select PB if the button to cancel recording pause is N. (3) Setting... your camcorder and the VCR to cancel recording pause on the VCR The buttons vary depending on the VCR, then press the dial. Select REC if the...
..."CUT-IN" "CUT-OUT" IR SETUP PAUSEMODE PAUSE IR TEST RETURN [MENU] : END Buttons to face each other Locate the infrared rays emitter of your camcorder and face it toward the remote sensor of your VCR. To cancel recording pause: - Select PB if the button to cancel recording pause is N. (3) Setting... your camcorder and the VCR to cancel recording pause on the VCR The buttons vary depending on the VCR, then press the dial. Select REC if the...

Operating Instructions
Page 110
... pause. 2 Turn the SEL/PUSH EXEC dial to select IR TEST, then press the dial. 3 Turn the SEL/PUSH EXEC dial to the operating instructions of your camcorder at least 30 cm (12 in.) away from the VCR. • Refer to select EXECUTE, then press the dial. Digital program editing (on tapes...
... pause. 2 Turn the SEL/PUSH EXEC dial to select IR TEST, then press the dial. 3 Turn the SEL/PUSH EXEC dial to the operating instructions of your camcorder at least 30 cm (12 in.) away from the VCR. • Refer to select EXECUTE, then press the dial. Digital program editing (on tapes...
Operating Instructions
Page 183
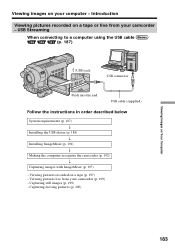
... cable (p. 187) (USB) jack USB connector Push into the end USB cable (supplied) Follow the instructions in order described below System requirements (p. 187) r Installing the USB driver (p. 189) r Installing ImageMixer (p. 191) r Making the computer recognize the camcorder (p. 192) r Capturing images with ImageMixer (p. 197) - Viewing pictures live from your computer - Capturing still images...
... cable (p. 187) (USB) jack USB connector Push into the end USB cable (supplied) Follow the instructions in order described below System requirements (p. 187) r Installing the USB driver (p. 189) r Installing ImageMixer (p. 191) r Making the computer recognize the camcorder (p. 192) r Capturing images with ImageMixer (p. 197) - Viewing pictures live from your computer - Capturing still images...
Operating Instructions
Page 184
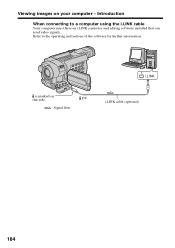
Refer to a computer using the i.LINK cable Your computer must have an i.LINK connector and editing software installed that can read video signals. DV : Signal flow i.LINK cable (optional) 184 i.LINK is marked on your computer - Viewing images on this side. Introduction When connecting to the operating instructions of the software for further information.
Refer to a computer using the i.LINK cable Your computer must have an i.LINK connector and editing software installed that can read video signals. DV : Signal flow i.LINK cable (optional) 184 i.LINK is marked on your computer - Viewing images on this side. Introduction When connecting to the operating instructions of the software for further information.
Operating Instructions
Page 185
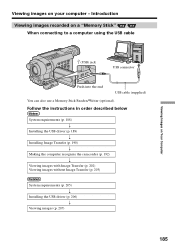
Introduction Viewing images recorded on your computer - Follow the instructions in order described below System requirements (p. 188) r Installing the USB driver (p. 189) r Installing Image Transfer (p. 190) r Making the computer recognize the camcorder (p. 192) r Viewing images with Image Transfer (p. 202) Viewing images without Image Transfer (p. 203) System requirements (p. 205) r Installing the USB driver (p. 206...
Introduction Viewing images recorded on your computer - Follow the instructions in order described below System requirements (p. 188) r Installing the USB driver (p. 189) r Installing Image Transfer (p. 190) r Making the computer recognize the camcorder (p. 192) r Viewing images with Image Transfer (p. 202) Viewing images without Image Transfer (p. 203) System requirements (p. 205) r Installing the USB driver (p. 206...


