Operating Instructions
Page 1
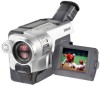
Serial No. Record the serial number in the space provided below. Model No. -TRV Model No. AC- Serial No. DCR-TRV350 TM SERIES DCR-TRV150/TRV250/TRV350/TRV351 CCD-TRV118/TRV318/TRV418 ©2003 Sony Corporation Refer to these numbers whenever you call upon your Sony dealer regarding this manual thoroughly, and retain it for future reference. 3-079-467-13 (1) Digital Video Camera Recorder Video Camera Recorder Operating Instructions Before operating the unit, please read this product. Owner's Record The model and serial numbers are located on the bottom.
Serial No. Record the serial number in the space provided below. Model No. -TRV Model No. AC- Serial No. DCR-TRV350 TM SERIES DCR-TRV150/TRV250/TRV350/TRV351 CCD-TRV118/TRV318/TRV418 ©2003 Sony Corporation Refer to these numbers whenever you call upon your Sony dealer regarding this manual thoroughly, and retain it for future reference. 3-079-467-13 (1) Digital Video Camera Recorder Video Camera Recorder Operating Instructions Before operating the unit, please read this product. Owner's Record The model and serial numbers are located on the bottom.

Operating Instructions
Page 4
Before you start reading this manual, camcorder-shape icons are used to capture images onto your computer (p. 208) 4 Capturing images on your computer CCD-TRV118 : CCD-TRV318 : CCD-TRV418 : DCR-TRV150 : DCR-TRV250 : DCR-TRV350 : DCR-TRV351 : Instructions with icons are ...for all models. Instructions with no icons are for the indicated models only. USB Streaming (p. 183) •Capturing images on your computer from your camcorder on your camcorder...
Before you start reading this manual, camcorder-shape icons are used to capture images onto your computer (p. 208) 4 Capturing images on your computer CCD-TRV118 : CCD-TRV318 : CCD-TRV418 : DCR-TRV150 : DCR-TRV250 : DCR-TRV350 : DCR-TRV351 : Instructions with icons are ...for all models. Instructions with no icons are for the indicated models only. USB Streaming (p. 183) •Capturing images on your computer from your camcorder on your camcorder...
Operating Instructions
Page 16
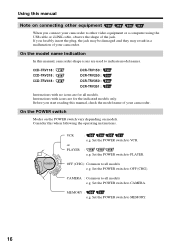
CCD-TRV118 : CCD-TRV318 : CCD-TRV418 : DCR-TRV150 : DCR-TRV250 : DCR-TRV350 : DCR-TRV351 : Instructions with icons are for all models. Set the POWER switch to VCR. : e.g. If you forcibly insert the plug, the jack may be damaged and they may result in a malfunction of your camcorder.... Set the POWER switch to MEMORY. 16 Before you connect your camcorder. CAMERA : Common to other equipment When you start reading this manual, check the model name of...
CCD-TRV118 : CCD-TRV318 : CCD-TRV418 : DCR-TRV150 : DCR-TRV250 : DCR-TRV350 : DCR-TRV351 : Instructions with icons are for all models. Set the POWER switch to VCR. : e.g. If you forcibly insert the plug, the jack may be damaged and they may result in a malfunction of your camcorder.... Set the POWER switch to MEMORY. 16 Before you connect your camcorder. CAMERA : Common to other equipment When you start reading this manual, check the model name of...
Operating Instructions
Page 42
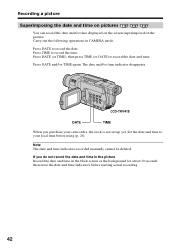
... the screen superimposed on the picture. Press DATE to record the time. The date and/or time indicator disappears. Press TIME to record the date. CCD-TRV418 DATE TIME When you do not record the date and time in the picture Record the date and time in CAMERA mode. Press DATE... date and time. If you purchase your local time before starting actual recording. 42 Press DATE (or TIME), then press TIME (or DATE) to your camcorder, the clock is not set up yet. Carry out the following operations in the black screen as the background for about 10 seconds, then erase...
... the screen superimposed on the picture. Press DATE to record the time. The date and/or time indicator disappears. Press TIME to record the date. CCD-TRV418 DATE TIME When you do not record the date and time in the picture Record the date and time in CAMERA mode. Press DATE... date and time. If you purchase your local time before starting actual recording. 42 Press DATE (or TIME), then press TIME (or DATE) to your camcorder, the clock is not set up yet. Carry out the following operations in the black screen as the background for about 10 seconds, then erase...
Operating Instructions
Page 51
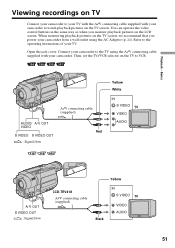
...When monitoring playback pictures on the TV screen. Connect your camcorder to the operating instructions of your camcorder from a wall outlet using the A/V connecting cable supplied with your camcorder. Then, set the TV/VCR selector on the LCD screen. A/V connecting cable (supplied) AUDIO/ A/ V... OUT VIDEO Red S VIDEO S VIDEO OUT : Signal flow Yellow White IN S VIDEO TV VIDEO AUDIO A/ V OUT S VIDEO OUT : Signal flow CCD-TRV418 A/V connecting cable...
...When monitoring playback pictures on the TV screen. Connect your camcorder to the operating instructions of your camcorder from a wall outlet using the A/V connecting cable supplied with your camcorder. Then, set the TV/VCR selector on the LCD screen. A/V connecting cable (supplied) AUDIO/ A/ V... OUT VIDEO Red S VIDEO S VIDEO OUT : Signal flow Yellow White IN S VIDEO TV VIDEO AUDIO A/ V OUT S VIDEO OUT : Signal flow CCD-TRV418 A/V connecting cable...

Operating Instructions
Page 59
... Using the wide mode You can record a cinema-like picture (CINEMA) or a 16:9 wide picture (16:9FULL) to CINEMA or 16:9FULL in the menu CCD-TRV418 MENU CAMERA SET D ZOOM 16:9W I DE OFF STEADYSHOT CINEMA N.S.LIGHT 16:9FULL RETURN [MENU] : END 59 in settings (p. 212).
... Using the wide mode You can record a cinema-like picture (CINEMA) or a 16:9 wide picture (16:9FULL) to CINEMA or 16:9FULL in the menu CCD-TRV418 MENU CAMERA SET D ZOOM 16:9W I DE OFF STEADYSHOT CINEMA N.S.LIGHT 16:9FULL RETURN [MENU] : END 59 in settings (p. 212).

Operating Instructions
Page 95
... VCR. With this connection, you have finished dubbing a tape Press x on VCRs that support the following systems: 8 mm , Hi8 , Digital8 , VHS , S-VHS , VHSC , S-VHSC , Betamax , ED Betamax , mini DV , DV , or MICRO...connecting cable. If your VCR has an S video jack Pictures can edit on both your camcorder and the VCR. If your VCR is a monaural type Connect the yellow plug of ... is output. If your VCR. Dubbing a tape Editing A/ V OUT S VIDEO OUT : Signal flow CCD-TRV418 A/V connecting cable (supplied) Yellow IN S VIDEO Black VIDEO AUDIO VCR When you do not need...
... VCR. With this connection, you have finished dubbing a tape Press x on VCRs that support the following systems: 8 mm , Hi8 , Digital8 , VHS , S-VHS , VHSC , S-VHSC , Betamax , ED Betamax , mini DV , DV , or MICRO...connecting cable. If your VCR has an S video jack Pictures can edit on both your camcorder and the VCR. If your VCR is a monaural type Connect the yellow plug of ... is output. If your VCR. Dubbing a tape Editing A/ V OUT S VIDEO OUT : Signal flow CCD-TRV418 A/V connecting cable (supplied) Yellow IN S VIDEO Black VIDEO AUDIO VCR When you do not need...
Operating Instructions
Page 99
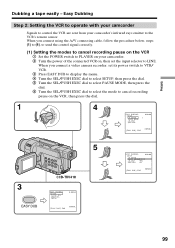
... PL POWER RA CAME AYER OFF(CHG) 4 EASY DUBBING SETUP I R SETUP PAUSE MODE I R TEST RETURN 0:00:00 3 [ EASY DUB ] : END NORMAL 5 3 EASY DUB CCD-TRV418 EASY DUBBING START T I T LE SEL MODE SEL SETUP 0:00:00 [ EASY DUB ] : END NORMAL EASY DUBBING 0:00:00 SETUP I R SETUP PAUSE MODE PAUSE I R TEST... REC RETURN PB [ EASY DUB ] : END NORMAL 99 Easy Dubbing Step 2: Setting the VCR to operate with your camcorder Signals to control the VCR are sent from your camcorder. 2 Turn the power of the connected VCR on, then set its power switch to VTR/ VCR. 3 Press EASY DUB to...
... PL POWER RA CAME AYER OFF(CHG) 4 EASY DUBBING SETUP I R SETUP PAUSE MODE I R TEST RETURN 0:00:00 3 [ EASY DUB ] : END NORMAL 5 3 EASY DUB CCD-TRV418 EASY DUBBING START T I T LE SEL MODE SEL SETUP 0:00:00 [ EASY DUB ] : END NORMAL EASY DUBBING 0:00:00 SETUP I R SETUP PAUSE MODE PAUSE I R TEST... REC RETURN PB [ EASY DUB ] : END NORMAL 99 Easy Dubbing Step 2: Setting the VCR to operate with your camcorder Signals to control the VCR are sent from your camcorder. 2 Turn the power of the connected VCR on, then set its power switch to VTR/ VCR. 3 Press EASY DUB to...

Operating Instructions
Page 100
... pause: - Check the code in "About the IR SETUP code" (p. 101). 1 EASY DUBBING SETUP I R SETUP PAUSE MODE I R TEST RETURN 0:00:00 3 [EASY DUB]:END NORMAL CCD-TRV418 EASY DUBBING SETUP I R SETUP PAUSE MODE I R TEST RETURN 0:00:00 3 [EASY DUB]:END NORMAL 100 Select PAUSE if the button to cancel recording pause...
... pause: - Check the code in "About the IR SETUP code" (p. 101). 1 EASY DUBBING SETUP I R SETUP PAUSE MODE I R TEST RETURN 0:00:00 3 [EASY DUB]:END NORMAL CCD-TRV418 EASY DUBBING SETUP I R SETUP PAUSE MODE I R TEST RETURN 0:00:00 3 [EASY DUB]:END NORMAL 100 Select PAUSE if the button to cancel recording pause...
Operating Instructions
Page 102
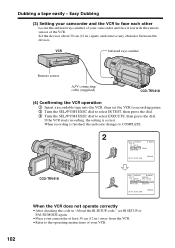
..., the indicator changes to COMPLETE. 2 EASY DUBBING 0:00:00 SETUP I R SETUP PAUSE MODE I R TEST READY RETURN [EASY DUB]:END NORMAL CCD-TRV418 EASY DUBBING 0:00:00 SETUP ENGAGE I R SETUP REC PAUSE PAUSE MODE I R TEST RETURN RETURN EXECUTE [EASY DUB]:END NORMAL When the VCR... - VCR Infrared rays emitter 102 Remote sensor A/V connecting cable (supplied) CCD-TRV418 (4) Confirming the VCR operation 1 Insert a recordable tape into the VCR, then set IR SETUP or PAUSE MODE again. • Place your camcorder at least 30 cm (12 in .) apart, and remove any obstacles between...
..., the indicator changes to COMPLETE. 2 EASY DUBBING 0:00:00 SETUP I R SETUP PAUSE MODE I R TEST READY RETURN [EASY DUB]:END NORMAL CCD-TRV418 EASY DUBBING 0:00:00 SETUP ENGAGE I R SETUP REC PAUSE PAUSE MODE I R TEST RETURN RETURN EXECUTE [EASY DUB]:END NORMAL When the VCR... - VCR Infrared rays emitter 102 Remote sensor A/V connecting cable (supplied) CCD-TRV418 (4) Confirming the VCR operation 1 Insert a recordable tape into the VCR, then set IR SETUP or PAUSE MODE again. • Place your camcorder at least 30 cm (12 in .) apart, and remove any obstacles between...

Operating Instructions
Page 103
... I NG T I TLE 0:00:00 HELLO! [EASY DUB]:END EASY DUBB I NG T I ZE L ARGE 0:00:00 HELLO! CUSTOM1 and CUSTOM2 are custom titles stored in your camcorder as desired. (4) Press the SEL/PUSH EXEC dial again to select TITLE SEL, then press the dial. (2) Select the desired title in "Making your own... to change them, go to Step 4 (p. 104). 1 Turn the SEL/PUSH EXEC dial to select the color, size, or background color, then press the dial. CCD-TRV418 1 2 3 EASY DUBBING START T I T LE SEL OFF MODE SEL SET UP 0:00:00 [EASY DUB]:END NORMAL EASY DUBBING T I T LE SEL 0:00:00 OFF HEL...
... I NG T I TLE 0:00:00 HELLO! [EASY DUB]:END EASY DUBB I NG T I ZE L ARGE 0:00:00 HELLO! CUSTOM1 and CUSTOM2 are custom titles stored in your camcorder as desired. (4) Press the SEL/PUSH EXEC dial again to select TITLE SEL, then press the dial. (2) Select the desired title in "Making your own... to change them, go to Step 4 (p. 104). 1 Turn the SEL/PUSH EXEC dial to select the color, size, or background color, then press the dial. CCD-TRV418 1 2 3 EASY DUBBING START T I T LE SEL OFF MODE SEL SET UP 0:00:00 [EASY DUB]:END NORMAL EASY DUBBING T I T LE SEL 0:00:00 OFF HEL...

Operating Instructions
Page 104
... dial. (2) Turn the SEL/PUSH EXEC dial to automatically repeat five seconds' recording and 25 seconds' standby. [a]: Recording time (VCR) [b]: Waiting time (VCR) [c]: Playback time (camcorder) [a] 5 s [b] 25 s [c] 30 s 5 s 25 s 30 s 1 EASY DUBBING START TITLE SEL MODE SEL SET UP 0:00:00 NORMAL [EASY DUB]:END NORMAL... CCD-TRV418 EASY DUBBING START TITLE SEL MODE SEL SET UP 0:00:00 NORMAL PREVIEW [EASY DUB]:END NORMAL 104 NORMAL: You can put a title only ...
... dial. (2) Turn the SEL/PUSH EXEC dial to automatically repeat five seconds' recording and 25 seconds' standby. [a]: Recording time (VCR) [b]: Waiting time (VCR) [c]: Playback time (camcorder) [a] 5 s [b] 25 s [c] 30 s 5 s 25 s 30 s 1 EASY DUBBING START TITLE SEL MODE SEL SET UP 0:00:00 NORMAL [EASY DUB]:END NORMAL... CCD-TRV418 EASY DUBBING START TITLE SEL MODE SEL SET UP 0:00:00 NORMAL PREVIEW [EASY DUB]:END NORMAL 104 NORMAL: You can put a title only ...
Operating Instructions
Page 253
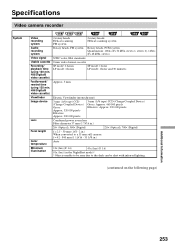
... camera recorder System Video recording system Audio recording system Video signal Usable cassette Recording/ playback time (using 120 min. Hi8/Digital8 video cassette) Viewfinder Image device Lens Focal length Color temperature Minimum illumination 2 rotary heads Helical scanning FM system...1 hour and 30 minutes Approx. 5 min. Electric Viewfinder (monochrome) 3 mm (1/6 type) CCD (Charge Coupled Device) Gross: Approx. 320 000 pixels Effective: Approx. 200 000 pixels 3 mm (1/6 type) CCD (Charge Coupled Device) Gross: Approx. 460 000 pixels Effective: Approx. 290 000 pixels Combined...
... camera recorder System Video recording system Audio recording system Video signal Usable cassette Recording/ playback time (using 120 min. Hi8/Digital8 video cassette) Viewfinder Image device Lens Focal length Color temperature Minimum illumination 2 rotary heads Helical scanning FM system...1 hour and 30 minutes Approx. 5 min. Electric Viewfinder (monochrome) 3 mm (1/6 type) CCD (Charge Coupled Device) Gross: Approx. 320 000 pixels Effective: Approx. 200 000 pixels 3 mm (1/6 type) CCD (Charge Coupled Device) Gross: Approx. 460 000 pixels Effective: Approx. 290 000 pixels Combined...

Operating Instructions
Page 259
Identifying parts and controls ea es ed ea DATE button * (p. 42) es TIME button * (p. 42) ed COUNTER RESET button * (p. 31) * CCD-TRV418 Quick Reference 259
Identifying parts and controls ea es ed ea DATE button * (p. 42) es TIME button * (p. 42) ed COUNTER RESET button * (p. 31) * CCD-TRV418 Quick Reference 259


