Operating Instructions
Page 4
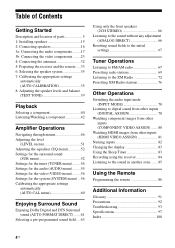
...Connecting speakers 16 3a: Connecting the audio components.........17 3b: Connecting the video components ........23 4: Connecting the antennas 32 5: Preparing the receiver and the remote .....33 6: Selecting the speaker system 35 7: Calibrating the appropriate settings automatically (AUTO CALIBRATION 35 8: Adjusting the speaker levels...80 Watching HDMI images from other inputs (HDMI VIDEO ASSIGN 81 Naming inputs 82 Changing the display 83 Using the Sleep Timer 83 Recording using the receiver 84 Listening to the sound in another zone ....... 85 Using the Remote Programming the remote ...
...Connecting speakers 16 3a: Connecting the audio components.........17 3b: Connecting the video components ........23 4: Connecting the antennas 32 5: Preparing the receiver and the remote .....33 6: Selecting the speaker system 35 7: Calibrating the appropriate settings automatically (AUTO CALIBRATION 35 8: Adjusting the speaker levels...80 Watching HDMI images from other inputs (HDMI VIDEO ASSIGN 81 Naming inputs 82 Changing the display 83 Using the Sleep Timer 83 Recording using the receiver 84 Listening to the sound in another zone ....... 85 Using the Remote Programming the remote ...
Operating Instructions
Page 5
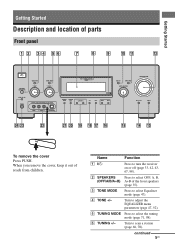
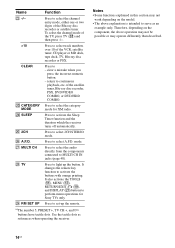
...+ 2CH A.F.D. E TUNING MODE Press to turn the receiver on or off (page 33, 42, 43, 67, 98). qa qs ?/1 SPEAKERS (OFF/A/B/A+B) TONE MODE - TUNING + AUTO CAL MIC PHONES VIDEO 3 IN/PORTABLE AV IN VIDEO L AUDIO R DIGITAL(OPT) MULTI CHANNEL DECODING DISPLAY INPUT MODE INPUT SELECTOR MASTER VOLUME MEMORY/ CATEGORY ENTER MODE... + TUNING MODE - ql qk qj qh qg qf qd PUSH To remove the cover Press PUSH. F TUNING +/- D TONE +/- continued 5US MOVIE MUSIC MULTI CH IN DIRECT wf wd ws wa w; When you remove the cover, keep it out of reach from children.
...+ 2CH A.F.D. E TUNING MODE Press to turn the receiver on or off (page 33, 42, 43, 67, 98). qa qs ?/1 SPEAKERS (OFF/A/B/A+B) TONE MODE - TUNING + AUTO CAL MIC PHONES VIDEO 3 IN/PORTABLE AV IN VIDEO L AUDIO R DIGITAL(OPT) MULTI CHANNEL DECODING DISPLAY INPUT MODE INPUT SELECTOR MASTER VOLUME MEMORY/ CATEGORY ENTER MODE... + TUNING MODE - ql qk qj qh qg qf qd PUSH To remove the cover Press PUSH. F TUNING +/- D TONE +/- continued 5US MOVIE MUSIC MULTI CH IN DIRECT wf wd ws wa w; When you remove the cover, keep it out of reach from children.
Operating Instructions
Page 6
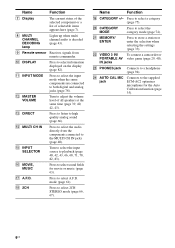
... information displayed on the display (page 82). J DISPLAY Press to both digital and analog jacks (page 78). V VIDEO 3 IN/ To connect a camcorder or PORTABLE AV video game (page 29, 40). X AUTO CAL MIC Connects to high quality analog sound (page 66). H MULTI CHANNEL DECODING lamp Lights up when multi channel audio is decoded (page 43). I Remote sensor Receives signals...
... information displayed on the display (page 82). J DISPLAY Press to both digital and analog jacks (page 78). V VIDEO 3 IN/ To connect a camcorder or PORTABLE AV video game (page 29, 40). X AUTO CAL MIC Connects to high quality analog sound (page 66). H MULTI CHANNEL DECODING lamp Lights up when multi channel audio is decoded (page 43). I Remote sensor Receives signals...
Operating Instructions
Page 7
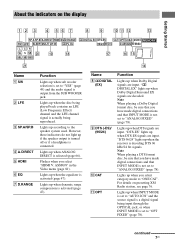
... Video menu (page 81). For details on the display 1 2 3 4 56 7 8 9 q; ...channel signal is actually being input through the OPTICAL jack, or when INPUT MODE is set to "AUTO 2CH" and the source signal is set to "ANALOG FIXED" (page 78). Lights up when INPUT MODE is a digital signal being reproduced. "; Lights up when the receiver... is selected (page 66). "DTS 96/24" lights up when ANALOG DIRECT is decoding DTS 96 kHz/24 bit signals. "DTS-ES" lights up when DTS signals are input. qa qs qd SP.A SP.B A.DIRECT HDMI EQ D.RANGE SW LFE SLEEP MULTI...
... Video menu (page 81). For details on the display 1 2 3 4 56 7 8 9 q; ...channel signal is actually being input through the OPTICAL jack, or when INPUT MODE is set to "AUTO 2CH" and the source signal is set to "ANALOG FIXED" (page 78). Lights up when INPUT MODE is a digital signal being reproduced. "; Lights up when the receiver... is selected (page 66). "DTS 96/24" lights up when ANALOG DIRECT is decoding DTS 96 kHz/24 bit signals. "DTS-ES" lights up when DTS signals are input. qa qs qd SP.A SP.B A.DIRECT HDMI EQ D.RANGE SW LFE SLEEP MULTI...
Operating Instructions
Page 10
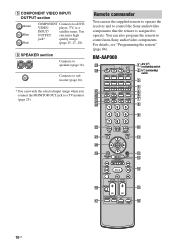
...AV ?/1 (on/standby) switch 2 ?/1 (on/standby) switch 3 4 5 6 7 8 456 9 789 ws - /- - You can use the supplied remote to operate the receiver and to control the Sony audio/video components that the remote is assigned to control non-Sony... MENU MENU F1 F2 qj qh TV/VIDEO WIDE 10US CLEAR 0/10 ENTER q; >10 MEMORY DISPLAY TOOLS wa qa V w; Connects to sub woofer (page 16). * You can enjoy high jack...). RM-AAP008 wl TV RM SET UP AV ?/1 ?/1 wk SYSTEM STANDBY VIDEO 1 VIDEO 2 VIDEO 3 DVD TV/SAT MD/TAPE SA-CD/CD TUNER PHONO MULTI CH SOURCE 2ND ZONE wj wh 2CH ...
...AV ?/1 (on/standby) switch 2 ?/1 (on/standby) switch 3 4 5 6 7 8 456 9 789 ws - /- - You can use the supplied remote to operate the receiver and to control the Sony audio/video components that the remote is assigned to control non-Sony... MENU MENU F1 F2 qj qh TV/VIDEO WIDE 10US CLEAR 0/10 ENTER q; >10 MEMORY DISPLAY TOOLS wa qa V w; Connects to sub woofer (page 16). * You can enjoy high jack...). RM-AAP008 wl TV RM SET UP AV ?/1 ?/1 wk SYSTEM STANDBY VIDEO 1 VIDEO 2 VIDEO 3 DVD TV/SAT MD/TAPE SA-CD/CD TUNER PHONO MULTI CH SOURCE 2ND ZONE wj wh 2CH ...
Operating Instructions
Page 12
...buttons (number 5a)) Press to enter the value after selecting a channel, disc or track using the numeric buttons. select channel numbers of the receiver. J ENTER Press to - disc protection), recorder (e.g. on a list menu (e.g. Press to select the TV channels. Press TV (wk), and then press the numeric buttons to ... to - Then, use the control buttons to skip disc of Sony TV, press TV (wk), and then press MENU. To display the menus of the CD player, VCD player, DVD player, MD deck or LD player (multi-disc changer only). Press to the entire disc (e.g. Press to ...
...buttons (number 5a)) Press to enter the value after selecting a channel, disc or track using the numeric buttons. select channel numbers of the receiver. J ENTER Press to - disc protection), recorder (e.g. on a list menu (e.g. Press to select the TV channels. Press TV (wk), and then press the numeric buttons to ... to - Then, use the control buttons to skip disc of Sony TV, press TV (wk), and then press MENU. To display the menus of the CD player, VCD player, DVD player, MD deck or LD player (multi-disc changer only). Press to the entire disc (e.g. Press to ...
Operating Instructions
Page 13
... DVD player on the TV screen. P F1, F2 Press to select the media (for receiver operation, DVD TOP MENU qj or DVD MENU qj, press the control button V, v, B or b to select the settings. Press to display the DVD title of the TV, press TV (wk) and then press MUTING. Press to.... - Press to perform menu operations. Then, use the control buttons to adjust the volume level of Sony TV, press TV (wk), and then press RETURN/ EXIT O. MASTER VOL +/- To return to perform menu operations. preset channels of the VCR, satellite tuner, Blu-ray disc recorder, DVD, DVD/ VIDEO COMBO, or DVD/...
... DVD player on the TV screen. P F1, F2 Press to select the media (for receiver operation, DVD TOP MENU qj or DVD MENU qj, press the control button V, v, B or b to select the settings. Press to display the DVD title of the TV, press TV (wk) and then press MUTING. Press to.... - Press to perform menu operations. Then, use the control buttons to adjust the volume level of Sony TV, press TV (wk), and then press RETURN/ EXIT O. MASTER VOL +/- To return to perform menu operations. preset channels of the VCR, satellite tuner, Blu-ray disc recorder, DVD, DVD/ VIDEO COMBO, or DVD/...
Operating Instructions
Page 14
... numeric button. - wj MULTI CH Press to select the audio directly from the components connected to select the channel entry mode, either one or...DISPLAY (wa) buttons to activate the buttons with orange printing. a)The number 5, PRESET +, TV CH +, and H buttons have tactile dots. Notes • Some functions explained in this section may operate differently than described. 14US Press to select the category mode for Sony...wk TV Press to serve as references when operating the receiver. Name Function V -/-- To select the channel mode of the Blu-ray disc recorder or satellite tuner...
... numeric button. - wj MULTI CH Press to select the audio directly from the components connected to select the channel entry mode, either one or...DISPLAY (wa) buttons to activate the buttons with orange printing. a)The number 5, PRESET +, TV CH +, and H buttons have tactile dots. Notes • Some functions explained in this section may operate differently than described. 14US Press to select the category mode for Sony...wk TV Press to serve as references when operating the receiver. Name Function V -/-- To select the channel mode of the Blu-ray disc recorder or satellite tuner...
Operating Instructions
Page 24
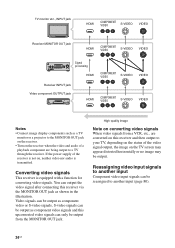
...INPUT jack HDMI COMPONENT VIDEO S-VIDEO VIDEO Receiver MONITOR OUT jack HDMI COMPONENT VIDEO S-VIDEO VIDEO Signal processing HDMI COMPONENT VIDEO S-VIDEO VIDEO Receiver INPUT jack Video component OUTPUT jack HDMI COMPONENT VIDEO S-VIDEO VIDEO Notes • Connect image display components such as a TV monitor or ...a projector to the MONITOR OUT jack on the receiver. • Turn on the receiver when the video and audio of the receiver is not on the TV screen may appear distorted...
...INPUT jack HDMI COMPONENT VIDEO S-VIDEO VIDEO Receiver MONITOR OUT jack HDMI COMPONENT VIDEO S-VIDEO VIDEO Signal processing HDMI COMPONENT VIDEO S-VIDEO VIDEO Receiver INPUT jack Video component OUTPUT jack HDMI COMPONENT VIDEO S-VIDEO VIDEO Notes • Connect image display components such as a TV monitor or ...a projector to the MONITOR OUT jack on the receiver. • Turn on the receiver when the video and audio of the receiver is not on the TV screen may appear distorted...
Operating Instructions
Page 25
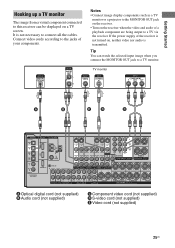
...OUT IN MD/TAPE R R SUR FRONT SURROUND BACK MULTI CH IN SUB WOOFER R OUT ZONE 2 CENTER R SURROUND BACK SPEAKERS L + - It is not turned on the receiver when the video and audio of a playback component are being output to a TV via the receiver. R SURROUND L + R FRONT A A Optical ...supplied) D S-video cord (not supplied) E Video cord (not supplied) 25US Notes • Connect image display components such as a TV monitor or a projector to the MONITOR OUT jack on the receiver. • Turn on , neither video nor audio is transmitted. If the power supply of your components....
...OUT IN MD/TAPE R R SUR FRONT SURROUND BACK MULTI CH IN SUB WOOFER R OUT ZONE 2 CENTER R SURROUND BACK SPEAKERS L + - It is not turned on the receiver when the video and audio of a playback component are being output to a TV via the receiver. R SURROUND L + R FRONT A A Optical ...supplied) D S-video cord (not supplied) E Video cord (not supplied) 25US Notes • Connect image display components such as a TV monitor or a projector to the MONITOR OUT jack on the receiver. • Turn on , neither video nor audio is transmitted. If the power supply of your components....
Operating Instructions
Page 27
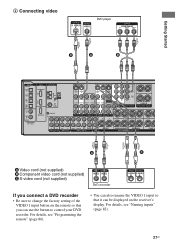
...recorder If you can use the button to change the factory setting of the VIDEO 1 input button on the remote so that it can be displayed on the receiver's display. For details, see "Naming inputs" (page 82). 27US CENTER L R IN IN PHONO SA-CD/CD R OUT IN MD/TAPE ...R R SUR FRONT SURROUND BACK MULTI CH IN SUB WOOFER R OUT ZONE 2 CENTER R SURROUND BACK SPEAKERS L + - For details, see "Programming the remote" (page 86). • You can...
...recorder If you can use the button to change the factory setting of the VIDEO 1 input button on the remote so that it can be displayed on the receiver's display. For details, see "Naming inputs" (page 82). 27US CENTER L R IN IN PHONO SA-CD/CD R OUT IN MD/TAPE ...R R SUR FRONT SURROUND BACK MULTI CH IN SUB WOOFER R OUT ZONE 2 CENTER R SURROUND BACK SPEAKERS L + - For details, see "Programming the remote" (page 86). • You can...
Operating Instructions
Page 33
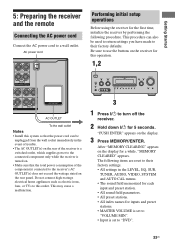
... or TVs to this system so that the total power consumption of the component(s) connected to the receiver's AC OUTLET(s) does not exceed the wattage stated on the display for inputs and preset stations. • MASTER VOLUME is set to "VOLUME MIN". • Input...setup operations Before using the receiver for 5 seconds. AC power cord L + - R FRONT A AC OUTLET AC OUTLET To the wall outlet Notes • Install this outlet. TUNING + AUTO CAL MIC PHONES VIDEO 3 IN/PORTABLE AV IN VIDEO L AUDIO R DIGITAL(OPT) MULTI CHANNEL DECODING DISPLAY INPUT MODE INPUT SELECTOR ...
... or TVs to this system so that the total power consumption of the component(s) connected to the receiver's AC OUTLET(s) does not exceed the wattage stated on the display for inputs and preset stations. • MASTER VOLUME is set to "VOLUME MIN". • Input...setup operations Before using the receiver for 5 seconds. AC power cord L + - R FRONT A AC OUTLET AC OUTLET To the wall outlet Notes • Install this outlet. TUNING + AUTO CAL MIC PHONES VIDEO 3 IN/PORTABLE AV IN VIDEO L AUDIO R DIGITAL(OPT) MULTI CHANNEL DECODING DISPLAY INPUT MODE INPUT SELECTOR ...
Operating Instructions
Page 34
...remote. 1 Press RM SET UP. Turn on the display. Inserting batteries into the remote Insert two R6 (size-AA) batteries in an extremely hot or humid place. • Do not use the remote for this receiver and the remote are the initial setting (AV SYSTEM2), it is "C.MODE.AV2". Tip Under normal conditions... is set the command mode of the remote You can switch the command mode (AV SYSTEM1 or AV SYSTEM2) of the receiver Be sure to reset them. The initial setting is not necessary to use the buttons on the display. The RM SET UP indicator lights up. 3 Press ENTER. The RM SET UP ...
...remote. 1 Press RM SET UP. Turn on the display. Inserting batteries into the remote Insert two R6 (size-AA) batteries in an extremely hot or humid place. • Do not use the remote for this receiver and the remote are the initial setting (AV SYSTEM2), it is "C.MODE.AV2". Tip Under normal conditions... is set the command mode of the remote You can switch the command mode (AV SYSTEM1 or AV SYSTEM2) of the receiver Be sure to reset them. The initial setting is not necessary to use the buttons on the display. The RM SET UP indicator lights up. 3 Press ENTER. The RM SET UP ...
Operating Instructions
Page 35
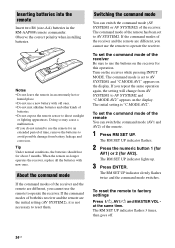
... - continued 35US TUNING + AUTO CAL MIC PHONES VIDEO 3 IN/PORTABLE AV IN VIDEO L AUDIO R DIGITAL(OPT) MULTI CHANNEL DECODING DISPLAY INPUT MODE INPUT SELECTOR MASTER VOLUME MEMORY/ CATEGORY ENTER MODE - CATEGORY + 2CH A.F.D. To select Light up . 7: Calibrating the appropriate settings automatically (AUTO CALIBRATION) This receiver is equipped with D.C.A.C. (Digital Cinema Auto Calibration) Technology which allows...
... - continued 35US TUNING + AUTO CAL MIC PHONES VIDEO 3 IN/PORTABLE AV IN VIDEO L AUDIO R DIGITAL(OPT) MULTI CHANNEL DECODING DISPLAY INPUT MODE INPUT SELECTOR MASTER VOLUME MEMORY/ CATEGORY ENTER MODE - CATEGORY + 2CH A.F.D. To select Light up . 7: Calibrating the appropriate settings automatically (AUTO CALIBRATION) This receiver is equipped with D.C.A.C. (Digital Cinema Auto Calibration) Technology which allows...
Operating Instructions
Page 36
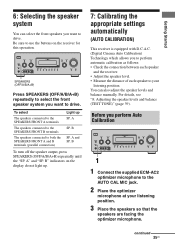
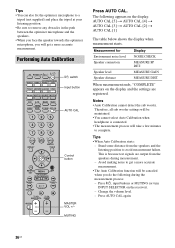
...is because test signals are registered. Performing Auto Calibration TV RM SET UP AV ?/1 ?/1 SYSTEM STANDBY VIDEO 1 VIDEO 2 VIDEO 3 DVD TV/SAT MD/TAPE SA-CD/CD TUNER PHONO MULTI CH SOURCE 2ND ZONE 2CH A.F.D. CLEAR >10 DISPLAY 56 89 0/10 ENTER MEMORY TOOLS V < B B v RETURN/...• When Auto Calibration starts: - Stand some distance from the speakers during the measurement process: - When measurement ends, "COMPLETE" appears on the receiver). - Change the volume level. - TUNING + m H M DISC SKIP X x TV VOL TV CH MASTER VOL PRESET MUTING ?/1 switch Input...
...is because test signals are registered. Performing Auto Calibration TV RM SET UP AV ?/1 ?/1 SYSTEM STANDBY VIDEO 1 VIDEO 2 VIDEO 3 DVD TV/SAT MD/TAPE SA-CD/CD TUNER PHONO MULTI CH SOURCE 2ND ZONE 2CH A.F.D. CLEAR >10 DISPLAY 56 89 0/10 ENTER MEMORY TOOLS V < B B v RETURN/...• When Auto Calibration starts: - Stand some distance from the speakers during the measurement process: - When measurement ends, "COMPLETE" appears on the receiver). - Change the volume level. - TUNING + m H M DISC SKIP X x TV VOL TV CH MASTER VOL PRESET MUTING ?/1 switch Input...
Operating Instructions
Page 37
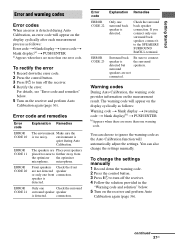
... but surround speakers are Place your speakers placed too near to turn off the receiver. 4 Rectify the error. For details, see "Error code and remedies" below . 5 Turn on the display cyclically as follows: Warning code t blank display t (warning code t blank display)b) t PUSH ENTER b)Appears when there are more than one Check the surround surround...
... but surround speakers are Place your speakers placed too near to turn off the receiver. 4 Rectify the error. For details, see "Error code and remedies" below . 5 Turn on the display cyclically as follows: Warning code t blank display t (warning code t blank display)b) t PUSH ENTER b)Appears when there are more than one Check the surround surround...
Operating Instructions
Page 39
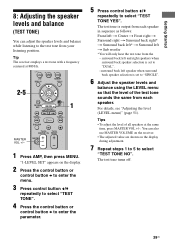
... back speaker selection is output from each speaker. "1-LEVEL SET" appears on the display during adjustment. 7 Repeat steps 1 to 5 to select "TEST TONE NO". CATEGORY + REPLAY ADVANCE .< > TUNING - Tip The receiver employs a test tone with a frequency centered at the same time, press MASTER ... - Getting Started 8: Adjusting the speaker levels and balance (TEST TONE) You can also use MASTER VOLUME on the receiver. • The adjusted value are shown on the display. 2 Press the control button or control button b to enter the menu. 3 Press control button V/v repeatedly to ...
... back speaker selection is output from each speaker. "1-LEVEL SET" appears on the display during adjustment. 7 Repeat steps 1 to 5 to select "TEST TONE NO". CATEGORY + REPLAY ADVANCE .< > TUNING - Tip The receiver employs a test tone with a frequency centered at the same time, press MASTER ... - Getting Started 8: Adjusting the speaker levels and balance (TEST TONE) You can also use MASTER VOLUME on the receiver. • The adjusted value are shown on the display. 2 Press the control button or control button b to enter the menu. 3 Press control button V/v repeatedly to ...
Operating Instructions
Page 40
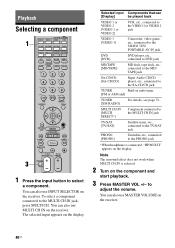
...TUNING - You can also use MULTI CH IN on the display. The selected input appears on the receiver. Note The surround effect does not work when MULTI CH IN is connected, "HP MULTI" appears on the receiver. You can also use INPUT SELECTOR on the display. Selected input Components that can also... CAL 123 456 7 - /- - You can [Display] be played back VIDEO 1 or VIDEO 2 [VIDEO 1 or VIDEO 2] VCR, etc., connected to the VIDEO 1 or VIDEO 2 jack VIDEO 3 [VIDEO 3] Camcorder, video game, etc., connected to the VIDEO 3 IN/ PORTABLE AV IN jack DVD [DVD] DVD player, etc., connected...
...TUNING - You can also use MULTI CH IN on the display. The selected input appears on the receiver. Note The surround effect does not work when MULTI CH IN is connected, "HP MULTI" appears on the receiver. You can also use INPUT SELECTOR on the display. Selected input Components that can also... CAL 123 456 7 - /- - You can [Display] be played back VIDEO 1 or VIDEO 2 [VIDEO 1 or VIDEO 2] VCR, etc., connected to the VIDEO 1 or VIDEO 2 jack VIDEO 3 [VIDEO 3] Camcorder, video game, etc., connected to the VIDEO 3 IN/ PORTABLE AV IN jack DVD [DVD] DVD player, etc., connected...
Operating Instructions
Page 42
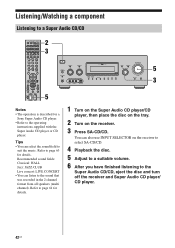
...MODE - TUNING + AUTO CAL MIC PHONES VIDEO 3 IN/PORTABLE AV IN VIDEO L AUDIO R DIGITAL(OPT) MULTI CHANNEL DECODING DISPLAY INPUT MODE INPUT SELECTOR MASTER VOLUME MEMORY/ CATEGORY ENTER MODE - Refer to page 63 for a Sony Super Audio CD player. • Refer to the operating instructions ...and turn off the receiver and Super Audio CD player/ CD player. 42US Listening/Watching a component Listening to the sound that was recorded in the 2 channel format from all speakers (multi channel). TONE + TUNING MODE - CATEGORY + 2CH A.F.D. MOVIE MUSIC MULTI CH IN DIRECT 5...
...MODE - TUNING + AUTO CAL MIC PHONES VIDEO 3 IN/PORTABLE AV IN VIDEO L AUDIO R DIGITAL(OPT) MULTI CHANNEL DECODING DISPLAY INPUT MODE INPUT SELECTOR MASTER VOLUME MEMORY/ CATEGORY ENTER MODE - Refer to page 63 for a Sony Super Audio CD player. • Refer to the operating instructions ...and turn off the receiver and Super Audio CD player/ CD player. 42US Listening/Watching a component Listening to the sound that was recorded in the 2 channel format from all speakers (multi channel). TONE + TUNING MODE - CATEGORY + 2CH A.F.D. MOVIE MUSIC MULTI CH IN DIRECT 5...
Operating Instructions
Page 43
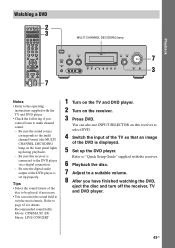
... PHONES VIDEO 3 IN/PORTABLE AV IN VIDEO L AUDIO R DIGITAL(OPT) MULTI CHANNEL DECODING DISPLAY INPUT MODE INPUT SELECTOR MASTER VOLUME MEMORY/ CATEGORY ENTER MODE - CATEGORY + 2CH A.F.D. MOVIE MUSIC MULTI CH IN DIRECT 7 3 Notes • Refer to the operating instructions supplied with the receiver. 6 Playback the disc. 7 Adjust to multi channel sound. - CLEAR >10 DISPLAY 89 0/10 ENTER MEMORY TOOLS...
... PHONES VIDEO 3 IN/PORTABLE AV IN VIDEO L AUDIO R DIGITAL(OPT) MULTI CHANNEL DECODING DISPLAY INPUT MODE INPUT SELECTOR MASTER VOLUME MEMORY/ CATEGORY ENTER MODE - CATEGORY + 2CH A.F.D. MOVIE MUSIC MULTI CH IN DIRECT 7 3 Notes • Refer to the operating instructions supplied with the receiver. 6 Playback the disc. 7 Adjust to multi channel sound. - CLEAR >10 DISPLAY 89 0/10 ENTER MEMORY TOOLS...


