

Limited Warranty (US Only)
Page 1
...THE DURATION OF THIS WARRANTY. For your authorized dealer, call : Sony Customer Information Services Center 1-800-222-7669 or visit the Sony Web Site: www.sony.com For an accessory or part not available from your convenience, Sony Electronics Inc. has established telephone numbers for a period of sale... altered or removed from the Product. REPAIR OR REPLACEMENT AS PROVIDED UNDER THIS WARRANTY IS THE EXCLUSIVE REMEDY OF THE CONSUMER. PARTS: In addition, Sony will repair or replace the Product, at no charge, or pay for all accessories are for product information or operation, call...
...THE DURATION OF THIS WARRANTY. For your authorized dealer, call : Sony Customer Information Services Center 1-800-222-7669 or visit the Sony Web Site: www.sony.com For an accessory or part not available from your convenience, Sony Electronics Inc. has established telephone numbers for a period of sale... altered or removed from the Product. REPAIR OR REPLACEMENT AS PROVIDED UNDER THIS WARRANTY IS THE EXCLUSIVE REMEDY OF THE CONSUMER. PARTS: In addition, Sony will repair or replace the Product, at no charge, or pay for all accessories are for product information or operation, call...

Operating Instructions
Page 2
...dangerous voltage" within the product's enclosure that may cause harmful interference to Part 15 of the FCC Rules. Do not install the appliance in a confined space, such as close to persons. Reorient or relocate the receiving antenna. - WARNING To reduce the risk of fire or electric shock, ...more of the following measures: - Don't throw away batteries with liquids, such as chemical waste. Increase the separation between the equipment and receiver. - Connect the equipment into an outlet on the apparatus. To prevent fire or shock hazard, do not cover the ventilation of them ...
...dangerous voltage" within the product's enclosure that may cause harmful interference to Part 15 of the FCC Rules. Do not install the appliance in a confined space, such as close to persons. Reorient or relocate the receiving antenna. - WARNING To reduce the risk of fire or electric shock, ...more of the following measures: - Don't throw away batteries with liquids, such as chemical waste. Increase the separation between the equipment and receiver. - Connect the equipment into an outlet on the apparatus. To prevent fire or shock hazard, do not cover the ventilation of them ...

Operating Instructions
Page 4
...COMPONENT VIDEO ASSIGN) ....... 71 Naming inputs 72 Changing the display 73 Using the Sleep Timer 73 Recording using the receiver 74 Using the Remote Programming the remote 75 Additional Information Glossary 78 Precautions 80 Troubleshooting 81 Specifications 84 Index 87 ...4US Table of Contents Getting Started Description and location of parts 5 1: Installing speakers 15 2: Connecting speakers 16 3a: Connecting the audio components.........17 3b: Connecting the video components ........22...
...COMPONENT VIDEO ASSIGN) ....... 71 Naming inputs 72 Changing the display 73 Using the Sleep Timer 73 Recording using the receiver 74 Using the Remote Programming the remote 75 Additional Information Glossary 78 Precautions 80 Troubleshooting 81 Specifications 84 Index 87 ...4US Table of Contents Getting Started Description and location of parts 5 1: Installing speakers 15 2: Connecting speakers 16 3a: Connecting the audio components.........17 3b: Connecting the video components ........22...

Operating Instructions
Page 5
... turn the receiver on or off (page 30, 38, 39, 60, 85). continued 5US Name A ?/1 B SPEAKERS (OFF/A/B/A+B) C TUNING MODE D TUNING +/- Press to scan a station (page 61, 62). When you remove the cover, keep it out of the front speakers (page 32). TUNING + VIDEO 3 IN/PORTABLE AV IN VIDEO L AUDIO R DIGITAL(OPT) MULTI CHANNEL DECODING...
... turn the receiver on or off (page 30, 38, 39, 60, 85). continued 5US Name A ?/1 B SPEAKERS (OFF/A/B/A+B) C TUNING MODE D TUNING +/- Press to scan a station (page 61, 62). When you remove the cover, keep it out of the front speakers (page 32). TUNING + VIDEO 3 IN/PORTABLE AV IN VIDEO L AUDIO R DIGITAL(OPT) MULTI CHANNEL DECODING...

Operating Instructions
Page 75
...selected and the programming procedure returns to the beginning of the component you can also program the remote for Sony components that accept infrared wireless control signals. 1 Press AV ?/1 while holding down RM SET UP. continued 75US Using the Remote To activate the input after programming ... flashes 4 times in step 1, the batteries are weak. Note that the remote can use those components as part of the numeric code correspond to factory settings. Press ?/1, AV ?/1 and MASTER VOL - Once the control signals have been memorized, you want to the component and the maker...
...selected and the programming procedure returns to the beginning of the component you can also program the remote for Sony components that accept infrared wireless control signals. 1 Press AV ?/1 while holding down RM SET UP. continued 75US Using the Remote To activate the input after programming ... flashes 4 times in step 1, the batteries are weak. Note that the remote can use those components as part of the numeric code correspond to factory settings. Press ?/1, AV ?/1 and MASTER VOL - Once the control signals have been memorized, you want to the component and the maker...
Operating Instructions
Page 84
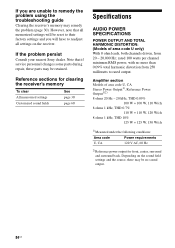
... service personnel changes some parts during repair, these parts may be reset to their factory settings and you are unable to remedy the problem using the troubleshooting guide Clearing the receiver's memory may be no more than 0.09% total harmonic distortion from 20 - 20,000 Hz; rated 100 watts per channel minimum RMS power...
... service personnel changes some parts during repair, these parts may be reset to their factory settings and you are unable to remedy the problem using the troubleshooting guide Clearing the receiver's memory may be no more than 0.09% total harmonic distortion from 20 - 20,000 Hz; rated 100 watts per channel minimum RMS power...
Operating Instructions
Page 85
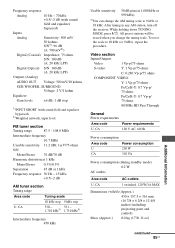
... (w/h/d) (Approx.) 430 × 157.5 × 316 mm (16 7/8 × 6 2/8 × 12 4/8 inches) including projecting parts and controls Mass (Approx.) 8.0 kg (17 lb 11 oz) continued 85US Additional Information After tuning in any AM station, turn off the receiver. FM tuner section Tuning range 87.5 - 108.0 MHz Intermediate frequency 10.7 MHz Useable sensitivity...
... (w/h/d) (Approx.) 430 × 157.5 × 316 mm (16 7/8 × 6 2/8 × 12 4/8 inches) including projecting parts and controls Mass (Approx.) 8.0 kg (17 lb 11 oz) continued 85US Additional Information After tuning in any AM station, turn off the receiver. FM tuner section Tuning range 87.5 - 108.0 MHz Intermediate frequency 10.7 MHz Useable sensitivity...


