

Operating Instructions
Page 4
...3b: Connecting the video components ........22 4: Connecting the antennas 29 5: Preparing the receiver and the remote .....30 6: Selecting the speaker system 32 7: Calibrating the appropriate settings automatically (AUTO CALIBRATION 32 8: Adjusting the speaker levels and balance (TEST TONE 36 Playback Selecting a ...the audio (AUDIO menu).........48 Settings for the video (VIDEO menu).........49 Settings for the system (SYSTEM menu) ...49 Calibrating the appropriate settings automatically (A. CAL menu 53 Enjoying Surround Sound Enjoying Dolby Digital and DTS Surround sound (AUTO FORMAT ...
...3b: Connecting the video components ........22 4: Connecting the antennas 29 5: Preparing the receiver and the remote .....30 6: Selecting the speaker system 32 7: Calibrating the appropriate settings automatically (AUTO CALIBRATION 32 8: Adjusting the speaker levels and balance (TEST TONE 36 Playback Selecting a ...the audio (AUDIO menu).........48 Settings for the video (VIDEO menu).........49 Settings for the system (SYSTEM menu) ...49 Calibrating the appropriate settings automatically (A. CAL menu 53 Enjoying Surround Sound Enjoying Dolby Digital and DTS Surround sound (AUTO FORMAT ...

Operating Instructions
Page 6
...select the audio directly from remote commander. K DIRECT Press to listen to the MULTI CH IN jacks (page 37). Press to select a category (page 67). Press to select A.F.D. G Remote sensor Receives signals from the components connected to high quality analog sound (page 59). M...38, 39, 59, 61, 63, 71, 72, 74). F MULTI CHANNEL DECODING lamp Lights up when multi channel audio is decoded (page 39). O A.F.D. R CATEGORY MODE Press to the supplied jack ECM-AC2 optimizer microphone for the Auto Calibration function (page 32). IN jacks U AUTO CAL MIC Connects to ...
...select the audio directly from remote commander. K DIRECT Press to listen to the MULTI CH IN jacks (page 37). Press to select a category (page 67). Press to select A.F.D. G Remote sensor Receives signals from the components connected to high quality analog sound (page 59). M...38, 39, 59, 61, 63, 71, 72, 74). F MULTI CHANNEL DECODING lamp Lights up when multi channel audio is decoded (page 39). O A.F.D. R CATEGORY MODE Press to the supplied jack ECM-AC2 optimizer microphone for the Auto Calibration function (page 32). IN jacks U AUTO CAL MIC Connects to ...

Operating Instructions
Page 12
... MUTING K MASTER VOL +a)/- Press to select the category mode for search (tracks, index, etc.) of the AV ?/1 switch changes automatically each time you press ?/1 (B) at the same time (SYSTEM STANDBY). Press to turn ... press WIDE to select preset TV channels. Press to select the wide picture mode. return to the MULTI CH IN jacks. To turn the receiver on -screen guide of the receiver. Press to select the audio directly...Press to adjust the TV volume level. Press to activate the Auto Calibration function. Press to operate. exit the menu while the menu or on or off all speakers at ...
... MUTING K MASTER VOL +a)/- Press to select the category mode for search (tracks, index, etc.) of the AV ?/1 switch changes automatically each time you press ?/1 (B) at the same time (SYSTEM STANDBY). Press to turn ... press WIDE to select preset TV channels. Press to select the wide picture mode. return to the MULTI CH IN jacks. To turn the receiver on -screen guide of the receiver. Press to select the audio directly...Press to adjust the TV volume level. Press to activate the Auto Calibration function. Press to operate. exit the menu while the menu or on or off all speakers at ...

Operating Instructions
Page 32
... sure to drive. TUNING + VIDEO 3 IN/PORTABLE AV IN VIDEO L AUDIO R DIGITAL(OPT) MULTI CHANNEL DECODING DISPLAY INPUT MODE INPUT SELECTOR MASTER VOLUME MEMORY/ CATEGORY ENTER MODE CATEGORY 2CH A.F.D. To select Light up . 7: Calibrating the appropriate settings automatically (AUTO CALIBRATION) This receiver is equipped with D.C.A.C. (Digital Cinema Auto Calibration) Technology which allows you want to drive. MOVIE...
... sure to drive. TUNING + VIDEO 3 IN/PORTABLE AV IN VIDEO L AUDIO R DIGITAL(OPT) MULTI CHANNEL DECODING DISPLAY INPUT MODE INPUT SELECTOR MASTER VOLUME MEMORY/ CATEGORY ENTER MODE CATEGORY 2CH A.F.D. To select Light up . 7: Calibrating the appropriate settings automatically (AUTO CALIBRATION) This receiver is equipped with D.C.A.C. (Digital Cinema Auto Calibration) Technology which allows you want to drive. MOVIE...
Operating Instructions
Page 33
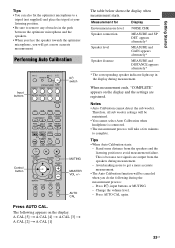
...measurement process will get a more accurate measurement. Change the volume level. - Press AUTO CAL again. 33US Tips • When Auto Calibration starts: - Stand some distance from the speakers during measurement. Getting Started Tips • You can also fix the optimizer microphone to...input buttons or MUTING. - Performing Auto Calibration Input buttons Control button TV ?/1 AV ?/1 ?/1 RM SET UP P SYSTEM STANDBY SLEEP VIDEO1 VIDEO2 VIDEO3 DVD MD/TAPE SA-CD/CD TUNER AUX MULTI CH 2CH A.F.D. Notes • Auto Calibration cannot detect the sub woofer. Therefore, ...
...measurement process will get a more accurate measurement. Change the volume level. - Press AUTO CAL again. 33US Tips • When Auto Calibration starts: - Stand some distance from the speakers during measurement. Getting Started Tips • You can also fix the optimizer microphone to...input buttons or MUTING. - Performing Auto Calibration Input buttons Control button TV ?/1 AV ?/1 ?/1 RM SET UP P SYSTEM STANDBY SLEEP VIDEO1 VIDEO2 VIDEO3 DVD MD/TAPE SA-CD/CD TUNER AUX MULTI CH 2CH A.F.D. Notes • Auto Calibration cannot detect the sub woofer. Therefore, ...

Operating Instructions
Page 34
...to the SPEAKERS SURROUND BACK L terminal. Be sure to turn off the receiver. 4 Follow the solution provided in the "Warning code and solution" below . 5 Turn on the receiver and perform Auto Calibration again (page 33). To change the settings manually. connection. ERROR 23 ... 21 Only one front connection. Check the surround back speaker connection. Warning codes During Auto Calibration, the warning code provides information on the receiver and perform Auto Calibration again (page 33). 34US The warning code will automatically adjust the settings. To rectify the error 1...
...to the SPEAKERS SURROUND BACK L terminal. Be sure to turn off the receiver. 4 Follow the solution provided in the "Warning code and solution" below . 5 Turn on the receiver and perform Auto Calibration again (page 33). To change the settings manually. connection. ERROR 23 ... 21 Only one front connection. Check the surround back speaker connection. Warning codes During Auto Calibration, the warning code provides information on the receiver and perform Auto Calibration again (page 33). 34US The warning code will automatically adjust the settings. To rectify the error 1...

Operating Instructions
Page 35
... surround right out of front speakers.c) range. Getting Started Warning code and solution Warning Explanation code Solution WARN. 40 The environment is quiet during Auto Calibration.
... surround right out of front speakers.c) range. Getting Started Warning code and solution Warning Explanation code Solution WARN. 40 The environment is quiet during Auto Calibration.

Operating Instructions
Page 53
...between the surround sound from the immediate left and right. x CRS. CAL menu) For details, see "7: Calibrating the appropriate settings automatically (AUTO CALIBRATION)" (page 32). 53US If you set the bass crossover frequency of the listening position, the surround effects become ...setup item is only available when at a rather wide angle. Calibrating the appropriate settings automatically (A. Nevertheless, each listening environment has many variables, such as wall reflections, and you playback multi channel surround encoded software and select the setting that provides a good ...
...between the surround sound from the immediate left and right. x CRS. CAL menu) For details, see "7: Calibrating the appropriate settings automatically (AUTO CALIBRATION)" (page 32). 53US If you set the bass crossover frequency of the listening position, the surround effects become ...setup item is only available when at a rather wide angle. Calibrating the appropriate settings automatically (A. Nevertheless, each listening environment has many variables, such as wall reflections, and you playback multi channel surround encoded software and select the setting that provides a good ...
Operating Instructions
Page 83
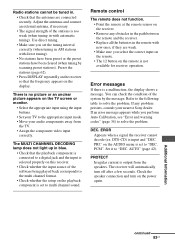
...receiver. • Check whether the input source of the software being played back corresponds to the multi channel format. • Check whether the setup on the playback component is set to the appropriate input mode. • Move your nearest Sony dealer. If an error message appears while you perform Auto Calibration.... • Select the appropriate input using the input buttons. • Set your TV to multi channel sound. If any obstacles in the path between the remote and the receiver. • Replace all the batteries in the remote with direct tuning). • No stations ...
...receiver. • Check whether the input source of the software being played back corresponds to the multi channel format. • Check whether the setup on the playback component is set to the appropriate input mode. • Move your nearest Sony dealer. If an error message appears while you perform Auto Calibration.... • Select the appropriate input using the input buttons. • Set your TV to multi channel sound. If any obstacles in the path between the remote and the receiver. • Replace all the batteries in the remote with direct tuning). • No stations ...
Marketing Specifications
Page 1
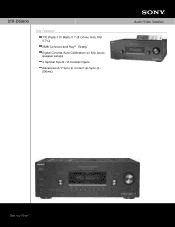
STR-DG600 Key Features 770 Watts-110 Watts X 7 (8 Ohms 1kHz,THD 0.7%) XM® Connect and Play™ Ready1 Digital Cinema Auto Calibration w/ Mic (auto speaker setup) 4 Optical Inputs / 2 Coaxial Inputs Advanced A/V Sync to correct Lip Sync (0 200ms) Audio Video Receiver
STR-DG600 Key Features 770 Watts-110 Watts X 7 (8 Ohms 1kHz,THD 0.7%) XM® Connect and Play™ Ready1 Digital Cinema Auto Calibration w/ Mic (auto speaker setup) 4 Optical Inputs / 2 Coaxial Inputs Advanced A/V Sync to correct Lip Sync (0 200ms) Audio Video Receiver
Marketing Specifications
Page 2
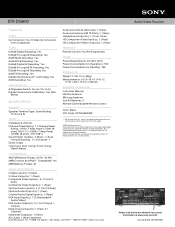
STR-DG600 Features Video Up Conversion: Yes (S-Video Up-Conversion from Composite) Antenna Terminal (AM Loop): 1 (Rear) Antenna Terminal (FM 75 Ohm): 1 (Rear) Headphone Output(s): 1 (Front- dts is a trademark of their respective owners. All Weights and measures are sold separately. Auto Format Decoding - 11; 2 Channel...Multi-Channel Input(s): 1 (Rear, 5.1 Channel) Subwoofer Output(s): 1 (Rear) AC Outlet: 1 (Rear) Switched Sony Electronics Inc. •16530 Via Esprillo •San Diego, CA 92127 •1-800-222-7669 •www.sony.com Audio Video Receiver...Cinema Auto Calibration: Yes (...
STR-DG600 Features Video Up Conversion: Yes (S-Video Up-Conversion from Composite) Antenna Terminal (AM Loop): 1 (Rear) Antenna Terminal (FM 75 Ohm): 1 (Rear) Headphone Output(s): 1 (Front- dts is a trademark of their respective owners. All Weights and measures are sold separately. Auto Format Decoding - 11; 2 Channel...Multi-Channel Input(s): 1 (Rear, 5.1 Channel) Subwoofer Output(s): 1 (Rear) AC Outlet: 1 (Rear) Switched Sony Electronics Inc. •16530 Via Esprillo •San Diego, CA 92127 •1-800-222-7669 •www.sony.com Audio Video Receiver...Cinema Auto Calibration: Yes (...


