

Operating Instructions
Page 4
...VIDEO ASSIGN) ....... 71 Naming inputs 72 Changing the display 73 Using the Sleep Timer 73 Recording using the receiver 74 Using the Remote Programming the remote 75 Additional Information Glossary 78 Precautions 80 Troubleshooting 81 Specifications 84 Index 87... 3b: Connecting the video components ........22 4: Connecting the antennas 29 5: Preparing the receiver and the remote .....30 6: Selecting the speaker system 32 7: Calibrating the appropriate settings automatically (AUTO CALIBRATION 32 8: Adjusting the speaker levels and balance (TEST TONE 36 Playback Selecting a component...
...VIDEO ASSIGN) ....... 71 Naming inputs 72 Changing the display 73 Using the Sleep Timer 73 Recording using the receiver 74 Using the Remote Programming the remote 75 Additional Information Glossary 78 Precautions 80 Troubleshooting 81 Specifications 84 Index 87... 3b: Connecting the video components ........22 4: Connecting the antennas 29 5: Preparing the receiver and the remote .....30 6: Selecting the speaker system 32 7: Calibrating the appropriate settings automatically (AUTO CALIBRATION 32 8: Adjusting the speaker levels and balance (TEST TONE 36 Playback Selecting a component...

Operating Instructions
Page 6
F MULTI CHANNEL DECODING lamp Lights up when multi channel audio is decoded (page 39). L MULTI CH IN Press to select the audio directly from remote commander. O A.F.D. P 2CH Press to the MULTI CH IN ... mode (page 54). T VIDEO 3 IN/ To connect a camcorder or PORTABLE AV video game (page 28, 37). G Remote sensor Receives signals from the components connected to select 2CH STEREO mode (page 59, 60)....Press to the supplied jack ECM-AC2 optimizer microphone for the Auto Calibration function (page 32). M INPUT SELECTOR Turn to select the input source to adjust...
F MULTI CHANNEL DECODING lamp Lights up when multi channel audio is decoded (page 39). L MULTI CH IN Press to select the audio directly from remote commander. O A.F.D. P 2CH Press to the MULTI CH IN ... mode (page 54). T VIDEO 3 IN/ To connect a camcorder or PORTABLE AV video game (page 28, 37). G Remote sensor Receives signals from the components connected to select 2CH STEREO mode (page 59, 60)....Press to the supplied jack ECM-AC2 optimizer microphone for the Auto Calibration function (page 32). M INPUT SELECTOR Turn to select the input source to adjust...

Operating Instructions
Page 12
...the menu or on-screen guide of all components, press ?/1 and AV ?/1 (A) at the same time, it will turn on or off . Name A AV ?/1 B ?/1 SLEEP C MULTI CH D MUSIC E CATEGORY MODE F PRESET/ CH/D.SKIP +/- Press to select preset TV channels. Press to light up the button. Press to - G ALT ...(multi-disc changer only). Press to select the channel entry mode, either one or two digit of the receiver. If you press the input buttons (wj). Press ALT (G) and then press SLEEP to operate. Press to select the audio directly from the components connected to activate the Auto Calibration ...
...the menu or on-screen guide of all components, press ?/1 and AV ?/1 (A) at the same time, it will turn on or off . Name A AV ?/1 B ?/1 SLEEP C MULTI CH D MUSIC E CATEGORY MODE F PRESET/ CH/D.SKIP +/- Press to select preset TV channels. Press to light up the button. Press to - G ALT ...(multi-disc changer only). Press to select the channel entry mode, either one or two digit of the receiver. If you press the input buttons (wj). Press ALT (G) and then press SLEEP to operate. Press to select the audio directly from the components connected to activate the Auto Calibration ...

Operating Instructions
Page 32
... the optimizer microphone at your listening position. To select Light up . 7: Calibrating the appropriate settings automatically (AUTO CALIBRATION) This receiver is equipped with D.C.A.C. (Digital Cinema Auto Calibration) Technology which allows you want to drive. TUNING + VIDEO 3 IN/PORTABLE AV IN VIDEO L AUDIO R DIGITAL(OPT) MULTI CHANNEL DECODING DISPLAY INPUT MODE INPUT SELECTOR MASTER VOLUME MEMORY/ CATEGORY ENTER...
... the optimizer microphone at your listening position. To select Light up . 7: Calibrating the appropriate settings automatically (AUTO CALIBRATION) This receiver is equipped with D.C.A.C. (Digital Cinema Auto Calibration) Technology which allows you want to drive. TUNING + VIDEO 3 IN/PORTABLE AV IN VIDEO L AUDIO R DIGITAL(OPT) MULTI CHANNEL DECODING DISPLAY INPUT MODE INPUT SELECTOR MASTER VOLUME MEMORY/ CATEGORY ENTER...
Operating Instructions
Page 33
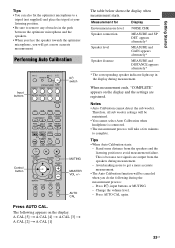
... Speaker distance Display NOISE.CHK MEASURE and SP DET. Tips • When Auto Calibration starts: - Performing Auto Calibration Input buttons Control button TV ?/1 AV ?/1 ?/1 RM SET UP P SYSTEM STANDBY SLEEP VIDEO1 VIDEO2 VIDEO3 DVD MD/TAPE SA-CD/CD TUNER AUX MULTI CH 2CH A.F.D. AUTO CAL Press AUTO CAL. Avoid making noise to get...
... Speaker distance Display NOISE.CHK MEASURE and SP DET. Tips • When Auto Calibration starts: - Performing Auto Calibration Input buttons Control button TV ?/1 AV ?/1 ?/1 RM SET UP P SYSTEM STANDBY SLEEP VIDEO1 VIDEO2 VIDEO3 DVD MD/TAPE SA-CD/CD TUNER AUX MULTI CH 2CH A.F.D. AUTO CAL Press AUTO CAL. Avoid making noise to get...

Operating Instructions
Page 34
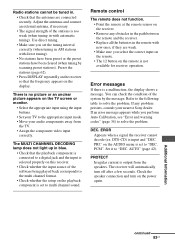
...the warning code. 2 Press the control button. 3 Press ?/1 to turn off the receiver. 4 Follow the solution provided in the "Warning code and solution" below . 5 Turn on the receiver and perform Auto Calibration again (page 33). Error code and remedies Error code Explanation Remedies ERROR 10 The ... are more than one surround back speaker, connect it to connect the surround speakers. The warning code will appear on the receiver and perform Auto Calibration again (page 33). 34US microphone. For details, see "Error code and remedies" below . 5 Turn on the display cyclically ...
...the warning code. 2 Press the control button. 3 Press ?/1 to turn off the receiver. 4 Follow the solution provided in the "Warning code and solution" below . 5 Turn on the receiver and perform Auto Calibration again (page 33). Error code and remedies Error code Explanation Remedies ERROR 10 The ... are more than one surround back speaker, connect it to connect the surround speakers. The warning code will appear on the receiver and perform Auto Calibration again (page 33). 34US microphone. For details, see "Error code and remedies" below . 5 Turn on the display cyclically ...

Operating Instructions
Page 35
... The surround right Reposition your distance is out of front speakers.c) range. WARN. 72 The center speaker Reposition your speaker level is quiet during Auto Calibration. speaker.f) WARN. 75 The surround back Reposition your balance is out of center speaker.d) range. e)For details, refer "Surround left distance is surround back left...
... The surround right Reposition your distance is out of front speakers.c) range. WARN. 72 The center speaker Reposition your speaker level is quiet during Auto Calibration. speaker.f) WARN. 75 The surround back Reposition your balance is out of center speaker.d) range. e)For details, refer "Surround left distance is surround back left...

Operating Instructions
Page 53
... indicator flashes on the SYSTEM menu. Nevertheless, each listening environment has many variables, such as wall reflections, and you playback multi channel surround encoded software and select the setting that you may result in a setting contrary to "SMALL" on the display. Amplifier...(Brightness of the display) Lets you set the bass crossover frequency of the speakers that best succeeds in 3 steps. x CRS. Calibrating the appropriate settings automatically (A. For other sound fields, speaker position is only available when at a rather wide angle. Therefore, although it...
... indicator flashes on the SYSTEM menu. Nevertheless, each listening environment has many variables, such as wall reflections, and you playback multi channel surround encoded software and select the setting that you may result in a setting contrary to "SMALL" on the display. Amplifier...(Brightness of the display) Lets you set the bass crossover frequency of the speakers that best succeeds in 3 steps. x CRS. Calibrating the appropriate settings automatically (A. For other sound fields, speaker position is only available when at a rather wide angle. Therefore, although it...
Operating Instructions
Page 83
...new ones, if they are connected securely. You can check the condition of the software being played back corresponds to the multi channel format. • Check whether the setup on the receiver. • Remove any problem persists, consult your audio components away from the speakers. on the AUDIO menu is no ... been preset or the preset stations have been cleared (when tuning by the message. Use direct tuning. • Make sure you perform Auto Calibration, see "Error and warning codes" (page 34) to the appropriate input mode. • Move your nearest Sony dealer.
...new ones, if they are connected securely. You can check the condition of the software being played back corresponds to the multi channel format. • Check whether the setup on the receiver. • Remove any problem persists, consult your audio components away from the speakers. on the AUDIO menu is no ... been preset or the preset stations have been cleared (when tuning by the message. Use direct tuning. • Make sure you perform Auto Calibration, see "Error and warning codes" (page 34) to the appropriate input mode. • Move your nearest Sony dealer.
Marketing Specifications
Page 1
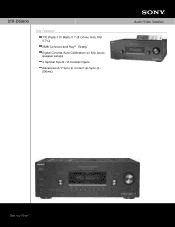
STR-DG600 Key Features 770 Watts-110 Watts X 7 (8 Ohms 1kHz,THD 0.7%) XM® Connect and Play™ Ready1 Digital Cinema Auto Calibration w/ Mic (auto speaker setup) 4 Optical Inputs / 2 Coaxial Inputs Advanced A/V Sync to correct Lip Sync (0 200ms) Audio Video Receiver
STR-DG600 Key Features 770 Watts-110 Watts X 7 (8 Ohms 1kHz,THD 0.7%) XM® Connect and Play™ Ready1 Digital Cinema Auto Calibration w/ Mic (auto speaker setup) 4 Optical Inputs / 2 Coaxial Inputs Advanced A/V Sync to correct Lip Sync (0 200ms) Audio Video Receiver
Marketing Specifications
Page 2
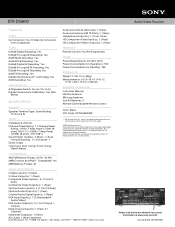
...8482; Technology: Yes dts® Decoding: Yes Convenience A/B Speaker Switch: Yes (A / B / A+B) Digital Cinema Auto Calibration: Yes (Mic- All other trademarks are approximate. Convenience AM/FM Memory Presets: 30 FM - 30 AM XM® Connect...Multi-Channel Input(s): 1 (Rear, 5.1 Channel) Subwoofer Output(s): 1 (Rear) AC Outlet: 1 (Rear) Switched Sony Electronics Inc. •16530 Via Esprillo •San Diego, CA 92127 •1-800-222-7669 •www.sony.com Audio Video Receiver Please visit the Dealer Network for current information at www.sony.com/dn Last Updated: 06/20/2008 STR-DG600...
...8482; Technology: Yes dts® Decoding: Yes Convenience A/B Speaker Switch: Yes (A / B / A+B) Digital Cinema Auto Calibration: Yes (Mic- All other trademarks are approximate. Convenience AM/FM Memory Presets: 30 FM - 30 AM XM® Connect...Multi-Channel Input(s): 1 (Rear, 5.1 Channel) Subwoofer Output(s): 1 (Rear) AC Outlet: 1 (Rear) Switched Sony Electronics Inc. •16530 Via Esprillo •San Diego, CA 92127 •1-800-222-7669 •www.sony.com Audio Video Receiver Please visit the Dealer Network for current information at www.sony.com/dn Last Updated: 06/20/2008 STR-DG600...


